![[Updated] The Clone's Playbook Secrets to Mirror Success on the TikTok Sphere for 2024](https://thmb.techidaily.com/65e89fa5592e17a634309edf6fa4b1c7a4776f7c9bc581c108157d66f219235d.jpg)
"[Updated] The Clone's Playbook Secrets to Mirror Success on the TikTok Sphere for 2024"
The Clone’s Playbook: Secrets to Mirror Success on the TikTok Sphere
How to Clone Yourself on TikTok

Shanoon Cox
Mar 27, 2024• Proven solutions
Every rising pop star needs music videos, but using professional video editing software may be too time-consuming if you want to quickly create a clone video you can share with your fans on TikTok.
Multiplying yourself in a video is a cool way of making sure that your video is going to get the kind of attention it deserves. The process of cloning yourself in a video is a simple one, but there are certain rules you have to follow while recording the footage that will help you avoid overlapping the figures you’re cloning. Here’s how you can make your first clone yourself video on TikTok.

Selecting the Song for your Clone Video
Before you start shooting the video you first need to select the song on TikTok you’re going to use in the video. Once you’ve found the perfect track simply record it and save it as a video to your camera roll. You can then import the video clip that contains the song into the Video Star app.
Here are 10 Popular TikTok Songs for you.

Using the Video Star App to Clone Yourself
1. Download Video Star App
Choosing a location, mounting your iPhone on a tripod, or picking the positions for each of your clones are all important steps you’ll need to take before you actually start recording. There are several apps that enable you to create clone videos easily, but in this article, we are going to show you how you can clone yourself with Video Star. The app can be downloaded from the App Store for free, but additional in-app purchases are necessary if you want to have access to all the power packs Video Star offers. You don’t have to record the video clips with this app since the iPhone’s native camera app is powerful enough to enable you to record high-quality footage.
2. Edit Multiple Video Clips
After you record all the positions for your next clone video with the iPhone’s native camera app, you should cut the video clips and keep only the parts where you are perfectly positioned, so your position in one clip doesn’t overlap with other positions. During the video recording process try to create as much separation between two positions in order to avoid any chance of overlapping. One of the best ways to achieve this is to shoot at a location that is spacious enough so you can make enough separation between two positions. Keep in mind that the maximum number of clips you can combine in the Video Star app is limited to just three, so if you want to have more than three clones in the shot you first have to piece together three clips, save them as a single file and then add more clips to the cloned video you created.
3. Level up Your Videos with Video Star
Video Star also enables you to shoot your videos from the app, and you can adjust the Countdown before the app starts recording or the Recording Speed. Make sure to enter the lowest Recording Speed value possible, because that way you’ll be recording like TikTok does on fast.
Tap the Record button, then select the Multiple options, and play the video that contains the song you previously selected. Once you reach the spot in the song where you want to introduce the clone simply tap Set, so the recording will stop at the designated point and you can move to another position. If at any point during recording you realize that your movements extend to your clone’s location, you can simply tap on the hamburger icon and select the Delete Last option.
To preview the video, you just have to tap on the Scissors icon, and the recorded video will automatically start playing. The Record New Clip in the Scissors menu lets you start from the beginning in case you’re not happy with the results or you can use this option to start recording the video with the second position of your clone.
When done, head back to the Scissors menu, and tap on the Multi-Layer Clip. This feature doesn’t come with the free version of the app, and you must purchase it in order to create a clone video. This action will enable you to select the back and front clips. After selecting the clips, the Mask Front menu will appear on the screen, choose the Shape option and use the hamburger icon on the right side of the screen to change the video’s shape to Rectangle. Drag the rectangle in the preview window so you can crop the first clip to match the demands of your video and press the Next icon to continue the video editing process.
Alternatively, you can use the Erase option to remove the unwanted parts of each video. You can find this option in the Mask Front or Mask Back menu, so just select it and use your finger to remove sections of the shot you don’t want to use.
The Add Effect menu will pop up on the screen so you can add different effects to your first video clip, and then repeat the entire process for the back clip. Once you’ve edited the second clip tap on the Create button to complete the process of making a multilayer clip. Tap Done to save the clip to your camera roll, and upload it to TikTok.
Conclusion
Cloning yourself in a video using the Video Star app is a simple process that can be mastered in a short period of time. The Video Star app lets you create as many clones of yourself as you want, so you just have to make sure that your video clips can be easily combined to feature two or more of your clones and have fun exploring the effects that can make your videos look even cooler. If you want to be a success on the TikTok platform, learning how to make clone videos is one of the best ways to do it, so choose your favorite songs and start producing clone yourself videos.
You can also use Wondershare Filmora to make a split-screen with ease. Check the tutorial below to figure out how to make a split-screen video to clone.


Shanoon Cox
Shanoon Cox is a writer and a lover of all things video.
Follow @Shanoon Cox
Shanoon Cox
Mar 27, 2024• Proven solutions
Every rising pop star needs music videos, but using professional video editing software may be too time-consuming if you want to quickly create a clone video you can share with your fans on TikTok.
Multiplying yourself in a video is a cool way of making sure that your video is going to get the kind of attention it deserves. The process of cloning yourself in a video is a simple one, but there are certain rules you have to follow while recording the footage that will help you avoid overlapping the figures you’re cloning. Here’s how you can make your first clone yourself video on TikTok.
Selecting the Song for your Clone Video
Before you start shooting the video you first need to select the song on TikTok you’re going to use in the video. Once you’ve found the perfect track simply record it and save it as a video to your camera roll. You can then import the video clip that contains the song into the Video Star app.
Here are 10 Popular TikTok Songs for you.
Using the Video Star App to Clone Yourself
1. Download Video Star App
Choosing a location, mounting your iPhone on a tripod, or picking the positions for each of your clones are all important steps you’ll need to take before you actually start recording. There are several apps that enable you to create clone videos easily, but in this article, we are going to show you how you can clone yourself with Video Star. The app can be downloaded from the App Store for free, but additional in-app purchases are necessary if you want to have access to all the power packs Video Star offers. You don’t have to record the video clips with this app since the iPhone’s native camera app is powerful enough to enable you to record high-quality footage.
2. Edit Multiple Video Clips
After you record all the positions for your next clone video with the iPhone’s native camera app, you should cut the video clips and keep only the parts where you are perfectly positioned, so your position in one clip doesn’t overlap with other positions. During the video recording process try to create as much separation between two positions in order to avoid any chance of overlapping. One of the best ways to achieve this is to shoot at a location that is spacious enough so you can make enough separation between two positions. Keep in mind that the maximum number of clips you can combine in the Video Star app is limited to just three, so if you want to have more than three clones in the shot you first have to piece together three clips, save them as a single file and then add more clips to the cloned video you created.
3. Level up Your Videos with Video Star
Video Star also enables you to shoot your videos from the app, and you can adjust the Countdown before the app starts recording or the Recording Speed. Make sure to enter the lowest Recording Speed value possible, because that way you’ll be recording like TikTok does on fast.
Tap the Record button, then select the Multiple options, and play the video that contains the song you previously selected. Once you reach the spot in the song where you want to introduce the clone simply tap Set, so the recording will stop at the designated point and you can move to another position. If at any point during recording you realize that your movements extend to your clone’s location, you can simply tap on the hamburger icon and select the Delete Last option.
To preview the video, you just have to tap on the Scissors icon, and the recorded video will automatically start playing. The Record New Clip in the Scissors menu lets you start from the beginning in case you’re not happy with the results or you can use this option to start recording the video with the second position of your clone.
When done, head back to the Scissors menu, and tap on the Multi-Layer Clip. This feature doesn’t come with the free version of the app, and you must purchase it in order to create a clone video. This action will enable you to select the back and front clips. After selecting the clips, the Mask Front menu will appear on the screen, choose the Shape option and use the hamburger icon on the right side of the screen to change the video’s shape to Rectangle. Drag the rectangle in the preview window so you can crop the first clip to match the demands of your video and press the Next icon to continue the video editing process.
Alternatively, you can use the Erase option to remove the unwanted parts of each video. You can find this option in the Mask Front or Mask Back menu, so just select it and use your finger to remove sections of the shot you don’t want to use.
The Add Effect menu will pop up on the screen so you can add different effects to your first video clip, and then repeat the entire process for the back clip. Once you’ve edited the second clip tap on the Create button to complete the process of making a multilayer clip. Tap Done to save the clip to your camera roll, and upload it to TikTok.
Conclusion
Cloning yourself in a video using the Video Star app is a simple process that can be mastered in a short period of time. The Video Star app lets you create as many clones of yourself as you want, so you just have to make sure that your video clips can be easily combined to feature two or more of your clones and have fun exploring the effects that can make your videos look even cooler. If you want to be a success on the TikTok platform, learning how to make clone videos is one of the best ways to do it, so choose your favorite songs and start producing clone yourself videos.
You can also use Wondershare Filmora to make a split-screen with ease. Check the tutorial below to figure out how to make a split-screen video to clone.
Shanoon Cox
Shanoon Cox is a writer and a lover of all things video.
Follow @Shanoon Cox
The Quest for Your Own Distinctive Stream Tagline
TikTok is one of the most famous social media platforms that many people use on a daily basis. Due to high traffic on TikTok, you can reach a larger audience instantly. Through TikTok, you can efficiently market and promote your e-commerce products with live streaming. Moreover, if you are holding an event or conference, you can connect with multiple people through TikTok live streaming.
If you are willing to live stream on TikTok through your PC, you would need a TikTok stream key. To know how to get the TikTok stream key, this article will help you.
Part 1: What is Stream Key?
A stream key is a combination of random letters and numbers which stores the information of your account. It allows different streaming software to live stream your video on your preferred platform. To use streaming software such as OBS Studio for live streaming, the stream key will help you connect with your preferred platform.
If you are using the YouTube platform, its stream key will consist of all the related information, such as login details and permissions. That’s why you should keep the streaming key of your platform confidential. Thus, the stream key can prevent you from hassle as you don’t have to sign in with your YouTube account on OBS Studio for live streaming.
Part 2: How to Get your Own TikTok Stream Key?
Before jumping on how to get the TikTok stream key, there are some basic requirements. To check the prerequisites, read the below points:
- To use the live stream feature on TikTok, you need to have 1,000 followers.
- There is an age restriction to use this feature. You should be 16 years old or older.
- To send and receive virtual gifts during your live stream, the age restriction is 18 years old.
Easy Steps to Get TikTok Stream Key Instantly
Do you want to know how to find TikTok stream key? A streaming key can significantly help you to connect with your platform to ensure high-quality live streaming. Check the following instructions to get your TikTok streaming key quickly.
Step1 Go to Live Option
Launch the TikTok app on your iPhone or Android device and tap on the “Plus” icon given below. Now tap on the “Live” option by scrolling right on your screen.
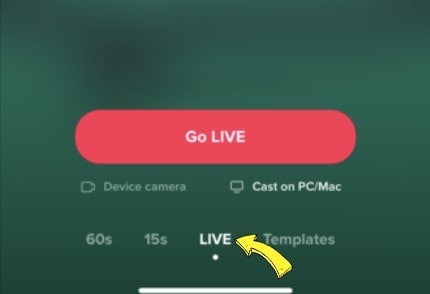
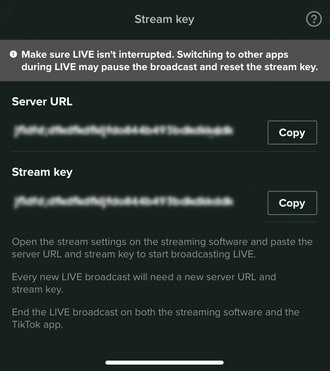
Step2 Copy the Streaming Key
Afterward, tap “Cast/Connect to PC/Mac” and select the “Go Live” button. Now you will be able to see the TikTok Stream Key and Server URL. You can tap on the “Copy” button given adjacent to the stream key and server URL. Make sure to copy both things carefully because they will be used in a later process.
Part 3: How to Go Live on TikTok with your Streaming Key?
Once you have gotten your stream key and server URL, now you can go live on TikTok through different streaming platforms. Read this section to learn how to live stream TikTok using the best streaming software.
Way 1. With OBS
OBS Studio is a famous streaming software that is used by professionals and experts. It is used for high-quality streams with additional features. It has an integrated video encoder that functions with great versatility. Along with producing live content, OBS Studio also offers an efficient screen recorder. Using this software, you can effectively add text and graphics to your video content.
In its clean interface, you have complete freedom to set your hotkeys. Using the hotkeys, you can complete a specific action instantly. While broadcasting your live stream, you can choose your preferred resolution on this software. Hence, it’s a great tool to live stream your TikTok flawlessly.
Instructions to Go Live on TikTok Via OBS Studio
OBS Studio is an advanced broadcasting software offering high-end results. To use OBS for live streaming on TikTok, check the below instructions:
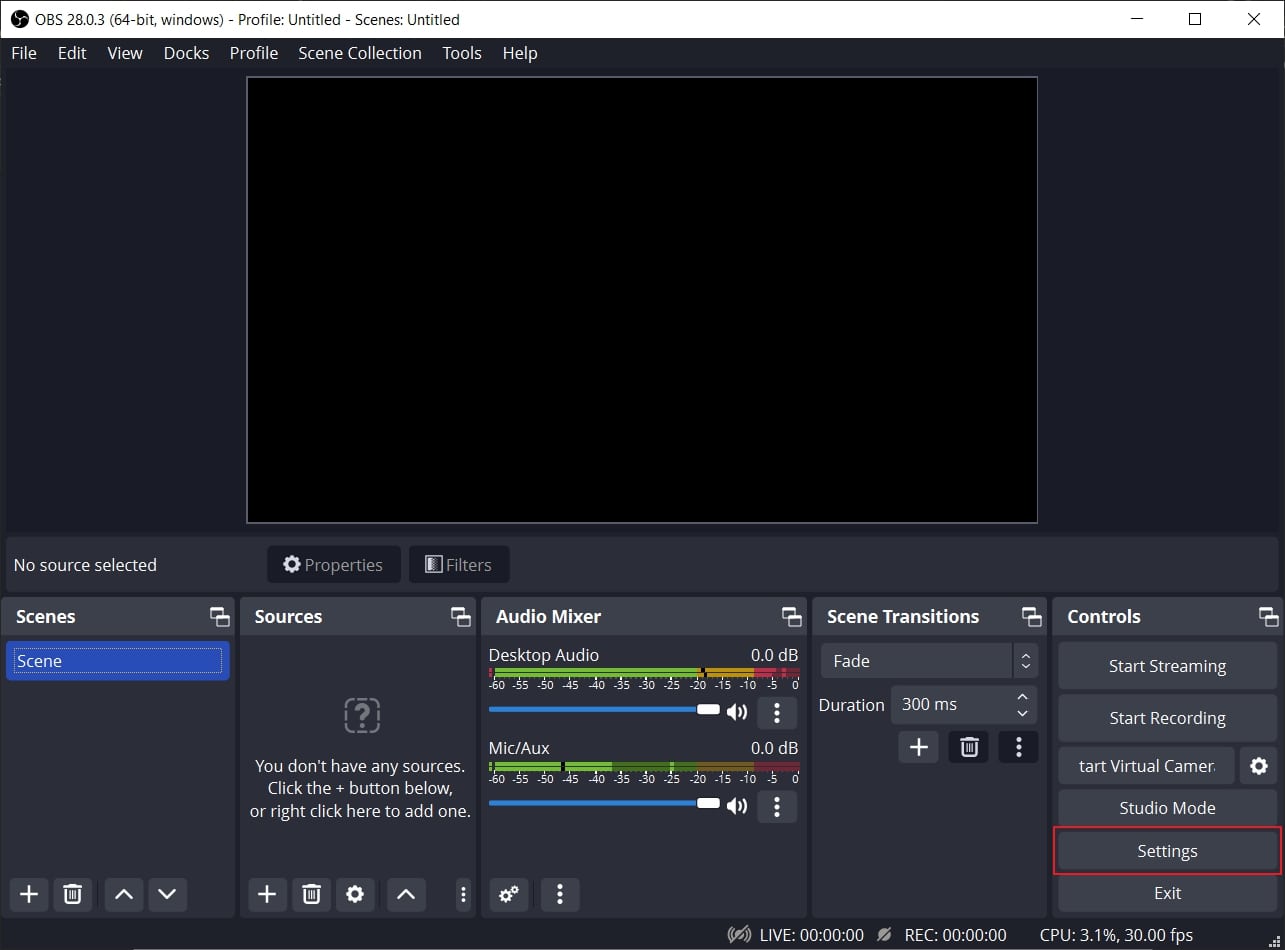
Step1 Navigate to Stream Section
Launch OBS Studio on your PC and click “Settings” under the “Controls” section. On the new window, select “Stream” from the left section.
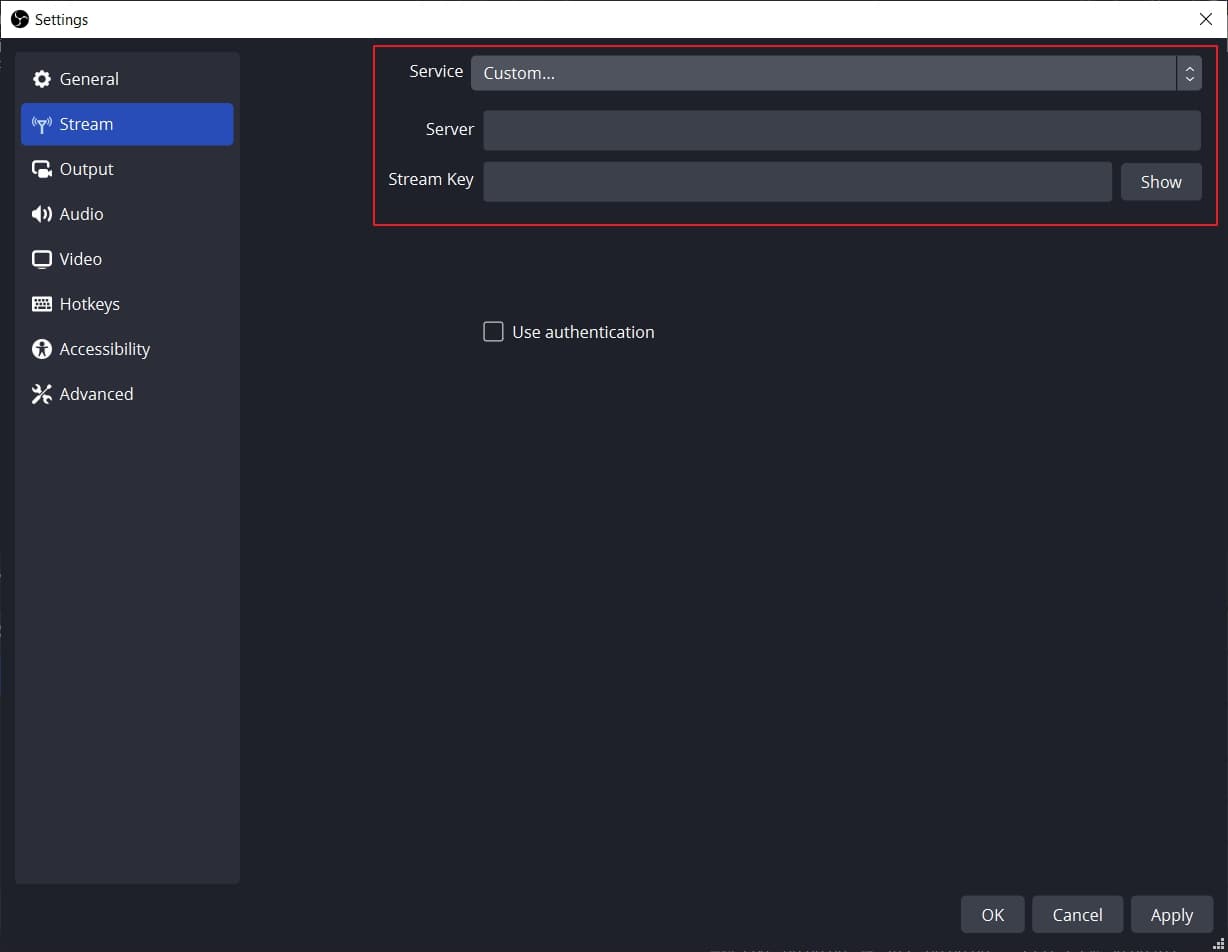
Step2 Enter Server URL and the Stream Key
On the Stream window, select “Custom” on the “Service” option. Once done, enter the Server and Stream Key on the given boxes. Now hit the “Apply” button to proceed with the process of getting live on TikTok with OBS.
Way 2. With Streamlabs
Streamlabs is an all-in-one streaming software that produces captivating results in a cost-effective manner. It shows compatibility with mainstream platforms like YouTube, Twitter, Discord, etc. This software consists of professional themes and overlays that you can utilize during live streaming. Furthermore, it supports multi-streaming, through which you can go live on various platforms simultaneously.
Using Streamlabs, you can get customizable alerts during your live stream. This will help you to check the feedback of your supporters quickly. Hence, Streamlabs is an excellent platform through which you can connect and engage with your audience effortlessly.
Instructions to Go Live on TikTok Using Streamlabs
Are you excited to use Streamlabs for conducting live streaming sessions on TikTok? To learn how to go live on TikTok using Streamlabs, here are the simple steps:
Step1 Open Streamlabs Desktop Settings
Download and install Streamlabs Desktop on your PC. Launch its interface and navigate to the “Gear” icon on the left side. It will open the settings of this tool. From the settings menu, choose “Stream” from the left side.
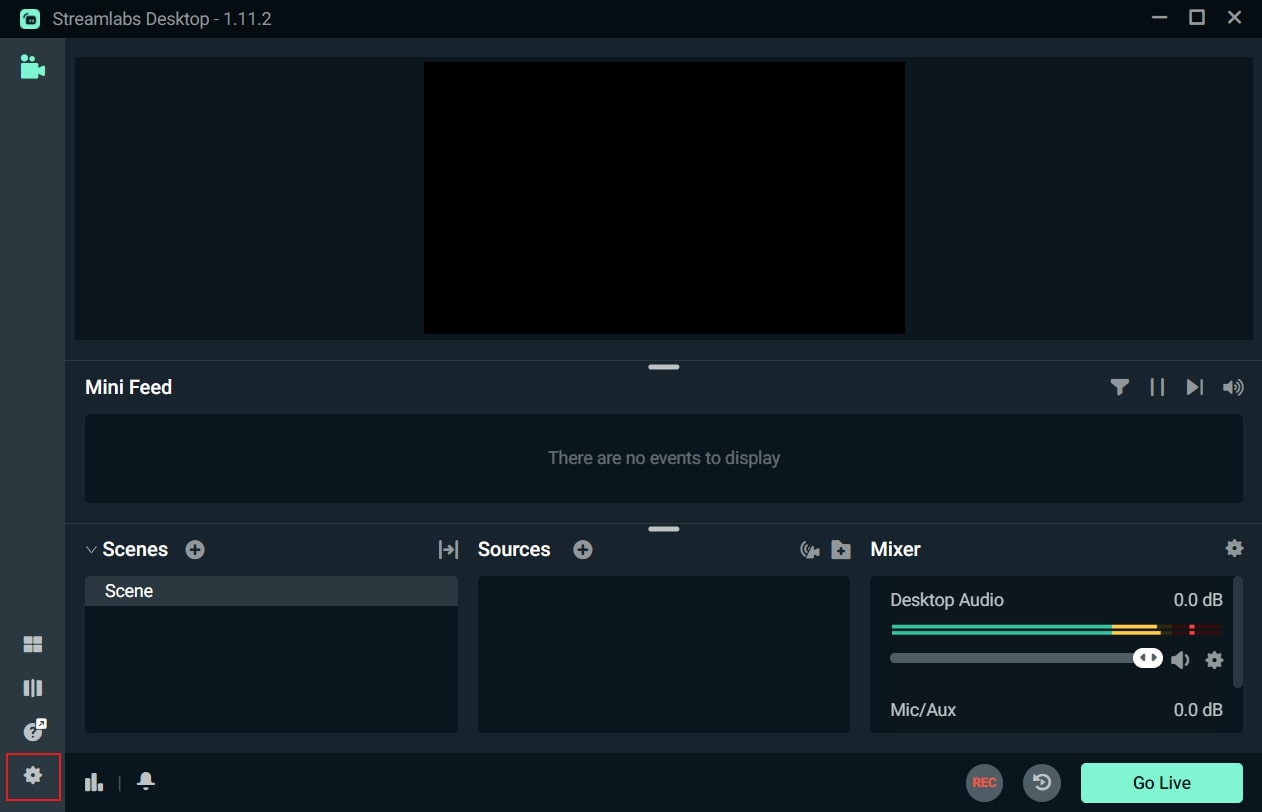
Step2 Add Streaming Key
On the Stream menu, select “Custom Streaming Service” as Stream Type. Afterward, add your Server URL and Stream Key on the given spaces. Once done, click on the “Done” button. Now you can easily go live through this streaming software on TikTok.

Bonus Tips: Easily Record and Edit Your Stream with Filmora
Are you interested in recording your live stream on TikTok? The best tool to capture your live streams efficiently on TikTok is Wondershare Filmora . This screen recorder has the ability to screen record your live streams in your desired resolution. Moreover, while recording your screen, you can simultaneously capture your webcam. It also gives you the option to select the recording area, preferably.
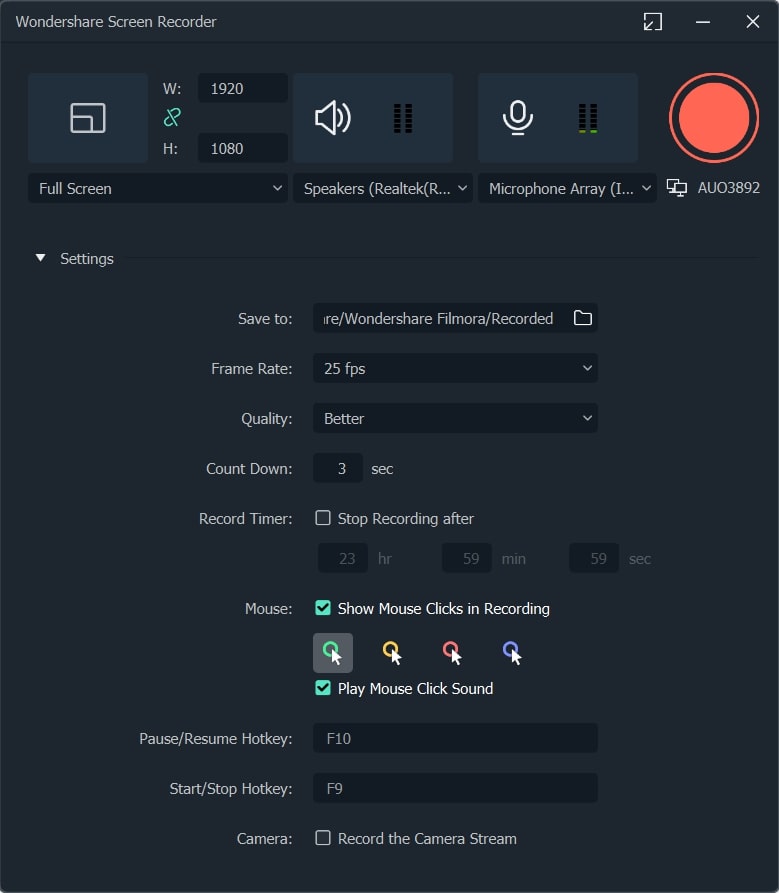
Besides screen recording, Filmora also offers a video editor. This editor offers more than 900 video effects that you can easily apply to your screen recording. Furthermore, you can also adjust the speed of your recorded video through this editor. You can also avail of other options to crop, split, resize, and trim the video. Hence, Filmora works efficiently to screen record and edit your live-stream sessions of TikTok. Watch the video below to learn more about Filmora’s new features.
Conclusion
Live streaming on TikTok is a new trend that many content creators and entrepreneurs are adopting. To go live on TikTok on your desktop, you would need a stream key. This article has provided clear instructions on how to get the TikTok stream key conveniently. Along with that, we have also highlighted a professional software known as Filmora to screen record and edit your TikTok live streaming.
Free Download For Win 7 or later(64-bit)
Free Download For macOS 10.14 or later
Part 1: What is Stream Key?
A stream key is a combination of random letters and numbers which stores the information of your account. It allows different streaming software to live stream your video on your preferred platform. To use streaming software such as OBS Studio for live streaming, the stream key will help you connect with your preferred platform.
If you are using the YouTube platform, its stream key will consist of all the related information, such as login details and permissions. That’s why you should keep the streaming key of your platform confidential. Thus, the stream key can prevent you from hassle as you don’t have to sign in with your YouTube account on OBS Studio for live streaming.
Part 2: How to Get your Own TikTok Stream Key?
Before jumping on how to get the TikTok stream key, there are some basic requirements. To check the prerequisites, read the below points:
- To use the live stream feature on TikTok, you need to have 1,000 followers.
- There is an age restriction to use this feature. You should be 16 years old or older.
- To send and receive virtual gifts during your live stream, the age restriction is 18 years old.
Easy Steps to Get TikTok Stream Key Instantly
Do you want to know how to find TikTok stream key? A streaming key can significantly help you to connect with your platform to ensure high-quality live streaming. Check the following instructions to get your TikTok streaming key quickly.
Step1 Go to Live Option
Launch the TikTok app on your iPhone or Android device and tap on the “Plus” icon given below. Now tap on the “Live” option by scrolling right on your screen.
Step2 Copy the Streaming Key
Afterward, tap “Cast/Connect to PC/Mac” and select the “Go Live” button. Now you will be able to see the TikTok Stream Key and Server URL. You can tap on the “Copy” button given adjacent to the stream key and server URL. Make sure to copy both things carefully because they will be used in a later process.
Part 3: How to Go Live on TikTok with your Streaming Key?
Once you have gotten your stream key and server URL, now you can go live on TikTok through different streaming platforms. Read this section to learn how to live stream TikTok using the best streaming software.
Way 1. With OBS
OBS Studio is a famous streaming software that is used by professionals and experts. It is used for high-quality streams with additional features. It has an integrated video encoder that functions with great versatility. Along with producing live content, OBS Studio also offers an efficient screen recorder. Using this software, you can effectively add text and graphics to your video content.
In its clean interface, you have complete freedom to set your hotkeys. Using the hotkeys, you can complete a specific action instantly. While broadcasting your live stream, you can choose your preferred resolution on this software. Hence, it’s a great tool to live stream your TikTok flawlessly.
Instructions to Go Live on TikTok Via OBS Studio
OBS Studio is an advanced broadcasting software offering high-end results. To use OBS for live streaming on TikTok, check the below instructions:
Step1 Navigate to Stream Section
Launch OBS Studio on your PC and click “Settings” under the “Controls” section. On the new window, select “Stream” from the left section.
Step2 Enter Server URL and the Stream Key
On the Stream window, select “Custom” on the “Service” option. Once done, enter the Server and Stream Key on the given boxes. Now hit the “Apply” button to proceed with the process of getting live on TikTok with OBS.
Way 2. With Streamlabs
Streamlabs is an all-in-one streaming software that produces captivating results in a cost-effective manner. It shows compatibility with mainstream platforms like YouTube, Twitter, Discord, etc. This software consists of professional themes and overlays that you can utilize during live streaming. Furthermore, it supports multi-streaming, through which you can go live on various platforms simultaneously.
Using Streamlabs, you can get customizable alerts during your live stream. This will help you to check the feedback of your supporters quickly. Hence, Streamlabs is an excellent platform through which you can connect and engage with your audience effortlessly.
Instructions to Go Live on TikTok Using Streamlabs
Are you excited to use Streamlabs for conducting live streaming sessions on TikTok? To learn how to go live on TikTok using Streamlabs, here are the simple steps:
Step1 Open Streamlabs Desktop Settings
Download and install Streamlabs Desktop on your PC. Launch its interface and navigate to the “Gear” icon on the left side. It will open the settings of this tool. From the settings menu, choose “Stream” from the left side.
Step2 Add Streaming Key
On the Stream menu, select “Custom Streaming Service” as Stream Type. Afterward, add your Server URL and Stream Key on the given spaces. Once done, click on the “Done” button. Now you can easily go live through this streaming software on TikTok.
Bonus Tips: Easily Record and Edit Your Stream with Filmora
Are you interested in recording your live stream on TikTok? The best tool to capture your live streams efficiently on TikTok is Wondershare Filmora . This screen recorder has the ability to screen record your live streams in your desired resolution. Moreover, while recording your screen, you can simultaneously capture your webcam. It also gives you the option to select the recording area, preferably.
Besides screen recording, Filmora also offers a video editor. This editor offers more than 900 video effects that you can easily apply to your screen recording. Furthermore, you can also adjust the speed of your recorded video through this editor. You can also avail of other options to crop, split, resize, and trim the video. Hence, Filmora works efficiently to screen record and edit your live-stream sessions of TikTok. Watch the video below to learn more about Filmora’s new features.
Conclusion
Live streaming on TikTok is a new trend that many content creators and entrepreneurs are adopting. To go live on TikTok on your desktop, you would need a stream key. This article has provided clear instructions on how to get the TikTok stream key conveniently. Along with that, we have also highlighted a professional software known as Filmora to screen record and edit your TikTok live streaming.
Free Download For Win 7 or later(64-bit)
Free Download For macOS 10.14 or later
Also read:
- [New] 2024 Approved Yield Entertaining Memes, Through Adobe Path
- [New] In 2024, Learning Luminaries Top Ed Streams Online
- [New] The Ultimate Guide to TikTok's Most Engaging Rap Songs for 2024
- [New] TikTok's Take Jujutsu Kaisen Challenges and Laughs for 2024
- [New] Top 30 Anime-Inspired Videos Reshaping Online Culture for 2024
- [Updated] 2024 Approved Explore the Finest 8 Websites 3D & Luxurious Text
- [Updated] 2024 Approved The Ultimate Guide Top 50+ Inspiring Lyrics for TikTok Creators
- [Updated] From Bland to Breathtaking Craft Captivating Content on TikTok Quickly for 2024
- [Updated] In 2024, Breaking Into the TikTok Livestream Realm
- 2024 Approved Enhance Video to Fit Instagram's Visual Taste
- 2024 Approved Zoom Meeting Fundamentals for the Uninitiated
- 8 Free Instagram to MP4 Converters You Can Try [Online/Windows/Mac]
- Crafting Visual Wonders An Insider’s Guide to Editing on Snapchat
- Detecting Unregistered Friends List
- Elevate Your Super Bowl Party: Essential Tips for a Top-Notch TV and Home Theater Configuration
- How to use iSpoofer on Honor Magic 6? | Dr.fone
- In 2024, Proven Ways in How To Hide Location on Life360 For Xiaomi Redmi 13C 5G | Dr.fone
- In 2024, Thinking About Changing Your Netflix Region Without a VPN On Oppo A59 5G? | Dr.fone
- Mastering Video Chat on Snapchat A 3-Step Guide to Efficiency
- Title: [Updated] The Clone's Playbook Secrets to Mirror Success on the TikTok Sphere for 2024
- Author: Gary
- Created at : 2024-10-11 18:01:47
- Updated at : 2024-10-18 16:57:37
- Link: https://tiktok-clips.techidaily.com/updated-the-clones-playbook-secrets-to-mirror-success-on-the-tiktok-sphere-for-2024/
- License: This work is licensed under CC BY-NC-SA 4.0.