![[Updated] In 2024, A Step-By-Step Journey to PC Live Streams – Master TikTok LIVE](https://thmb.techidaily.com/cf88e87b734b5b9f59ddbd2f8f99680f9b1ec3ba8de831308f2fd3fe15c5bbed.jpg)
"[Updated] In 2024, A Step-By-Step Journey to PC Live Streams – Master TikTok LIVE"
A Step-By-Step Journey to PC Live Streams – Master TikTok LIVE
Content creators on TikTok adopt various creative ways to engage audiences. Many fashion influencers provide makeup tutorials by doing a live stream on TikTok. Moreover, game lovers like to live stream their gameplay on TikTok to attract a large number of people. Thus, live streams on TikTok are a new norm among content creators and game lovers to maximize their target audience.
If you don’t know how to go live on TikTok on PC, this article will guide you. Through this well-structured article, you can find four easy ways to go live on TikTok on your computer.
- Way 1: With OBS
- Way 2: With Streamlabs
- Way 3: With XSplit Broadcaster
- Way 4: With TikTok Live Studio Software
Part 1: Prerequisite for Live Stream on TikTok from PC
To start TikTok live streaming on your PC, there are some pre-requirements. These requirements are necessary to prevent the misuse of TikTok by any means. Once you have fulfilled these requirements, you can easily go for live streaming on TikTok without any restrictions.
- To enable the live stream feature on TikTok, you must have at least 1000 followers on your account.
- You should be above 16 years old to access this feature. Moreover, to increase your engagement during live streams by sending virtual gifts, you should be 18 years old or above.
- To begin live streaming on a PC using streaming software, you must have a streaming key and server URL.

How to Get your Streaming Key on TikTok?
A streaming key is a random combination of alphanumeric characters. It helps you to connect your TikTok account with a streaming platform to enable high-quality results. To get your streaming key in the easiest way, check the following steps:
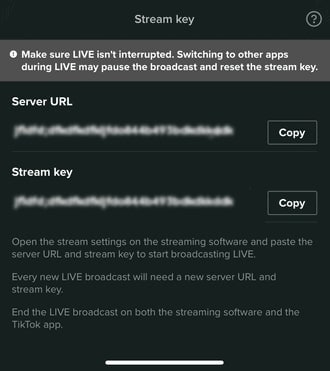
Step1 Open your TikTok app to begin the process. Select the “Plus” icon and choose the “Live” button from the right side. Afterward, choose the “Cast/Connect to PC/Mac” option to proceed.
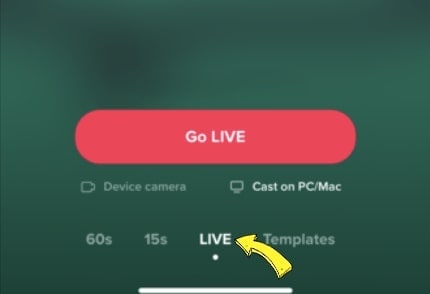
Step2 Now tap on the “Go Live” option that will open a new window. Now you can see your Stream Key and Server URL. Press the “Copy” option given next to these two options. Afterward, you can share your stream key and server URL with your PC, which will be used later.
Part 2: Benefits of Going Live on TikTok with Computer
There are various advantages of going live on TikTok with a PC. By doing so, you can ensure a better quality of your live streaming session. To learn more, let’s discuss the details.
1. Great Stability
Holding a mobile phone for live streams can be hectic and tiring. Moreover, it won’t offer camera stability, and the end result can be shaky. By using a computer, you don’t have to hold anything. With great stability and ease, you can conduct live streams for a longer run.
2. High Video/Audio Quality
iOS and Samsung devices provide high video quality. However, if you are using low-end smartphones, you won’t get high video and audio quality. In such a circumstance, you should use your computer to maintain better quality. By doing so, your audience can listen and view your live streams flawlessly.
3. Picture-in-Picture Display
Live streams on mobile phones restrict you from displaying a variety of content simultaneously. Through your PC, you can do live streaming on TikTok while playing your favorite games. You can easily open multiple windows on your PC during live streams. Moreover, you can have a picture-in-picture display to use a webcam while going for a live stream.
Part 3: 4 Ways to Go Live on TikTok On PC
Are you eager to know how to stream on TikTok on PC using different ways? Let’s shed light on some simple yet effective ways to go for live streaming on TikTok with a PC.
Way 1: With OBS
OBS is a highly compatible and free broadcasting software. It is available for mainstream platforms such as Windows, Mac, and Linux. It offers high-end results during streaming with an audio mixer. It also provides customized options to set hotkeys, choose sources, and adjust the properties. Besides being a great streaming software, OBS also functions as a screen recorder.
Therefore, OBS is a famous streaming tool that ensures great quality in live streaming on TikTok. To learn how to go live on TikTok on a computer using OBS, here are the easy steps:
Step1 Download and install OBS on your PC successfully. Once done, go to the “Controls” section and click on “Settings.” A new window will pop up from which click on the “Stream” option given on the left panel.
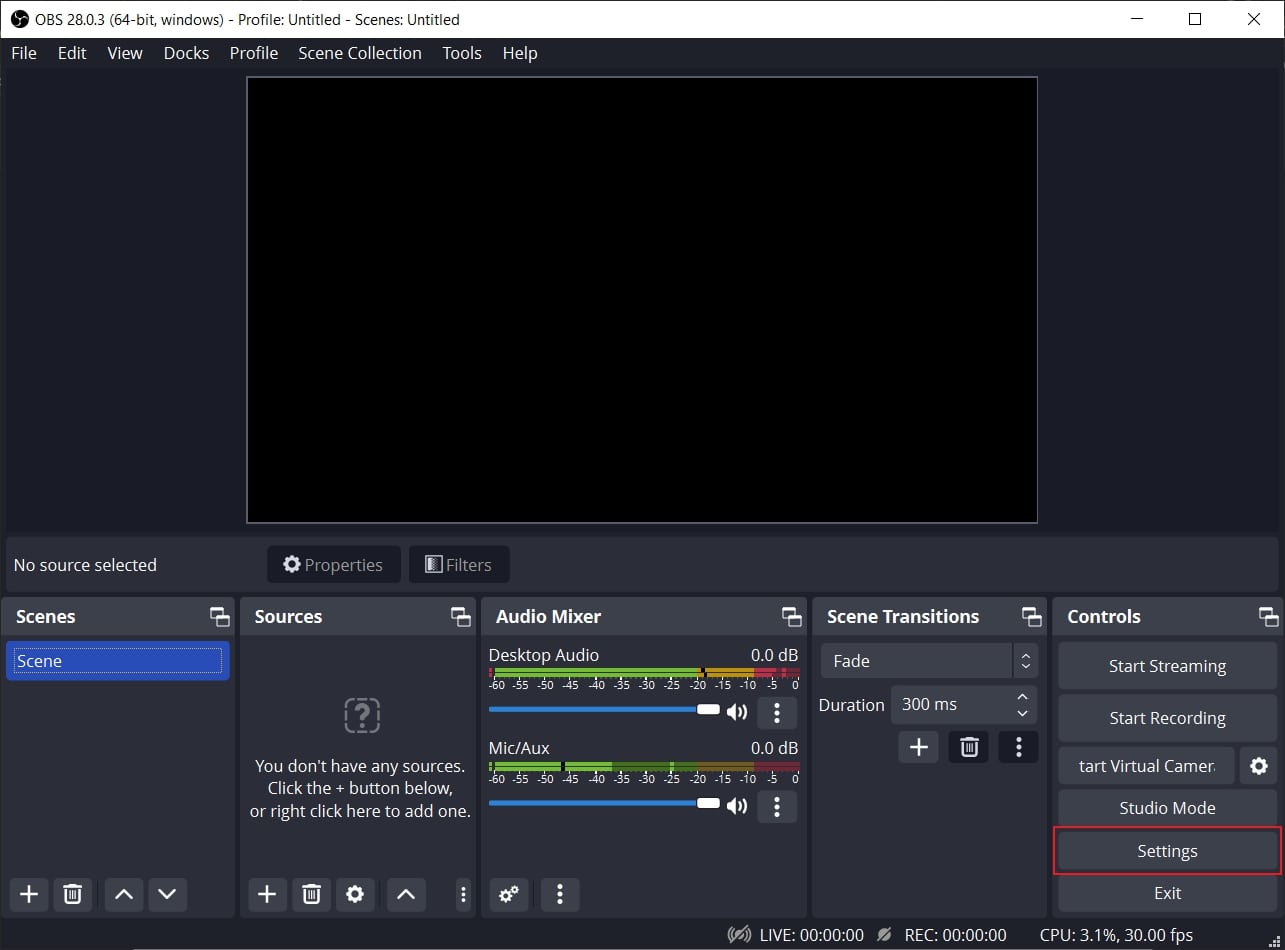
Step2 On the “Service” box, choose “Custom” to proceed. Now enter the stream key and server URL you have gotten before. Once done with all requirements, click on the “Apply” option.

Way 2: With Streamlabs
Streamlabs is a popular streaming tool comprising great capabilities for live streaming. Using this platform, you can broadcast your webcam, microphone’s audio, games, desktop screen, etc. If you want to invite a guest during your live stream, Streamlabs provide a collab camera. Furthermore, this software provides distinctive and attractive overlays. You can easily choose from hundreds of overlays and apply them to your live stream.
You can also set important alerts on this tool, preferably. In order to begin your live stream on TikTok using Streamlabs, check the below steps:
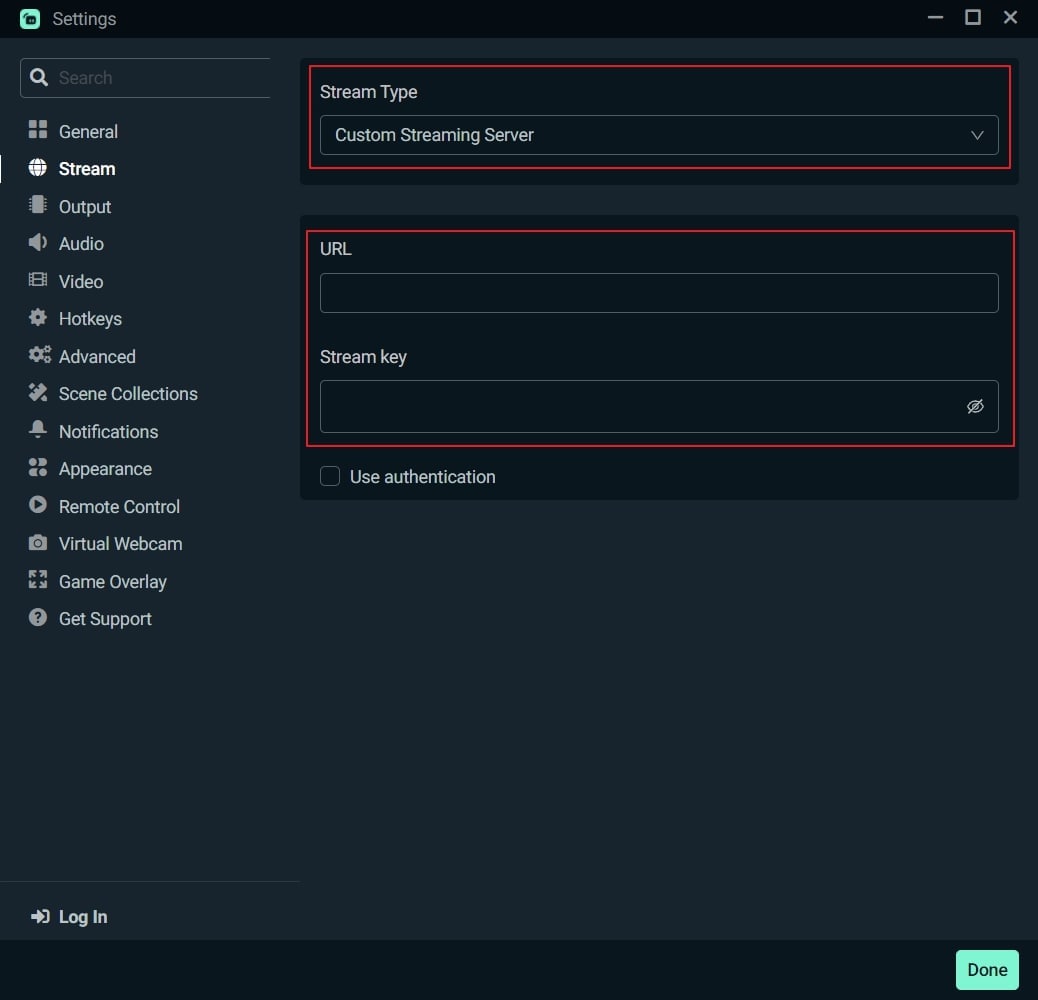
Step1 Once done with installing Streamlabs on your PC, open its main interface. Click on the “Gear” icon displayed in the left section. From the settings menu, click on the “Stream” option.
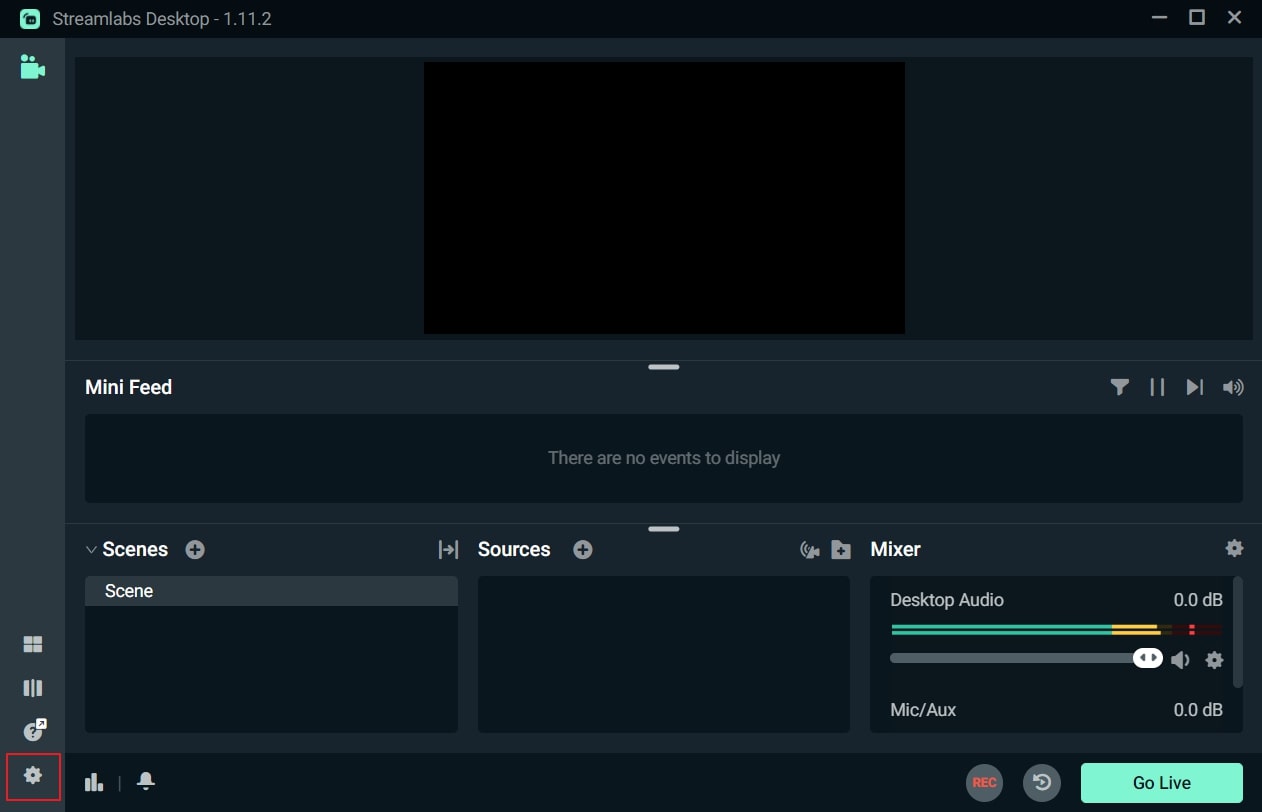
Step2 On the new menu, choose “Custom Streaming Service” as your Stream Type. Now add the required Stream Key and Server URL on the given boxes. Afterward, hit the “Done” button.
Way 3: With XSplit Broadcaster
Want to know how to stream on TikTok on PC efficiently? XSplit Broadcaster is a powerful streaming tool used by many professionals. It can be used to live stream gameplays, e-sports, and other videos in high resolution. This streaming software provides different layout wizards to display your live streaming screen efficiently.
Moreover, it also supports multi-streaming, through which you can go live on various platforms at the same time. To use XSplit Broadcaster to live stream on TikTok, here are the instructions:
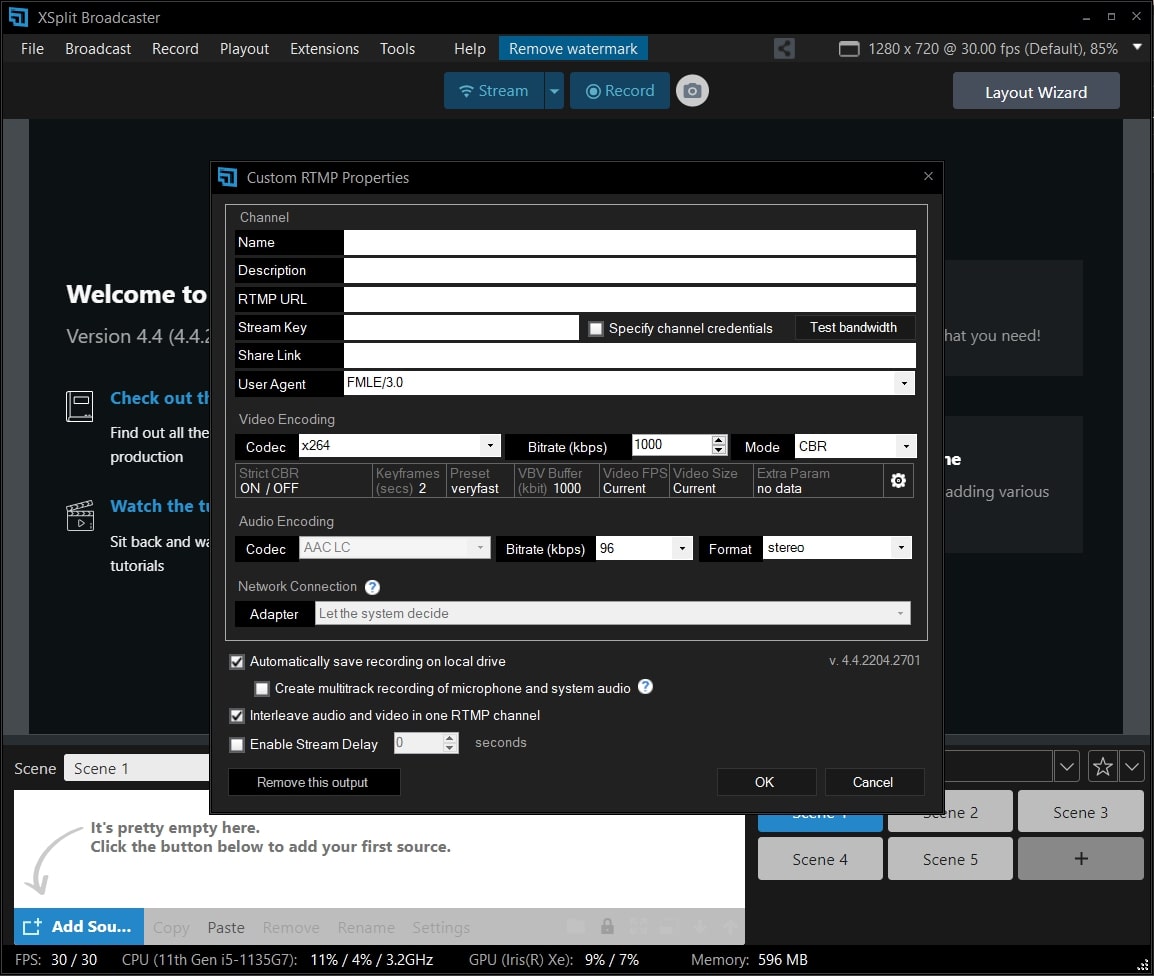
Step1 Launch XSplit Broadcaster on your PC and navigate to the “Broadcast” button displayed on top. Afterward, click on “Set up a new output” to proceed with the TikTok live stream process.
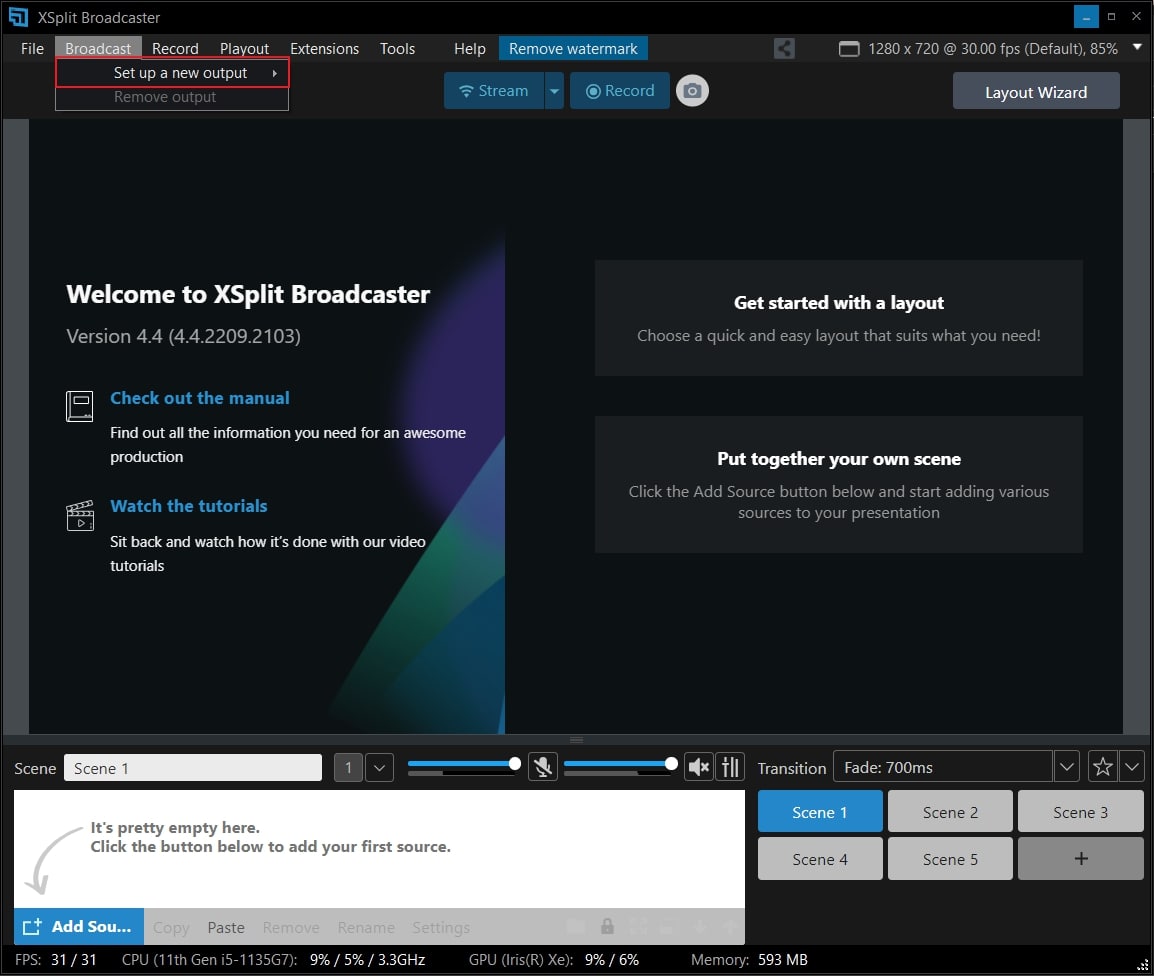
Step2 Now tap on “Custom RTMP,” which will redirect you to a new window. Here, you can add your streaming key and server URL to continue. You can also add information, such as name, channel, etc., to this window. Once done, press the “OK” button.
Way 4: With TikTok Live Studio Software
TikTok Live Studio software is the official software of TikTok for live streaming. This app is currently only available for Windows users. This software provides various customizable options that enable you to adjust your camera and microphone properties easily. It has an easy-to-use interface that allows beginners to conduct live streaming on TikTok in high quality.
As this software is directly linked to your TikTok account, you don’t have to add the stream key and server URL to initiate live streaming. Do you want to learn how to go live on TikTok on a PC using the TikTok software? You can check the following steps:
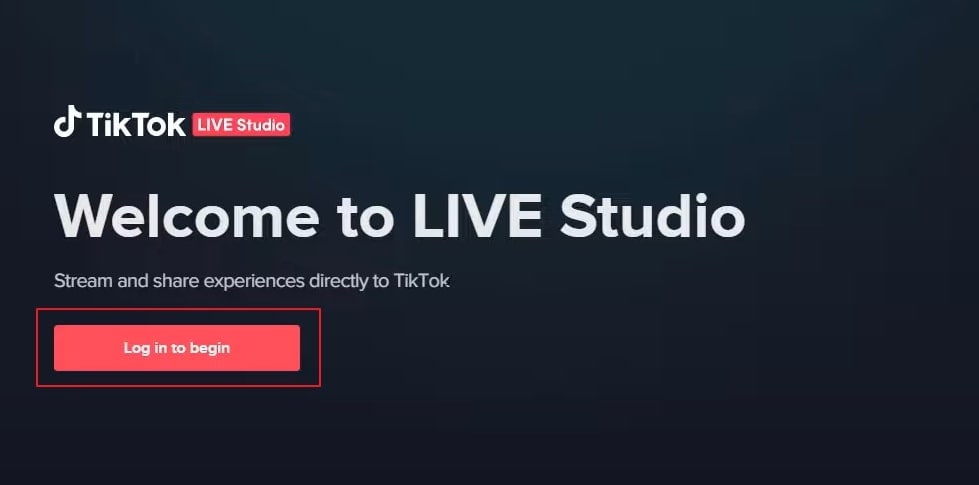
Step1 Launch TikTok Live Studio software on your PC and click on “Log in to begin.” Go to the login page and follow the on-screen instructions to set up this software successfully. On the Microphone window, choose your preferred microphone as your default device.
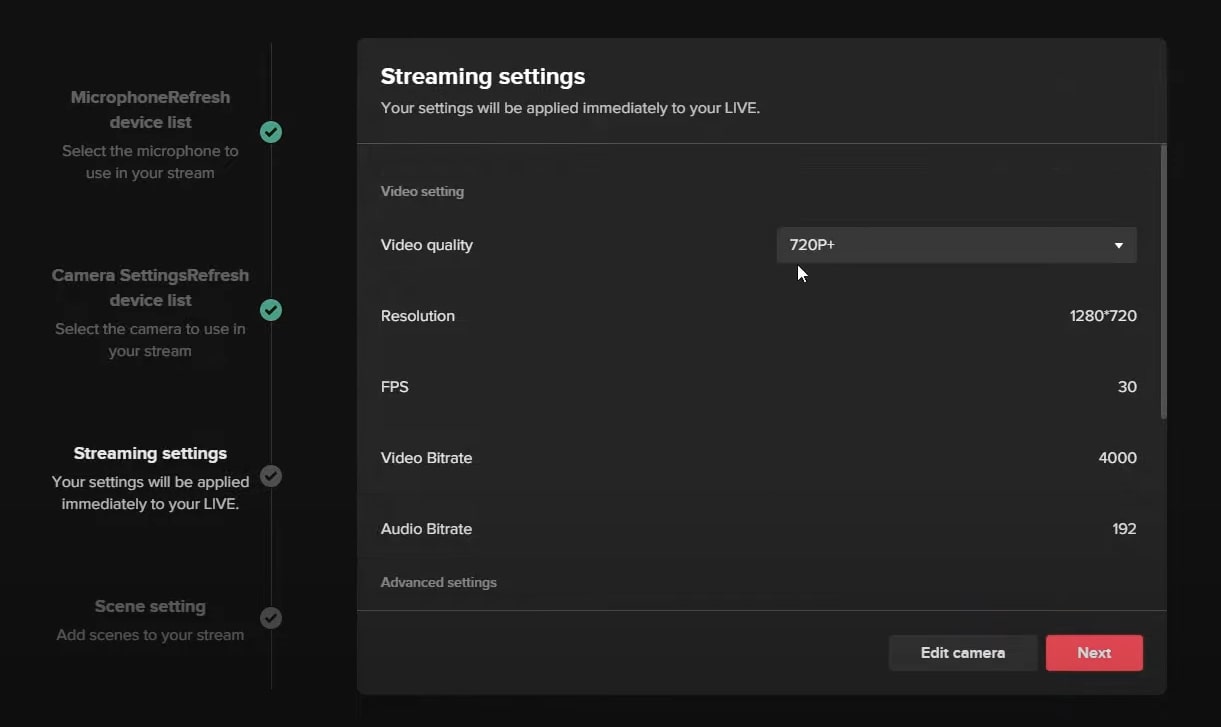
Step2 Afterward, adjust the camera settings and press the “Next” button. It will redirect you to streaming settings. You can choose the video and audio quality from this window. Click on the “Next” button to continue. Also, make sure to adjust the scene settings as well.
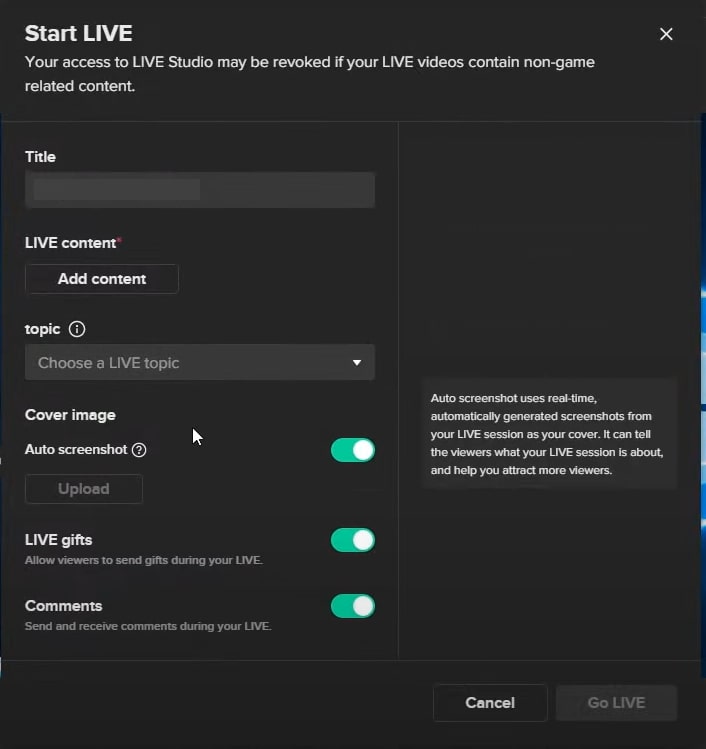
Step3 Now, you can see your PC screen along with your webcam. You can modify the screen size manually. You can also change the camera background and remove background noise from the settings. Once done with settings, press the “Start” button. Now give a title to your live streaming and choose your Live content. Next, click on the “Confirm” button and hit the “Go Live” button.
Bonus Tips: Easily Record and Edit Your Stream with Filmora
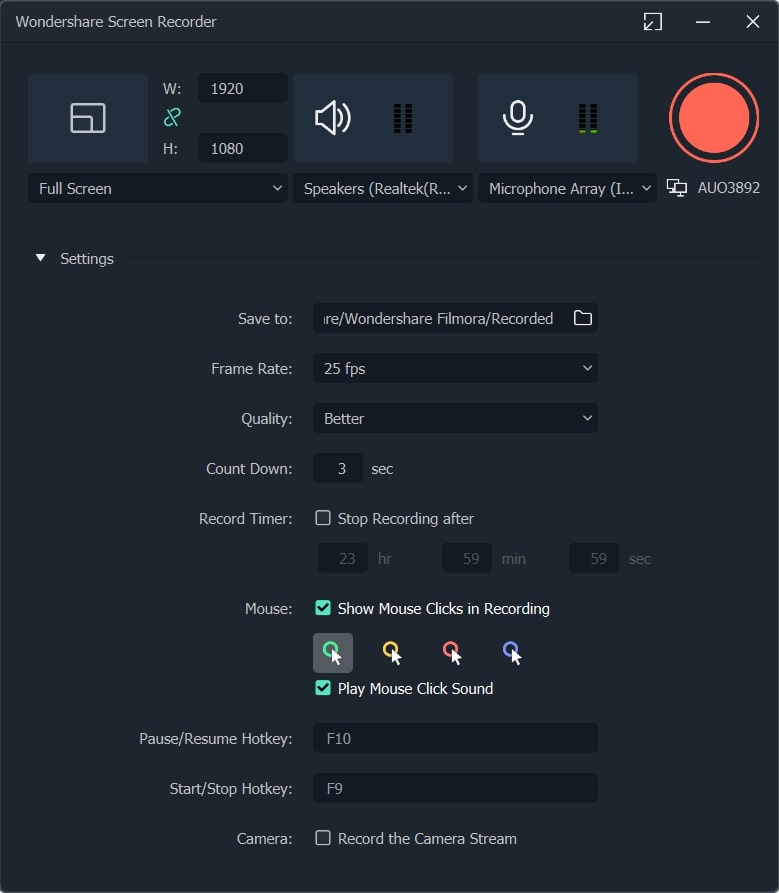
Have you ever used a screen recorder to capture your live streaming? Wondershare Filmora is the most compatible tool that offers a premium screen recorder and editor. The screen recorder in this platform can record a selected area with high audio and video quality. Along with capturing your live streaming session, you can use Pen to demonstrate in an enhanced way.
The video editor of Filmora offers professional visual effects and transitions. It supports high-quality video formats such as 4K and HD and enables intuitive editing. Moreover, you can also utilize its advanced features such as Auto Reframe, AI Portrait, Split Screen, Green Screen, etc. By availing of these features, you can execute professional editing on your recorded live streams. To understand more about Filmora’s new features, watch the video below.
Conclusion
Live streaming on TikTok is a new technique to target audiences effortlessly. There are various ways through which you can go for live streaming on TikTok. If you don’t know how to go live on TikTok PC properly, you can take help from this article. Also, to screen record and edit a live stream, you can use our recommended tool known as Wondershare Filmora.
Free Download For Win 7 or later(64-bit)
Free Download For macOS 10.14 or later
Part 1: Prerequisite for Live Stream on TikTok from PC
To start TikTok live streaming on your PC, there are some pre-requirements. These requirements are necessary to prevent the misuse of TikTok by any means. Once you have fulfilled these requirements, you can easily go for live streaming on TikTok without any restrictions.
- To enable the live stream feature on TikTok, you must have at least 1000 followers on your account.
- You should be above 16 years old to access this feature. Moreover, to increase your engagement during live streams by sending virtual gifts, you should be 18 years old or above.
- To begin live streaming on a PC using streaming software, you must have a streaming key and server URL.
How to Get your Streaming Key on TikTok?
A streaming key is a random combination of alphanumeric characters. It helps you to connect your TikTok account with a streaming platform to enable high-quality results. To get your streaming key in the easiest way, check the following steps:
Step1 Open your TikTok app to begin the process. Select the “Plus” icon and choose the “Live” button from the right side. Afterward, choose the “Cast/Connect to PC/Mac” option to proceed.
Step2 Now tap on the “Go Live” option that will open a new window. Now you can see your Stream Key and Server URL. Press the “Copy” option given next to these two options. Afterward, you can share your stream key and server URL with your PC, which will be used later.
Part 2: Benefits of Going Live on TikTok with Computer
There are various advantages of going live on TikTok with a PC. By doing so, you can ensure a better quality of your live streaming session. To learn more, let’s discuss the details.
1. Great Stability
Holding a mobile phone for live streams can be hectic and tiring. Moreover, it won’t offer camera stability, and the end result can be shaky. By using a computer, you don’t have to hold anything. With great stability and ease, you can conduct live streams for a longer run.
2. High Video/Audio Quality
iOS and Samsung devices provide high video quality. However, if you are using low-end smartphones, you won’t get high video and audio quality. In such a circumstance, you should use your computer to maintain better quality. By doing so, your audience can listen and view your live streams flawlessly.
3. Picture-in-Picture Display
Live streams on mobile phones restrict you from displaying a variety of content simultaneously. Through your PC, you can do live streaming on TikTok while playing your favorite games. You can easily open multiple windows on your PC during live streams. Moreover, you can have a picture-in-picture display to use a webcam while going for a live stream.
Part 3: 4 Ways to Go Live on TikTok On PC
Are you eager to know how to stream on TikTok on PC using different ways? Let’s shed light on some simple yet effective ways to go for live streaming on TikTok with a PC.
Way 1: With OBS
OBS is a highly compatible and free broadcasting software. It is available for mainstream platforms such as Windows, Mac, and Linux. It offers high-end results during streaming with an audio mixer. It also provides customized options to set hotkeys, choose sources, and adjust the properties. Besides being a great streaming software, OBS also functions as a screen recorder.
Therefore, OBS is a famous streaming tool that ensures great quality in live streaming on TikTok. To learn how to go live on TikTok on a computer using OBS, here are the easy steps:
Step1 Download and install OBS on your PC successfully. Once done, go to the “Controls” section and click on “Settings.” A new window will pop up from which click on the “Stream” option given on the left panel.
Step2 On the “Service” box, choose “Custom” to proceed. Now enter the stream key and server URL you have gotten before. Once done with all requirements, click on the “Apply” option.
Way 2: With Streamlabs
Streamlabs is a popular streaming tool comprising great capabilities for live streaming. Using this platform, you can broadcast your webcam, microphone’s audio, games, desktop screen, etc. If you want to invite a guest during your live stream, Streamlabs provide a collab camera. Furthermore, this software provides distinctive and attractive overlays. You can easily choose from hundreds of overlays and apply them to your live stream.
You can also set important alerts on this tool, preferably. In order to begin your live stream on TikTok using Streamlabs, check the below steps:
Step1 Once done with installing Streamlabs on your PC, open its main interface. Click on the “Gear” icon displayed in the left section. From the settings menu, click on the “Stream” option.
Step2 On the new menu, choose “Custom Streaming Service” as your Stream Type. Now add the required Stream Key and Server URL on the given boxes. Afterward, hit the “Done” button.
Way 3: With XSplit Broadcaster
Want to know how to stream on TikTok on PC efficiently? XSplit Broadcaster is a powerful streaming tool used by many professionals. It can be used to live stream gameplays, e-sports, and other videos in high resolution. This streaming software provides different layout wizards to display your live streaming screen efficiently.
Moreover, it also supports multi-streaming, through which you can go live on various platforms at the same time. To use XSplit Broadcaster to live stream on TikTok, here are the instructions:
Step1 Launch XSplit Broadcaster on your PC and navigate to the “Broadcast” button displayed on top. Afterward, click on “Set up a new output” to proceed with the TikTok live stream process.
Step2 Now tap on “Custom RTMP,” which will redirect you to a new window. Here, you can add your streaming key and server URL to continue. You can also add information, such as name, channel, etc., to this window. Once done, press the “OK” button.
Way 4: With TikTok Live Studio Software
TikTok Live Studio software is the official software of TikTok for live streaming. This app is currently only available for Windows users. This software provides various customizable options that enable you to adjust your camera and microphone properties easily. It has an easy-to-use interface that allows beginners to conduct live streaming on TikTok in high quality.
As this software is directly linked to your TikTok account, you don’t have to add the stream key and server URL to initiate live streaming. Do you want to learn how to go live on TikTok on a PC using the TikTok software? You can check the following steps:
Step1 Launch TikTok Live Studio software on your PC and click on “Log in to begin.” Go to the login page and follow the on-screen instructions to set up this software successfully. On the Microphone window, choose your preferred microphone as your default device.
Step2 Afterward, adjust the camera settings and press the “Next” button. It will redirect you to streaming settings. You can choose the video and audio quality from this window. Click on the “Next” button to continue. Also, make sure to adjust the scene settings as well.
Step3 Now, you can see your PC screen along with your webcam. You can modify the screen size manually. You can also change the camera background and remove background noise from the settings. Once done with settings, press the “Start” button. Now give a title to your live streaming and choose your Live content. Next, click on the “Confirm” button and hit the “Go Live” button.
Bonus Tips: Easily Record and Edit Your Stream with Filmora
Have you ever used a screen recorder to capture your live streaming? Wondershare Filmora is the most compatible tool that offers a premium screen recorder and editor. The screen recorder in this platform can record a selected area with high audio and video quality. Along with capturing your live streaming session, you can use Pen to demonstrate in an enhanced way.
The video editor of Filmora offers professional visual effects and transitions. It supports high-quality video formats such as 4K and HD and enables intuitive editing. Moreover, you can also utilize its advanced features such as Auto Reframe, AI Portrait, Split Screen, Green Screen, etc. By availing of these features, you can execute professional editing on your recorded live streams. To understand more about Filmora’s new features, watch the video below.
Conclusion
Live streaming on TikTok is a new technique to target audiences effortlessly. There are various ways through which you can go for live streaming on TikTok. If you don’t know how to go live on TikTok PC properly, you can take help from this article. Also, to screen record and edit a live stream, you can use our recommended tool known as Wondershare Filmora.
Free Download For Win 7 or later(64-bit)
Free Download For macOS 10.14 or later
Step-by-Step Tutorial on Adding Captions to TikTok Videos
TikTok is one of the most famous social media apps as it creates various trends frequently that engage users continuously. Every week, you can explore various TikTok trends, such as dance videos, pranks, challenges, or quick hacks. These trends are a great entertainment source for people and motivate them to create engaging content.
However, adding captions is mandatory if you want to make TikTok trend videos for a diverse audience. This article will guide you if you are unaware of how to add captions on TikTok. We will provide 5 different ways to create TikTok captions effectively.
- Way 1: Auto-Generate Captions with TikTok’s Built-in Feature
- Way 2: Use Auto Captions in CapCut
- Way 3: Add Captions to TikTok Videos Manually
- Way 4: Automatically Add Subtitles to TikTok Videos with Online Editor
Part 1: Why Should You Add Captions to TikTok Videos?
Adding captions on TikTok videos can bring you multiple advantages. To learn more about the benefits of adding captions on TikTok, read this section:
1. Increases Comprehension
It may be possible that viewers won’t be able to understand a particular dialogue in your TikTok video. To make your TikTok content more understandable, adding captions can prove to be a great option. Moreover, if some viewers can’t turn on the sound of TikTok videos, they can easily read the captions to understand the content.
2. Enhances Focus
Captions have the ability to grasp the attention of a viewer automatically. Adding captions to your TikTok video lets your viewers focus more properly. Thus, you can engage your audience throughout the TikTok video effortlessly.
3. Helps During Audio Problems
Audio problems may arise unexpectedly. In such situations, added captions on TikTok videos can offer great convenience. Moreover, people who have auditory disabilities can also enjoy your TikTok videos.
4. Attracts Diverse Audience
If some foreigners can’t understand or speak your native language, TikTok captions are necessary for them. By doing so, a broad and diverse audience can watch your TikTok videos easily.
Part 2: How to Add Captions on TikTok?
There are various ways through which you can generate TikTok captions effortlessly. Read this section to discover multiple and convenient ways to create TikTok captions easily.
Way 1: Auto-Generate Captions with TikTok’s Built-in Feature
If you don’t want to download video editing software, you can utilize the built-in feature of TikTok to create auto-captions. This will save you from the hassle of launching or accessing a professional subtitle editor. Moreover, it will also save you time and effort from creating subtitles manually. To use the built-in feature of TikTok automatic captions, check the following instructions:
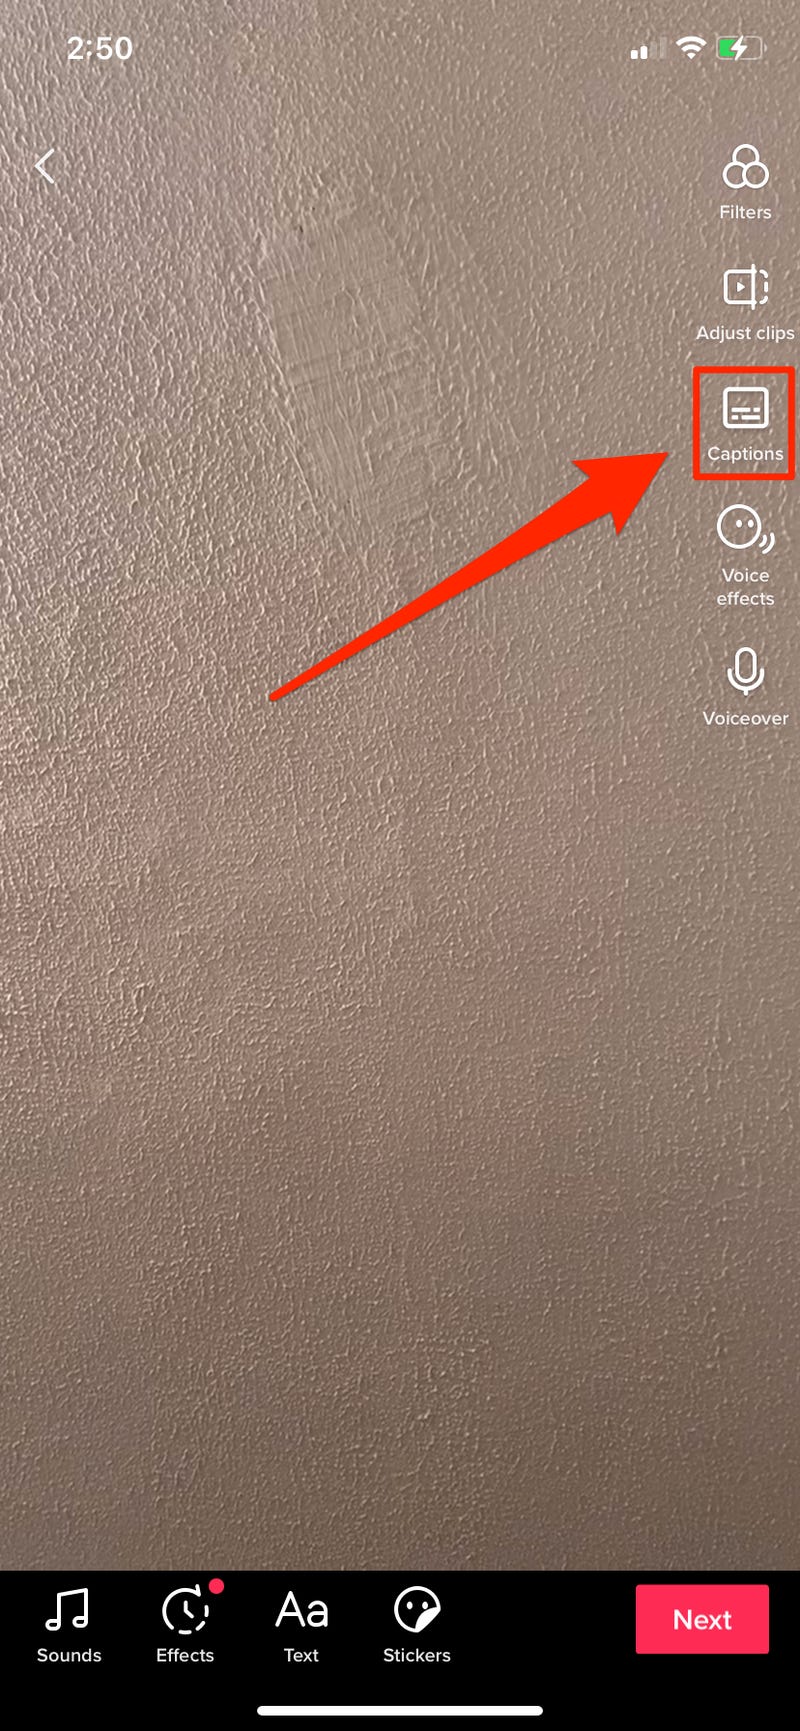
Step1 Once you have captured a video on TikTok, tap the “Tick” icon from the bottom right side. This will redirect you to the editing mode.
Step2 On the editing mode, locate the “Captions” option from the right side. After tapping on it, TikTok will instantly generate the subtitles automatically. Make sure that all the captions are correctly created. Once you are done, hit the “Save” button displayed at the top right side. Afterward, you can quickly post your TikTok video with captions.
Way 2: Use Auto Captions in CapCut
CapCut and TikTok are closely related to each other as they both have the same parent company called ByteDance. Thus, using CapCut to create captions for your TikTok videos can bring high-quality results. You can easily download CapCut on Android and iOS devices without any complications. The interface of this tool is clean that allows you to generate subtitles efficiently.
The auto caption feature in CapCut enables you to produce subtitles instantly. It uses advanced algorithms that ensure high accuracy while creating subtitles. To use this advanced feature of CapCut, read the below steps:
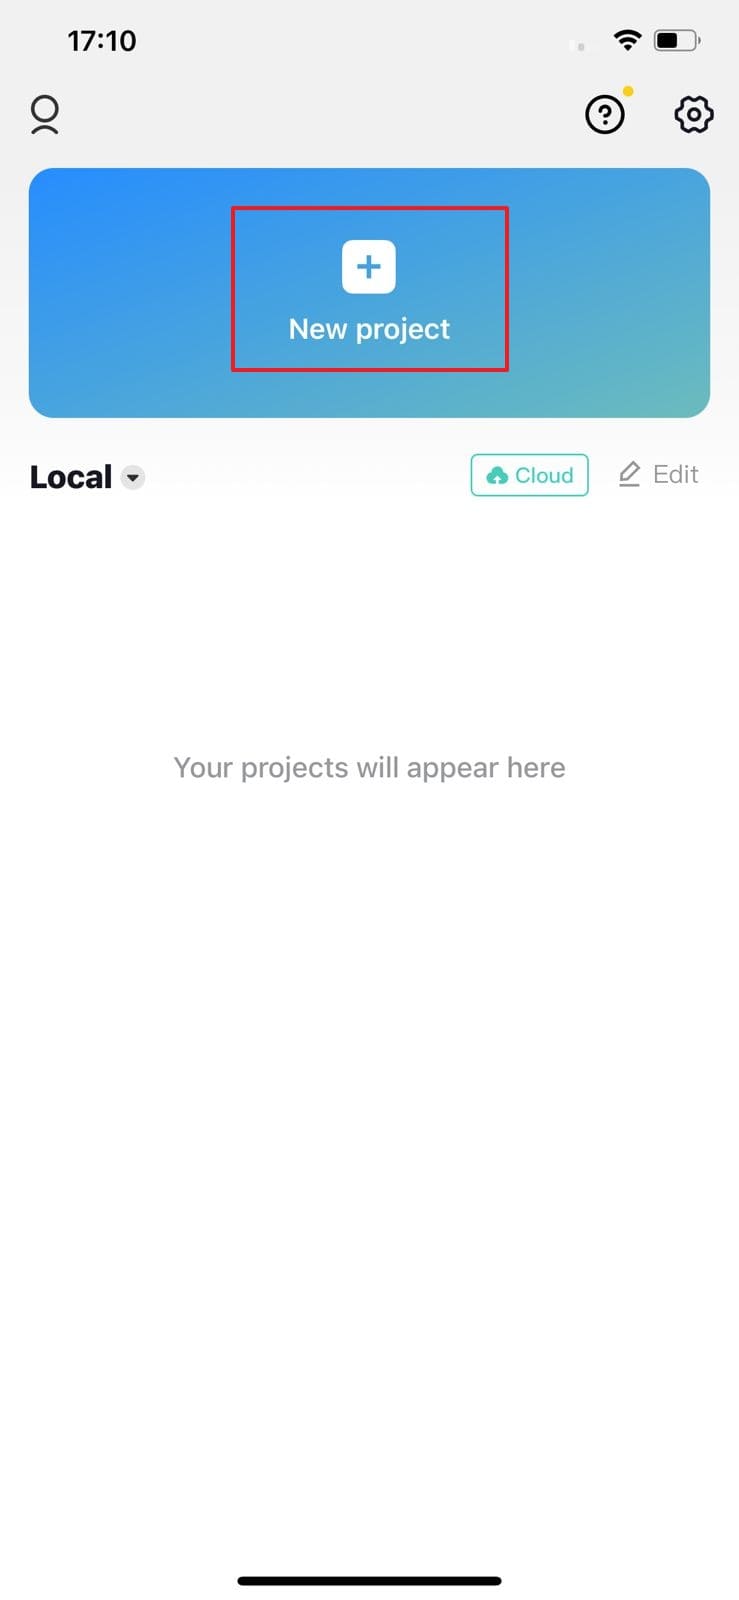
Step1 Download and launch CapCut on your phone. To import, tap on “New Project” and select the video from your phone’s gallery. Tap on “Add” to head to the editing mode of CapCut.
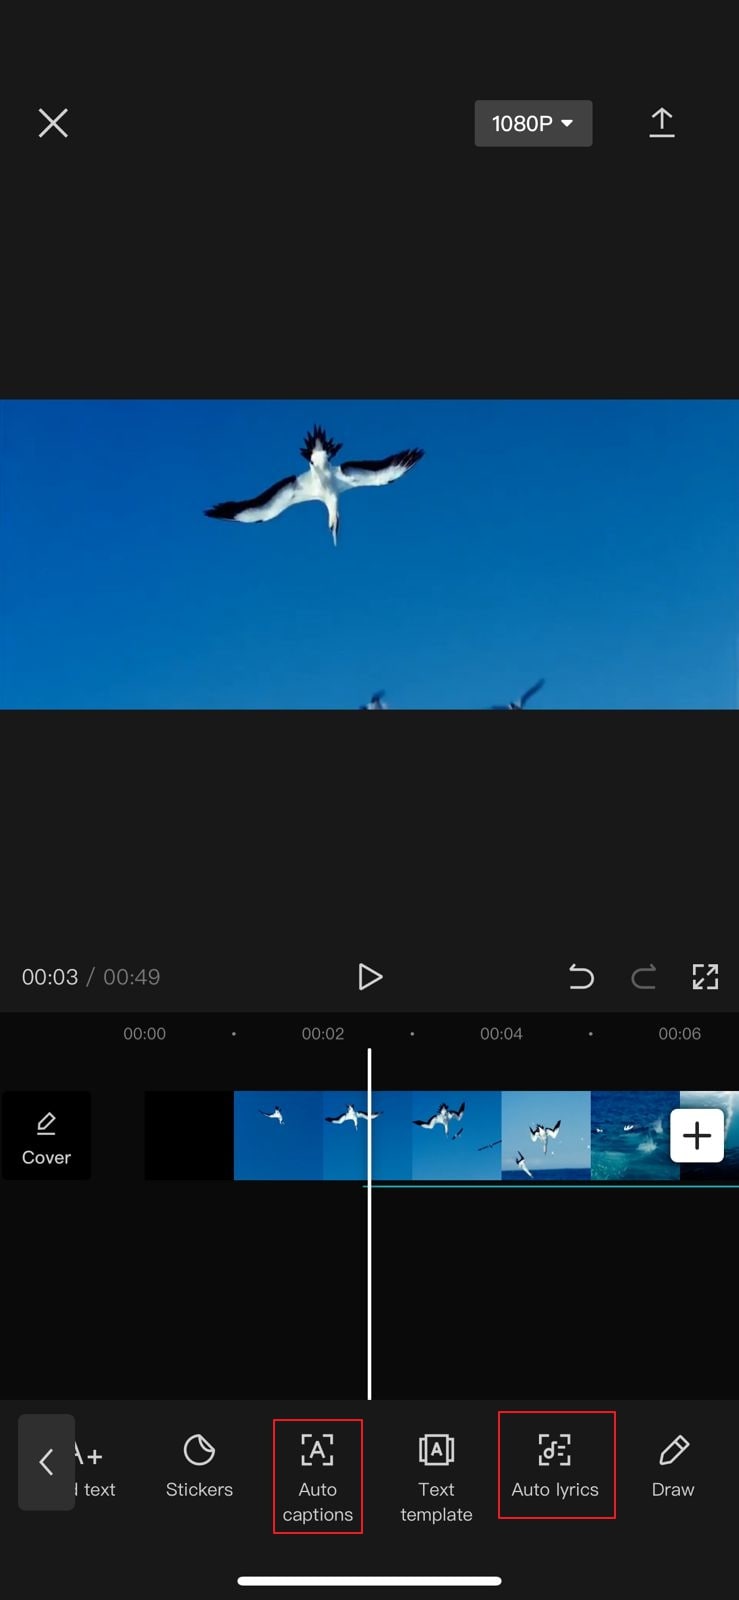
Step2 Afterward, select “Text” options from which you can either choose “Auto Lyrics” or “Auto Captions.” Using the Auto Lyrics option, you can generate captions for a song automatically. On the other hand, by using the Auto Captions option, you can transcribe the voice in your video to create subtitles. From the pop-up menus, choose the sound source and language to proceed.
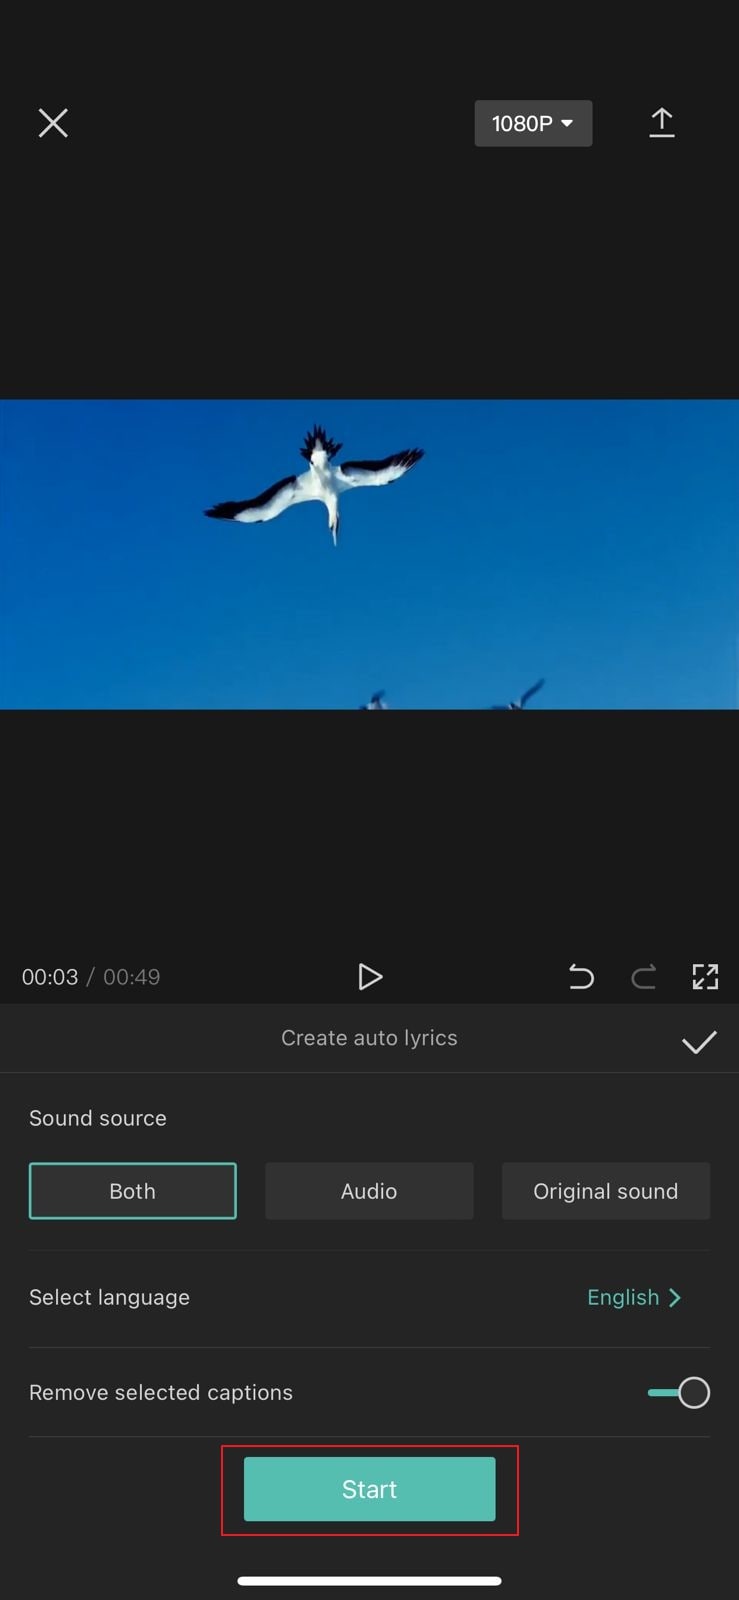
Step3 Once you are done adjusting the settings, hit the “Start” button. After some seconds, CapCut will create captions for your TikTok video efficiently. Afterward, you can choose video resolution and hit the “Arrow” icon to export the video.
Way 3: Add Captions to TikTok Videos Manually
If you want to create captions for TikTok briefly, you can manually add them using the instructions given below. This method is extremely simple and helpful if you want to create small captions for your TikTok videos. Moreover, you can efficiently choose the font, color, and style of your captions in this manual method:
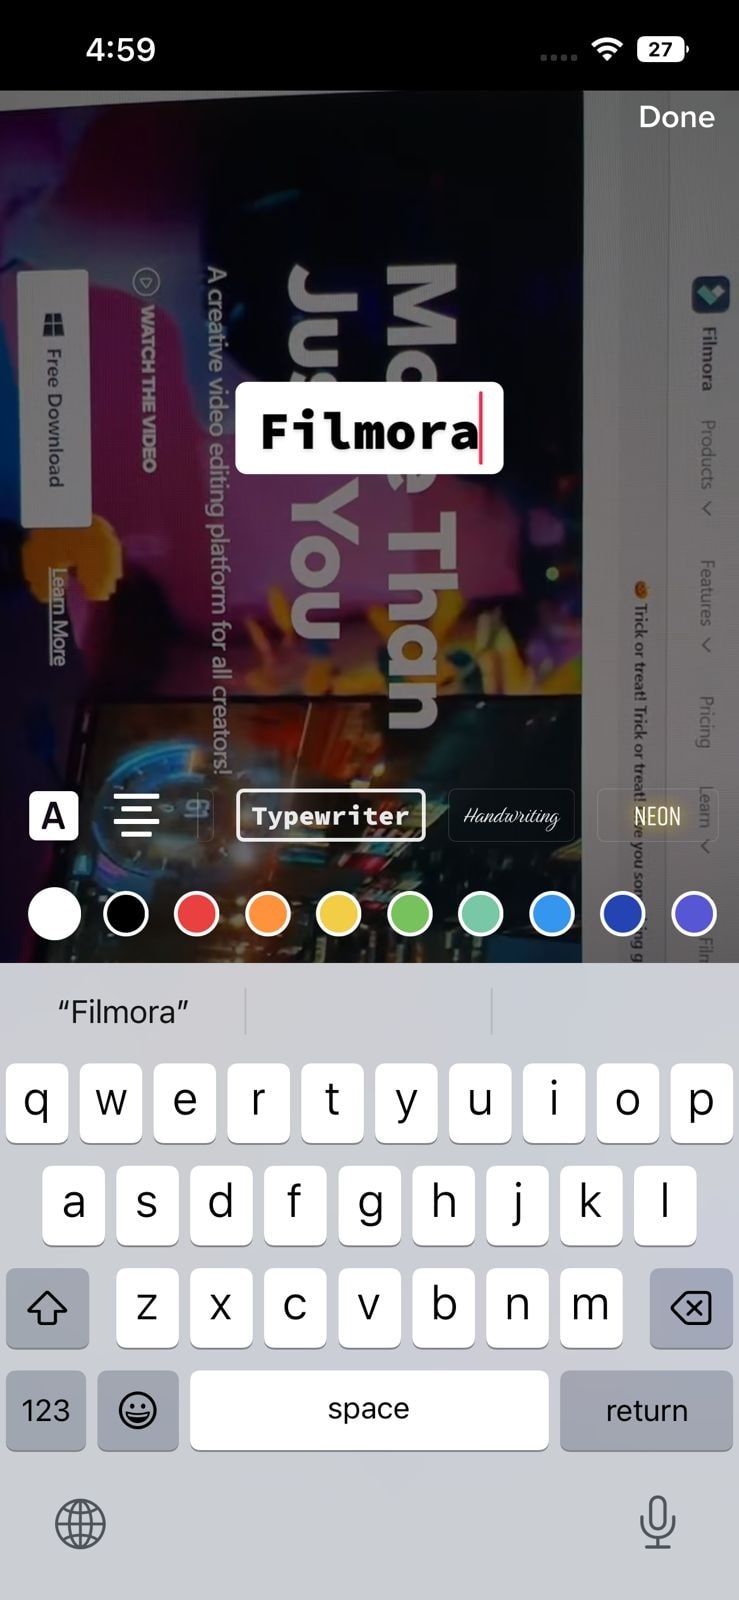
Step1 Open your TikTok app and create a video to begin. Tap on the “Tick” icon to enter the editing mode. Select “Text” given on the bottom toolbar of your screen.
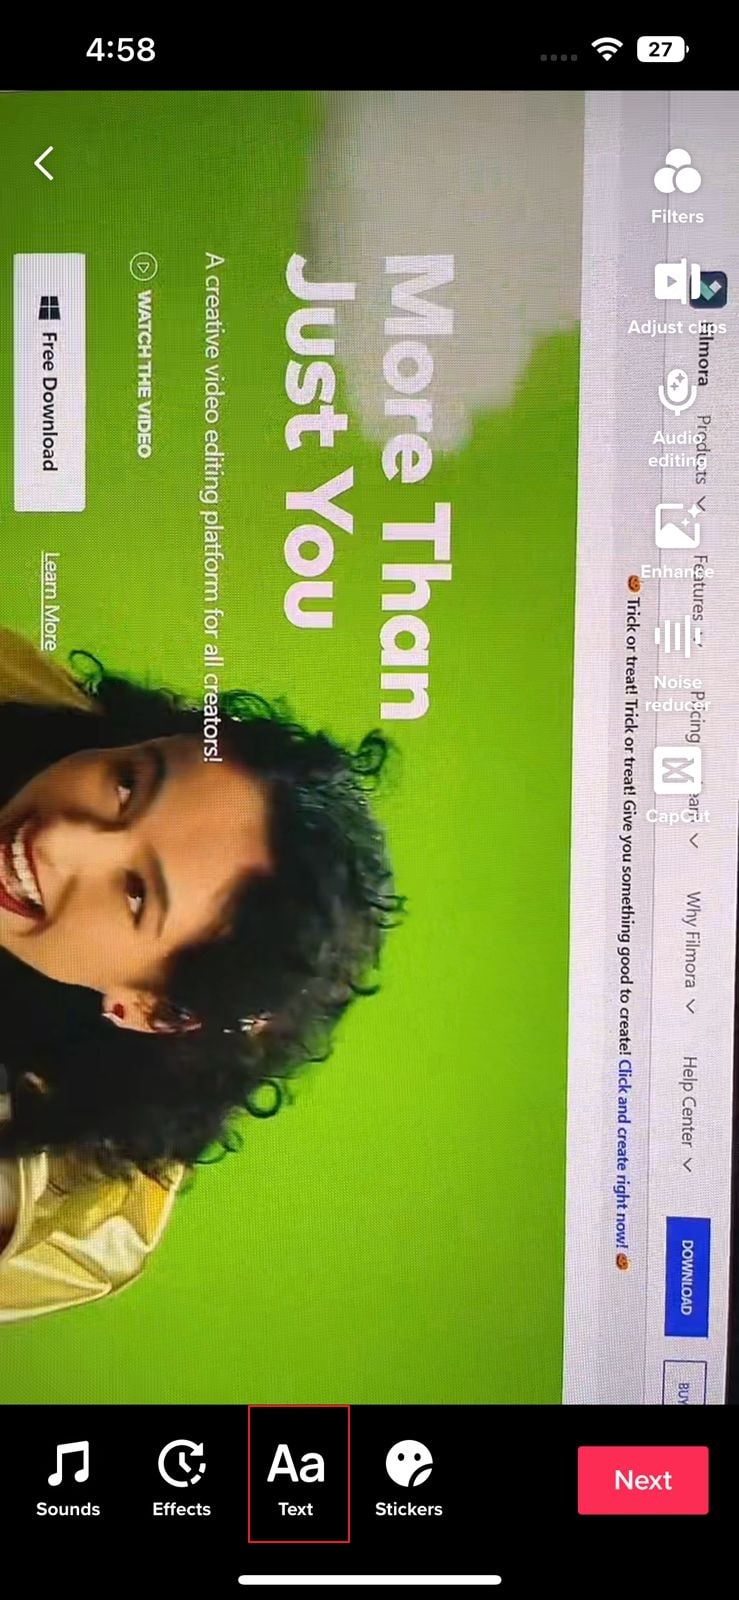
Step2 Now, choose the style for your captions from the available options. Select the color and start writing your captions carefully. Once you are done, you can save and publish your created TikTok video.
Way 4: Automatically Add Subtitles to TikTok Videos with Online Editor
There are various online editors that can create captions for TikTok videos automatically. They use the Auto Transcription feature, through which the tool can create subtitles by recognizing the voice used in a TikTok video. One of the reliable online tools that can produce auto-subtitles is Veed.io.
Veed.io is an online tool that is capable of creating TikTok automatic captions efficiently. You can easily access this online tool from your web browsers. Moreover, it supports more than 100 languages and accents that you can choose to create auto-captions. Also, you can translate your captions into different languages using this tool. To use this tool flawlessly, check the below steps:
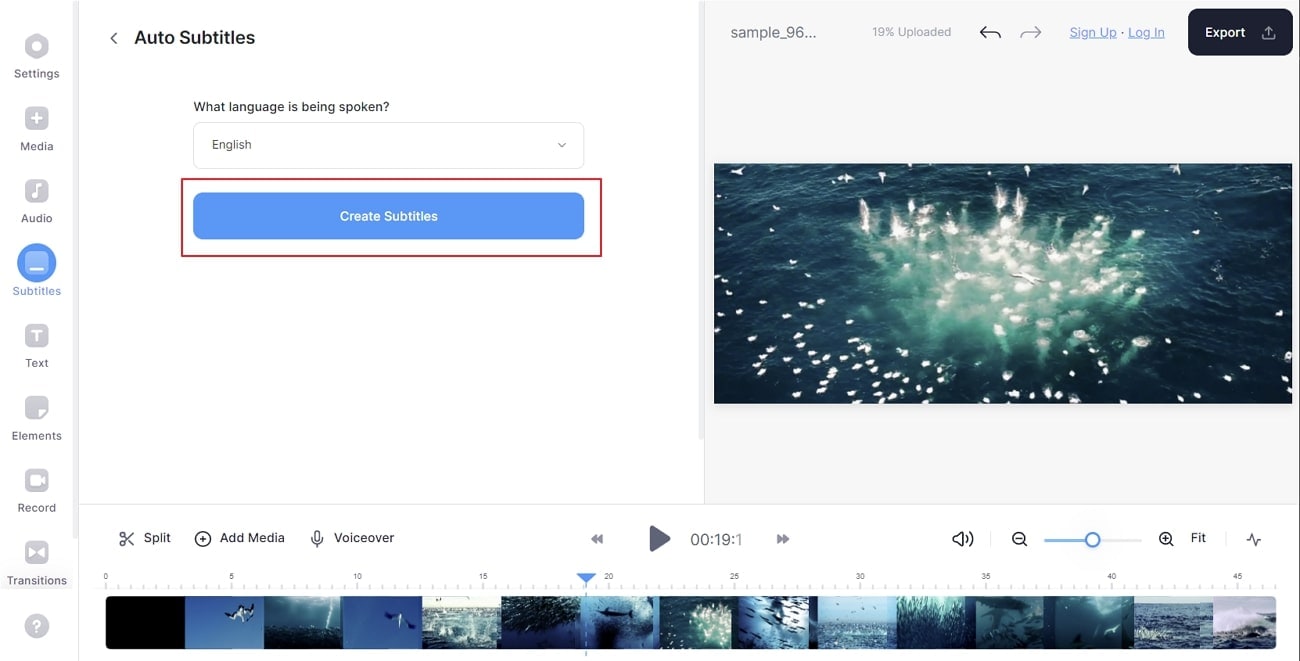
Step1 Begin by reaching the official website of Veed.io. Go to its Tools and locate the “Auto Subtitle Generator” option. It will redirect you to another page that consists of the tool information.

Step2 Click “Get Started” and upload a video from your system. Once you are done, tap on “Subtitles” and select “Auto Subtitle” from the given options. Choose your preferred language and tap on “Create Subtitles.”
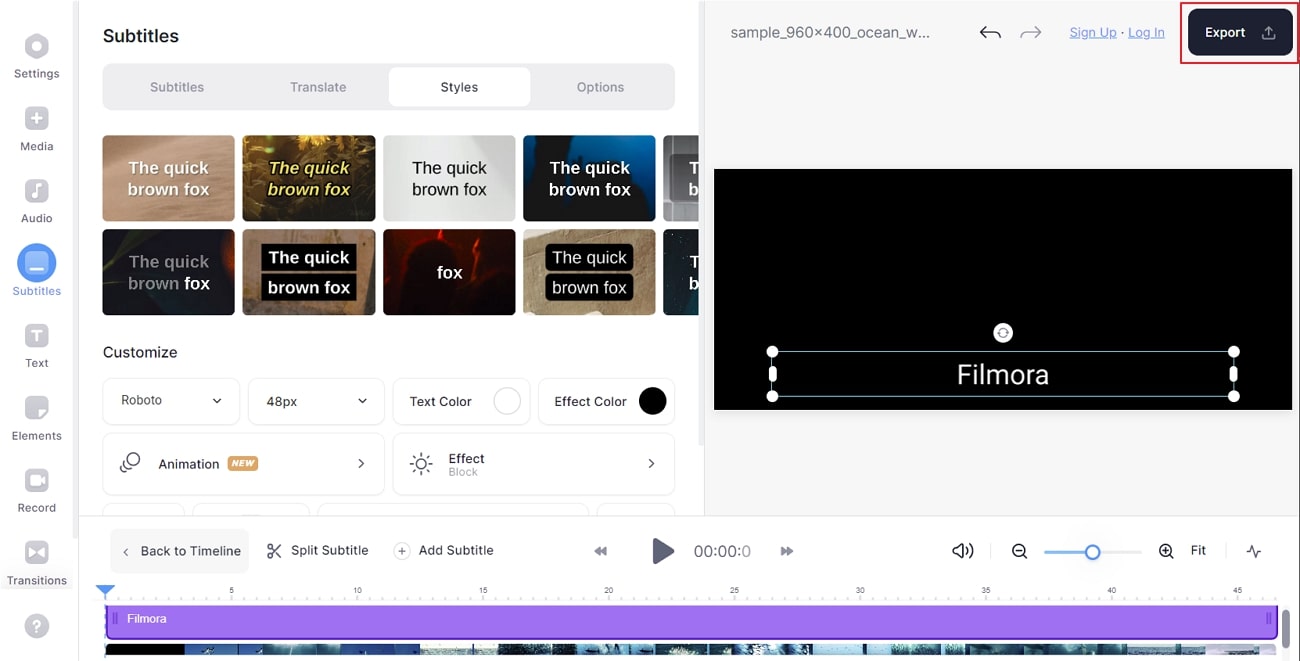
Step3 After waiting some time, you can see your auto-captions. You can choose the text color, effect, size, and alignment from the given options. Once you are satisfied with the TikTok captions, hit the “Export” button.
Part 3: How to Add Captions to Your TikTok Videos with Filmora
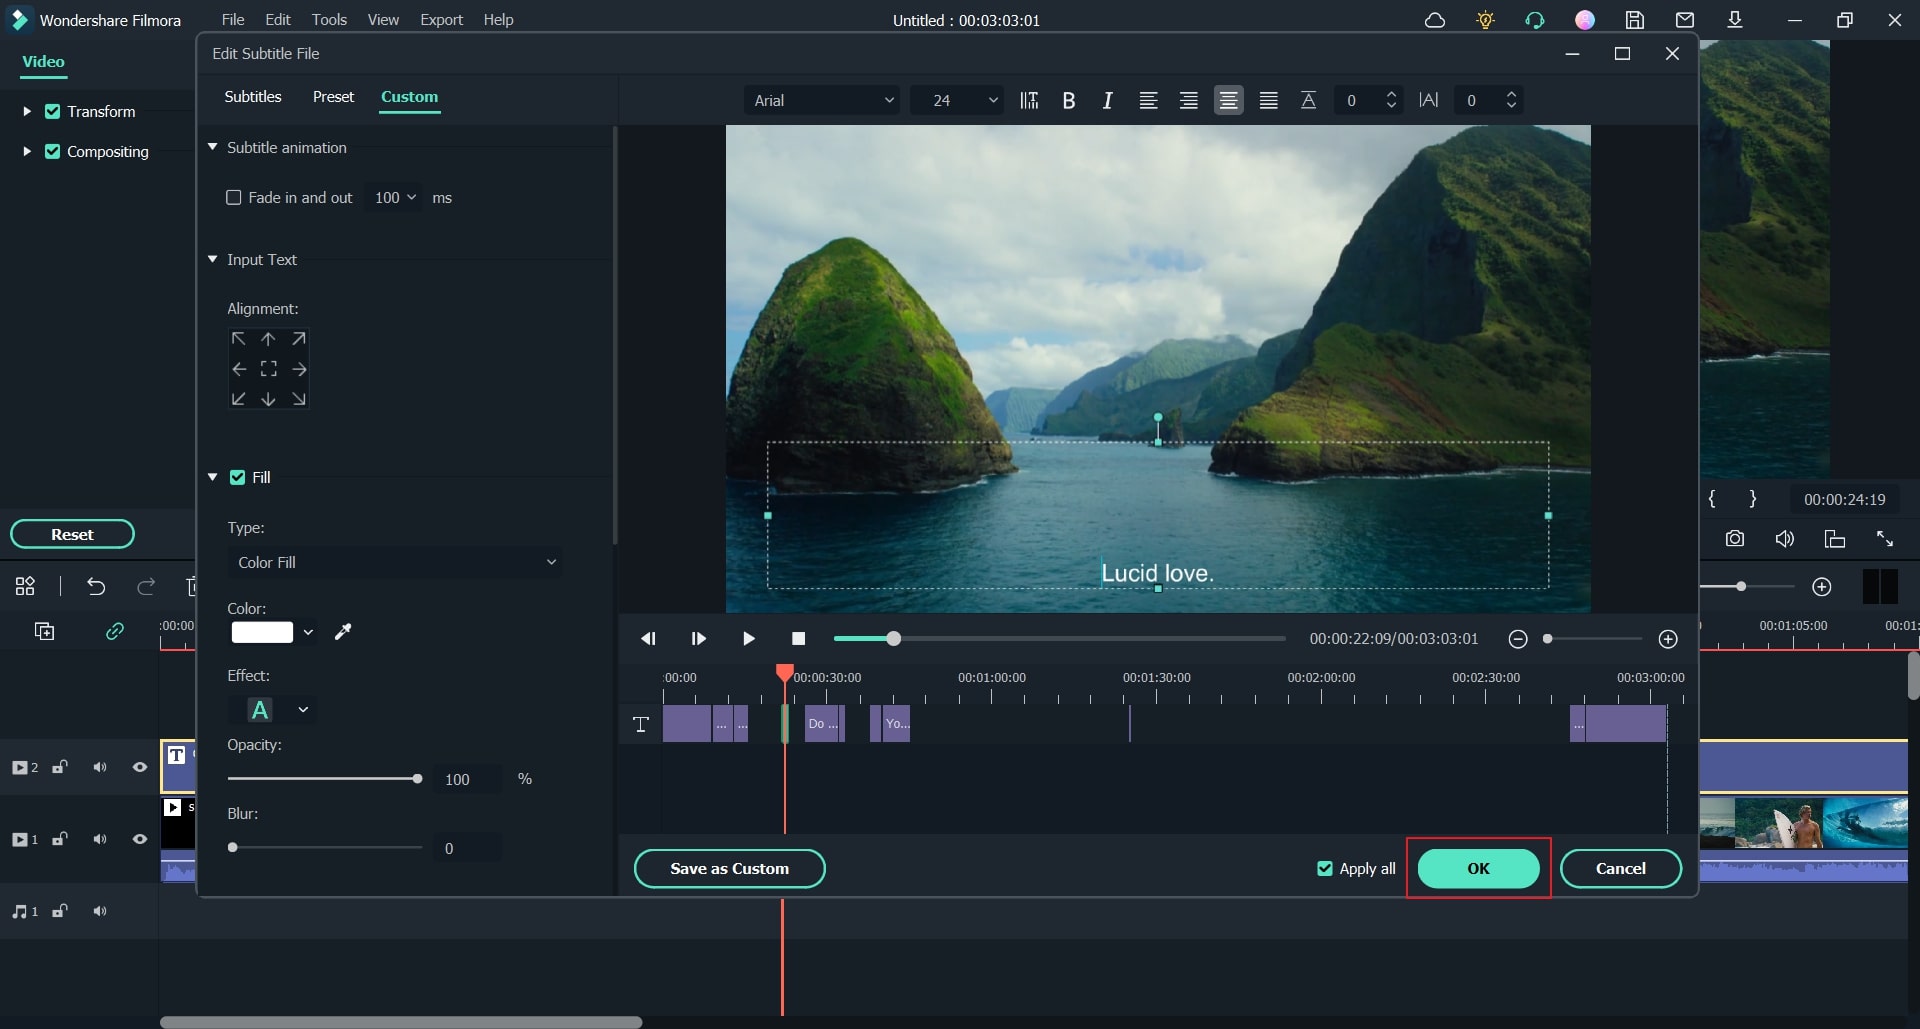
If you want to add further enhancements to your TikTok captions, you can use an offline tool like Wondershare Filmora . Using this platform, you can manually add captions by choosing the suitable style from the presets. Moreover, you can also add customizations to the captions through Filomora easily. You can also upload SRT files on this tool to produce TikTok captions.
Free Download For Win 7 or later(64-bit)
Free Download For macOS 10.14 or later
TikTok automatic captions can be easily generated from Filmora as it offers excellent results through its Speech-to-Text feature. Using this unique feature, you can transcribe the voice in your TikTok videos in up to 16 different languages. To use this feature conveniently, follow the below steps:
Step 1 Import the TikTok Video
Once done with launching and creating the Filmora project on your PC, hit the “Arrow” icon to import your video file on this tool. Now drag and drop the video file to the timeline in order to proceed.
Step 2 Initiate the Automatic Subtitle Feature
On your timeline, tap on the “Speech-to-Text” feature. Choose your language and video clip from the pop-up menu. Wait for some seconds, and the subtitles will be generated automatically. Double-click on the created TikTok automatic captions to open the editing settings. Here, you can select subtitles style and respective time duration. You can also add customizations efficiently.
Step 3 Export the TikTok Video
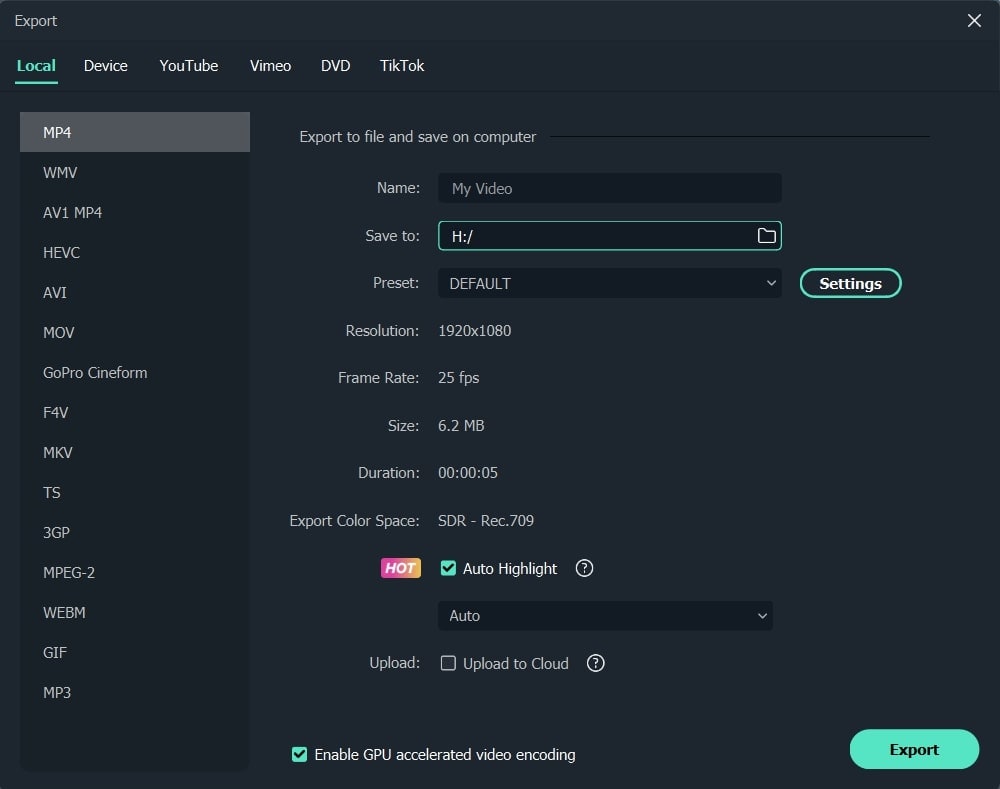
After completing all the settings, you can click on the “Export” button. Before exporting, you can choose the video resolution and file formats easily. Also, this tool gives you the facility to export the video file directly to your TikTok account.
Part 4: People Also Want to Know
1. How to add captions to TikTok?
To add TikTok captions, you can choose the manual or automatic way. TikTok has a built-in auto-generator through which you can add captions automatically. Moreover, there are different offline and online tools, such as Filmora, CapCut, and Veed.io, through which you can add captions on TikTok flawlessly.
2. How to add captions to TikTok after posting?
If you want to add TikTok captions after posting, you have to download the video on your phone first. Afterward, hit the Plus icon to re-upload the video from your gallery. Choose that particular video again and tap on the Post button. Now you can write the captions on the given space easily. Afterward, tap on the “Post” button.
Last Words
This article has shed light on various ways how to add captions on TikTok efficiently. You can add TikTok captions manually or use the auto-generator for ease. Moreover, we have also highlighted an online tool to create subtitles that can be accessed from any web browser. However, if you want a professional caption editor for a longer run, Wondershare Filmora is the best choice among other tools. It has an easy-to-use interface and achieves accurate results comfortably.
Part 1: Why Should You Add Captions to TikTok Videos?
Adding captions on TikTok videos can bring you multiple advantages. To learn more about the benefits of adding captions on TikTok, read this section:
1. Increases Comprehension
It may be possible that viewers won’t be able to understand a particular dialogue in your TikTok video. To make your TikTok content more understandable, adding captions can prove to be a great option. Moreover, if some viewers can’t turn on the sound of TikTok videos, they can easily read the captions to understand the content.
2. Enhances Focus
Captions have the ability to grasp the attention of a viewer automatically. Adding captions to your TikTok video lets your viewers focus more properly. Thus, you can engage your audience throughout the TikTok video effortlessly.
3. Helps During Audio Problems
Audio problems may arise unexpectedly. In such situations, added captions on TikTok videos can offer great convenience. Moreover, people who have auditory disabilities can also enjoy your TikTok videos.
4. Attracts Diverse Audience
If some foreigners can’t understand or speak your native language, TikTok captions are necessary for them. By doing so, a broad and diverse audience can watch your TikTok videos easily.
Part 2: How to Add Captions on TikTok?
There are various ways through which you can generate TikTok captions effortlessly. Read this section to discover multiple and convenient ways to create TikTok captions easily.
Way 1: Auto-Generate Captions with TikTok’s Built-in Feature
If you don’t want to download video editing software, you can utilize the built-in feature of TikTok to create auto-captions. This will save you from the hassle of launching or accessing a professional subtitle editor. Moreover, it will also save you time and effort from creating subtitles manually. To use the built-in feature of TikTok automatic captions, check the following instructions:
Step1 Once you have captured a video on TikTok, tap the “Tick” icon from the bottom right side. This will redirect you to the editing mode.
Step2 On the editing mode, locate the “Captions” option from the right side. After tapping on it, TikTok will instantly generate the subtitles automatically. Make sure that all the captions are correctly created. Once you are done, hit the “Save” button displayed at the top right side. Afterward, you can quickly post your TikTok video with captions.
Way 2: Use Auto Captions in CapCut
CapCut and TikTok are closely related to each other as they both have the same parent company called ByteDance. Thus, using CapCut to create captions for your TikTok videos can bring high-quality results. You can easily download CapCut on Android and iOS devices without any complications. The interface of this tool is clean that allows you to generate subtitles efficiently.
The auto caption feature in CapCut enables you to produce subtitles instantly. It uses advanced algorithms that ensure high accuracy while creating subtitles. To use this advanced feature of CapCut, read the below steps:
Step1 Download and launch CapCut on your phone. To import, tap on “New Project” and select the video from your phone’s gallery. Tap on “Add” to head to the editing mode of CapCut.
Step2 Afterward, select “Text” options from which you can either choose “Auto Lyrics” or “Auto Captions.” Using the Auto Lyrics option, you can generate captions for a song automatically. On the other hand, by using the Auto Captions option, you can transcribe the voice in your video to create subtitles. From the pop-up menus, choose the sound source and language to proceed.
Step3 Once you are done adjusting the settings, hit the “Start” button. After some seconds, CapCut will create captions for your TikTok video efficiently. Afterward, you can choose video resolution and hit the “Arrow” icon to export the video.
Way 3: Add Captions to TikTok Videos Manually
If you want to create captions for TikTok briefly, you can manually add them using the instructions given below. This method is extremely simple and helpful if you want to create small captions for your TikTok videos. Moreover, you can efficiently choose the font, color, and style of your captions in this manual method:
Step1 Open your TikTok app and create a video to begin. Tap on the “Tick” icon to enter the editing mode. Select “Text” given on the bottom toolbar of your screen.
Step2 Now, choose the style for your captions from the available options. Select the color and start writing your captions carefully. Once you are done, you can save and publish your created TikTok video.
Way 4: Automatically Add Subtitles to TikTok Videos with Online Editor
There are various online editors that can create captions for TikTok videos automatically. They use the Auto Transcription feature, through which the tool can create subtitles by recognizing the voice used in a TikTok video. One of the reliable online tools that can produce auto-subtitles is Veed.io.
Veed.io is an online tool that is capable of creating TikTok automatic captions efficiently. You can easily access this online tool from your web browsers. Moreover, it supports more than 100 languages and accents that you can choose to create auto-captions. Also, you can translate your captions into different languages using this tool. To use this tool flawlessly, check the below steps:
Step1 Begin by reaching the official website of Veed.io. Go to its Tools and locate the “Auto Subtitle Generator” option. It will redirect you to another page that consists of the tool information.
Step2 Click “Get Started” and upload a video from your system. Once you are done, tap on “Subtitles” and select “Auto Subtitle” from the given options. Choose your preferred language and tap on “Create Subtitles.”
Step3 After waiting some time, you can see your auto-captions. You can choose the text color, effect, size, and alignment from the given options. Once you are satisfied with the TikTok captions, hit the “Export” button.
Part 3: How to Add Captions to Your TikTok Videos with Filmora
If you want to add further enhancements to your TikTok captions, you can use an offline tool like Wondershare Filmora . Using this platform, you can manually add captions by choosing the suitable style from the presets. Moreover, you can also add customizations to the captions through Filomora easily. You can also upload SRT files on this tool to produce TikTok captions.
Free Download For Win 7 or later(64-bit)
Free Download For macOS 10.14 or later
TikTok automatic captions can be easily generated from Filmora as it offers excellent results through its Speech-to-Text feature. Using this unique feature, you can transcribe the voice in your TikTok videos in up to 16 different languages. To use this feature conveniently, follow the below steps:
Step 1 Import the TikTok Video
Once done with launching and creating the Filmora project on your PC, hit the “Arrow” icon to import your video file on this tool. Now drag and drop the video file to the timeline in order to proceed.
Step 2 Initiate the Automatic Subtitle Feature
On your timeline, tap on the “Speech-to-Text” feature. Choose your language and video clip from the pop-up menu. Wait for some seconds, and the subtitles will be generated automatically. Double-click on the created TikTok automatic captions to open the editing settings. Here, you can select subtitles style and respective time duration. You can also add customizations efficiently.
Step 3 Export the TikTok Video
After completing all the settings, you can click on the “Export” button. Before exporting, you can choose the video resolution and file formats easily. Also, this tool gives you the facility to export the video file directly to your TikTok account.
Part 4: People Also Want to Know
1. How to add captions to TikTok?
To add TikTok captions, you can choose the manual or automatic way. TikTok has a built-in auto-generator through which you can add captions automatically. Moreover, there are different offline and online tools, such as Filmora, CapCut, and Veed.io, through which you can add captions on TikTok flawlessly.
2. How to add captions to TikTok after posting?
If you want to add TikTok captions after posting, you have to download the video on your phone first. Afterward, hit the Plus icon to re-upload the video from your gallery. Choose that particular video again and tap on the Post button. Now you can write the captions on the given space easily. Afterward, tap on the “Post” button.
Last Words
This article has shed light on various ways how to add captions on TikTok efficiently. You can add TikTok captions manually or use the auto-generator for ease. Moreover, we have also highlighted an online tool to create subtitles that can be accessed from any web browser. However, if you want a professional caption editor for a longer run, Wondershare Filmora is the best choice among other tools. It has an easy-to-use interface and achieves accurate results comfortably.
Also read:
- [New] Bypassing the Unseen Block on TikTok for 2024
- [New] The Ultimate Path to TikTok Fun for MacBook Owners
- [New] Unveiling the Secrets to Viral TikTok with These Best Captions
- [Updated] How to Dominate TikTok's Trending Topics for More Engagement for 2024
- [Updated] Sharing Tactics IGTV for a Larger FB Audience
- Facebook to MP3 Converter Tool for 2024
- How To Transfer WhatsApp From Apple iPhone 12 Pro Max to other iPhone 13 devices? | Dr.fone
- Neutering Night-Shade Nuisances: Acer Devices
- Optimize Your Workflow - Latest Supported Driver for Lenovo ThinkPad Thunderbolt Expansion Unit Available Now
- Safe & Easy Techniques to Clean a Flatscreen TV Without Damage
- Secure Your Files: Immediate Access with Premium Data Retrieval
- The Indelible Tune List 10 Most Sticky TikTok Songs of 2024
- The iPhone & iCloud Sync A Step-by-Step Photo Arrangement Guide for 2024
- The Ultimate Tutorial on Incorporating Text Captions Into Your IG Stories
- Ultimate Guide to Fix Microsoft Flight Simulator 2020: No More PC Crashes!
- Unleash the Power of TikTok Convert to High-Quality MP4s for 2024
- Title: [Updated] In 2024, A Step-By-Step Journey to PC Live Streams – Master TikTok LIVE
- Author: Gary
- Created at : 2024-11-14 00:07:55
- Updated at : 2024-11-14 21:44:04
- Link: https://tiktok-clips.techidaily.com/updated-in-2024-a-step-by-step-journey-to-pc-live-streams-master-tiktok-live/
- License: This work is licensed under CC BY-NC-SA 4.0.