
!["[Updated] From Beginner to Pro The Ultimate Guide to Slow Motion on TikTok for 2024"](https://www.lifewire.com/thmb/85rwStNr21lvFIjCfmY8ErdogYI=/400x300/filters:no_upscale():max_bytes(150000):strip_icc():format(webp)/wimbledonlivestream-c22d5eefbf8f40e9b25ba4cab1734ece.jpg)
"[Updated] From Beginner to Pro The Ultimate Guide to Slow Motion on TikTok for 2024"
From Beginner to Pro: The Ultimate Guide to Slow Motion on TikTok
TikTok is a music video-making program that enables users to create entertaining, innovative, and visually appealing videos. The program gives users a plethora of tools and alternatives to help them increase their creativity and originality when it comes to their material. It is possible to apply the Slow-motion effect to a video using one of the tools that TikTok gives to its users.
The slow-motion effect will slow down the pace of that specific area of the movie, which will significantly impact the overall quality of your content. Therefore, in this article, we have compiled a comprehensive guide that will show you the exact methods of making Slow Motion Tik Tok videos for your social content. Let’s get started!
In this article
01 How to Record Tik Tok Video Wit Slow Motion Effects?
02 How o Add Slow-Mo Effects After Recording Videos on Tik Tok?
03 How to Slow Down Tik Tok Videos Online for Free?
04 How to Slow TikTok Video And Song Using Filmora?
Part 1: How to Record Tik Tok Video Wit Slow Motion Effects?
TikTok videos may benefit from adding effects, which is a simple process. You may do it during the recording process or after the fact in post-production. One viral effect is slow-motion. You can use this to create some quite amusing videos, particularly when combined with other effects.
In this section, we’ll go through how to record a TikTok video with the slow-mo effect.
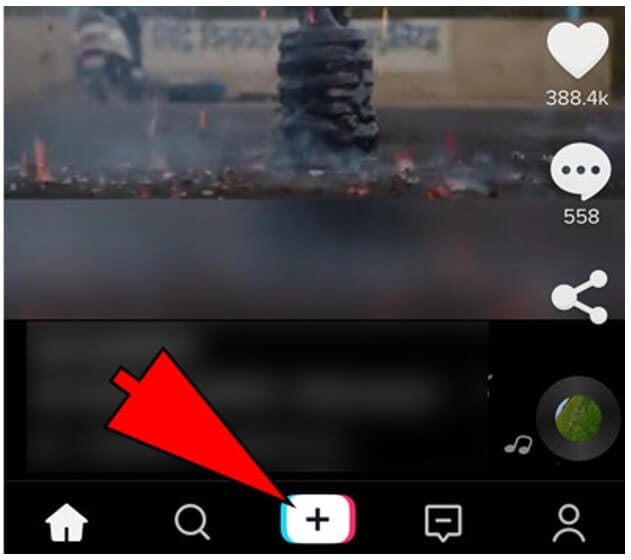
Step 1: The first step is to Open Tik Tok, which can be accomplished by searching for the program on your smartphone. When you first launch TikTok, it will open in the feed area by default, as seen below. Navigation to the new video screen requires one press on the + symbol at the bottom of your screen, as seen in the image below before it will appear.
Note: You will be taken to the recording area, where your phone’s camera will be launched immediately.
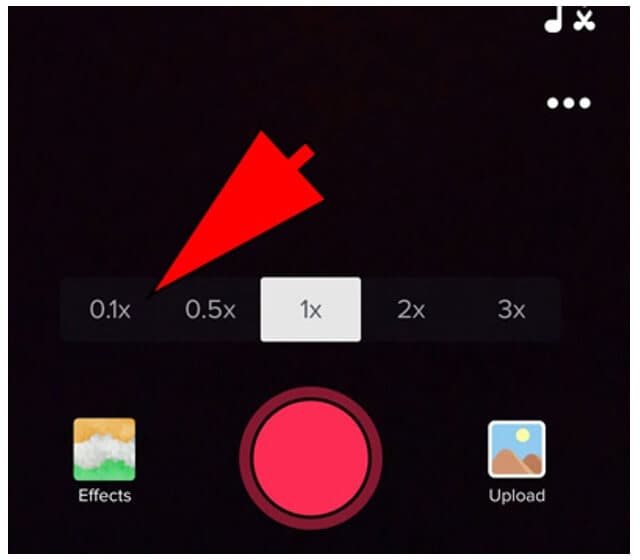
Step 2: When you first access the new video area, a bar displaying the various recording speeds displays, as seen in the screenshot below. It is necessary to pick the slowest feasible speed.
Tip: You may also select the video’s pace based on your preferences and how sluggish you want to make the movie seem.
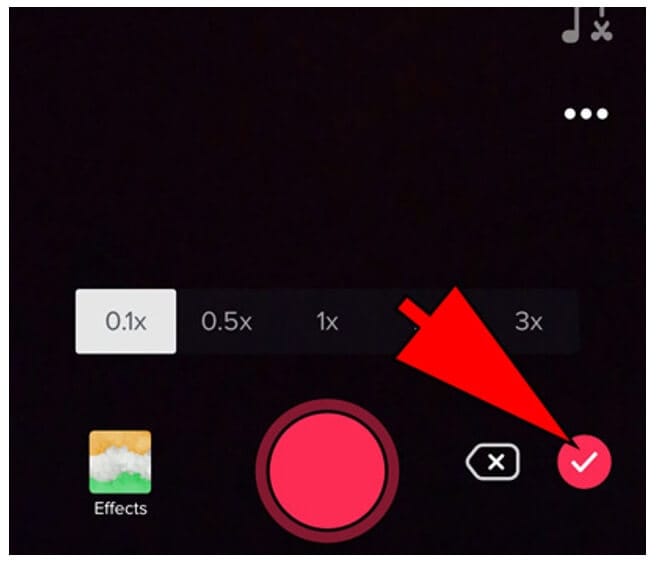
Step 3: Next to selecting the desired speed, you must go to the following screen. It is possible to see a Check Mark option appear in the right-hand corner of the screen, as seen in the illustration. Tap on it once to advance to the next stage.
Step 4: Then, go to the next step after selecting the desired speed. As seen below, you must record the video by Tapping and Holding the Red Color Record button for some time.
Note: Once the video has been recorded and is in a slower speed, it will automatically be recorded in slow motion. You can use this method to record your TikTok videos with a slow-motion effect.
Part 2: How o Add Slow-Mo Effects After Recording Videos on Tik Tok?
What about the videos you have already recorded on your TikTok application? Can you slow them down too? The following steps illustrate how to apply a slow-motion effect to your TikTok videos once they have been recorded using the app.
It is simple to record a video by simply going to the “Add new” area and selecting the video of your choosing to record. When you’ve finished recording, choose the next choice from the drop-down menu. Following that, you may proceed with the procedure.
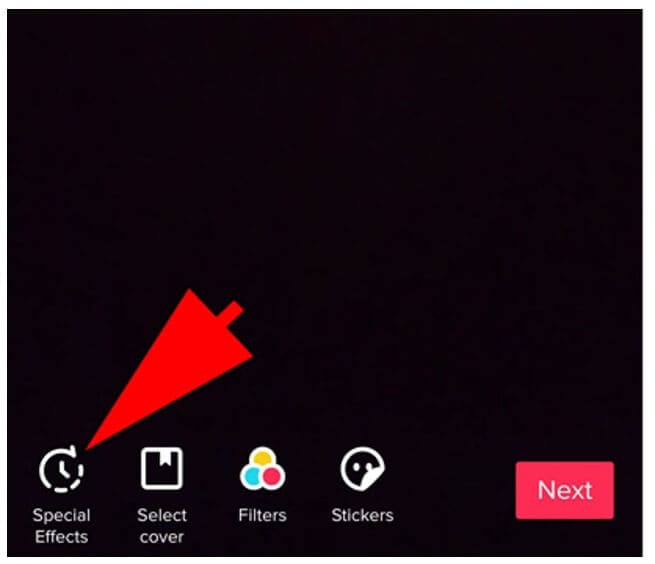
Step 1: Once you’ve arrived at the next screen, you’ll need to click on the Circular clock symbol to activate the effect. It is located in the bottom left corner of the screen, as seen below.
Tip: To access it, click on it. To access the effects, tap on it once. The effects under the Filter effects section will be immediately activated.
Step 2: To use this feature, you must browse the Time Effects part of the effects section. To do so, choose “Time effects“ from the drop-down menu in the bottom right corner of the screen, as shown by the arrow in the image below. It will provide you with different temporal effects.
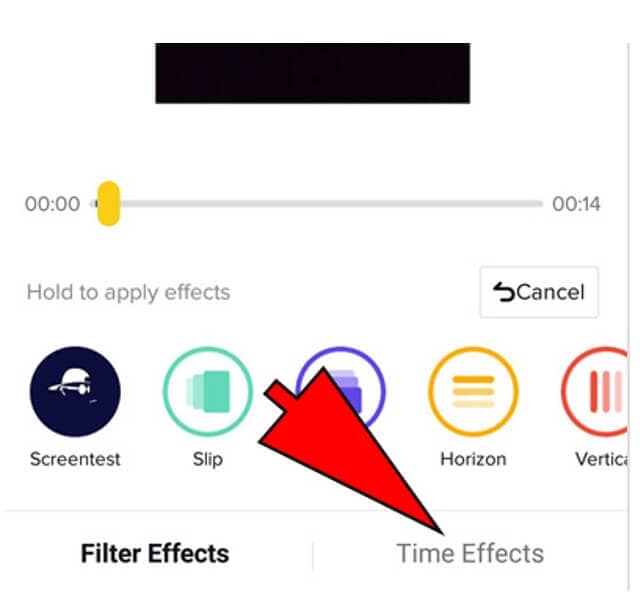
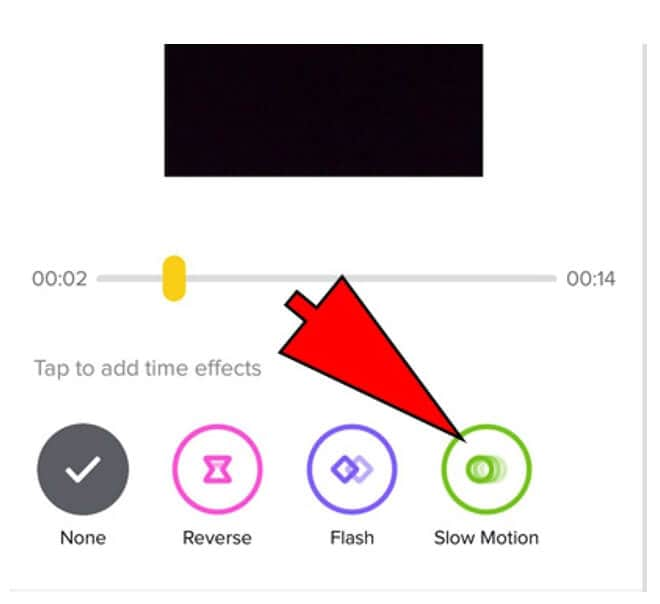
Step 3: It is necessary to choose the Slow Motion option from the list of alternatives that appears, as shown in the figure below. This will give the video the appearance of being in slow motion.
Tip: Changing the length of the slow-motion is accomplished by dragging the green square that appears on the screen. Drag it to any portion of the page where you want the slow-motion effect to appear.
Step 4: Once you’re pleased with the effect, you may save it by selecting the save option from the menu. As seen in the illustration below, click on “Save“ will save your work.
(Note: You will be returned to the previous screen if you do so. After that, you may edit it with whatever filters you want and publish it just like any other video).
Part 3: How to Slow Down Tik Tok Videos Online for Free?
Kapwing
In a couple of seconds, Kapwing can speed up and slow down short videos. Slo-mo, timelapse, and hyperspeed films may be made with no editing skills then shared on social networking websites like YouTube.
Get started by uploading a video or pasting a URL. AVI, MP4, MOV, and 3PG are all supported formats by Kapwing. As slow as 0.25x for a slow-motion movie and as much as 4x for an enhanced video are available. Let’s give you a step-by-step illustration:
Step 1: On TikTok, find the video you want to slow down and click on. You have the option of slowing down videos from other people’s profiles and those from your profile. Copy the URL that appears when you click the Share button.
Step 2: This is where Kapwing comes in, and we utilize it on our PC using Chrome to accomplish our objective. Visit https://www.kapwing.com/ and copy the URL of the TikTok video and paste it into Kapwing.
Step 3: Go to the Speed section, and use the – and + buttons to make the video slow down or speed up. After selecting “slow-motion“ as your preferred speed, press the “play“ button to begin watching the movie. If the video moves too slowly, click on the Plus sign and keep rewatching it until you’re satisfied with the pace.

Step 4: This step is optional, but it comes in useful if you’re performing in a duet or if you want to watch a TikTok video while you’re not connected to the internet. Following your completion of the speed adjustment, go to the top of the studio and click Export Video. After your video has been processed, you may save it to your device by clicking the Download button.

For more detail, you can check this article: How to make a slo-mo video with Kapwing?
Part 4: How to Slow TikTok Video And Song Using Filmora?
In principle, TikTok can meet the majority of users’ video creation, editing, and sharing requirements. While the TikTok app can produce high-quality videos, it may fall short when it comes to adding unique effects to your videos.
Then you’ll want the assistance of a professional video editing program to complete your project. Also, you must know about online TikTok downloaders without watermarks . But what if you wish to enhance and refine these videos? We want to offer to you Filmora Video Editor to make a slow-motion TikTok video as quickly and simply as possible.
For Win 7 or later (64-bit)
For macOS 10.12 or later
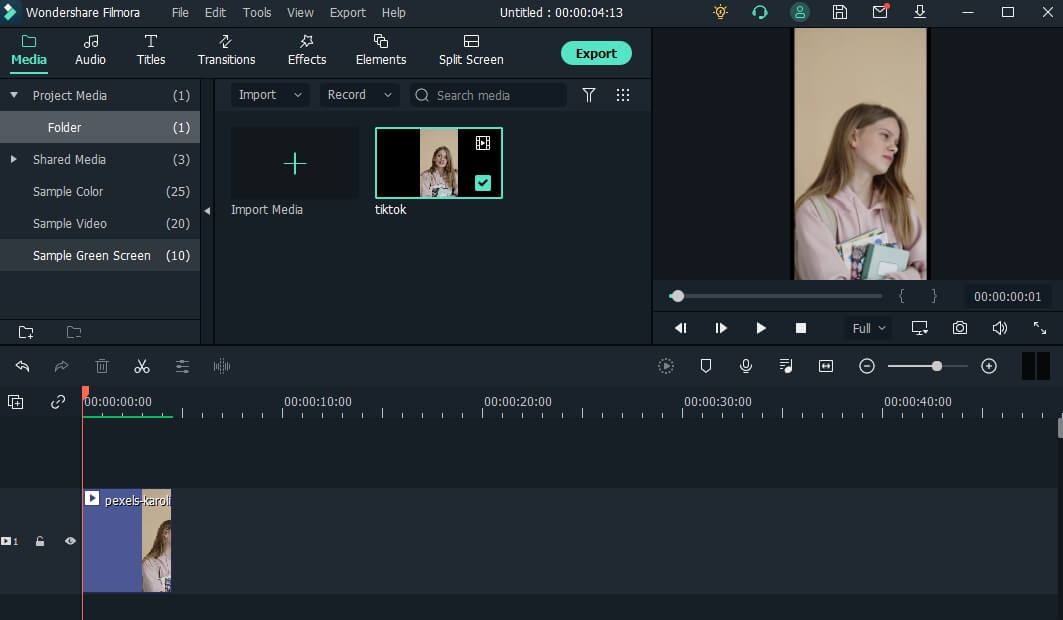
Step 1: Launch the Filmora Video Editor, with its aspect ratio set to 9:16 since it’s downloaded the TikTok video. Then, to access the editing panel, choose “New Project“ from the menu bar.

Step 2: Drag and drag the video right into the interface to edit it. Alternatively, you can choose “Add files“ from the drop-down menu by clicking the “+” button. Using the media library, drag and drop the video you wish to slow down onto the timeline once added to the project.
Step 3: To access the speed control panel, pick the video on the timeline and right-click on it, then choose “Speed“ from the context menu, and then select Speed and Duration option.
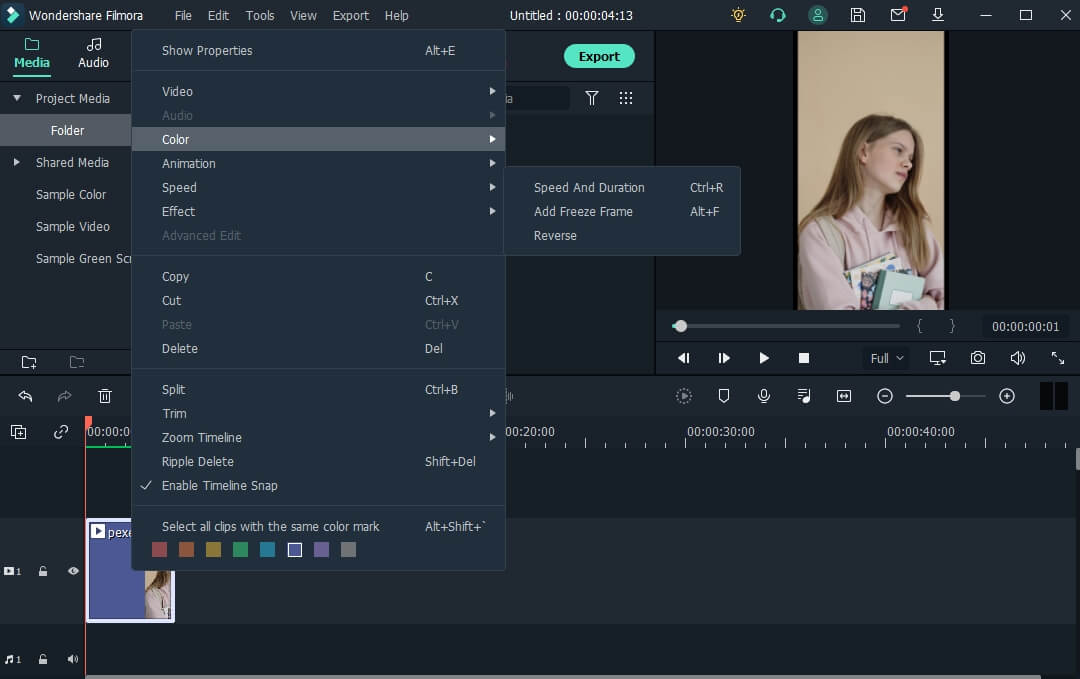
You may adjust the video speed by dragging the slider to the right or left as needed.

Note: The Filmora Video Editor enables you to modify the playback speed to as little as TEN times slower than the actual speed of the video.
After that, you may use various editing tools to create your video one-of-a-kind and spectacular, depending on your requirements.
Step 5: It’s time to save your modified movie clip to your device. Click the Export button to save the video to your local or share to YouTube or Vimeo directly.
Conclusion
Well, now you know how you can add the slo-mo effect on Slow Motion TikTok videos. We have covered the most straightforward steps with their respective screenshots that will give you a proper illustration to help you make and apply slow-motion effects to your videos. In the end, for PC users, you can even use Wondershare Filmora to apply slow-motion effects to your videos on PC. It’s one of the best and most easy-to-use software for PC users.
02 How o Add Slow-Mo Effects After Recording Videos on Tik Tok?
03 How to Slow Down Tik Tok Videos Online for Free?
04 How to Slow TikTok Video And Song Using Filmora?
Part 1: How to Record Tik Tok Video Wit Slow Motion Effects?
TikTok videos may benefit from adding effects, which is a simple process. You may do it during the recording process or after the fact in post-production. One viral effect is slow-motion. You can use this to create some quite amusing videos, particularly when combined with other effects.
In this section, we’ll go through how to record a TikTok video with the slow-mo effect.
Step 1: The first step is to Open Tik Tok, which can be accomplished by searching for the program on your smartphone. When you first launch TikTok, it will open in the feed area by default, as seen below. Navigation to the new video screen requires one press on the + symbol at the bottom of your screen, as seen in the image below before it will appear.
Note: You will be taken to the recording area, where your phone’s camera will be launched immediately.
Step 2: When you first access the new video area, a bar displaying the various recording speeds displays, as seen in the screenshot below. It is necessary to pick the slowest feasible speed.
Tip: You may also select the video’s pace based on your preferences and how sluggish you want to make the movie seem.
Step 3: Next to selecting the desired speed, you must go to the following screen. It is possible to see a Check Mark option appear in the right-hand corner of the screen, as seen in the illustration. Tap on it once to advance to the next stage.
Step 4: Then, go to the next step after selecting the desired speed. As seen below, you must record the video by Tapping and Holding the Red Color Record button for some time.
Note: Once the video has been recorded and is in a slower speed, it will automatically be recorded in slow motion. You can use this method to record your TikTok videos with a slow-motion effect.
Part 2: How o Add Slow-Mo Effects After Recording Videos on Tik Tok?
What about the videos you have already recorded on your TikTok application? Can you slow them down too? The following steps illustrate how to apply a slow-motion effect to your TikTok videos once they have been recorded using the app.
It is simple to record a video by simply going to the “Add new” area and selecting the video of your choosing to record. When you’ve finished recording, choose the next choice from the drop-down menu. Following that, you may proceed with the procedure.
Step 1: Once you’ve arrived at the next screen, you’ll need to click on the Circular clock symbol to activate the effect. It is located in the bottom left corner of the screen, as seen below.
Tip: To access it, click on it. To access the effects, tap on it once. The effects under the Filter effects section will be immediately activated.
Step 2: To use this feature, you must browse the Time Effects part of the effects section. To do so, choose “Time effects“ from the drop-down menu in the bottom right corner of the screen, as shown by the arrow in the image below. It will provide you with different temporal effects.
Step 3: It is necessary to choose the Slow Motion option from the list of alternatives that appears, as shown in the figure below. This will give the video the appearance of being in slow motion.
Tip: Changing the length of the slow-motion is accomplished by dragging the green square that appears on the screen. Drag it to any portion of the page where you want the slow-motion effect to appear.
Step 4: Once you’re pleased with the effect, you may save it by selecting the save option from the menu. As seen in the illustration below, click on “Save“ will save your work.
(Note: You will be returned to the previous screen if you do so. After that, you may edit it with whatever filters you want and publish it just like any other video).
Part 3: How to Slow Down Tik Tok Videos Online for Free?
Kapwing
In a couple of seconds, Kapwing can speed up and slow down short videos. Slo-mo, timelapse, and hyperspeed films may be made with no editing skills then shared on social networking websites like YouTube.
Get started by uploading a video or pasting a URL. AVI, MP4, MOV, and 3PG are all supported formats by Kapwing. As slow as 0.25x for a slow-motion movie and as much as 4x for an enhanced video are available. Let’s give you a step-by-step illustration:
Step 1: On TikTok, find the video you want to slow down and click on. You have the option of slowing down videos from other people’s profiles and those from your profile. Copy the URL that appears when you click the Share button.
Step 2: This is where Kapwing comes in, and we utilize it on our PC using Chrome to accomplish our objective. Visit https://www.kapwing.com/ and copy the URL of the TikTok video and paste it into Kapwing.
Step 3: Go to the Speed section, and use the – and + buttons to make the video slow down or speed up. After selecting “slow-motion“ as your preferred speed, press the “play“ button to begin watching the movie. If the video moves too slowly, click on the Plus sign and keep rewatching it until you’re satisfied with the pace.
Step 4: This step is optional, but it comes in useful if you’re performing in a duet or if you want to watch a TikTok video while you’re not connected to the internet. Following your completion of the speed adjustment, go to the top of the studio and click Export Video. After your video has been processed, you may save it to your device by clicking the Download button.
For more detail, you can check this article: How to make a slo-mo video with Kapwing?
Part 4: How to Slow TikTok Video And Song Using Filmora?
In principle, TikTok can meet the majority of users’ video creation, editing, and sharing requirements. While the TikTok app can produce high-quality videos, it may fall short when it comes to adding unique effects to your videos.
Then you’ll want the assistance of a professional video editing program to complete your project. Also, you must know about online TikTok downloaders without watermarks . But what if you wish to enhance and refine these videos? We want to offer to you Filmora Video Editor to make a slow-motion TikTok video as quickly and simply as possible.
For Win 7 or later (64-bit)
For macOS 10.12 or later
Step 1: Launch the Filmora Video Editor, with its aspect ratio set to 9:16 since it’s downloaded the TikTok video. Then, to access the editing panel, choose “New Project“ from the menu bar.
Step 2: Drag and drag the video right into the interface to edit it. Alternatively, you can choose “Add files“ from the drop-down menu by clicking the “+” button. Using the media library, drag and drop the video you wish to slow down onto the timeline once added to the project.
Step 3: To access the speed control panel, pick the video on the timeline and right-click on it, then choose “Speed“ from the context menu, and then select Speed and Duration option.
You may adjust the video speed by dragging the slider to the right or left as needed.
Note: The Filmora Video Editor enables you to modify the playback speed to as little as TEN times slower than the actual speed of the video.
After that, you may use various editing tools to create your video one-of-a-kind and spectacular, depending on your requirements.
Step 5: It’s time to save your modified movie clip to your device. Click the Export button to save the video to your local or share to YouTube or Vimeo directly.
Conclusion
Well, now you know how you can add the slo-mo effect on Slow Motion TikTok videos. We have covered the most straightforward steps with their respective screenshots that will give you a proper illustration to help you make and apply slow-motion effects to your videos. In the end, for PC users, you can even use Wondershare Filmora to apply slow-motion effects to your videos on PC. It’s one of the best and most easy-to-use software for PC users.
The Art of Augmentation: Creating Big Head Scenes for TikTok
On TikTok, the Big head effect is commonly employed by content producers to generate humorous videos. In particular, the Big head filter may be utilized for various creative production projects, including caricature films, memes, and teaching.
How to get that TikTok Big Head effect? Would you like to make your head look larger than your body in TikTok videos or photos? It’s effortless to do on your Android smartphone. The best part is that we will show you how to use a Big head filter on different applications in this article and how to edit it. Aside from TikTok, there’s another software you can use to enlarge your head in videos or images. Let’s show you!
In this article
01 How to Get the Big Head Filter on TikTok?
02 How to Make a Big Head Effect in CapCut?
03 How to Add Big Head Effect in Filmora Video Editor? [3 Ways]
Part 1: How to Get the Big Head Filter on TikTok?
The TikTok Big Head effect is an extremely entertaining filter. TikTok is a social media platform that specializes in sharing short video content. Its consumer subscription has surpassed Facebook, Instagram, Twitter, and even Snapchat, and its download percentages are much greater than those of the above said social networking sites.
The TikTok Big Head effect on TikTok, on the other hand, was so widespread that it began to be used by more prominent ‘TikTokers.’ Afterward, in a single glance, all users of the social networking in concern began to use it on TikTok live broadcasts. This is how you can use the TikTok Big Head effect:
Step 1: Go to TikTok’s Discover menu to access the Big Head effects.
Step 2: Type “Big Head“ or #bighead into the search bar and choose the top hashtag**_, #bighead_**. Each TikTok video that employs a Big Head filter would then be displayed.
Step 3: To test out a filter, choose one of the numerous videos available and look for the filter’s name in the lower-left corner.
Step 4: Try pressing on the filter’s title, then touch on the Camera icon at the bottom of the display to make a TikTok video employing the Big Head filter in concern.
Here is a detailed video tutorial about how to make a big head effect in TikTok directly.
Part 2: How to Make a Big Head Effect in CapCut?
CapCut is a content creation application that lets users apply various stickers, filters , and effects to their videos. It also has an essential green screen function, a zooming capability that acts like a Ken Burns effect , and many more features.
With the CapCut software, you can quickly enlarge your head in videos. With a single click of the big head effect, your head would instantly become larger than your body. Here’s how to do it step by step:
Step 1: In the CapCut software, create a New Project and then upload a video in which you will enlarge your head.
Step 2: Click the Effects option at the bottom of the display, and then tap the Facial or Body Effects option.
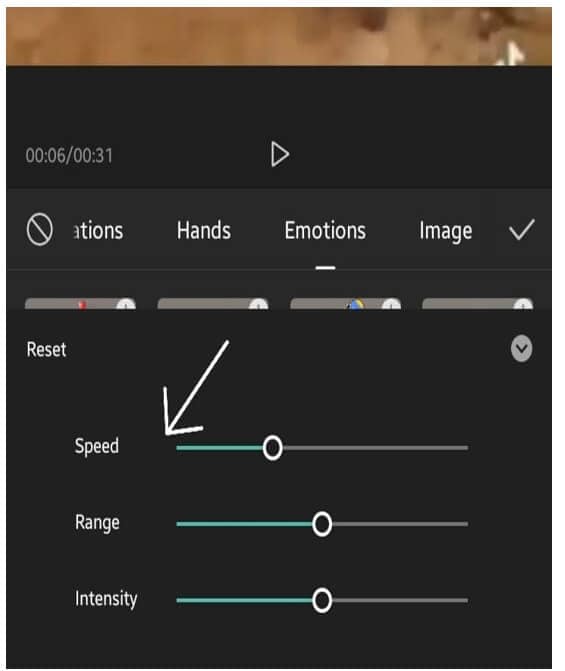
Step 3: Locate and choose the Big Head effect from the Emotions effect section.
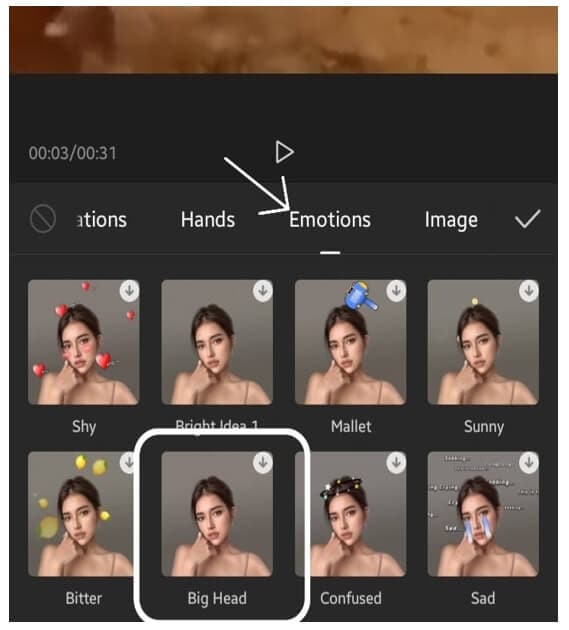
Step 4: The big head effect may be modified in speed, range, and intensity. Finally, adjust the duration of the Big head effect to match the video’s length.
You can check the video tutorial below to find out more details in creating big head and small body effect on video with CapCut.
Part 3: How to Add Big Head Effect in Filmora Video Editor? [3 Ways]
Filmora video editor by Wondershare includes the typical overlays, transitions, trimming, as well as the effects that we’ve grown to expect from the enthusiast-level video editor. It features a user-friendly interface that is clean, minimalistic, and dark. If that wasn’t enough, we’re sure you’ll be pleased to learn that the Filmora program can be used to create the TikTok big head effect in several ways.
With all of the characteristics we’ve discussed so far, you may further customize the Big Head effect with various Filmora effects. Let’s show you how:
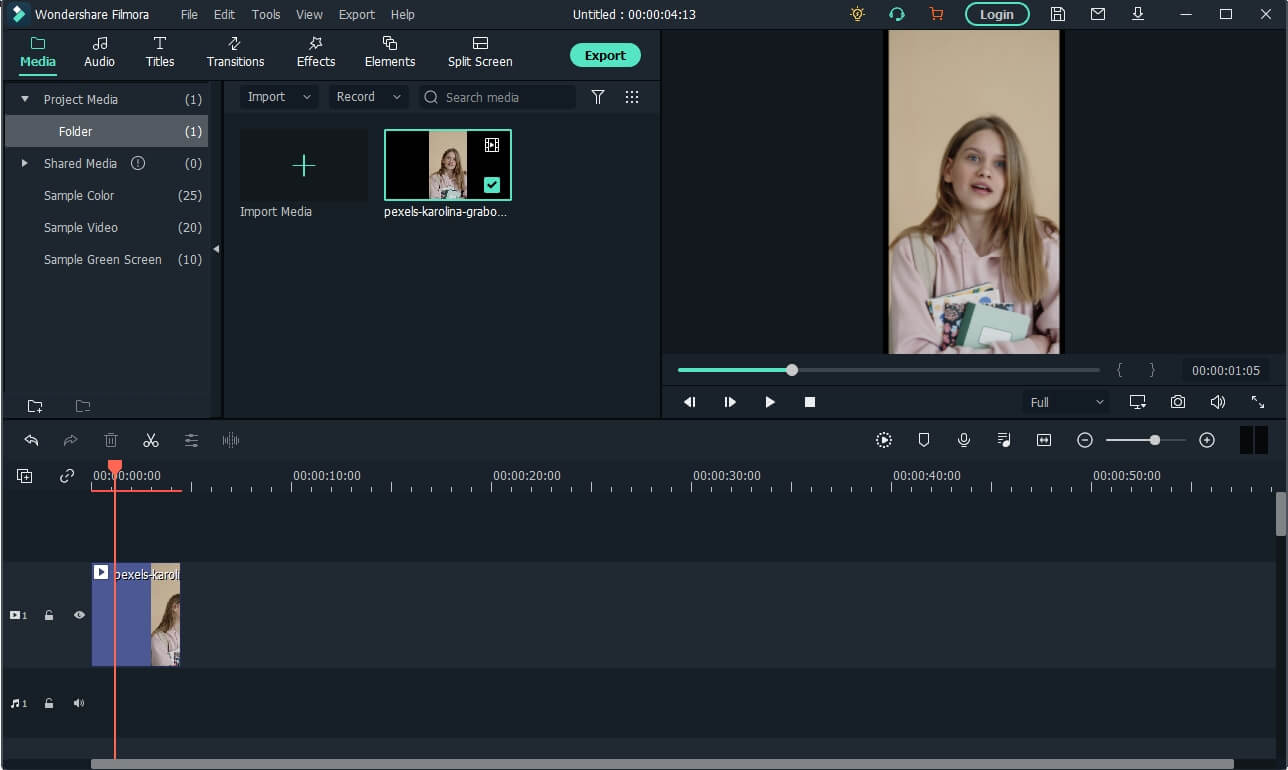
Launch Filmora and click on the Import tab to select the video file you want to use. And then drag and drop the imported media file onto the timeline panel.
For Win 7 or later (64-bit)
For macOS 10.12 or later
Method 1: Create Big Head with AR Stick Bubble Head Effect in Filmora Video Editor
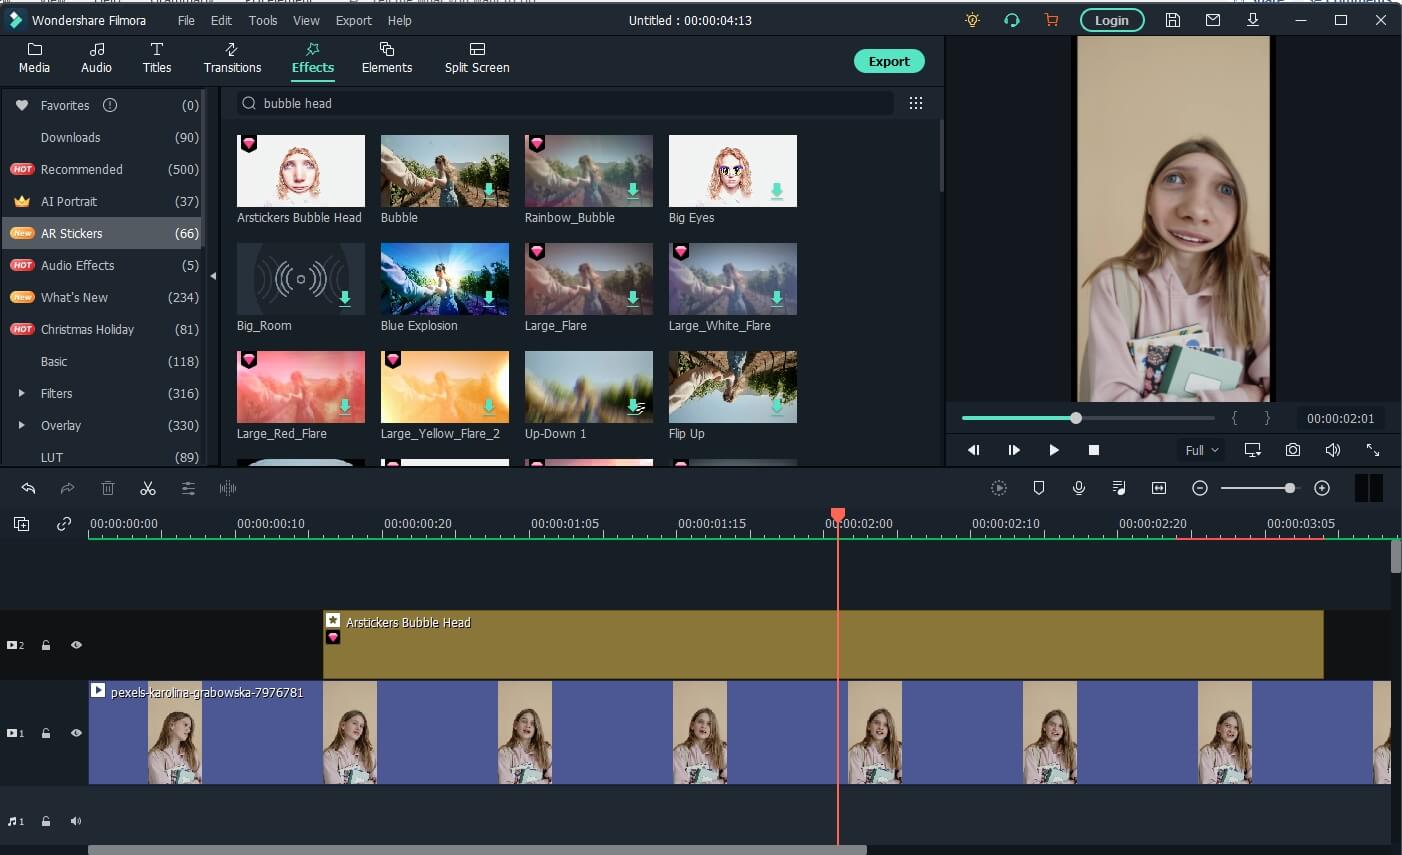
To add the Big Head effect on Filmora, click on the Effects option and select the AR Stickers option. Type bubble head in the search bar and then you will see it in the screen. Then, drag and drop the AR Stickers Bubble Head effect onto the timeline**,** specifically to the portion of the video where you want to add the Big Head filter on the person. As you do that, you will see a Bubble present on the video.
Besides the bubble head effect, there are many more AR stickers available, such as heart eyes, censor bar, emojis, and big eyes. Download the Filmora video editor now and check it yourself.
For Win 7 or later (64-bit)
For macOS 10.12 or later
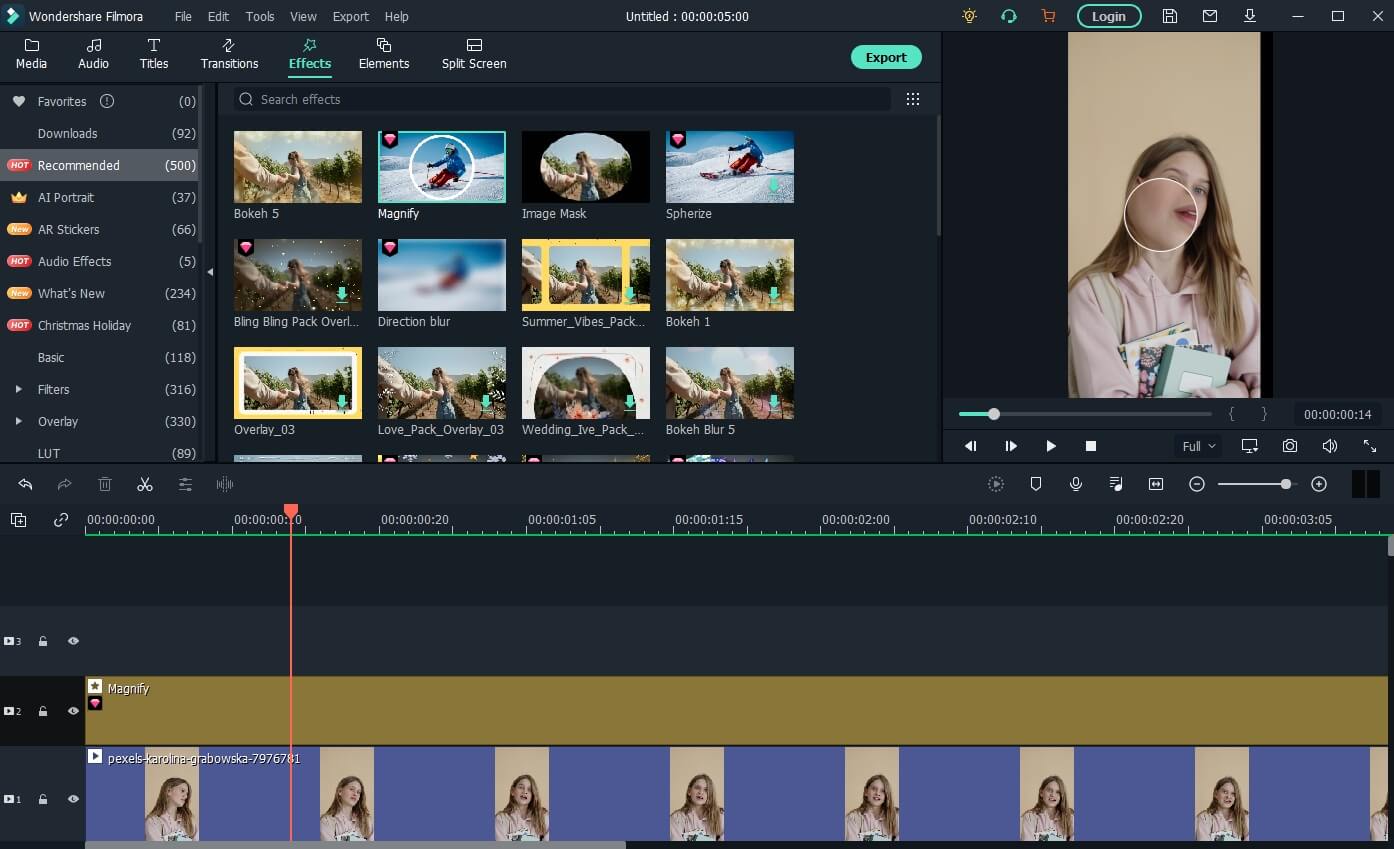
Method 2: Add Magnify Effect to Video
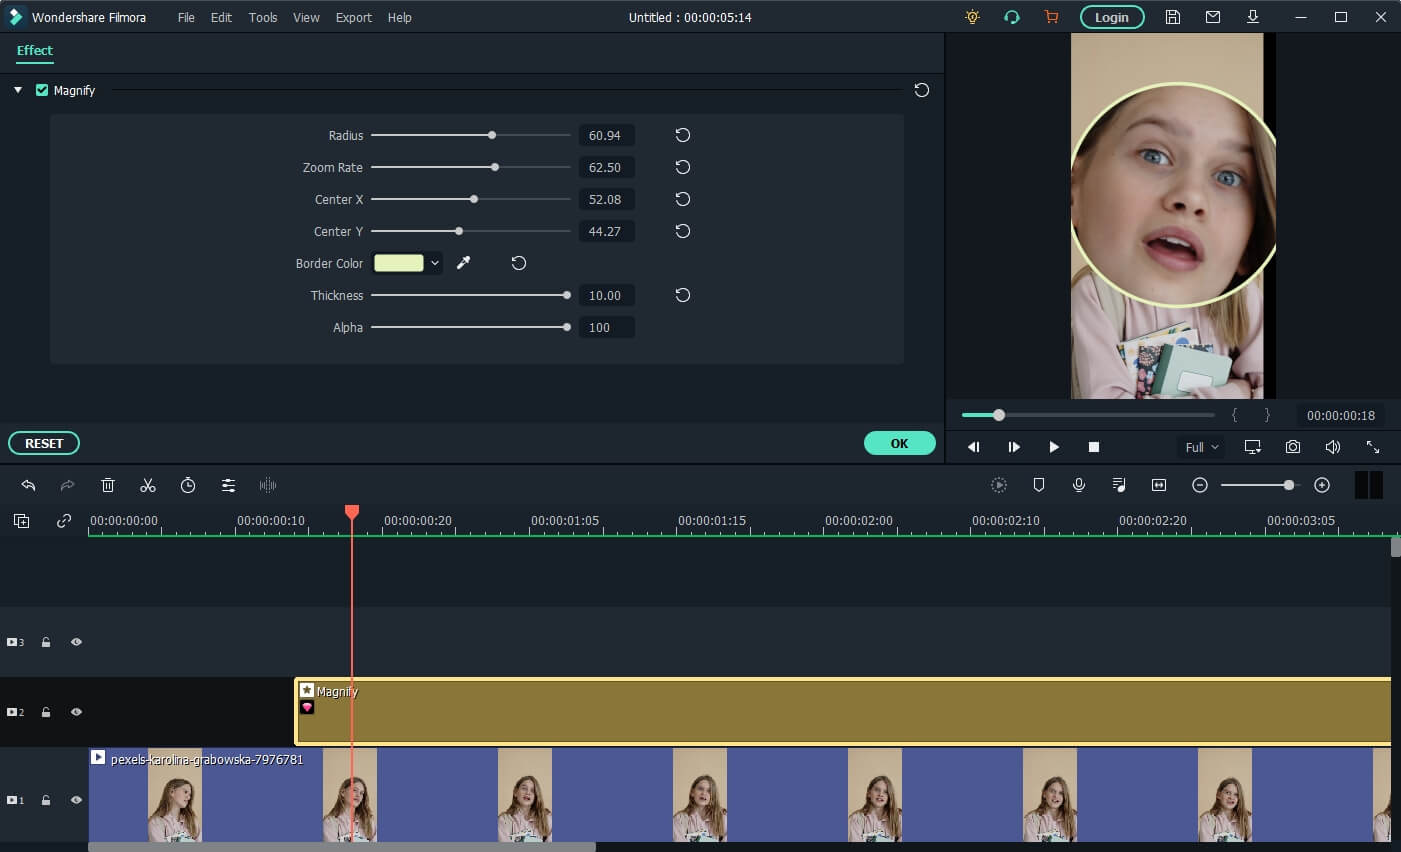
In the Effects tab, go to the Recommended category, and then you will see the magnify effect. Drag and drop it to the timeline above the video track, and you will see part of the video has been magnified accordingly.
Now, double click on the effect in the timeline and open the Properties of the magnify effect. From the Properties section, you can adjust the size of the bubble using functions such as the Radius, CenterY, CenterX, Alpha, Zoom rate, etc to get a better video with big head effects.
Note: If you’re unable to locate the Magnify option in the Effects tab, please download and install the latest version of Filmora, and then type “Magnify” in the search bar, and the system will directly take you to where the option is present.
Method 3: Use Mask and Scale to Make a Video with Big Head Effect
Besides adding magnify effects and bubblehead effects, you can also use the mask preset to create a big head effect in Filmora.
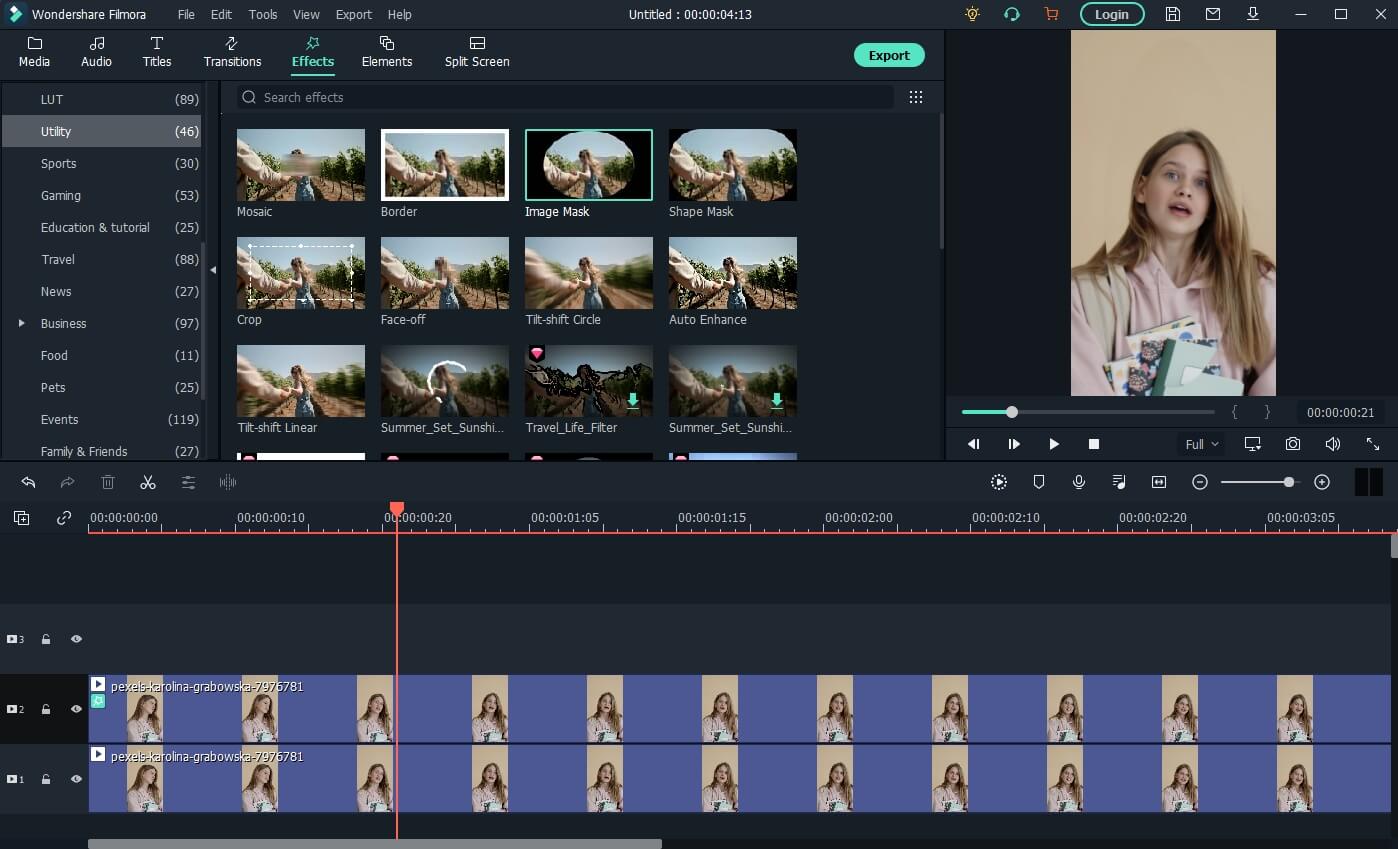
Drag and drop the video to video track 1 and video track 2 respectively in Filmora. Then go to the Effect tab, and scroll down to the Utility category, and place the Image Mask effect to the video above. Or, you can type image mask in the search bar to locate it quickly.
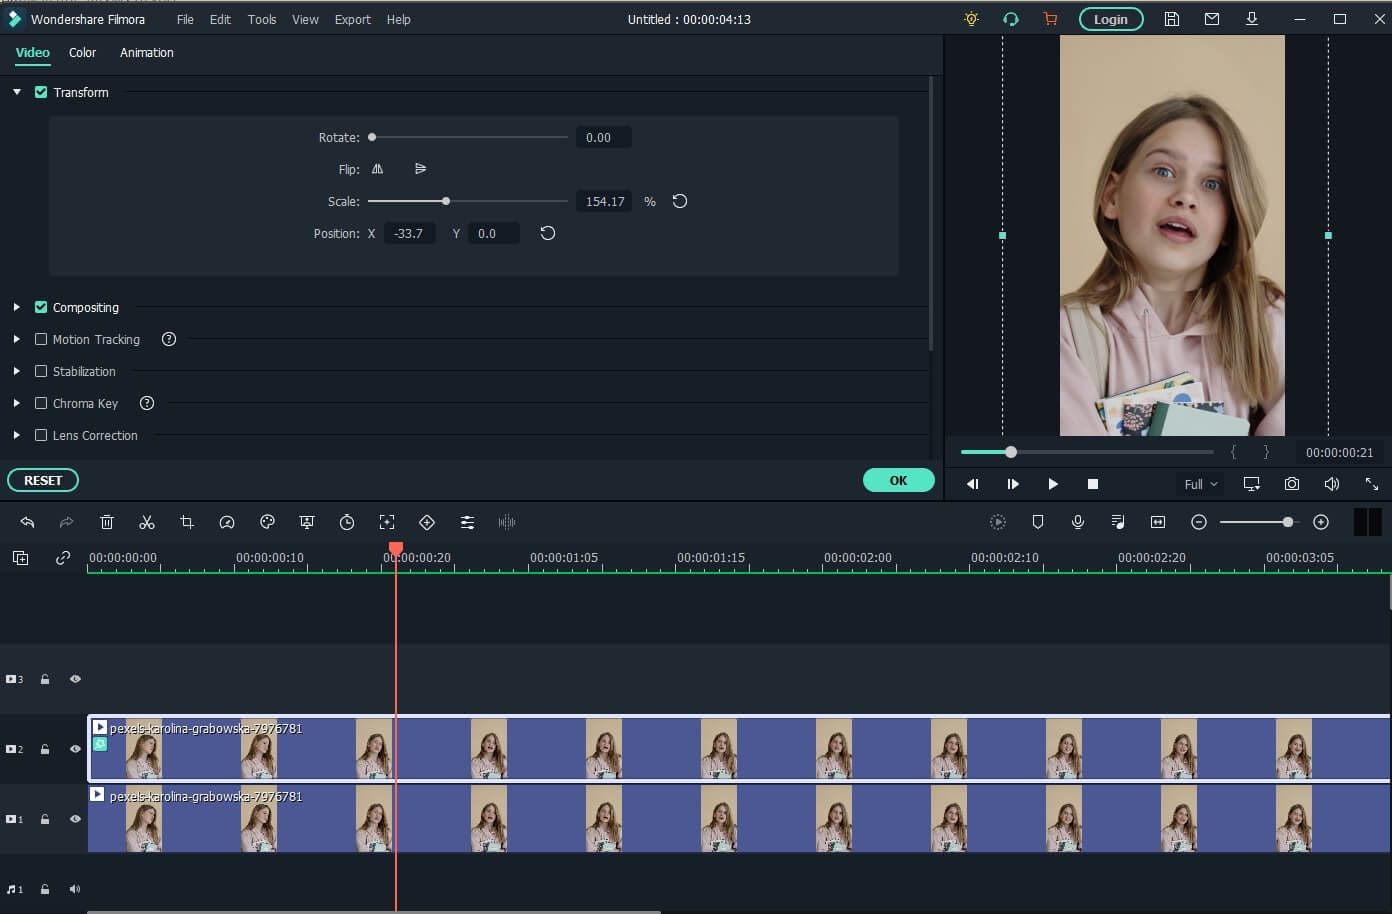
Now, double-click the video with the image mask to adjust the properties. Scroll down to the Video Effects field, and you will see the Image Mask. Click the arrow icon to choose a mask preset, adjust its position and size settings to fit the video.
Tips: You can hide the video in track 1 by clicking the eye icon so you can adjust the video with the image mask conveniently. Click it again then you will see the video.
Next, click the video in track 2 again, and then go to the Transform tab, use the Scale slider to adjust the video size to make a big head effect.
Watch the video tutorial below to find out how to use the Image Mask effect to create a video with a big head effect in Filmora.
For Win 7 or later (64-bit)
For macOS 10.12 or later
After creating the video with a big head effect, click the Export button on the screen to save the video on the computer, and then upload it to TikTok from your computer directly.
Conclusion
This article demonstrates the steps you need to take to add the TikTok Big Head filter to your videos. Remember, the Big Head filter is used to make videos more amusing for entertainment purposes.
Not only TikTok, but different apps such as CapCut on Android and Wondershare Filmora on PC can be of great use to you. Especially in Filmora, you get tons of video editing features that unlock your way into the editing world!
02 How to Make a Big Head Effect in CapCut?
03 How to Add Big Head Effect in Filmora Video Editor? [3 Ways]
Part 1: How to Get the Big Head Filter on TikTok?
The TikTok Big Head effect is an extremely entertaining filter. TikTok is a social media platform that specializes in sharing short video content. Its consumer subscription has surpassed Facebook, Instagram, Twitter, and even Snapchat, and its download percentages are much greater than those of the above said social networking sites.
The TikTok Big Head effect on TikTok, on the other hand, was so widespread that it began to be used by more prominent ‘TikTokers.’ Afterward, in a single glance, all users of the social networking in concern began to use it on TikTok live broadcasts. This is how you can use the TikTok Big Head effect:
Step 1: Go to TikTok’s Discover menu to access the Big Head effects.
Step 2: Type “Big Head“ or #bighead into the search bar and choose the top hashtag**_, #bighead_**. Each TikTok video that employs a Big Head filter would then be displayed.
Step 3: To test out a filter, choose one of the numerous videos available and look for the filter’s name in the lower-left corner.
Step 4: Try pressing on the filter’s title, then touch on the Camera icon at the bottom of the display to make a TikTok video employing the Big Head filter in concern.
Here is a detailed video tutorial about how to make a big head effect in TikTok directly.
Part 2: How to Make a Big Head Effect in CapCut?
CapCut is a content creation application that lets users apply various stickers, filters , and effects to their videos. It also has an essential green screen function, a zooming capability that acts like a Ken Burns effect , and many more features.
With the CapCut software, you can quickly enlarge your head in videos. With a single click of the big head effect, your head would instantly become larger than your body. Here’s how to do it step by step:
Step 1: In the CapCut software, create a New Project and then upload a video in which you will enlarge your head.
Step 2: Click the Effects option at the bottom of the display, and then tap the Facial or Body Effects option.
Step 3: Locate and choose the Big Head effect from the Emotions effect section.
Step 4: The big head effect may be modified in speed, range, and intensity. Finally, adjust the duration of the Big head effect to match the video’s length.
You can check the video tutorial below to find out more details in creating big head and small body effect on video with CapCut.
Part 3: How to Add Big Head Effect in Filmora Video Editor? [3 Ways]
Filmora video editor by Wondershare includes the typical overlays, transitions, trimming, as well as the effects that we’ve grown to expect from the enthusiast-level video editor. It features a user-friendly interface that is clean, minimalistic, and dark. If that wasn’t enough, we’re sure you’ll be pleased to learn that the Filmora program can be used to create the TikTok big head effect in several ways.
With all of the characteristics we’ve discussed so far, you may further customize the Big Head effect with various Filmora effects. Let’s show you how:
Launch Filmora and click on the Import tab to select the video file you want to use. And then drag and drop the imported media file onto the timeline panel.
For Win 7 or later (64-bit)
For macOS 10.12 or later
Method 1: Create Big Head with AR Stick Bubble Head Effect in Filmora Video Editor
To add the Big Head effect on Filmora, click on the Effects option and select the AR Stickers option. Type bubble head in the search bar and then you will see it in the screen. Then, drag and drop the AR Stickers Bubble Head effect onto the timeline**,** specifically to the portion of the video where you want to add the Big Head filter on the person. As you do that, you will see a Bubble present on the video.
Besides the bubble head effect, there are many more AR stickers available, such as heart eyes, censor bar, emojis, and big eyes. Download the Filmora video editor now and check it yourself.
For Win 7 or later (64-bit)
For macOS 10.12 or later
Method 2: Add Magnify Effect to Video
In the Effects tab, go to the Recommended category, and then you will see the magnify effect. Drag and drop it to the timeline above the video track, and you will see part of the video has been magnified accordingly.
Now, double click on the effect in the timeline and open the Properties of the magnify effect. From the Properties section, you can adjust the size of the bubble using functions such as the Radius, CenterY, CenterX, Alpha, Zoom rate, etc to get a better video with big head effects.
Note: If you’re unable to locate the Magnify option in the Effects tab, please download and install the latest version of Filmora, and then type “Magnify” in the search bar, and the system will directly take you to where the option is present.
Method 3: Use Mask and Scale to Make a Video with Big Head Effect
Besides adding magnify effects and bubblehead effects, you can also use the mask preset to create a big head effect in Filmora.
Drag and drop the video to video track 1 and video track 2 respectively in Filmora. Then go to the Effect tab, and scroll down to the Utility category, and place the Image Mask effect to the video above. Or, you can type image mask in the search bar to locate it quickly.
Now, double-click the video with the image mask to adjust the properties. Scroll down to the Video Effects field, and you will see the Image Mask. Click the arrow icon to choose a mask preset, adjust its position and size settings to fit the video.
Tips: You can hide the video in track 1 by clicking the eye icon so you can adjust the video with the image mask conveniently. Click it again then you will see the video.
Next, click the video in track 2 again, and then go to the Transform tab, use the Scale slider to adjust the video size to make a big head effect.
Watch the video tutorial below to find out how to use the Image Mask effect to create a video with a big head effect in Filmora.
For Win 7 or later (64-bit)
For macOS 10.12 or later
After creating the video with a big head effect, click the Export button on the screen to save the video on the computer, and then upload it to TikTok from your computer directly.
Conclusion
This article demonstrates the steps you need to take to add the TikTok Big Head filter to your videos. Remember, the Big Head filter is used to make videos more amusing for entertainment purposes.
Not only TikTok, but different apps such as CapCut on Android and Wondershare Filmora on PC can be of great use to you. Especially in Filmora, you get tons of video editing features that unlock your way into the editing world!
Also read:
- Embracing Whimsy Cartoon Face Magic in Snapchat
- [Updated] Effortless OOTD Videography for Mac Users on TikTok
- [Updated] Navigating Through TikTok’s Rich Content Ecosystem (Dances, Songs & Memes) for 2024
- [New] In 2024, Mouthwatering Moments 10 Viral Food Trends on TikTok
- [New] In 2024, Storing TikTok Videos An Easy Guide for Smartphone Owners
- 2024 Approved Unlock the Full Power of Apple's Siri with Integrated Voice Control on TikTok
- [Updated] In 2024, Best Budget TikTok Cuts and Enhancements for Macs
- [New] 2024 Approved Can’t Miss These Hot TikTok Goodies Available at Amazon
- IPhone Mastery Seamless TikTok Video Acquisition for 2024
- [Updated] Top 5 TikTok GIF Tools Mastering Video-to-GIF Transformations for 2024
- [New] The Ultimate Guide to Capturing Memorable Moments on TikTok with Filmmaker Tools
- [Updated] Boosting Visibility on TikTok with Smart Hashtags for 2024
- [Updated] Safety First Where to Buy Followers on TikTok Responsibly
- [Updated] Foodie Fads The #Tiktok Treat that Took Over for 2024
- Jumpstart Your Cash with These 8 Innovative TikTok Methods for 2024
- [New] Advanced Techniques to Skip Content on TikTok
- TikTok Video Steal Mode IPhone Edition for 2024
- In 2024, What's Outside of TikTok? A Curated List of Popular Channels
- Essential Tips for Keeping Up with TikTok’s New Wave
- [New] Essential Steps to Shoot Stunning Slow Mo Videos for TikTok
- [New] Quick Recovery Preventing Accidental TikTok Refreshes
- [New] 2024 Approved Flex Your Content Collection with TikTok Downloads
- [New] The Top 8 TikTok Hacks for Maximizing Income for 2024
- IPhone Users Unobstructed TikTok Video Access
- [Updated] 2024 Approved Compreeved List of Top 10 PC-Based TikTok Creators
- 2024 Approved Mastering the Art of Imitation for a Unique and Authentic TikTok Presence
- [Updated] Craft Your Masterpiece on TikTok Adding Professional Voiceovers for 2024
- [Updated] In 2024, Unleash Viral Potential Top 50+ Trending TikTok HashTags
- [New] In 2024, Discovering TikTok's Artistic Expressions & Internet Fads
- Binge-Worthy Viral Video Roundup on TikTok
- 2024 Approved Elevate Your Virtual Self The Art of Replicating Oneself on TikTok
- [New] 2024 Approved Rhythmic Rollercoaster Jumping on the Wave of Top Rapping Songs
- [New] In 2024, The Final Act of Severing TikTok Ties Temporarily
- 2024 Approved Unleash Creative Potential on TikTok Perfecting Sound and Visual Sync
- [New] 2024 Approved Becoming an Exclusive Guest on TikTok Live
- Elevate Your TikTok Experience with Proficient Voicework for 2024
- [Updated] 2024 Approved Choreographing a Memorable TikTok Fade-Out
- The Ultimate Guide to the Best 7 TikTok Apps for Success for 2024
- [New] In 2024, Unleash Your Creative Side with Top PFP Ideas for TikTok
- [New] In 2024, Unlock the Power of Live Broadcasting with TikTok From PC
- [New] In 2024, Top TikTok Ad Techniques Engaging Audienrances & Showcasing Successes
- Issues playing MKV video on Moto G Stylus 5G (2023)
- [New] 2024 Approved Master the Art of Sharing Funny GIFs Instagram's Latest Trend Explained in 4 Steps
- [Updated] The Ultimate Guide to Open-Source Screencasting Tools
- In 2024, 5 Easy Ways to Copy Contacts from Oppo Reno 10 5G to iPhone 14 and 15 | Dr.fone
- [Updated] In 2024, Incorporating Instagram's Cutting Edge Filters
- How to recover deleted photos from Android Gallery after format on OnePlus 12R
- Navigating Instagram's Restrictions for Larger Posts for 2024
- In 2024, 9 Mind-Blowing Tricks to Hatch Eggs in Pokemon Go Without Walking On Motorola Defy 2 | Dr.fone
- The Best iSpoofer Alternative to Try On Tecno Spark 10 5G | Dr.fone
- In 2024, Pattern Locks Are Unsafe Secure Your Infinix Hot 40 Phone Now with These Tips
- In 2024, A How-To Guide on Bypassing iPhone 15 Pro Max iCloud Activation Lock
- [Updated] In 2024, Leading Third-Place iPad Recording Software Guide
- [Updated] Tactics to Make FB Videos Attractive and Effective for 2024
- New 2024 Approved Cease iPhones Acoustic Level Modulation
- [New] Mastering Instagram's Newest Feature Reels Explained
- Find My App Troubleshooting No Location Found vs. Location Not Available & How to Fix Them On Apple iPhone 12 Pro Max | Dr.fone
- In 2024, Cutting-Edge SplitCams Rated or Not?
- Updated 2024 Approved FREE 10 Best Online Music Makers
- [Updated] High Definition Playtime Best HDMI 2.1 Gaming Displays [PS5 Compatible]
- In 2024, Two Ways to Track My Boyfriends Samsung Galaxy M54 5G without Him Knowing | Dr.fone
- Updated Audio Time Travel Discovering Leading Audio Reverser Technology
- Updated 2024 Approved The Artistic Edge of Professional Sound Editing Software Analyzing Features, Advantages, Limitations, and Competitive Overview
- In 2024, Full Guide on Mirroring Your OnePlus Nord CE 3 5G to Your PC/Mac | Dr.fone
- Easy steps to recover deleted messages from Honor X7b
- [Updated] Windows PC Broadcasting Manual A Comprehensive Live TV Recording Guide for 2024
- [Updated] 2024 Approved Transform Your Broadcasts 5 Advanced Recording Methods Web
- Updated 2024 Approved Top 4 Elon Musk Voice Generator Programs to Make You Sound Like the Billionaire
- [Updated] 2024 Approved Cultivating Connections Friendly Games Growth with Friends on Farms
- In 2024, How and Where to Find a Shiny Stone Pokémon For Realme GT Neo 5? | Dr.fone
- In 2024, Latest way to get Shiny Meltan Box in Pokémon Go Mystery Box On Oppo K11 5G | Dr.fone
- New Looking for a Great Way to Make Your Own Anime Music Video? The Following Are the Top AMV Makers to Choose From
- Updated In 2024, Voice to Word Made Easy Discovering the Best Free Android and iOS Transcription Tools
- In 2024, How to Show Wi-Fi Password on Realme 11 Pro+
- Title: "[Updated] From Beginner to Pro The Ultimate Guide to Slow Motion on TikTok for 2024"
- Author: Gary
- Created at : 2024-05-23 07:31:23
- Updated at : 2024-05-24 07:31:23
- Link: https://tiktok-clips.techidaily.com/updated-from-beginner-to-pro-the-ultimate-guide-to-slow-motion-on-tiktok-for-2024/
- License: This work is licensed under CC BY-NC-SA 4.0.
