
Secrets of Crafting an Exclusive Identifier on TikTok
Secrets of Crafting an Exclusive Identifier on TikTok
TikTok is one of the most famous social media platforms that many people use on a daily basis. Due to high traffic on TikTok, you can reach a larger audience instantly. Through TikTok, you can efficiently market and promote your e-commerce products with live streaming. Moreover, if you are holding an event or conference, you can connect with multiple people through TikTok live streaming.
If you are willing to live stream on TikTok through your PC, you would need a TikTok stream key. To know how to get the TikTok stream key, this article will help you.
Part 1: What is Stream Key?
A stream key is a combination of random letters and numbers which stores the information of your account. It allows different streaming software to live stream your video on your preferred platform. To use streaming software such as OBS Studio for live streaming, the stream key will help you connect with your preferred platform.
If you are using the YouTube platform, its stream key will consist of all the related information, such as login details and permissions. That’s why you should keep the streaming key of your platform confidential. Thus, the stream key can prevent you from hassle as you don’t have to sign in with your YouTube account on OBS Studio for live streaming.
Part 2: How to Get your Own TikTok Stream Key?
Before jumping on how to get the TikTok stream key, there are some basic requirements. To check the prerequisites, read the below points:
- To use the live stream feature on TikTok, you need to have 1,000 followers.
- There is an age restriction to use this feature. You should be 16 years old or older.
- To send and receive virtual gifts during your live stream, the age restriction is 18 years old.
Easy Steps to Get TikTok Stream Key Instantly
Do you want to know how to find TikTok stream key? A streaming key can significantly help you to connect with your platform to ensure high-quality live streaming. Check the following instructions to get your TikTok streaming key quickly.
Step1 Go to Live Option
Launch the TikTok app on your iPhone or Android device and tap on the “Plus” icon given below. Now tap on the “Live” option by scrolling right on your screen.
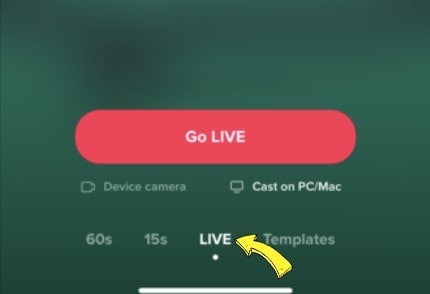
Step2 Copy the Streaming Key
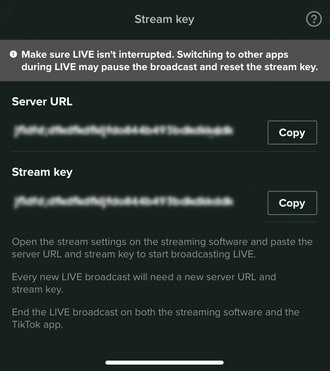
Afterward, tap “Cast/Connect to PC/Mac” and select the “Go Live” button. Now you will be able to see the TikTok Stream Key and Server URL. You can tap on the “Copy” button given adjacent to the stream key and server URL. Make sure to copy both things carefully because they will be used in a later process.
Part 3: How to Go Live on TikTok with your Streaming Key?
Once you have gotten your stream key and server URL, now you can go live on TikTok through different streaming platforms. Read this section to learn how to live stream TikTok using the best streaming software.
Way 1. With OBS
OBS Studio is a famous streaming software that is used by professionals and experts. It is used for high-quality streams with additional features. It has an integrated video encoder that functions with great versatility. Along with producing live content, OBS Studio also offers an efficient screen recorder. Using this software, you can effectively add text and graphics to your video content.
In its clean interface, you have complete freedom to set your hotkeys. Using the hotkeys, you can complete a specific action instantly. While broadcasting your live stream, you can choose your preferred resolution on this software. Hence, it’s a great tool to live stream your TikTok flawlessly.
Instructions to Go Live on TikTok Via OBS Studio
OBS Studio is an advanced broadcasting software offering high-end results. To use OBS for live streaming on TikTok, check the below instructions:
Step1 Navigate to Stream Section
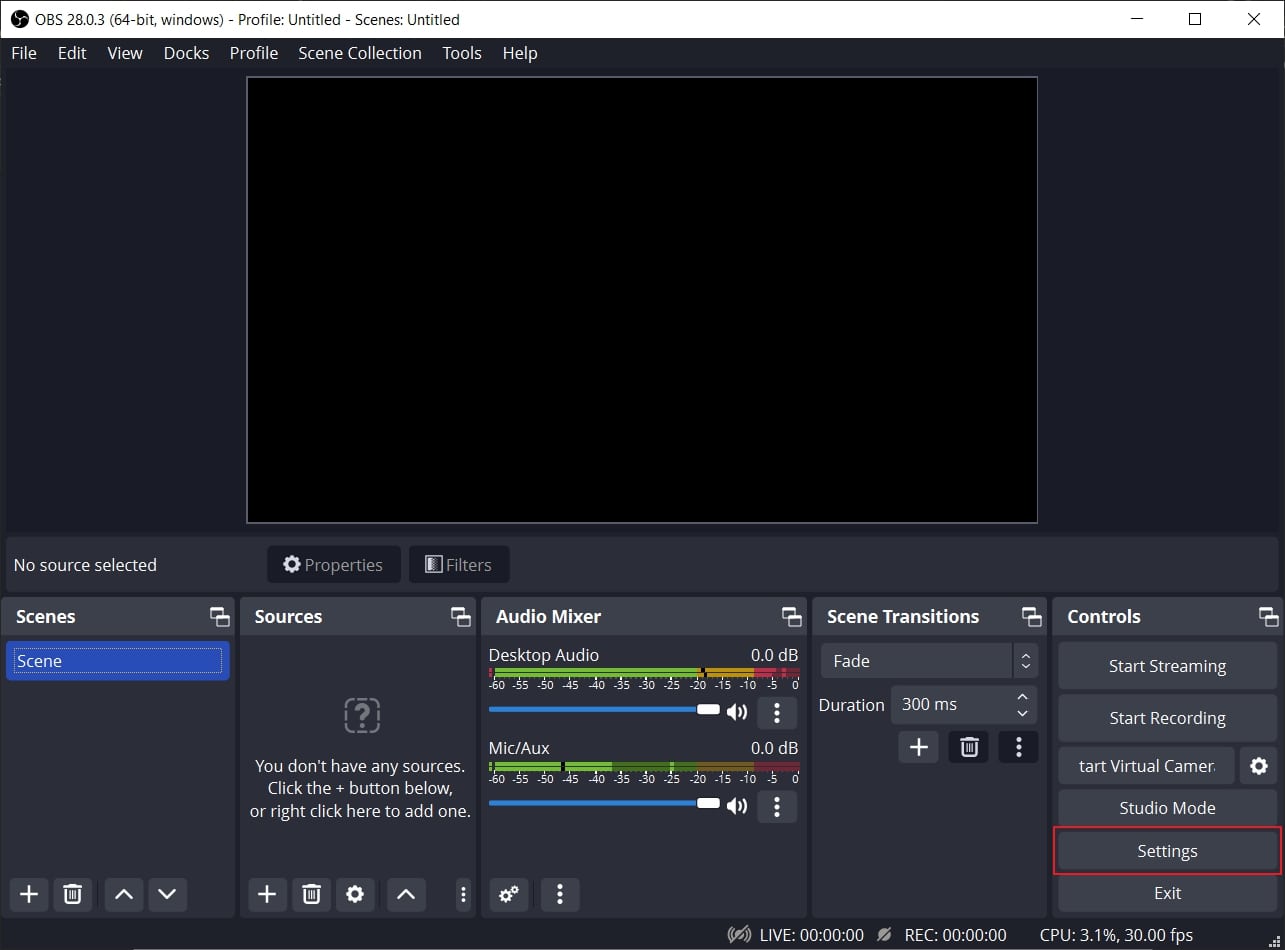
Launch OBS Studio on your PC and click “Settings” under the “Controls” section. On the new window, select “Stream” from the left section.
Step2 Enter Server URL and the Stream Key
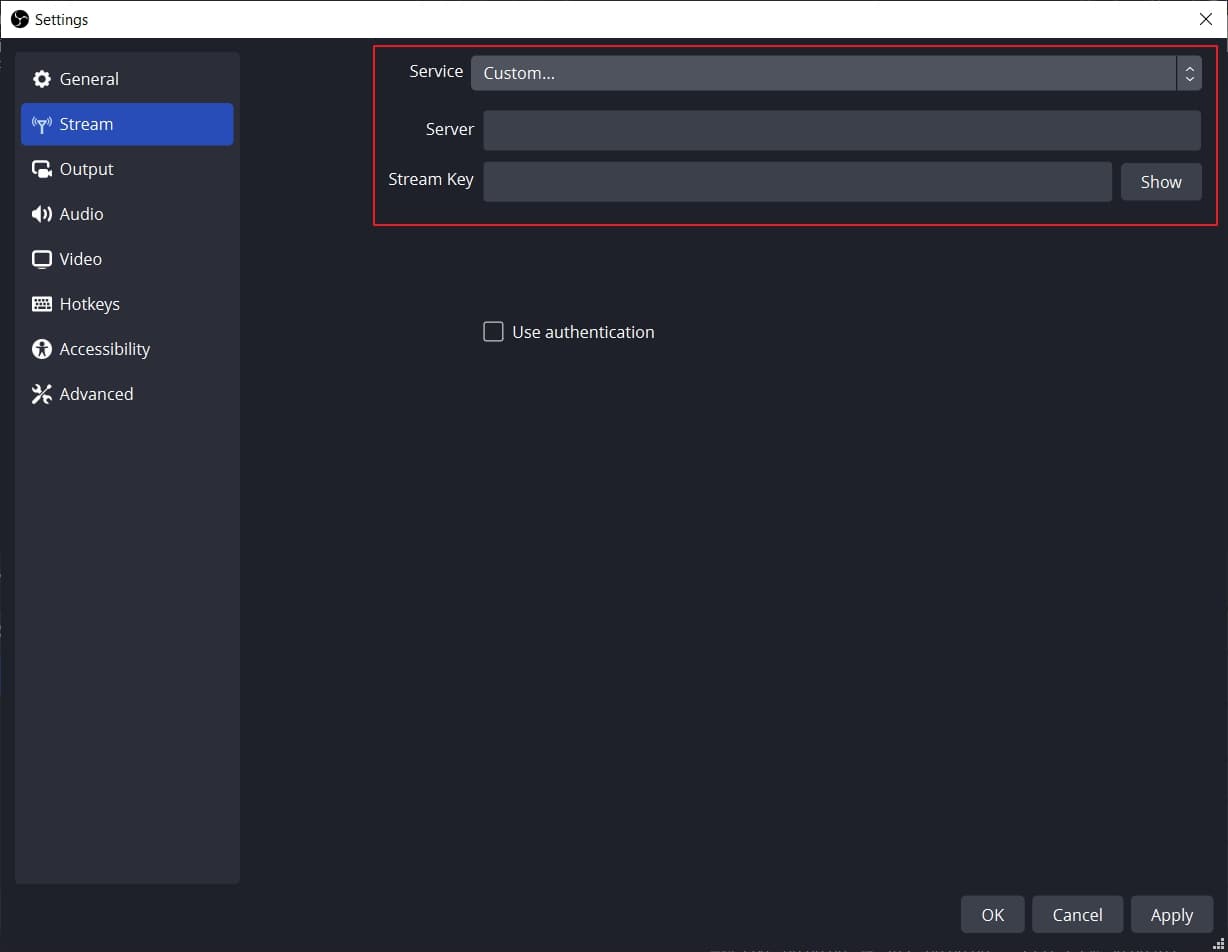
On the Stream window, select “Custom” on the “Service” option. Once done, enter the Server and Stream Key on the given boxes. Now hit the “Apply” button to proceed with the process of getting live on TikTok with OBS.
Way 2. With Streamlabs
Streamlabs is an all-in-one streaming software that produces captivating results in a cost-effective manner. It shows compatibility with mainstream platforms like YouTube, Twitter, Discord, etc. This software consists of professional themes and overlays that you can utilize during live streaming. Furthermore, it supports multi-streaming, through which you can go live on various platforms simultaneously.
Using Streamlabs, you can get customizable alerts during your live stream. This will help you to check the feedback of your supporters quickly. Hence, Streamlabs is an excellent platform through which you can connect and engage with your audience effortlessly.
Instructions to Go Live on TikTok Using Streamlabs
Are you excited to use Streamlabs for conducting live streaming sessions on TikTok? To learn how to go live on TikTok using Streamlabs, here are the simple steps:
Step1 Open Streamlabs Desktop Settings
Download and install Streamlabs Desktop on your PC. Launch its interface and navigate to the “Gear” icon on the left side. It will open the settings of this tool. From the settings menu, choose “Stream” from the left side.
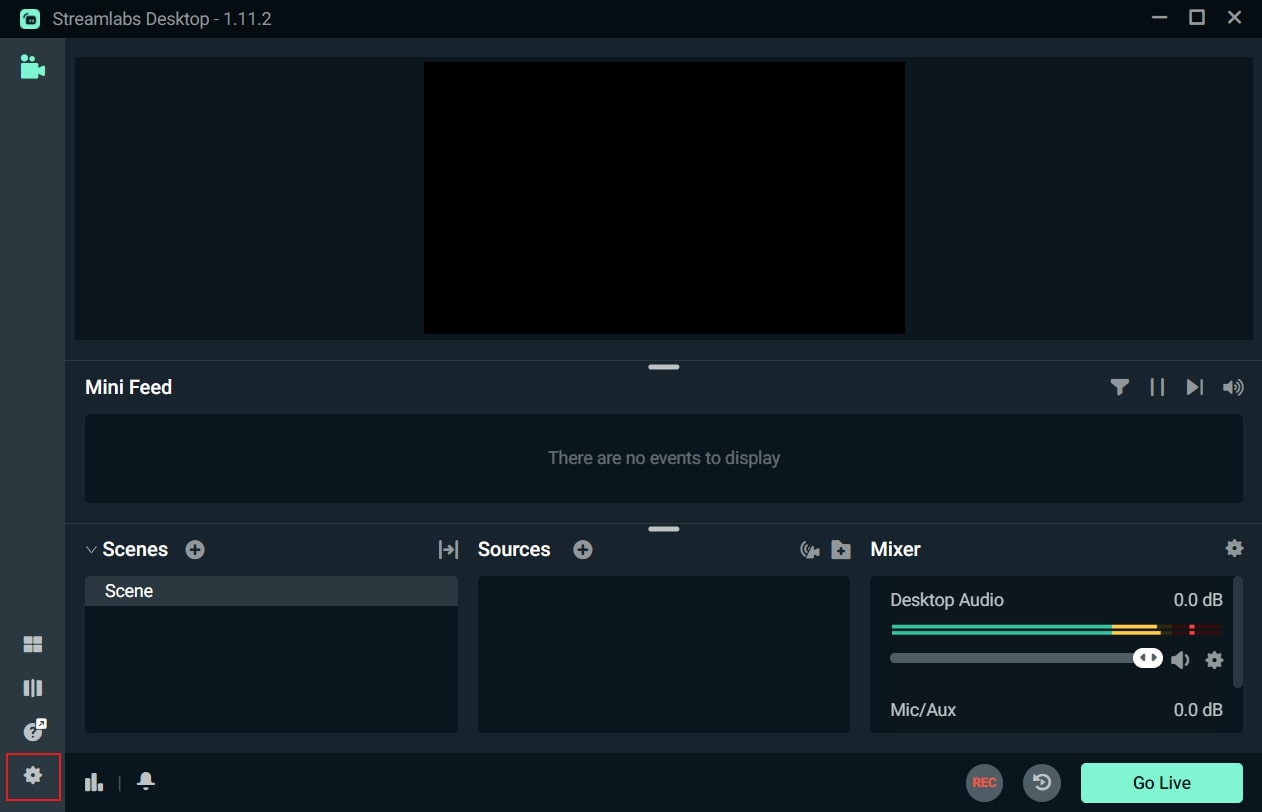
Step2 Add Streaming Key
On the Stream menu, select “Custom Streaming Service” as Stream Type. Afterward, add your Server URL and Stream Key on the given spaces. Once done, click on the “Done” button. Now you can easily go live through this streaming software on TikTok.

Bonus Tips: Easily Record and Edit Your Stream with Filmora
Are you interested in recording your live stream on TikTok? The best tool to capture your live streams efficiently on TikTok is Wondershare Filmora . This screen recorder has the ability to screen record your live streams in your desired resolution. Moreover, while recording your screen, you can simultaneously capture your webcam. It also gives you the option to select the recording area, preferably.
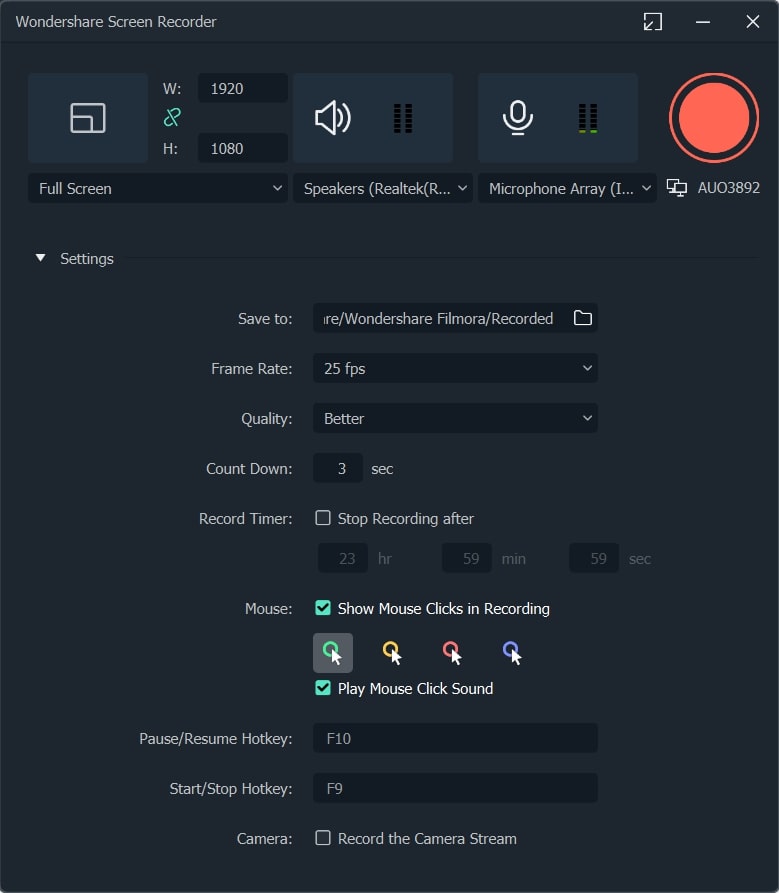
Besides screen recording, Filmora also offers a video editor. This editor offers more than 900 video effects that you can easily apply to your screen recording. Furthermore, you can also adjust the speed of your recorded video through this editor. You can also avail of other options to crop, split, resize, and trim the video. Hence, Filmora works efficiently to screen record and edit your live-stream sessions of TikTok. Watch the video below to learn more about Filmora’s new features.
Conclusion
Live streaming on TikTok is a new trend that many content creators and entrepreneurs are adopting. To go live on TikTok on your desktop, you would need a stream key. This article has provided clear instructions on how to get the TikTok stream key conveniently. Along with that, we have also highlighted a professional software known as Filmora to screen record and edit your TikTok live streaming.
Free Download For Win 7 or later(64-bit)
Free Download For macOS 10.14 or later
Part 1: What is Stream Key?
A stream key is a combination of random letters and numbers which stores the information of your account. It allows different streaming software to live stream your video on your preferred platform. To use streaming software such as OBS Studio for live streaming, the stream key will help you connect with your preferred platform.
If you are using the YouTube platform, its stream key will consist of all the related information, such as login details and permissions. That’s why you should keep the streaming key of your platform confidential. Thus, the stream key can prevent you from hassle as you don’t have to sign in with your YouTube account on OBS Studio for live streaming.
Part 2: How to Get your Own TikTok Stream Key?
Before jumping on how to get the TikTok stream key, there are some basic requirements. To check the prerequisites, read the below points:
- To use the live stream feature on TikTok, you need to have 1,000 followers.
- There is an age restriction to use this feature. You should be 16 years old or older.
- To send and receive virtual gifts during your live stream, the age restriction is 18 years old.
Easy Steps to Get TikTok Stream Key Instantly
Do you want to know how to find TikTok stream key? A streaming key can significantly help you to connect with your platform to ensure high-quality live streaming. Check the following instructions to get your TikTok streaming key quickly.
Step1 Go to Live Option
Launch the TikTok app on your iPhone or Android device and tap on the “Plus” icon given below. Now tap on the “Live” option by scrolling right on your screen.
Step2 Copy the Streaming Key
Afterward, tap “Cast/Connect to PC/Mac” and select the “Go Live” button. Now you will be able to see the TikTok Stream Key and Server URL. You can tap on the “Copy” button given adjacent to the stream key and server URL. Make sure to copy both things carefully because they will be used in a later process.
Part 3: How to Go Live on TikTok with your Streaming Key?
Once you have gotten your stream key and server URL, now you can go live on TikTok through different streaming platforms. Read this section to learn how to live stream TikTok using the best streaming software.
Way 1. With OBS
OBS Studio is a famous streaming software that is used by professionals and experts. It is used for high-quality streams with additional features. It has an integrated video encoder that functions with great versatility. Along with producing live content, OBS Studio also offers an efficient screen recorder. Using this software, you can effectively add text and graphics to your video content.
In its clean interface, you have complete freedom to set your hotkeys. Using the hotkeys, you can complete a specific action instantly. While broadcasting your live stream, you can choose your preferred resolution on this software. Hence, it’s a great tool to live stream your TikTok flawlessly.
Instructions to Go Live on TikTok Via OBS Studio
OBS Studio is an advanced broadcasting software offering high-end results. To use OBS for live streaming on TikTok, check the below instructions:
Step1 Navigate to Stream Section
Launch OBS Studio on your PC and click “Settings” under the “Controls” section. On the new window, select “Stream” from the left section.
Step2 Enter Server URL and the Stream Key
On the Stream window, select “Custom” on the “Service” option. Once done, enter the Server and Stream Key on the given boxes. Now hit the “Apply” button to proceed with the process of getting live on TikTok with OBS.
Way 2. With Streamlabs
Streamlabs is an all-in-one streaming software that produces captivating results in a cost-effective manner. It shows compatibility with mainstream platforms like YouTube, Twitter, Discord, etc. This software consists of professional themes and overlays that you can utilize during live streaming. Furthermore, it supports multi-streaming, through which you can go live on various platforms simultaneously.
Using Streamlabs, you can get customizable alerts during your live stream. This will help you to check the feedback of your supporters quickly. Hence, Streamlabs is an excellent platform through which you can connect and engage with your audience effortlessly.
Instructions to Go Live on TikTok Using Streamlabs
Are you excited to use Streamlabs for conducting live streaming sessions on TikTok? To learn how to go live on TikTok using Streamlabs, here are the simple steps:
Step1 Open Streamlabs Desktop Settings
Download and install Streamlabs Desktop on your PC. Launch its interface and navigate to the “Gear” icon on the left side. It will open the settings of this tool. From the settings menu, choose “Stream” from the left side.
Step2 Add Streaming Key
On the Stream menu, select “Custom Streaming Service” as Stream Type. Afterward, add your Server URL and Stream Key on the given spaces. Once done, click on the “Done” button. Now you can easily go live through this streaming software on TikTok.
Bonus Tips: Easily Record and Edit Your Stream with Filmora
Are you interested in recording your live stream on TikTok? The best tool to capture your live streams efficiently on TikTok is Wondershare Filmora . This screen recorder has the ability to screen record your live streams in your desired resolution. Moreover, while recording your screen, you can simultaneously capture your webcam. It also gives you the option to select the recording area, preferably.
Besides screen recording, Filmora also offers a video editor. This editor offers more than 900 video effects that you can easily apply to your screen recording. Furthermore, you can also adjust the speed of your recorded video through this editor. You can also avail of other options to crop, split, resize, and trim the video. Hence, Filmora works efficiently to screen record and edit your live-stream sessions of TikTok. Watch the video below to learn more about Filmora’s new features.
Conclusion
Live streaming on TikTok is a new trend that many content creators and entrepreneurs are adopting. To go live on TikTok on your desktop, you would need a stream key. This article has provided clear instructions on how to get the TikTok stream key conveniently. Along with that, we have also highlighted a professional software known as Filmora to screen record and edit your TikTok live streaming.
Free Download For Win 7 or later(64-bit)
Free Download For macOS 10.14 or later
The Game Changer: 2 Ways to Elevate Your TikTok Video Creations Using Filmora
How to Make TikTok Reaction Videos Easily in 2 Ways

Shanoon Cox
Mar 27, 2024• Proven solutions
With all the videos of different moods and categories available on the platform, TikTok’s reaction is something that makes the footage more engaging. Available for both iOS and Android platforms, TikTok allows you to record, edit , and compile a video of up to 60 seconds, and apply a plethora of filters and animation effects to them along with adding relevant music to awe your audience.
Considering this, here you will learn how to make TikTok reaction videos with ease from within the app itself, and if that’s not enough, using one of the best and most efficient programs available in the market that can even allow you to add unique effects to the reactions you create.
- Part 1: How to Make React Videos on TikTok
- Part 2: How to Use Snap Filmora to Make TikTok Reaction Videos
Bonus: Create A More Attractive Video with Human Segmentation Effect
The human segmentation effect under AI Portrait allows you to isolate people from video background even without a green screen, and then you can composite it to make a reaction video easily. Watch the video tutorial below to find out more details.


Want to read the texts instead of watching videos? Check the complete guide to making a reaction video in 3 ways .
Part 1: How to React to a TikTok Video
After being equipped with all the worldly knowledge about TikTok reaction videos, you can follow the steps given below to learn how to react to the footage created by other people:
1. Tap Share and Record Your Reaction
Start TikTok, play the video you want to react on, tap the Share icon from the lower-right area, and tap the React option from the Share to menu. Tap Flip from the top-right corner of the Camera screen to switch between the front and rear camera as needed, optionally tap the Mic icon to disable or enable voice and system audio capture, drag and reposition React window according to the source footage, and tap the Record button from the bottom to start shooting your TikTok reaction. Wait while the source clip and your recording process are complete successfully before moving forward to the next step.

2. Apply Filters
Tap the Filters icon from the top-right corner, tap to pick a filter from those available at the bottom, and tap anywhere on the screen to accept the one you selected and to get back to the previous window.

3. Manage Audio
Tap the Mixer icon from the upper-right corner of the screen, drag the My Voice and Soundtrack Volume sliders to manage your voice recording and the internal audio respectively, and tap Done to save the changes once you’re through with the modifications. Back on the previous window, tap Next from the bottom-right corner.

4. Publish the Video
Tap the Who can view this video option to manage your reaction’s visibility settings (optional). Tap the Save to device toggle switch to prevent TikTok reaction from being stored on your mobile’s storage (optional). Next, tap the Post button from the bottom-right corner to publish the video to TikTok.

More creative tricks about TikTok video: Clone Yourself in TikTok
Part 2: How to Make Reaction Videos with Filmora
Even though you can make TikTok reaction videos using its own filters and audio mixing tools that work pretty well under ideal conditions, if you are a perfectionist and like precision in anything you do or create, you need a dedicated program that has been designed specifically for the purpose.
Although several such tools are available in the market and can be easily downloaded and used, the best among them is Filmora by Wondershare. Wondershare Filmora is an industry-standard production and post-production tool for both Mac and Windows PCs that the majority of users prefer over its competitors such as Adobe Premiere Pro, Final Cut Pro X, etc. This is because Filmora offers simple UI, is less resource-intensive, and is able to render the outputs significantly faster.
You can learn how to make TikTok reaction videos using Wondershare Filmora by following the steps given below:
Note: Before proceeding, make sure that you have already copied the source (and the reaction) video(s) from your smartphone to your computer.
1. Create New Project and Set Preferences
Start Wondershare Filmora on your Windows or Mac PC, go to File > New Project and click 9:16 (Portrait) from the submenu that appears.
Click Split Screen from the standard toolbar at the top, hover mouse to the screen type preset you want to use, click the + ( Add to Project ) icon that appears at the bottom-right corner of the thumbnail, and click OK from the bottom-right corner once the preset is added to the Timeline.

2. Import and Add Video(s) Preview/Timeline
Click the Media button from the standard toolbar, click anywhere inside the Media window at the upper-left corner, and when the Open box comes up, select and import the video file(s) you want to participate in the TikTok reaction. Alternatively, you can also click Record from below the standard toolbar, and choose any of the options to record your own video or voice right from within Wondershare Filmora itself.
Next, click and drag each of the imported videos to their corresponding screen sections in the Preview window in the upper-right area. Notice how the files are automatically added to the Timeline at the bottom.
3. Add Elements and Titles
Click Elements from the standard toolbar, hover mouse to the element you want to add to the reaction, click the + icon that appears at the center of the thumbnail, and reposition the element in the Timeline to match the duration with that of the reaction you are creating.

4. Export the Reaction

Click EXPORT from the top-middle section of the interface, go to the Local tab from the top of the Export box that appears next, select your preferred format from the left bar, optionally choose a destination folder from the right window, optionally click SETTINGS to fine-tune the output preferences as needed, and click EXPORT from the bottom-right corner to export the TikTok reaction. Or, you can save it in the settings perfect for iPhone or another device.
Below is a sample reaction video made with Filmora, you can do much better than that for your TikTok account:
Besides using Filmora to edit reaction videos with the split-screen presets, you can also use some other video editing software to create a reaction video . Filmora can empower your video creation with more creativity, watch the video below and download Filmora to try.
Conclusion
A TikTok reaction enables you to make the source videos more fun and entertaining. Luckily the app itself has a “React” button that helps you create TikTok reaction videos with merely a few simple taps. However, if you feel that the built-in options are not as robust as they should be, a third-party program like Wondershare Filmora is something you would definitely love to try your hands on as the software is not only easy to use, it is also lightweight, and doesn’t put any overhead on your computer hardware.
Shanoon Cox
Shanoon Cox is a writer and a lover of all things video.
Follow @Shanoon Cox
Shanoon Cox
Mar 27, 2024• Proven solutions
With all the videos of different moods and categories available on the platform, TikTok’s reaction is something that makes the footage more engaging. Available for both iOS and Android platforms, TikTok allows you to record, edit , and compile a video of up to 60 seconds, and apply a plethora of filters and animation effects to them along with adding relevant music to awe your audience.
Considering this, here you will learn how to make TikTok reaction videos with ease from within the app itself, and if that’s not enough, using one of the best and most efficient programs available in the market that can even allow you to add unique effects to the reactions you create.
- Part 1: How to Make React Videos on TikTok
- Part 2: How to Use Snap Filmora to Make TikTok Reaction Videos
Bonus: Create A More Attractive Video with Human Segmentation Effect
The human segmentation effect under AI Portrait allows you to isolate people from video background even without a green screen, and then you can composite it to make a reaction video easily. Watch the video tutorial below to find out more details.
Want to read the texts instead of watching videos? Check the complete guide to making a reaction video in 3 ways .
Part 1: How to React to a TikTok Video
After being equipped with all the worldly knowledge about TikTok reaction videos, you can follow the steps given below to learn how to react to the footage created by other people:
1. Tap Share and Record Your Reaction
Start TikTok, play the video you want to react on, tap the Share icon from the lower-right area, and tap the React option from the Share to menu. Tap Flip from the top-right corner of the Camera screen to switch between the front and rear camera as needed, optionally tap the Mic icon to disable or enable voice and system audio capture, drag and reposition React window according to the source footage, and tap the Record button from the bottom to start shooting your TikTok reaction. Wait while the source clip and your recording process are complete successfully before moving forward to the next step.
2. Apply Filters
Tap the Filters icon from the top-right corner, tap to pick a filter from those available at the bottom, and tap anywhere on the screen to accept the one you selected and to get back to the previous window.
3. Manage Audio
Tap the Mixer icon from the upper-right corner of the screen, drag the My Voice and Soundtrack Volume sliders to manage your voice recording and the internal audio respectively, and tap Done to save the changes once you’re through with the modifications. Back on the previous window, tap Next from the bottom-right corner.
4. Publish the Video
Tap the Who can view this video option to manage your reaction’s visibility settings (optional). Tap the Save to device toggle switch to prevent TikTok reaction from being stored on your mobile’s storage (optional). Next, tap the Post button from the bottom-right corner to publish the video to TikTok.
More creative tricks about TikTok video: Clone Yourself in TikTok
Part 2: How to Make Reaction Videos with Filmora
Even though you can make TikTok reaction videos using its own filters and audio mixing tools that work pretty well under ideal conditions, if you are a perfectionist and like precision in anything you do or create, you need a dedicated program that has been designed specifically for the purpose.
Although several such tools are available in the market and can be easily downloaded and used, the best among them is Filmora by Wondershare. Wondershare Filmora is an industry-standard production and post-production tool for both Mac and Windows PCs that the majority of users prefer over its competitors such as Adobe Premiere Pro, Final Cut Pro X, etc. This is because Filmora offers simple UI, is less resource-intensive, and is able to render the outputs significantly faster.
You can learn how to make TikTok reaction videos using Wondershare Filmora by following the steps given below:
Note: Before proceeding, make sure that you have already copied the source (and the reaction) video(s) from your smartphone to your computer.
1. Create New Project and Set Preferences
Start Wondershare Filmora on your Windows or Mac PC, go to File > New Project and click 9:16 (Portrait) from the submenu that appears.
Click Split Screen from the standard toolbar at the top, hover mouse to the screen type preset you want to use, click the + ( Add to Project ) icon that appears at the bottom-right corner of the thumbnail, and click OK from the bottom-right corner once the preset is added to the Timeline.
2. Import and Add Video(s) Preview/Timeline
Click the Media button from the standard toolbar, click anywhere inside the Media window at the upper-left corner, and when the Open box comes up, select and import the video file(s) you want to participate in the TikTok reaction. Alternatively, you can also click Record from below the standard toolbar, and choose any of the options to record your own video or voice right from within Wondershare Filmora itself.
Next, click and drag each of the imported videos to their corresponding screen sections in the Preview window in the upper-right area. Notice how the files are automatically added to the Timeline at the bottom.
3. Add Elements and Titles
Click Elements from the standard toolbar, hover mouse to the element you want to add to the reaction, click the + icon that appears at the center of the thumbnail, and reposition the element in the Timeline to match the duration with that of the reaction you are creating.
4. Export the Reaction
Click EXPORT from the top-middle section of the interface, go to the Local tab from the top of the Export box that appears next, select your preferred format from the left bar, optionally choose a destination folder from the right window, optionally click SETTINGS to fine-tune the output preferences as needed, and click EXPORT from the bottom-right corner to export the TikTok reaction. Or, you can save it in the settings perfect for iPhone or another device.
Below is a sample reaction video made with Filmora, you can do much better than that for your TikTok account:
Besides using Filmora to edit reaction videos with the split-screen presets, you can also use some other video editing software to create a reaction video . Filmora can empower your video creation with more creativity, watch the video below and download Filmora to try.
Conclusion
A TikTok reaction enables you to make the source videos more fun and entertaining. Luckily the app itself has a “React” button that helps you create TikTok reaction videos with merely a few simple taps. However, if you feel that the built-in options are not as robust as they should be, a third-party program like Wondershare Filmora is something you would definitely love to try your hands on as the software is not only easy to use, it is also lightweight, and doesn’t put any overhead on your computer hardware.
Shanoon Cox
Shanoon Cox is a writer and a lover of all things video.
Follow @Shanoon Cox
Also read:
- [New] Elevating Your Content with Voiceacting Mastery for 2024
- [New] Ethical and Safe TikTok Following Hacks
- [New] In 2024, From Ordinary to Spectacular Making Wow-Worthy TikTok Videos with Templates
- [Updated] Fusion Feats Mixing Genres in the World's Most Engaging TikToks
- 2024 Approved The Ultimate Selection Top 10 Zero-Dollar Video Calls
- 2024 Approved Transform Your TikTok Profile with These Cutting-Edge PFPs
- A Guide to OpenAI's GPT Evolution (GPT-1-4)
- Artificial Intelligence & Microsoft Licensing: The Case Against Using Chatbots for Key Generation on Windows 11
- Crafting Risk-Free Exercise Strategies with AI
- Guía Completa: Cómo Replicar Tu Sistema De Arranque Dual Con Una Unidad SSD
- In 2024, 4 solution to get rid of pokemon fail to detect location On Apple iPhone 6 Plus | Dr.fone
- In 2024, Chronicles of Charms A Compreentic Toolkit for Twitter's Visual Treasures
- In 2024, Laugh Trails on TikTok The Best Joke Threads for a Chuckle
- Security First Legitimate TikTok Fan Buys
- Step Into the Virtual Realm with Updated Android Tips for 2024
- The Ultimate Guide 7 Favorite TikTok Glyphs + Secret Symbols for 2024
- システム復元時に問題発生: 指定されたポイントからファイルの回復失敗
- Title: Secrets of Crafting an Exclusive Identifier on TikTok
- Author: Gary
- Created at : 2024-12-19 01:13:57
- Updated at : 2024-12-24 20:27:15
- Link: https://tiktok-clips.techidaily.com/secrets-of-crafting-an-exclusive-identifier-on-tiktok/
- License: This work is licensed under CC BY-NC-SA 4.0.