Resurrecting Lost, Confidential Snapshots
Resurrecting Lost, Confidential Snapshots
Have you ever set some of your Snapchat pictures to “My Eyes Only” and then accidentally deleted them? Well, it’s happened to the best of us. Whether it’s a hilarious Snap streak with your best friend or a cute photo of your pet, losing important data can be frustrating.
But don’t worry, there’s a way to recover them! In this article, we’ll show you how to recover “My Eyes Only” pictures on Snapchat. We’ll also discuss how you can change or retrieve your password if you’ve forgotten it.
Part 1. How To Recover Photos Deleted From “My Eyes Only” on Snapchat
- Method 1. Recovering The Photos Via Snapchat - For iOS and Android
- Method 2. Using File Browser - For Android
Have you accidentally deleted a photo from your “My Eyes Only” album on Snapchat, and you’re now panicking because you think it’s gone forever? Don’t worry: with our two step-by-step methods provided below, you will surely retrieve your deleted snaps.
Method 1. Recovering The Photos Via Snapchat - For iOS and Android
The first method to recover My Eyes Only pictures on Snapchat is via the Privacy tab. Although it is a bit of a long process, this is surely going to work.
Here’s a quick and simple rundown of how you can recover your photos via Snapchat on your iOS and Android device:
Step1 Launch the Snapchat app on your device and sign in to your account. On the top left side of the screen, click your profile icon.
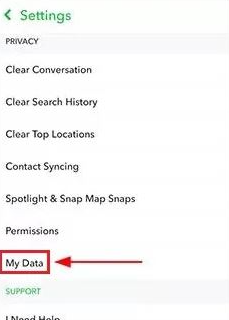
Step2 Tap the Setting icon and scroll down to the Privacy tab.

Step3 Under the Privacy tab, find the “My Data” option and tap it.
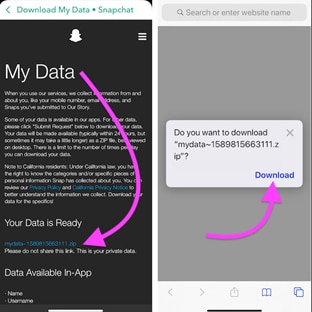
Step4 Log in to your Snapchat account once again, submit your request for data recovery from Snapchat’s server and download it.
![]()
Note: Keep in mind that only the snaps saved in your memory roll will be revived by this method.
Method 2. Using File Browser - For Android
You can also recover your My Eyes Only snapshots from the File Manager on your device. However, this solution only works on Android devices because iPhones do not provide all access to apps for your data safety.
Step1 Launch the File browser or File app on your device.
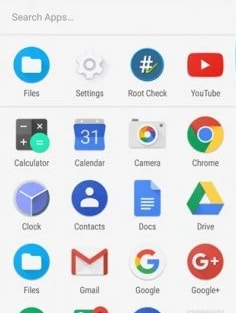
Step2 Head to “Data,” find the “Snapchat data or com.snapchat.android” file, and tap to open it.
Step3 Now, find a file with the “a .nomedia” extension, delete it, and the data will be restored to your Snapchat account.
![]()
Note: This method is only effective for a brief amount of time. Therefore, to recover your deleted Snaps, you should follow this method as soon as possible after they are deleted.
Apart from reading the methods we provided for your, you can also watch this video tutorial to help you recover My Eyes Only pictures quickly.
Part 2. A Bonus Tip: What If You Forget The Password Of My Eye Only
If you’ve ever forgotten the password to your “My Eye Only” on Snapchat, don’t worry; below, we’ve provided a few easy-to-follow instructions to help you quickly reset the password.
![]()
Note: If you opt to reset your current passcode, everything presently saved to My Eyes Only will be lost!!
How To Reset My Eyes Only Password?
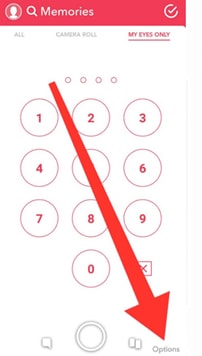
Step1 Open the Snapchat app on your Android or iOS device and tap the overlaid Photos icon to head to the Memories section. Next, go to the “My Eyes Only” tab.
Step2 Tap “Options” at the lower right corner of the screen and select “Forgot Password.”
Step3 Type your Snapchat password and tap “Next.” Accept the rules and tap “Continue” to proceed further.
Step4 Reset the password and tap “Confirm” to apply your changes.
FAQs
How To Change My Eyes Only Password?
If you still remember the present password but want to change it, do the following steps to change the “My Eyes Only” password:
Step1 Open the Snapchat app, head to the Memories section, and tap the “My Eyes Only” tab.
Step2 Tap “Option”> “Change Password” and type your current “My Eyes Only” password to continue.
Step3 Type your new PIN and tap “Next.” Tap the “Use Passphrase” option if you do not want to set a PIN code.
Step4 Tap the box next to “I understand that if …” and tap “Continue.” Finally, tap “Finish” to complete the process.
How Do I Move Snaps To My Eyes Only?
Here’s how you can move Snaps to the “My Eyes Only” section on Snapchat:
Step1 Open the Snapchat app on your phone and go to the Memories section.
Step2 Choose the snap you want to move, tap and hold it.
Step3 Select “My Eyes Only” to move your snap.
How Do I Set Up My Eyes Only?
To set up “My Eyes Only” on Snapchat, do the following steps in sequence:
Step1 Head to the Memories section in Snapchat and tap the “My Eyes Only” tab.
Step2 Under the My Eyes Only tab, tap the “Quick Setup” option.
Step3 Create a passphrase or PIN and confirm it. Now, check the box next to “I understand that…,” select “Continue,” and tap the “Finish“ option to complete the setup process.
How Do I Save Snaps To My Eyes Only By Default?
To save your Snaps to My Eyes only by default, follow these instructions step-by-step:
Step1 Open your Snapchat account and tap your Profile icon.
Step2 Tap the Settings icons at the top right-hand side of the screen and head to Memories.
Step3 Now, tap the toggle button next to “Save to My Eyes Only By Default” to change the settings. Your snaps will now save to the My Eyes Only section every time.
Conclusion
In this article, we’ve provided two step-by-step methods to help you recover My Eyes Only pictures on Snapchat on your iOS or Android device**.** We’ve also discussed how you can change or recover the My Eyes Only password with easy-to-follow instructions.
All in all, it is possible to recover your “My Eyes Only” pictures from Snapchat. While the process may be a little bit time-consuming, it is definitely worth it if you value your privacy. So, if you ever find yourself in this predicament, don’t despair - there is hope!
Be sure to follow the instructions carefully, and hopefully, you’ll be able to get your photos back!
Free Download For Win 7 or later(64-bit)
Free Download For macOS 10.14 or later
Method 2. Using File Browser - For Android
You can also recover your My Eyes Only snapshots from the File Manager on your device. However, this solution only works on Android devices because iPhones do not provide all access to apps for your data safety.
Step1 Launch the File browser or File app on your device.
Step2 Head to “Data,” find the “Snapchat data or com.snapchat.android” file, and tap to open it.
Step3 Now, find a file with the “a .nomedia” extension, delete it, and the data will be restored to your Snapchat account.
![]()
Note: This method is only effective for a brief amount of time. Therefore, to recover your deleted Snaps, you should follow this method as soon as possible after they are deleted.
Apart from reading the methods we provided for your, you can also watch this video tutorial to help you recover My Eyes Only pictures quickly.
Part 2. A Bonus Tip: What If You Forget The Password Of My Eye Only
If you’ve ever forgotten the password to your “My Eye Only” on Snapchat, don’t worry; below, we’ve provided a few easy-to-follow instructions to help you quickly reset the password.
![]()
Note: If you opt to reset your current passcode, everything presently saved to My Eyes Only will be lost!!
How To Reset My Eyes Only Password?
Step1 Open the Snapchat app on your Android or iOS device and tap the overlaid Photos icon to head to the Memories section. Next, go to the “My Eyes Only” tab.
Step2 Tap “Options” at the lower right corner of the screen and select “Forgot Password.”
Step3 Type your Snapchat password and tap “Next.” Accept the rules and tap “Continue” to proceed further.
Step4 Reset the password and tap “Confirm” to apply your changes.
FAQs
How To Change My Eyes Only Password?
If you still remember the present password but want to change it, do the following steps to change the “My Eyes Only” password:
Step1 Open the Snapchat app, head to the Memories section, and tap the “My Eyes Only” tab.
Step2 Tap “Option”> “Change Password” and type your current “My Eyes Only” password to continue.
Step3 Type your new PIN and tap “Next.” Tap the “Use Passphrase” option if you do not want to set a PIN code.
Step4 Tap the box next to “I understand that if …” and tap “Continue.” Finally, tap “Finish” to complete the process.
How Do I Move Snaps To My Eyes Only?
Here’s how you can move Snaps to the “My Eyes Only” section on Snapchat:
Step1 Open the Snapchat app on your phone and go to the Memories section.
Step2 Choose the snap you want to move, tap and hold it.
Step3 Select “My Eyes Only” to move your snap.
How Do I Set Up My Eyes Only?
To set up “My Eyes Only” on Snapchat, do the following steps in sequence:
Step1 Head to the Memories section in Snapchat and tap the “My Eyes Only” tab.
Step2 Under the My Eyes Only tab, tap the “Quick Setup” option.
Step3 Create a passphrase or PIN and confirm it. Now, check the box next to “I understand that…,” select “Continue,” and tap the “Finish“ option to complete the setup process.
How Do I Save Snaps To My Eyes Only By Default?
To save your Snaps to My Eyes only by default, follow these instructions step-by-step:
Step1 Open your Snapchat account and tap your Profile icon.
Step2 Tap the Settings icons at the top right-hand side of the screen and head to Memories.
Step3 Now, tap the toggle button next to “Save to My Eyes Only By Default” to change the settings. Your snaps will now save to the My Eyes Only section every time.
Conclusion
In this article, we’ve provided two step-by-step methods to help you recover My Eyes Only pictures on Snapchat on your iOS or Android device**.** We’ve also discussed how you can change or recover the My Eyes Only password with easy-to-follow instructions.
All in all, it is possible to recover your “My Eyes Only” pictures from Snapchat. While the process may be a little bit time-consuming, it is definitely worth it if you value your privacy. So, if you ever find yourself in this predicament, don’t despair - there is hope!
Be sure to follow the instructions carefully, and hopefully, you’ll be able to get your photos back!
Free Download For Win 7 or later(64-bit)
Free Download For macOS 10.14 or later
Japanese Pop Culture in Every Frame: Learn to Use Snapchat’s Filters
What Is Anime Filter On Snapchat?

Shanoon Cox
Mar 27, 2024• Proven solutions
Snapchat anime filter is the new sensation that is making waves all across social media. The best part about anime filter is that it has the ability to transform your videos and images into anime instantly. This filter has already gone viral on other social media platforms, such as TikTok, Instagram, and Twitter.
Filters and effects are not new when it comes to social media services, and almost all of them have their own versions, which you can use. Snapchat is here with a new lens, which is becoming immensely popular. If you have been trying to use the Snapchat anime filter and don’t know how to go about it, you have come to the right place because this article will talk about how to get this filter and how to use it. Keep reading!
Part 1: What is Anime Filter on Snapchat?
Out of the many AR lenses from Snapchat, the latest one is the anime lens. It’s a filter that will morph a person’s photo or video into an anime character and will customize the anime face based on the person’s facial features. So, rather than simply applying a generic image on top of your face, Snapchat makes sure that the anime image looks similar to your actual image. And as a result, each person’s anime face turns out to be different.
Since the hashtag #animefilter is trending, you can also apply the anime filter on your face and be a part of the trend. The reaction to this filter is lowkey amazing because the filter not only changes your face and makes it look like a part of a hit anime cartoon series or movie, but it sometimes also changes your hair color making you look like the King of the Pirates or Rapunzel. What this lens will do and how your image will turn out to be is highly fascinating.
What stands out is that after the anime filter of Snapchat was released, it has been used over 3 billion times. Snapchat has confirmed this statistic in its Third Quarter 2020 Financial report, and they even said that they already knew it would be a massive hit.
Part 2: How to Get the Anime Filter on Snapchat?
Now that you know how popular the Snapchat anime filter is. It’s worth knowing how to get it. Although this filter is available on Snapchat, many users are facing issues finding it. This section will show you two easy ways to get this filter. You can use one or both methods and start using the filter to show the world how you will look like an anime character. Here are the two ways:
Method 1: Get the Anime Face Filter on Snapchat via Link
Step 1: First, click on the link here . You will need this link to get the anime face filter.
Step 2: Once you click on the click, a pop-up window will open. If you haven’t downloaded the anime filter yet, then Snapchat will say, “New lens found.” Right below it, you will see the message “unlock for 48 hours.” Go ahead and click on that.
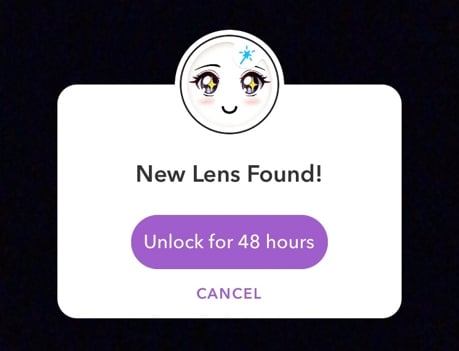
Step 3: By clicking on the purple button, your Snapchat anime filter will be available for use for 48 hours.
Here’s a pro tip, if you want to continue using this filter, once the 48 hours are over, simply repeat the steps, and you can use it for additional 48 hours. Simple!
If the pop-up says, “nothing to see here”, which means you have the filter already. In this case, you can go to Snapchat and click the filter accordingly.
Method 2: Get the Anime Style Filter via Explore on Snapchat
If you don’t want to click any unknown links, you can explore the anime filter by searching on Snapchat.
Step 1: Make sure your Snapchat is up-to-date. If not, update it to the latest version.
Step 2: Open Snapchat on your mobile or tablet, whichever you are using. Now, turn the lens towards you or someone else as if you are clicking a picture.
Step 3: Now, click on the smiley face filter button, and tap on the Explore button to continue.
Step 4: You can now search for Anime Styles. There are several anime filters available, just make sure that the creator of the filter is Snapchat.
Step 5: Once you have the anime filter, you can record a video of yourself, or take photos. You may also use both back and front cameras to turn anyone into an anime character.
Pro tip: This filter works on already saved photos and videos as well. Try them on too. This filter will work only on your face, though. So, it won’t turn your entire body into an anime character.
Part 3: How Do I Get More Filters on Snapchat?
Since Snapchat keeps coming up with attractive filters, you may wonder how you can get more filters to keep using them. Well, there are a few tricks that you can try. We will explain these tricks in detail, so make sure to follow them correctly.
Trick 1: Turn on Snapchat Geofilters
Before you try using Snapchat geofilters, you will first have to permit Snapchat to access your location. Whether you are using iOS or Android, enable location, and you will start seeing geofilters and all the other filters that you have saved.
Don’t expect a plethora of filters to suddenly turn up. For example, when you apply a geofilter, you will see that it adds an illustration and the place name to your Snap. So, the more you explore and go out, the more filters you will start seeing.
Trick 2: Check Online Resources on Lens Studio and Lenslist
You can also explore two filter libraries, which are Lens Studio and Lenslist. These are repositories of AR content. These two libraries have many attractive filters. All you need to do is scan the Snapcode available in the filters and unlock them. Both of them will have duplicate filters as well, though. But dig a bit deeper, and you will have enough codes of filters to keep using them every day. You will find these codes in your profile once you add them.
Trick 3: Share Snapcodes for Snapchat
The last way to add Snapcode of filters is by scanning other people’s codes. Once you go to your profile, you will see your Snapcodes, which other people can scan. Just like that, you can scan other people’s code as well. Some codes will be available for 24 hours, while others for 48 hours. After that, you can scan the code again when you want to reuse them. To scan a code, just hold your camera over the code and allow the screen to register it.
Bonus: How to Add Anime Effect to Video with Filmora
As we shared, Snapchat will only morph your face into an anime character. But if you are not satisfied with that and want to turn a whole video into anime or cartoon, then one of the best ways to go about it is by getting Wondershare Filmora. Filmora is an easy-to-use yet powerful enough video editing tool loaded with stunning effects, such as cartoons, sketches, color sketches, and more. The process is very easy to follow, and to use Filmora, you don’t need to be a pro. Here are the steps that you can follow:
Step 1: Launch Wondershare Filmora to your Mac or Windows computer. If you haven’t downloaded it yet, click the Try It Free button below to start.


Step 2: Now, import media files and load the video that you want to convert into a cartoon or anime to the media library, and then add that video to the timeline.

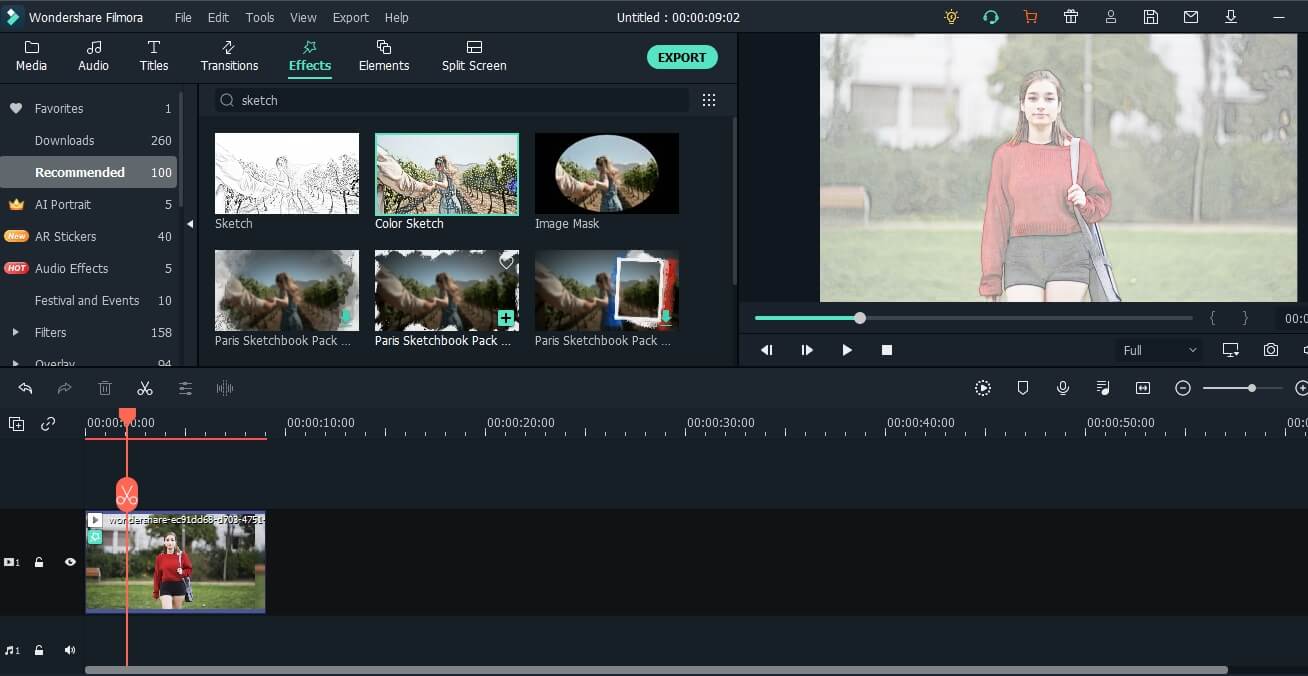
Step 3: Go to the Effects option, and type sketch in the search effects bar, which will be on the top of the screen.
Step 4: Currently, Filmora provides sketch and color sketch effects. Try each one of them to see which one works the best. If you want to add the filter to the entire video, just drag and drop the filter to the video, and it’s done.
Step 5: Finally, click on the Export button after everything is done to save the edited video on your computer.
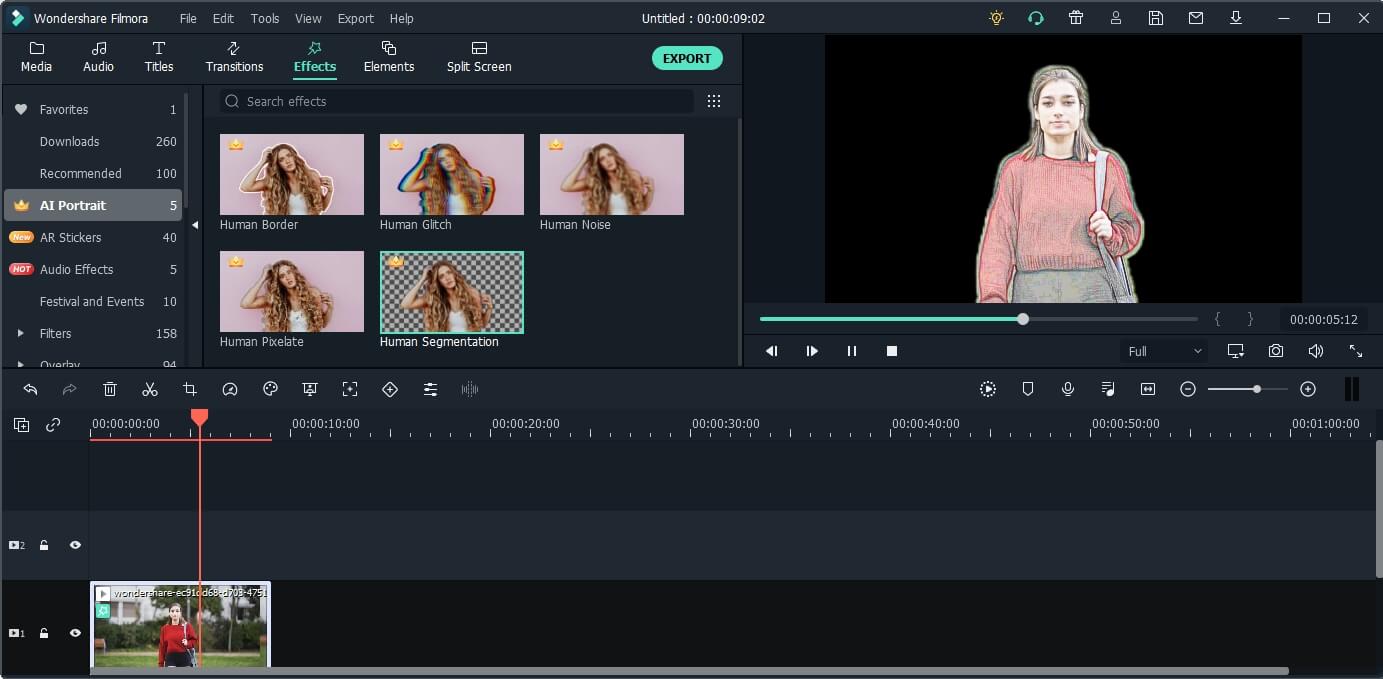
Note: If you want to add the sketch effect to the person only, you can use the Human Segmentation in AI Portrait. In this way, you can also try the Cartoon effect to see the result.
Check the video tutorial below to explore more usage of the AI Portrait add-on.
Shanoon Cox
Shanoon Cox is a writer and a lover of all things video.
Follow @Shanoon Cox
Shanoon Cox
Mar 27, 2024• Proven solutions
Snapchat anime filter is the new sensation that is making waves all across social media. The best part about anime filter is that it has the ability to transform your videos and images into anime instantly. This filter has already gone viral on other social media platforms, such as TikTok, Instagram, and Twitter.
Filters and effects are not new when it comes to social media services, and almost all of them have their own versions, which you can use. Snapchat is here with a new lens, which is becoming immensely popular. If you have been trying to use the Snapchat anime filter and don’t know how to go about it, you have come to the right place because this article will talk about how to get this filter and how to use it. Keep reading!
Part 1: What is Anime Filter on Snapchat?
Out of the many AR lenses from Snapchat, the latest one is the anime lens. It’s a filter that will morph a person’s photo or video into an anime character and will customize the anime face based on the person’s facial features. So, rather than simply applying a generic image on top of your face, Snapchat makes sure that the anime image looks similar to your actual image. And as a result, each person’s anime face turns out to be different.
Since the hashtag #animefilter is trending, you can also apply the anime filter on your face and be a part of the trend. The reaction to this filter is lowkey amazing because the filter not only changes your face and makes it look like a part of a hit anime cartoon series or movie, but it sometimes also changes your hair color making you look like the King of the Pirates or Rapunzel. What this lens will do and how your image will turn out to be is highly fascinating.
What stands out is that after the anime filter of Snapchat was released, it has been used over 3 billion times. Snapchat has confirmed this statistic in its Third Quarter 2020 Financial report, and they even said that they already knew it would be a massive hit.
Part 2: How to Get the Anime Filter on Snapchat?
Now that you know how popular the Snapchat anime filter is. It’s worth knowing how to get it. Although this filter is available on Snapchat, many users are facing issues finding it. This section will show you two easy ways to get this filter. You can use one or both methods and start using the filter to show the world how you will look like an anime character. Here are the two ways:
Method 1: Get the Anime Face Filter on Snapchat via Link
Step 1: First, click on the link here . You will need this link to get the anime face filter.
Step 2: Once you click on the click, a pop-up window will open. If you haven’t downloaded the anime filter yet, then Snapchat will say, “New lens found.” Right below it, you will see the message “unlock for 48 hours.” Go ahead and click on that.
Step 3: By clicking on the purple button, your Snapchat anime filter will be available for use for 48 hours.
Here’s a pro tip, if you want to continue using this filter, once the 48 hours are over, simply repeat the steps, and you can use it for additional 48 hours. Simple!
If the pop-up says, “nothing to see here”, which means you have the filter already. In this case, you can go to Snapchat and click the filter accordingly.
Method 2: Get the Anime Style Filter via Explore on Snapchat
If you don’t want to click any unknown links, you can explore the anime filter by searching on Snapchat.
Step 1: Make sure your Snapchat is up-to-date. If not, update it to the latest version.
Step 2: Open Snapchat on your mobile or tablet, whichever you are using. Now, turn the lens towards you or someone else as if you are clicking a picture.
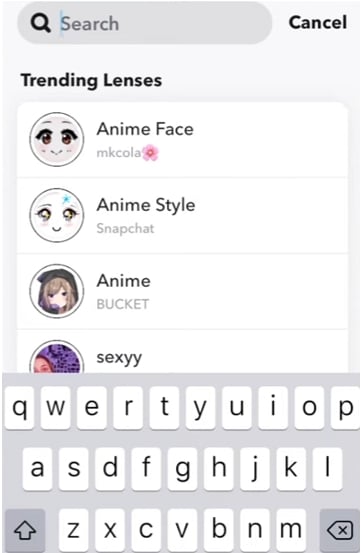
Step 3: Now, click on the smiley face filter button, and tap on the Explore button to continue.
Step 4: You can now search for Anime Styles. There are several anime filters available, just make sure that the creator of the filter is Snapchat.
Step 5: Once you have the anime filter, you can record a video of yourself, or take photos. You may also use both back and front cameras to turn anyone into an anime character.
Pro tip: This filter works on already saved photos and videos as well. Try them on too. This filter will work only on your face, though. So, it won’t turn your entire body into an anime character.
Part 3: How Do I Get More Filters on Snapchat?
Since Snapchat keeps coming up with attractive filters, you may wonder how you can get more filters to keep using them. Well, there are a few tricks that you can try. We will explain these tricks in detail, so make sure to follow them correctly.
Trick 1: Turn on Snapchat Geofilters
Before you try using Snapchat geofilters, you will first have to permit Snapchat to access your location. Whether you are using iOS or Android, enable location, and you will start seeing geofilters and all the other filters that you have saved.
Don’t expect a plethora of filters to suddenly turn up. For example, when you apply a geofilter, you will see that it adds an illustration and the place name to your Snap. So, the more you explore and go out, the more filters you will start seeing.
Trick 2: Check Online Resources on Lens Studio and Lenslist
You can also explore two filter libraries, which are Lens Studio and Lenslist. These are repositories of AR content. These two libraries have many attractive filters. All you need to do is scan the Snapcode available in the filters and unlock them. Both of them will have duplicate filters as well, though. But dig a bit deeper, and you will have enough codes of filters to keep using them every day. You will find these codes in your profile once you add them.
Trick 3: Share Snapcodes for Snapchat
The last way to add Snapcode of filters is by scanning other people’s codes. Once you go to your profile, you will see your Snapcodes, which other people can scan. Just like that, you can scan other people’s code as well. Some codes will be available for 24 hours, while others for 48 hours. After that, you can scan the code again when you want to reuse them. To scan a code, just hold your camera over the code and allow the screen to register it.
Bonus: How to Add Anime Effect to Video with Filmora
As we shared, Snapchat will only morph your face into an anime character. But if you are not satisfied with that and want to turn a whole video into anime or cartoon, then one of the best ways to go about it is by getting Wondershare Filmora. Filmora is an easy-to-use yet powerful enough video editing tool loaded with stunning effects, such as cartoons, sketches, color sketches, and more. The process is very easy to follow, and to use Filmora, you don’t need to be a pro. Here are the steps that you can follow:
Step 1: Launch Wondershare Filmora to your Mac or Windows computer. If you haven’t downloaded it yet, click the Try It Free button below to start.
Step 2: Now, import media files and load the video that you want to convert into a cartoon or anime to the media library, and then add that video to the timeline.
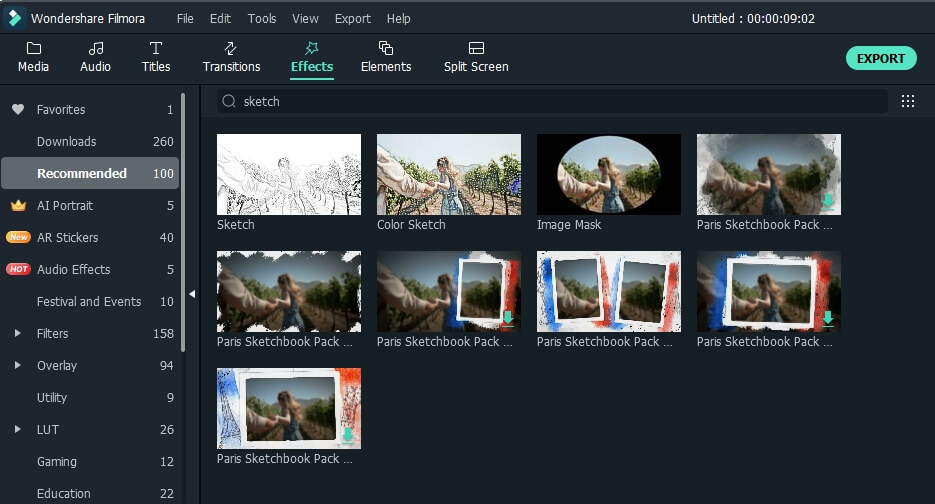
Step 3: Go to the Effects option, and type sketch in the search effects bar, which will be on the top of the screen.
Step 4: Currently, Filmora provides sketch and color sketch effects. Try each one of them to see which one works the best. If you want to add the filter to the entire video, just drag and drop the filter to the video, and it’s done.
Step 5: Finally, click on the Export button after everything is done to save the edited video on your computer.
Note: If you want to add the sketch effect to the person only, you can use the Human Segmentation in AI Portrait. In this way, you can also try the Cartoon effect to see the result.
Check the video tutorial below to explore more usage of the AI Portrait add-on.
Shanoon Cox
Shanoon Cox is a writer and a lover of all things video.
Follow @Shanoon Cox
Shanoon Cox
Mar 27, 2024• Proven solutions
Snapchat anime filter is the new sensation that is making waves all across social media. The best part about anime filter is that it has the ability to transform your videos and images into anime instantly. This filter has already gone viral on other social media platforms, such as TikTok, Instagram, and Twitter.
Filters and effects are not new when it comes to social media services, and almost all of them have their own versions, which you can use. Snapchat is here with a new lens, which is becoming immensely popular. If you have been trying to use the Snapchat anime filter and don’t know how to go about it, you have come to the right place because this article will talk about how to get this filter and how to use it. Keep reading!
Part 1: What is Anime Filter on Snapchat?
Out of the many AR lenses from Snapchat, the latest one is the anime lens. It’s a filter that will morph a person’s photo or video into an anime character and will customize the anime face based on the person’s facial features. So, rather than simply applying a generic image on top of your face, Snapchat makes sure that the anime image looks similar to your actual image. And as a result, each person’s anime face turns out to be different.
Since the hashtag #animefilter is trending, you can also apply the anime filter on your face and be a part of the trend. The reaction to this filter is lowkey amazing because the filter not only changes your face and makes it look like a part of a hit anime cartoon series or movie, but it sometimes also changes your hair color making you look like the King of the Pirates or Rapunzel. What this lens will do and how your image will turn out to be is highly fascinating.
What stands out is that after the anime filter of Snapchat was released, it has been used over 3 billion times. Snapchat has confirmed this statistic in its Third Quarter 2020 Financial report, and they even said that they already knew it would be a massive hit.
Part 2: How to Get the Anime Filter on Snapchat?
Now that you know how popular the Snapchat anime filter is. It’s worth knowing how to get it. Although this filter is available on Snapchat, many users are facing issues finding it. This section will show you two easy ways to get this filter. You can use one or both methods and start using the filter to show the world how you will look like an anime character. Here are the two ways:
Method 1: Get the Anime Face Filter on Snapchat via Link
Step 1: First, click on the link here . You will need this link to get the anime face filter.
Step 2: Once you click on the click, a pop-up window will open. If you haven’t downloaded the anime filter yet, then Snapchat will say, “New lens found.” Right below it, you will see the message “unlock for 48 hours.” Go ahead and click on that.
Step 3: By clicking on the purple button, your Snapchat anime filter will be available for use for 48 hours.
Here’s a pro tip, if you want to continue using this filter, once the 48 hours are over, simply repeat the steps, and you can use it for additional 48 hours. Simple!
If the pop-up says, “nothing to see here”, which means you have the filter already. In this case, you can go to Snapchat and click the filter accordingly.
Method 2: Get the Anime Style Filter via Explore on Snapchat
If you don’t want to click any unknown links, you can explore the anime filter by searching on Snapchat.
Step 1: Make sure your Snapchat is up-to-date. If not, update it to the latest version.
Step 2: Open Snapchat on your mobile or tablet, whichever you are using. Now, turn the lens towards you or someone else as if you are clicking a picture.
Step 3: Now, click on the smiley face filter button, and tap on the Explore button to continue.
Step 4: You can now search for Anime Styles. There are several anime filters available, just make sure that the creator of the filter is Snapchat.
Step 5: Once you have the anime filter, you can record a video of yourself, or take photos. You may also use both back and front cameras to turn anyone into an anime character.
Pro tip: This filter works on already saved photos and videos as well. Try them on too. This filter will work only on your face, though. So, it won’t turn your entire body into an anime character.
Part 3: How Do I Get More Filters on Snapchat?
Since Snapchat keeps coming up with attractive filters, you may wonder how you can get more filters to keep using them. Well, there are a few tricks that you can try. We will explain these tricks in detail, so make sure to follow them correctly.
Trick 1: Turn on Snapchat Geofilters
Before you try using Snapchat geofilters, you will first have to permit Snapchat to access your location. Whether you are using iOS or Android, enable location, and you will start seeing geofilters and all the other filters that you have saved.
Don’t expect a plethora of filters to suddenly turn up. For example, when you apply a geofilter, you will see that it adds an illustration and the place name to your Snap. So, the more you explore and go out, the more filters you will start seeing.
Trick 2: Check Online Resources on Lens Studio and Lenslist
You can also explore two filter libraries, which are Lens Studio and Lenslist. These are repositories of AR content. These two libraries have many attractive filters. All you need to do is scan the Snapcode available in the filters and unlock them. Both of them will have duplicate filters as well, though. But dig a bit deeper, and you will have enough codes of filters to keep using them every day. You will find these codes in your profile once you add them.
Trick 3: Share Snapcodes for Snapchat
The last way to add Snapcode of filters is by scanning other people’s codes. Once you go to your profile, you will see your Snapcodes, which other people can scan. Just like that, you can scan other people’s code as well. Some codes will be available for 24 hours, while others for 48 hours. After that, you can scan the code again when you want to reuse them. To scan a code, just hold your camera over the code and allow the screen to register it.
Bonus: How to Add Anime Effect to Video with Filmora
As we shared, Snapchat will only morph your face into an anime character. But if you are not satisfied with that and want to turn a whole video into anime or cartoon, then one of the best ways to go about it is by getting Wondershare Filmora. Filmora is an easy-to-use yet powerful enough video editing tool loaded with stunning effects, such as cartoons, sketches, color sketches, and more. The process is very easy to follow, and to use Filmora, you don’t need to be a pro. Here are the steps that you can follow:
Step 1: Launch Wondershare Filmora to your Mac or Windows computer. If you haven’t downloaded it yet, click the Try It Free button below to start.
Step 2: Now, import media files and load the video that you want to convert into a cartoon or anime to the media library, and then add that video to the timeline.
Step 3: Go to the Effects option, and type sketch in the search effects bar, which will be on the top of the screen.
Step 4: Currently, Filmora provides sketch and color sketch effects. Try each one of them to see which one works the best. If you want to add the filter to the entire video, just drag and drop the filter to the video, and it’s done.
Step 5: Finally, click on the Export button after everything is done to save the edited video on your computer.
Note: If you want to add the sketch effect to the person only, you can use the Human Segmentation in AI Portrait. In this way, you can also try the Cartoon effect to see the result.
Check the video tutorial below to explore more usage of the AI Portrait add-on.
Shanoon Cox
Shanoon Cox is a writer and a lover of all things video.
Follow @Shanoon Cox
Also read:
- [New] Crafting the Ultimate List 15 Premier Mounts for GoPro
- [New] Discovering Your Own Original Tagline in the Realm of TikTok for 2024
- [Updated] 2024 Approved Direct TikTok Video Downloader Flawless MP4 Outputs
- [Updated] 2024 Approved Template Wizardry A Blueprint for Creating Viral TikToks
- [Updated] 2024 Approved Voiceover Fundamentals for Aspiring TikTok Creators
- [Updated] In 2024, Micro-Videos in the Spotlight Who Wins, YouTube Shorts or TikTok?
- How to Factory Reset Google Pixel 7a If I Forgot Security Code or Password? | Dr.fone
- Not What We Appear To Be | Free Book
- Tiktok Bugs What If My Tiktok Not Working for 2024
- Understanding Related Searches: Comprehensive Guide & Effective SEO Strategies with SEO PowerSuite
- Where Is the Best Place to Catch Dratini On Xiaomi Civi 3 Disney 100th Anniversary Edition | Dr.fone
- Title: Resurrecting Lost, Confidential Snapshots
- Author: Gary
- Created at : 2024-12-28 16:35:42
- Updated at : 2025-01-03 16:56:09
- Link: https://tiktok-clips.techidaily.com/resurrecting-lost-confidential-snapshots/
- License: This work is licensed under CC BY-NC-SA 4.0.