"Perfect Snapchat Video Maximizing Mac Capabilities"
Perfect Snapchat Video: Maximizing Mac Capabilities
How to Make a Video Best Fits Snapchat Size on Mac?

Liza Brown
Oct 26, 2023• Proven solutions
How to create a video best fit Snapchat? With more than 240 million active daily users, Snapchat is one of the most popular social media networks globally. It is also an instant messaging app that allows its users to express themselves visually in a diverse variety of manners including photos, videos, stories, stickers, emoji, and more.
One of the best features of Snapchat that makes it so attractive among the young audience is its mobile-oriented user interface. Snapchat was the first social networking platform to introduce the concept of daily stories which was widely adopted by other instant messengers as well including Instagram and WhatsApp. Since it is a mobile-oriented platform, you need to create and edit your videos in a certain way to make sure they are the best fit for Snapchat.
You May Also Like: The Ultimate Guide of Snapchat Filters
What Are the Ideal Features of a Snapchat Video?
Snapchat is highly optimized for vertical viewing which means that all the content needs to be served in portrait aspect ratio instead of landscape used by YouTube and other video platforms. You need to ensure that every aspect of your video is perfect before you can upload it for Snapchat on Mac. Here are some of the key features that you must not forget.

- Resolution - The ideal resolution of a Snapchat video is 1080 x 1920 pixels which is known as full HD. This resolution will ensure that your video loads in the right way and remains sharp and crisp for an excellent viewing experience.
- Video Format - The recommended video format for Snapchat clips is MP4 and MOV. You can use either of those formats on your Mac.
- Aspect Ratio - This is one of the key aspects of any video that determines the orientation of viewing. For a perfect Snapchat video, it is recommended that you keep the aspect ratio to 9:16.
- Video Length Size - Remember that Snapchat isn’t like YouTube and serves an audience that wants micro-entertainment. This is why the recommended time for your video is 3 to 10 seconds with the video size not exceeding 32 MB. Otherwise, the Snapchat audience may not respond well to your videos.
That is why it is crucial that your Snapchat video has all the ideal features so your audience can enjoy the viewing experience as intended instead of attempting to manipulate their phones to be able to see the video clearly. It will create an unpleasant and frustrating experience and your viewers might not stay with you.
How to Adjust the Video for Snapchat on Mac? [Step-by-Step]
- Part1. Changing Snapchat Video Format on Filmora
- Part2. Changing Snapchat Video Aspect Ratio on Filmora
- Part3. Changing Snapchat Video Size on Filmora
If your video doesn’t have the ideal features for Snapchat uploading, you don’t need to worry. You can easily edit your video on Filmora X to adjust everything including the aspect ratio, size, and format.


Part1. Changing Snapchat Video Format on Filmora
- Importing Video
The first step is to import the video using the option ‘Import Media Files’ in the import tab. You can also drag and drop the media files you need to work on.

- Selecting the Right Output Format
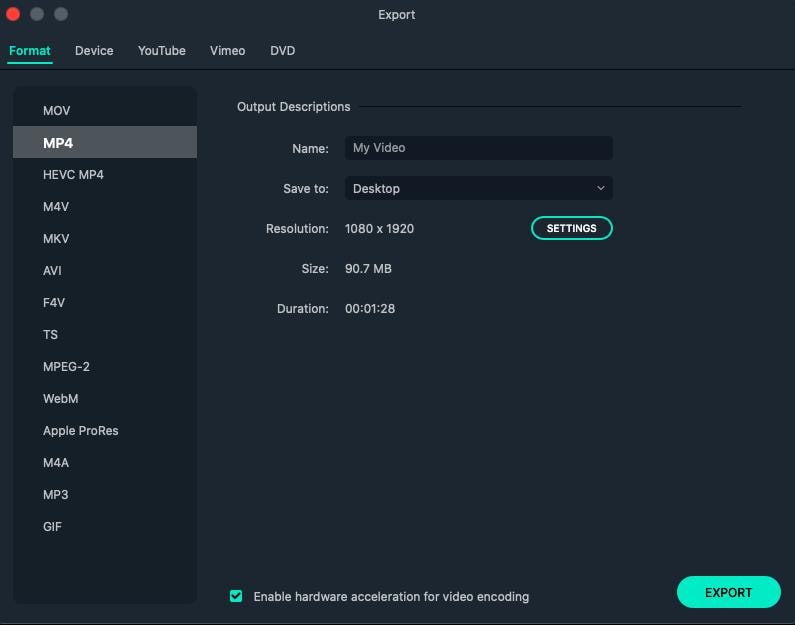
Once you have imported the file, drag and drop it onto the Timeline. Now click on the ‘Export’ button. Here you will be able to select your output video format which needs to be either MOV or MP4.
- Exporting Your Snapchat Video
After you have defined the settings, you can click on the ‘Export’ button to start the saving process. Your video is now available to you in the right format.
Part2. Changing Snapchat Video Aspect Ratio on Filmora
You can use multiple methods to change the aspect ratio of your Snapchat video on Filmora. It depends on the nature of editing you need to perform on your video. You can choose from any of the methods given below to edit your video for Snapchat in a user-friendly manner on Mac.
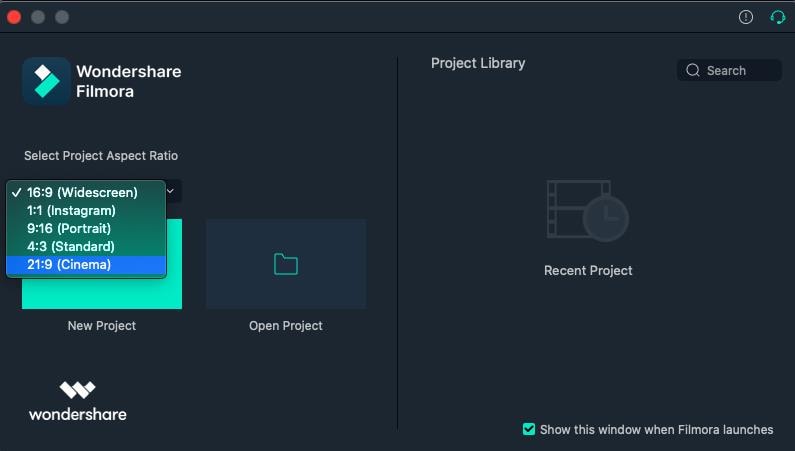
● Method 1 - Launch the editor and click on the drop-down list. You will see the popular aspect ratios listed in the list from where you can choose any. Select the right one that is 9:16 for Snapchat and export the file right away.
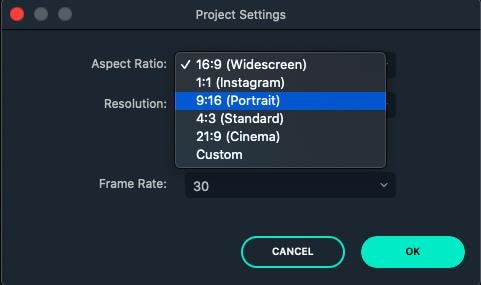
● Method 2 - The second method you can use is present under the Project Settings. You can also lock the aspect ratio using the features available here.

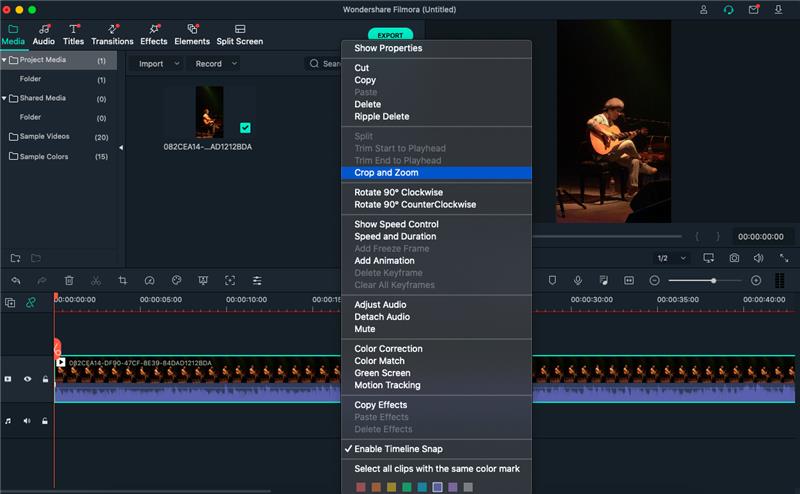
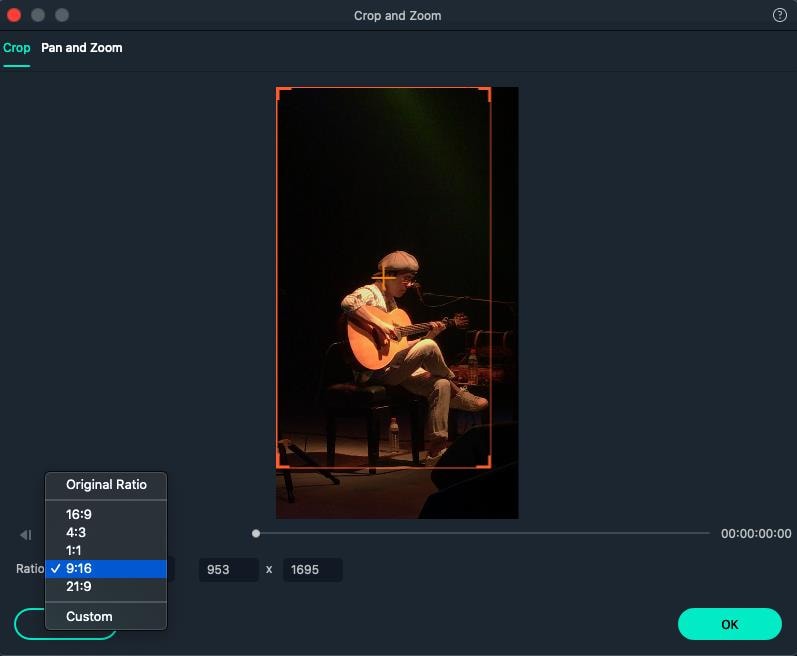
● Method 3 - The third method allows you to change the aspect ratio manually during the video editing process. You need to right-click on the timeline and select the ‘Crop and Zoom’ option. You will see a pop-up window where all the popular options will be available to you. You can choose either of them or select an aspect ratio manually.
● Step 4 - The final method to change the aspect ratio of your video on Mac is at the time of exporting your media file. Here you can select the aspect ratio for your local computer, a particular device, YouTube, or DVD TV.

Part3. Changing Snapchat Video Size on Filmora
- Importing Media File to Filmora
Using the ‘Import’ menu, import your media files, or simply drag and drop them from your Mac OS. Once the files are in the software, drag them to the Timeline track.
- Cropping Your Video for Snapchat
Here you can use the ‘Crop and Zoom’ button from the Timeline by right-clicking on it, so you can only focus on the aspect of the video that you want to show. This will resize the video as well.
- Cutting the Video
Another option you have is to delete the unnecessary parts of the video by selecting them through the indicator present on the timeline. Once you have selected the parts you don’t need, right-click on them and select ‘Delete’.
- Exporting Your Snapchat Video
Once you have resized your video by cropping and cutting the media file, you can now export it in the right resolution, bit rate, and format to ensure you get the minimum file size.
Liza Brown
Liza Brown is a writer and a lover of all things video.
Follow @Liza Brown
Liza Brown
Oct 26, 2023• Proven solutions
How to create a video best fit Snapchat? With more than 240 million active daily users, Snapchat is one of the most popular social media networks globally. It is also an instant messaging app that allows its users to express themselves visually in a diverse variety of manners including photos, videos, stories, stickers, emoji, and more.
One of the best features of Snapchat that makes it so attractive among the young audience is its mobile-oriented user interface. Snapchat was the first social networking platform to introduce the concept of daily stories which was widely adopted by other instant messengers as well including Instagram and WhatsApp. Since it is a mobile-oriented platform, you need to create and edit your videos in a certain way to make sure they are the best fit for Snapchat.
You May Also Like: The Ultimate Guide of Snapchat Filters
What Are the Ideal Features of a Snapchat Video?
Snapchat is highly optimized for vertical viewing which means that all the content needs to be served in portrait aspect ratio instead of landscape used by YouTube and other video platforms. You need to ensure that every aspect of your video is perfect before you can upload it for Snapchat on Mac. Here are some of the key features that you must not forget.
- Resolution - The ideal resolution of a Snapchat video is 1080 x 1920 pixels which is known as full HD. This resolution will ensure that your video loads in the right way and remains sharp and crisp for an excellent viewing experience.
- Video Format - The recommended video format for Snapchat clips is MP4 and MOV. You can use either of those formats on your Mac.
- Aspect Ratio - This is one of the key aspects of any video that determines the orientation of viewing. For a perfect Snapchat video, it is recommended that you keep the aspect ratio to 9:16.
- Video Length Size - Remember that Snapchat isn’t like YouTube and serves an audience that wants micro-entertainment. This is why the recommended time for your video is 3 to 10 seconds with the video size not exceeding 32 MB. Otherwise, the Snapchat audience may not respond well to your videos.
That is why it is crucial that your Snapchat video has all the ideal features so your audience can enjoy the viewing experience as intended instead of attempting to manipulate their phones to be able to see the video clearly. It will create an unpleasant and frustrating experience and your viewers might not stay with you.
How to Adjust the Video for Snapchat on Mac? [Step-by-Step]
- Part1. Changing Snapchat Video Format on Filmora
- Part2. Changing Snapchat Video Aspect Ratio on Filmora
- Part3. Changing Snapchat Video Size on Filmora
If your video doesn’t have the ideal features for Snapchat uploading, you don’t need to worry. You can easily edit your video on Filmora X to adjust everything including the aspect ratio, size, and format.
Part1. Changing Snapchat Video Format on Filmora
- Importing Video
The first step is to import the video using the option ‘Import Media Files’ in the import tab. You can also drag and drop the media files you need to work on.
- Selecting the Right Output Format
Once you have imported the file, drag and drop it onto the Timeline. Now click on the ‘Export’ button. Here you will be able to select your output video format which needs to be either MOV or MP4.
- Exporting Your Snapchat Video
After you have defined the settings, you can click on the ‘Export’ button to start the saving process. Your video is now available to you in the right format.
Part2. Changing Snapchat Video Aspect Ratio on Filmora
You can use multiple methods to change the aspect ratio of your Snapchat video on Filmora. It depends on the nature of editing you need to perform on your video. You can choose from any of the methods given below to edit your video for Snapchat in a user-friendly manner on Mac.
● Method 1 - Launch the editor and click on the drop-down list. You will see the popular aspect ratios listed in the list from where you can choose any. Select the right one that is 9:16 for Snapchat and export the file right away.
● Method 2 - The second method you can use is present under the Project Settings. You can also lock the aspect ratio using the features available here.
● Method 3 - The third method allows you to change the aspect ratio manually during the video editing process. You need to right-click on the timeline and select the ‘Crop and Zoom’ option. You will see a pop-up window where all the popular options will be available to you. You can choose either of them or select an aspect ratio manually.
● Step 4 - The final method to change the aspect ratio of your video on Mac is at the time of exporting your media file. Here you can select the aspect ratio for your local computer, a particular device, YouTube, or DVD TV.
Part3. Changing Snapchat Video Size on Filmora
- Importing Media File to Filmora
Using the ‘Import’ menu, import your media files, or simply drag and drop them from your Mac OS. Once the files are in the software, drag them to the Timeline track.
- Cropping Your Video for Snapchat
Here you can use the ‘Crop and Zoom’ button from the Timeline by right-clicking on it, so you can only focus on the aspect of the video that you want to show. This will resize the video as well.
- Cutting the Video
Another option you have is to delete the unnecessary parts of the video by selecting them through the indicator present on the timeline. Once you have selected the parts you don’t need, right-click on them and select ‘Delete’.
- Exporting Your Snapchat Video
Once you have resized your video by cropping and cutting the media file, you can now export it in the right resolution, bit rate, and format to ensure you get the minimum file size.
Liza Brown
Liza Brown is a writer and a lover of all things video.
Follow @Liza Brown
Optimal Transfer Methods: IPhone Camera Roll to Snapchat Journey
Many people haven’t backed up their camera roll to Snapchat due to the default settings. If you want to save each photo or video from your device on the Snapchat cloud, backing up the camera to the Memories is necessary. By doing so, you cannot lose important photos or videos from your phone.
If you change the default settings of the Memories created from the camera roll, Snapchat will automatically create a backup of your Memories. In this regard, this article will guide you on how to back up the camera roll to Snapchat in the easiest way.
Part 1: Backing up automatically - Creating Snapchat Stories from your Camera Roll
If you don’t want to alter the settings of your camera roll, this part will offer you an easy method. Through this method, you can create Snapchat stories from the camera roll directly. By doing so, you can instantly save the camera roll photos to your Snapchat without backing up. To make a Snapchat story from your camera roll, read the following instructions:
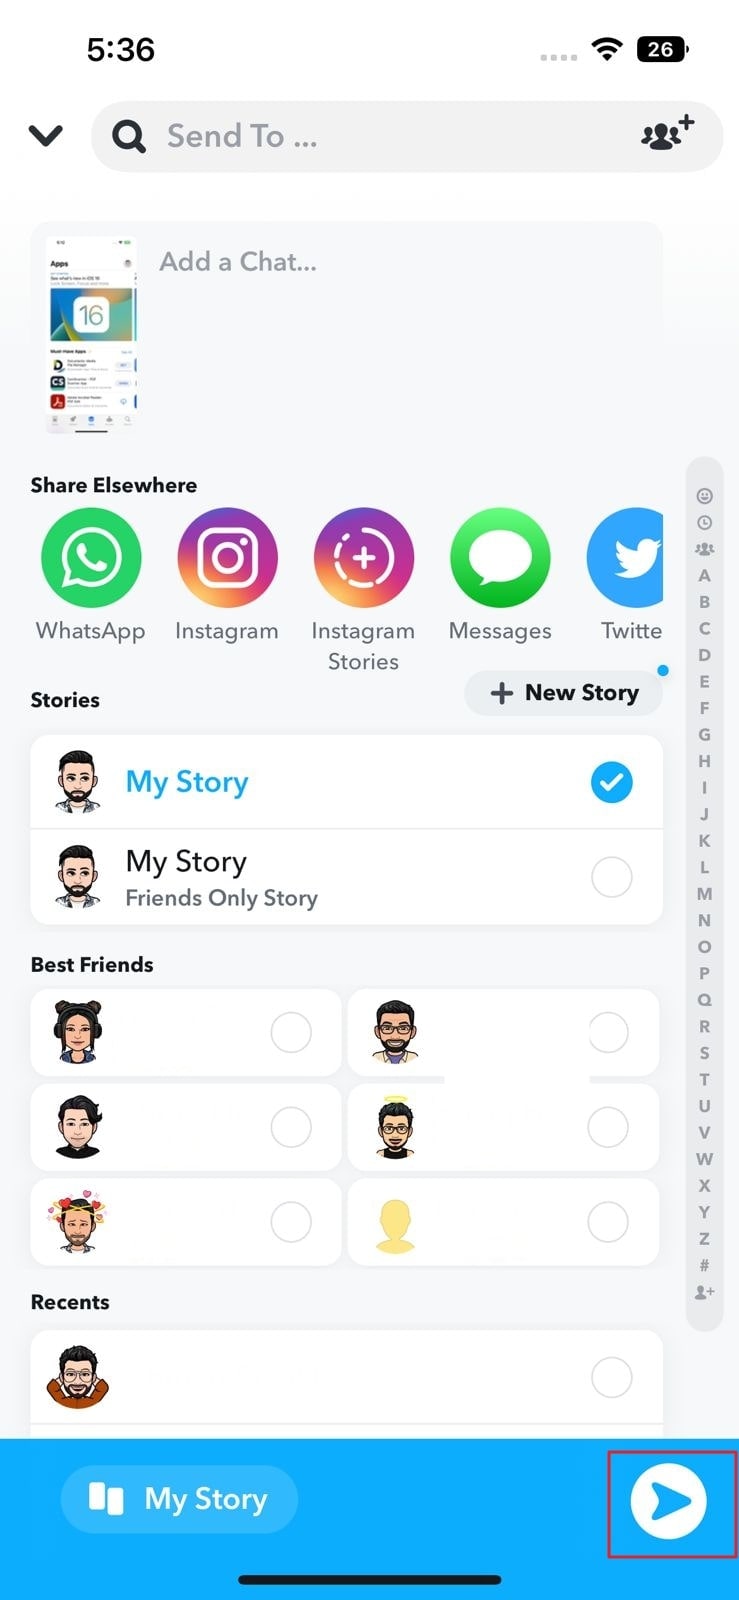
Step1 Open your Snapchat and swipe up from the bottom. Head to the Camera Roll section and select any photo.

Step2 After selecting a particular photo or video, hit the “Arrow” icon. Afterward, tap on the “My Story” option to create a story. For confirmation, press the “Arrow” icon again. This will create a Snapchat story instantly from your Camera Roll.
Part 2: How to Backup your Camera Roll to Snapchat without Creating Stories
In Snapchat, you can only save the camera roll videos having a maximum of 10-second length. It indicates that you cannot save the camera roll videos which exceed the 10-second limit. Furthermore, there are various ways that enable you to make a Camera Roll backup on Snapchat. In this part, we will guide you on how to save a Camera roll photo or video on Snapchat without creating a story. Also, these steps are applicable on both Android and iOS devices:
Step1 After opening your Snapchat app, open your Memories by swiping up. Proceed to your “Camera Roll” section and long-press on any picture. This will let you select any photo or video on your Camera Roll.

Step2 Once you have selected the picture, choose the “Create Story” option. Afterward, tap on the “Save Story” option, which will save the camera roll picture in the Memories section.

Part 3: How to Check Your Backup Progress
To ensure a complete backup of your Memories on Snapchat, a stable Wi-Fi connection is mandatory. That’s why make sure to connect your phone with a stable and strong internet connection. Moreover, if you have chosen multiple photos or videos from the Camera Roll, you can save them as a story on Snapchat. However, if you want to save individual images, you will need to make their backup separately in Memories. To check your backup progress on Snapchat, navigate to the following steps:
Step1 Once you have opened your Snapchat, tap on your Bitmoji icon. From there, proceed to the “Settings” by tapping on the gear icon.

Step2 Scroll down a little to find the option “Memories.” Afterward, you can see the option “Backup Progress.” If you can see the word “Complete,” it means that your Memories are backed up completely. If not, connect your phone to a stable Wi-Fi connection.

Part 4: How to Turn On the Smart Backup
A Smart Backup is an advanced option on Snapchat that lets you back up memories automatically. If you enable this feature, Snapchat will automatically create a backup through a stable internet connection. This feature allows you to easily access your Memories even if you reinstall Snapchat on another device. Moreover, you can save your phone’s storage by saving photos or videos in Memories. To activate the Smart Backup feature, read the below instructions:
Step1 After opening Snapchat, head to its “Settings.” In the Settings menu, locate the option “Memories.”

Step2 After tapping on Memories, you can see various options. Among multiple options, turn on the toggle of “Smart Backup.” Thus, Snapchat will automatically back up your Memories through this activated feature.

Part 5: FAQs
1. How to Backup Memories to Camera Roll on Snapchat?
Open your Snapchat and head to its “Memories.” From the “Snaps” section, select any snap that you want to save to Camera Roll. After choosing the snap, hit on the “Arrow” icon. Under the “Share Elsewhere” heading, press the “Download” icon. This will immediately save the snap on your Camera Roll.
2. How to Backup Pictures in Both Memories and Camera Roll?
To initiate, tap on your “Bitmoji” icon on Snapchat. Head to “Settings” and choose “Memories” from the displayed options. Afterward, tap on the “Save Button” option under the heading “Save Destinations.” In the “Save Button” menu, you can tap “Memories and Camera Roll” to backup pictures in both sections.
3. How to Get My Story Snaps to Auto-Save to Memories?
The process to auto-save the stories to Memories is quite simple. For this, open the “Settings” of Snapchat and head to the “Memories” option. Under the heading called “Save Destination,” tap on “Auto-Save My Story Snaps.” Once done, enable the option “Auto-Save to Memories.” Thus, your Snapchat stories will be automatically saved to your Memories.
Wrap Up
Snapchat allows you to save the captured pictures and videos in their Memories. By doing so, you can save your device’s storage space easily. Moreover, you can access the saved snaps in Memories by logging into your Snapchat from any device. That’s why this article has offered a well-described guide on how to back up the camera roll to Snapchat in a simple way.
Free Download For Win 7 or later(64-bit)
Free Download For macOS 10.14 or later
Free Download For macOS 10.14 or later
Also read:
- [New] 2024 Approved Accelerating Filming on TikTok for Real-Time Results
- [New] 2024 Approved Broadcast Brilliance with Cost-Effective Templates
- [New] Comprehensive LG BP350 Monitor Review with Comparisons for 2024
- [Updated] Capturing Audiences' Attention with Animated Viral Video Hits
- [Updated] In 2024, Mastering Video Creation Adobe Captivate Guide
- [Updated] In 2024, Pioneer Your Personal Brand in TikTok with Dynamic Backgrounds
- [Updated] In 2024, Stirring Interest & Emotions The Ultimate Guide to Engaging TikTok Captions
- [Updated] Join the Readathon with These #Booktik Hits
- [Updated] Risk-Free Providers of Popularity Boosts on TikTok
- 2024 Approved 5 Prime GIF to Video Conversion Services, No Download Required
- 2024 Approved Winning Strategies & Hashtags for YouTube's Best FreeFirers
- Ensuring Secure Bitcoin Transactions: Expert Advice From YL Computing & YL Software
- Expert Advice: Fix Heartcrashes on PC to Enjoy Uninterrupted Play in Hearthstone
- How to Launch Snapchat Seamlessly on Mac Systems
- Resolving 'Unable to Get Settings' Issue in NVIDIA GeForce Experience
- Unlocking the Potential of iOS 16'S Depth Feature: 7 Essential Troubleshooting Steps
- Title: Perfect Snapchat Video Maximizing Mac Capabilities
- Author: Gary
- Created at : 2024-12-27 16:46:39
- Updated at : 2025-01-03 16:50:56
- Link: https://tiktok-clips.techidaily.com/perfect-snapchat-video-maximizing-mac-capabilities/
- License: This work is licensed under CC BY-NC-SA 4.0.