
![[New] The Ultimate Guide to TikTok Video Sharing (Chrome, Android)](https://www.lifewire.com/thmb/_atXbVpqt-bBP3NhxI9aFSkiOqU=/400x300/filters:no_upscale():max_bytes(150000):strip_icc():format(webp)/GettyImages-1305200685-e977d0ca4e9a47e2b006e5b32a9922fd.jpg)
[New] The Ultimate Guide to TikTok Video Sharing (Chrome, Android)
The Ultimate Guide to TikTok Video Sharing (Chrome, Android)
Tiktok started out as a popular video-sharing platform for smartphones, but due to the massive response it got from people all around the world, it also launched a desktop version in 2021.
While creating, editing, and uploading videos on Tiktok via smartphones is as easy as pie, many people find it confusing, especially those new to this platform.
Therefore, in this article, we have compiled a step-by-step guide on how to upload Tiktok videos on Chrome, Android, and iPhone.
So, let’s get into it asap!
Upload Tiktok Videos on Chrome
Uploading Tiktok videos via Chrome is quite an easy and straightforward process. Just follow these steps, and you’re done!
Step 1
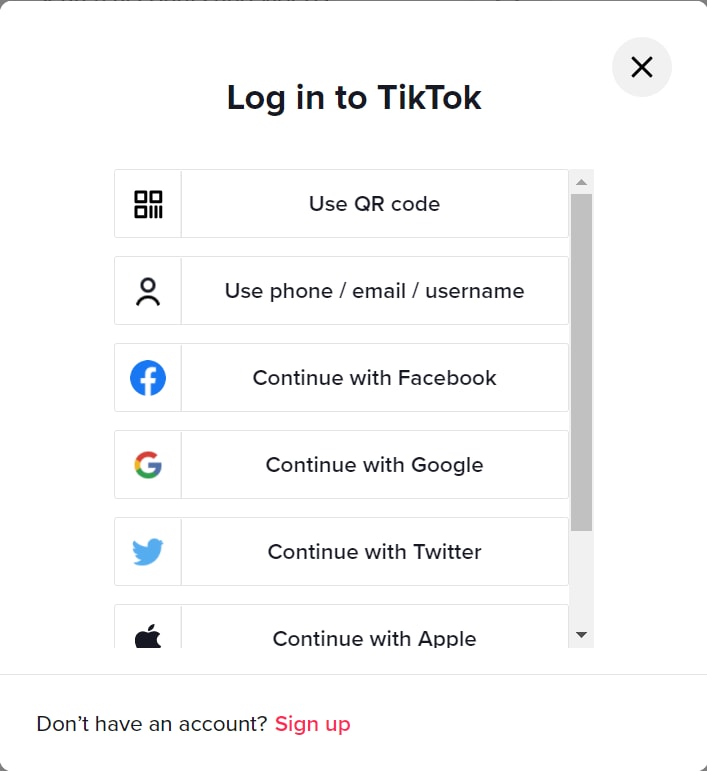
Go to the website version of Tiktok from Chrome, and click on “Log In” at the top-right corner of the page. You can also click on “Log In” under the “Following” option on the left.

Step 2
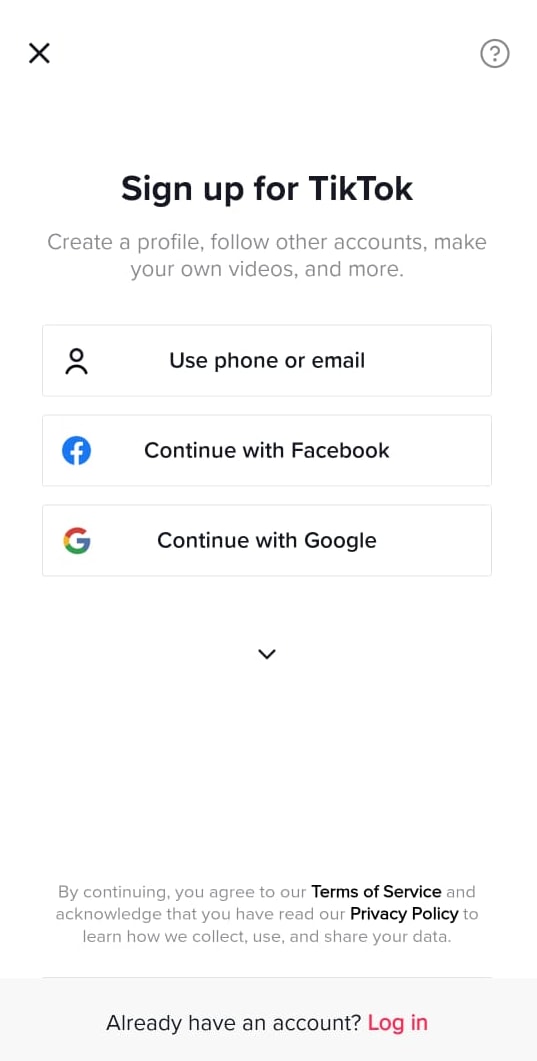
You will get a popup asking you to either sign up to Tiktok or log in using your email, Facebook, Twitter, Google, Apple, or Instagram. You can choose whichever option you find convenient.
Step 3
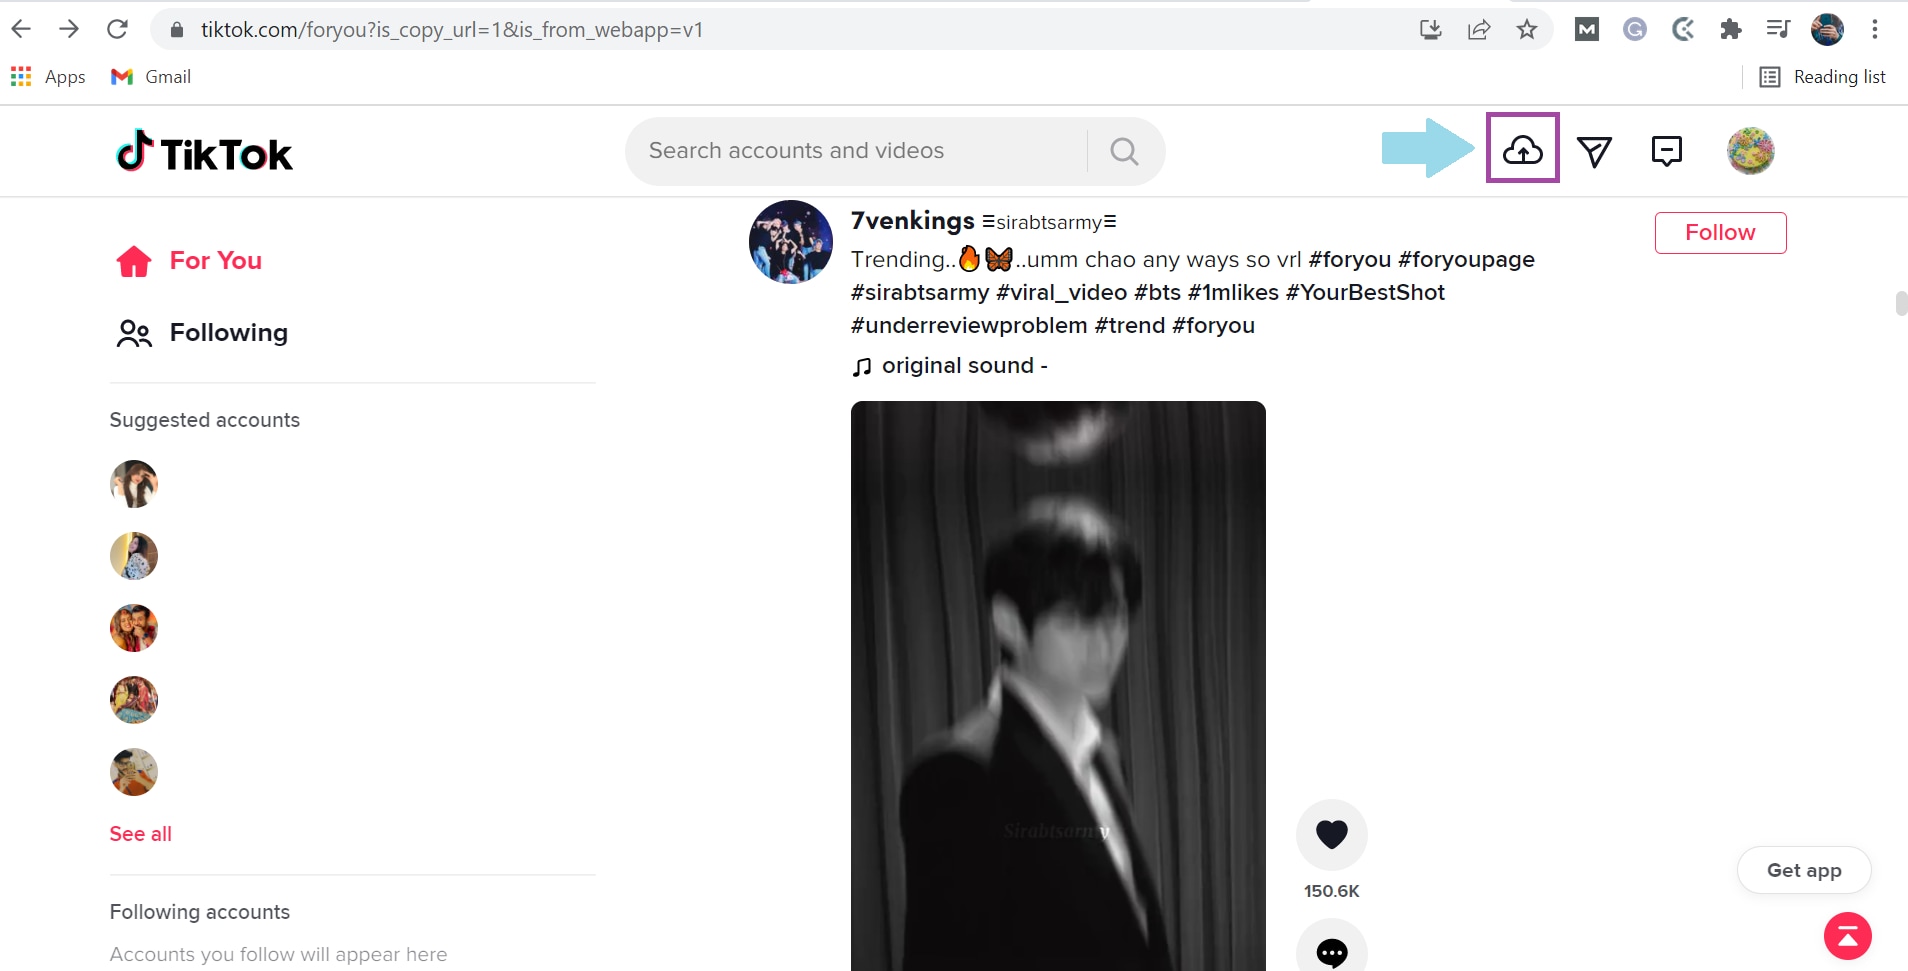
Click on the “Upload” option indicated by a cloud with an arrow.
Step 4
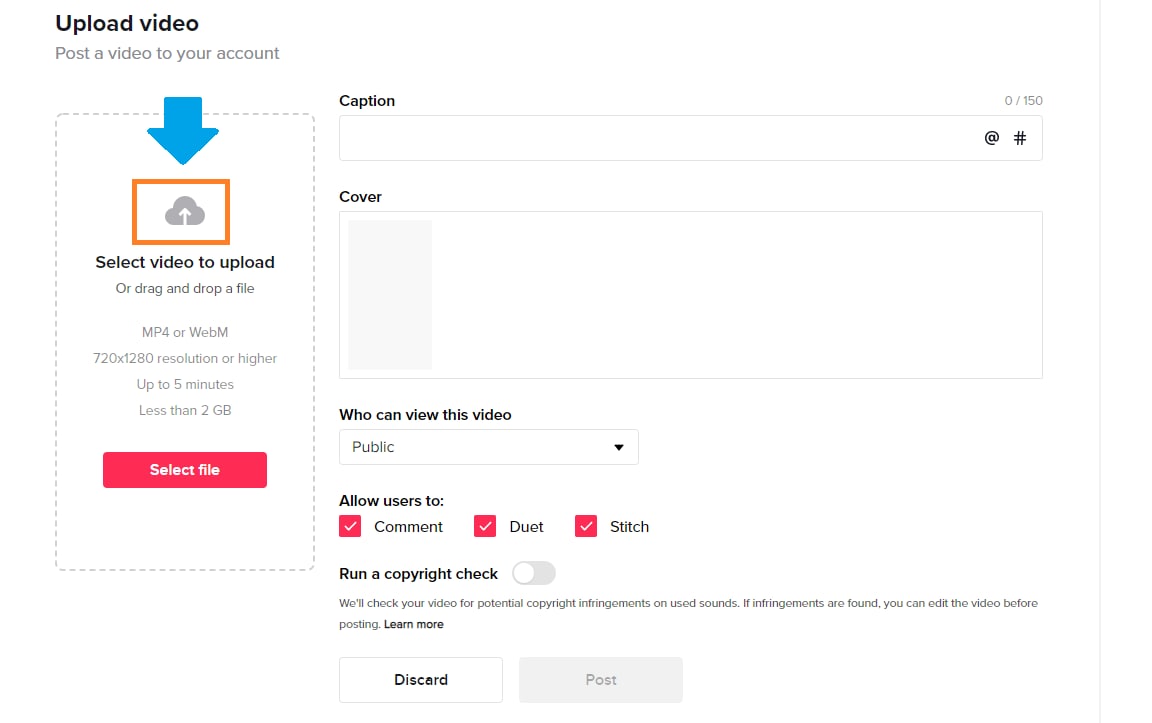
Click on “Select Video to Upload” and choose a video from your PC’s storage.
Step 5
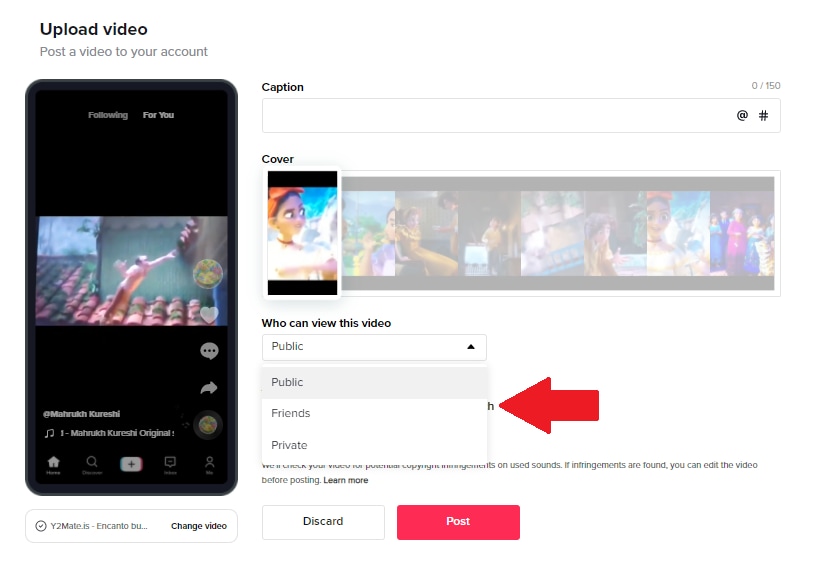
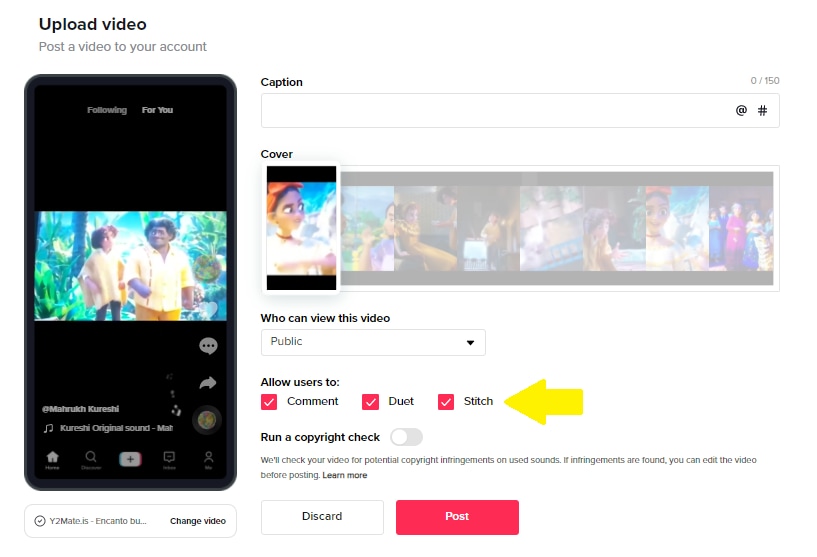
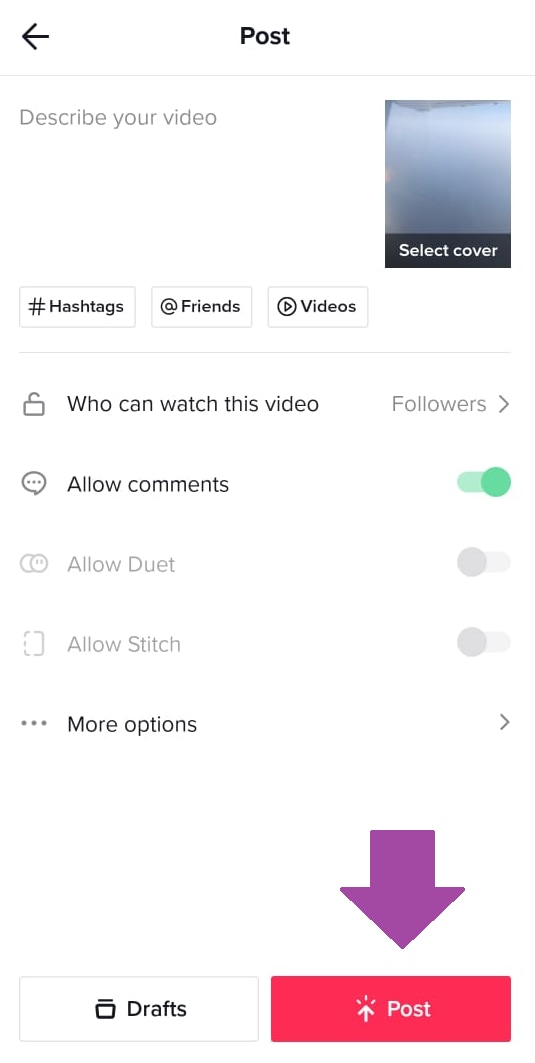
Once the video is uploaded, add a caption with hashtags and select the cover for your video.

Step 6
The next step is to choose whether your video can be viewed by the public or your friends or whether you want to keep it private from everyone.
Step 7
You can also allow or restrict users to comment on your video, make duets, or stitch your video.
Step 8
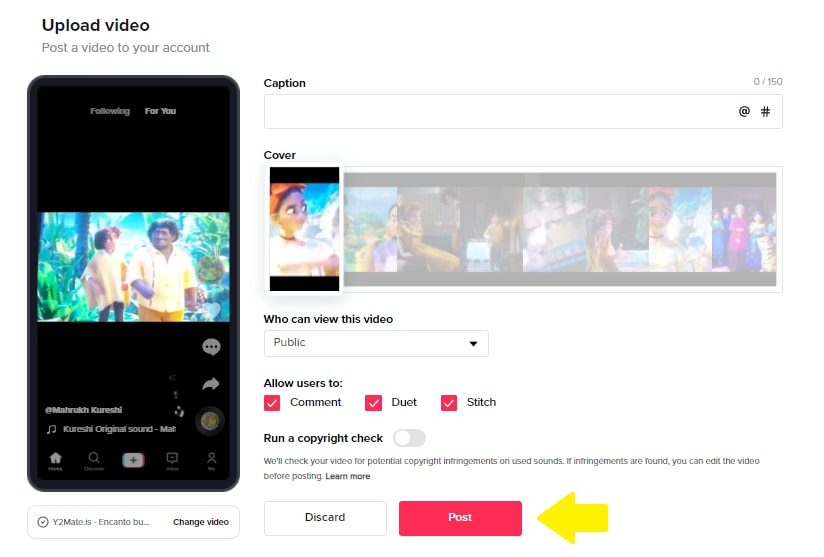
Once you have adjusted all the settings, click on “Post” to upload the video to Tiktok.
Your video will be uploaded on Tiktok and ready to receive comments and likes!
Wasn’t that easy?
Now, if you want to upload a Tiktok video on Android or iPhone, we have a tutorial for that too!
Upload Tiktok Videos on Android/iPhone
Here are the steps to upload Tiktok videos on Android or iPhone.
Step 1
Launch the Tiktok app on your Android or iOS device, and sign up using any of the given methods or log in if you already have an account.
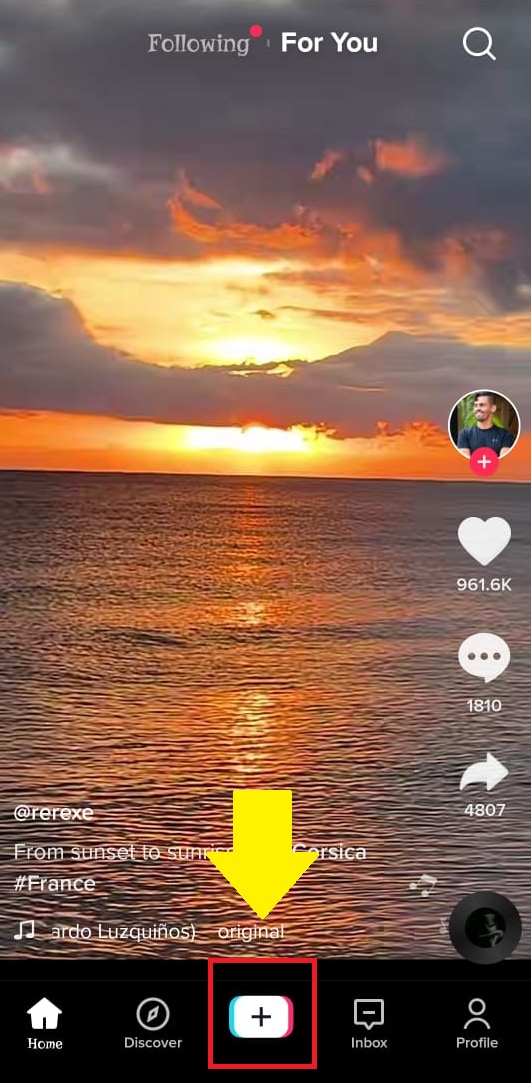
Step 2
Click on the “+” sign to go to the video recording page.
Step 3
Click on the “Upload” option at the bottom right of the screen. This will take you to your device’s gallery/photos.
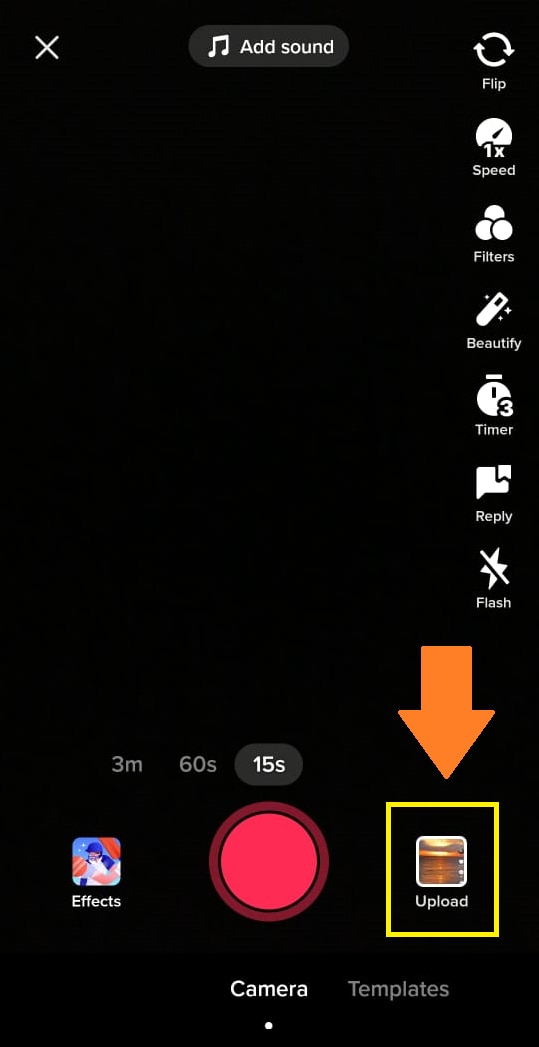
Step 4
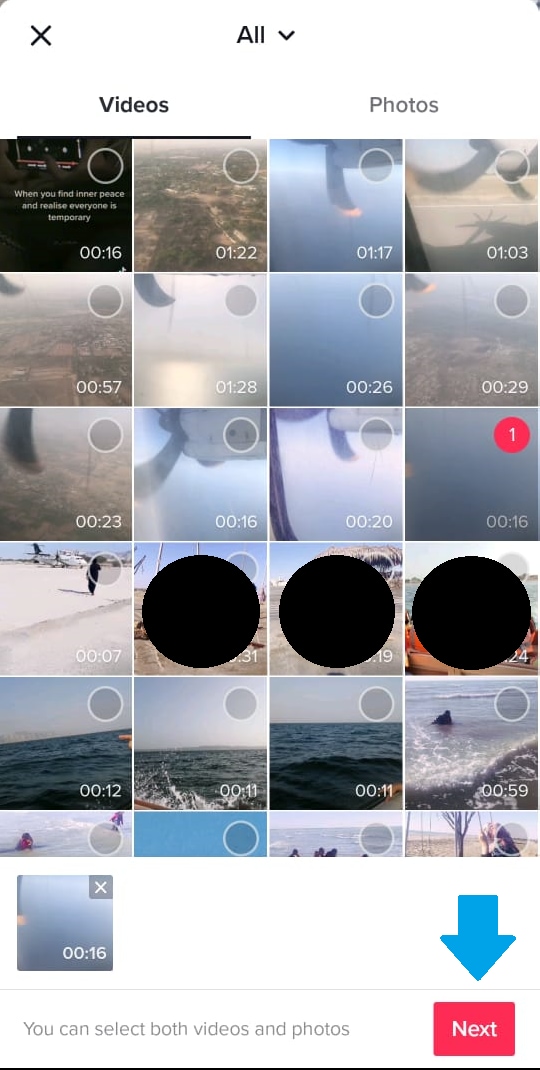
Tap on the video you want to upload to Tiktok and click “Next.”
Step 5
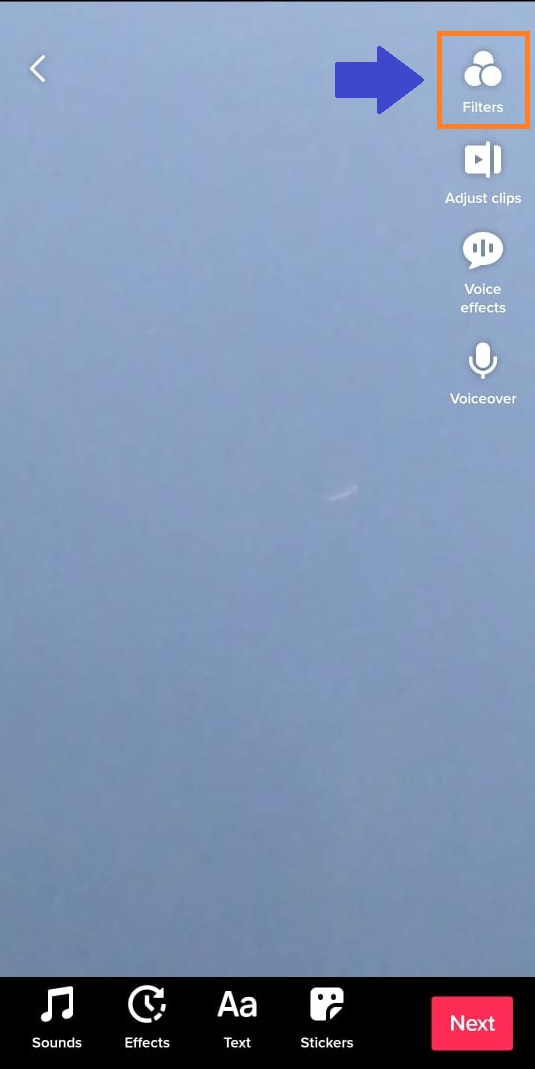
On the next page, you will see several different options to edit your video.
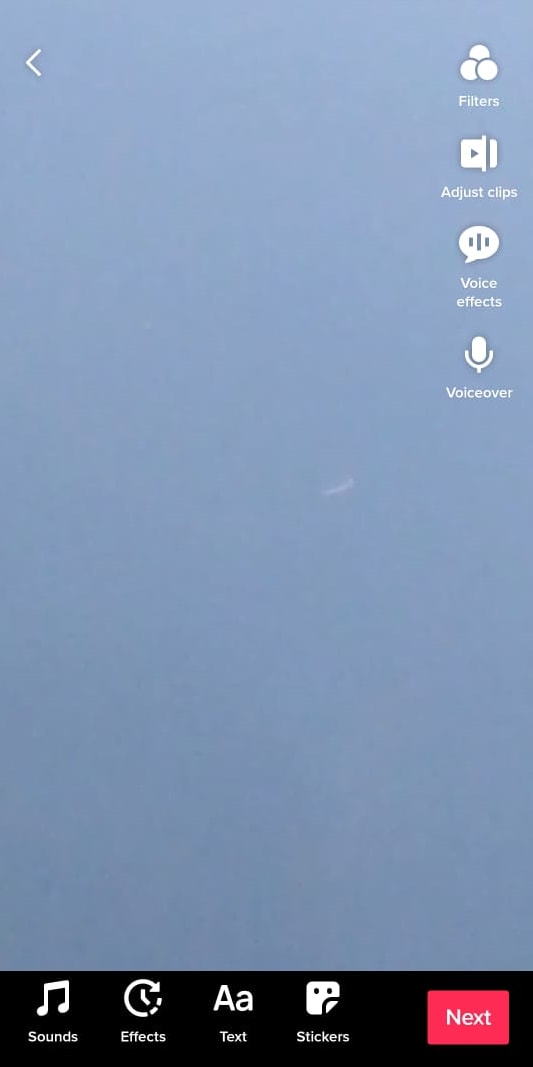
- You can add filters to your video by tapping on the “Filter” option at the top.
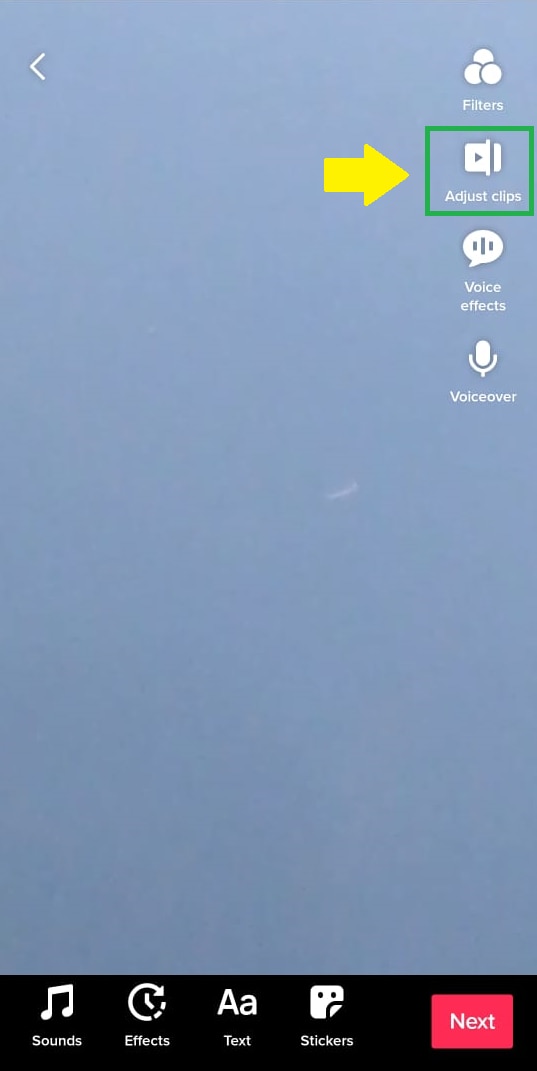
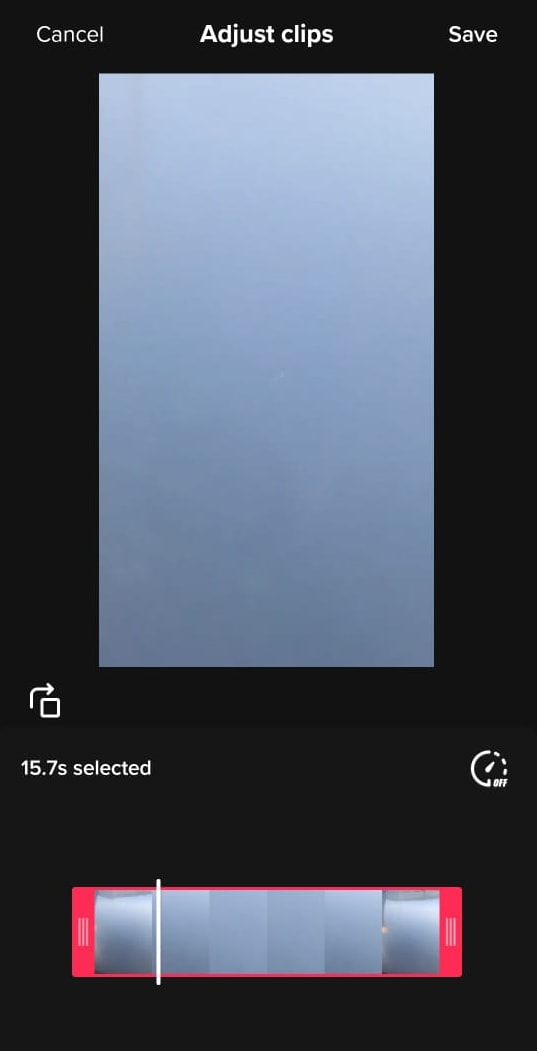
- To trim, rotate, and set the playback speed of your video, tap on “Adjust Clips.”
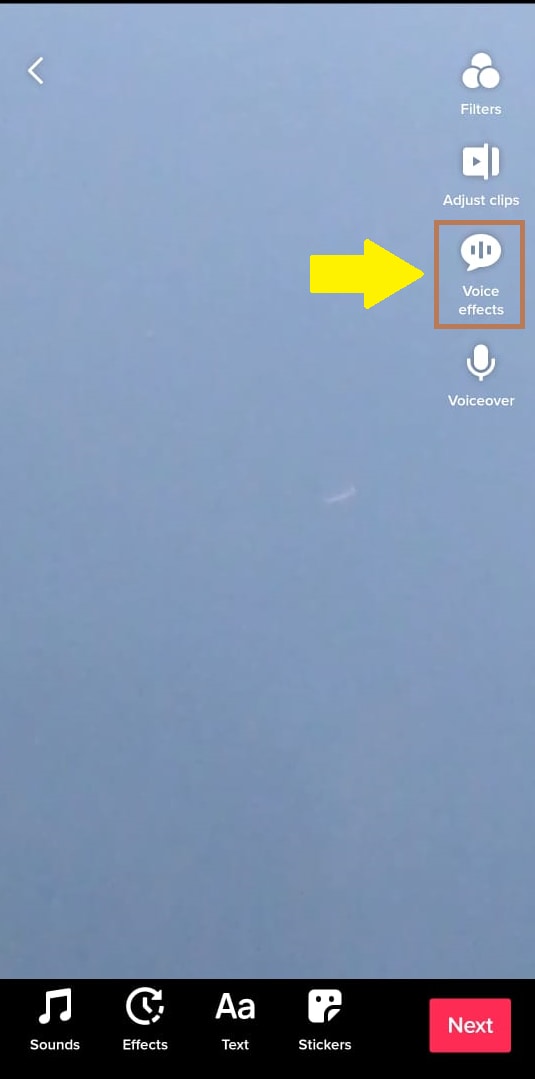
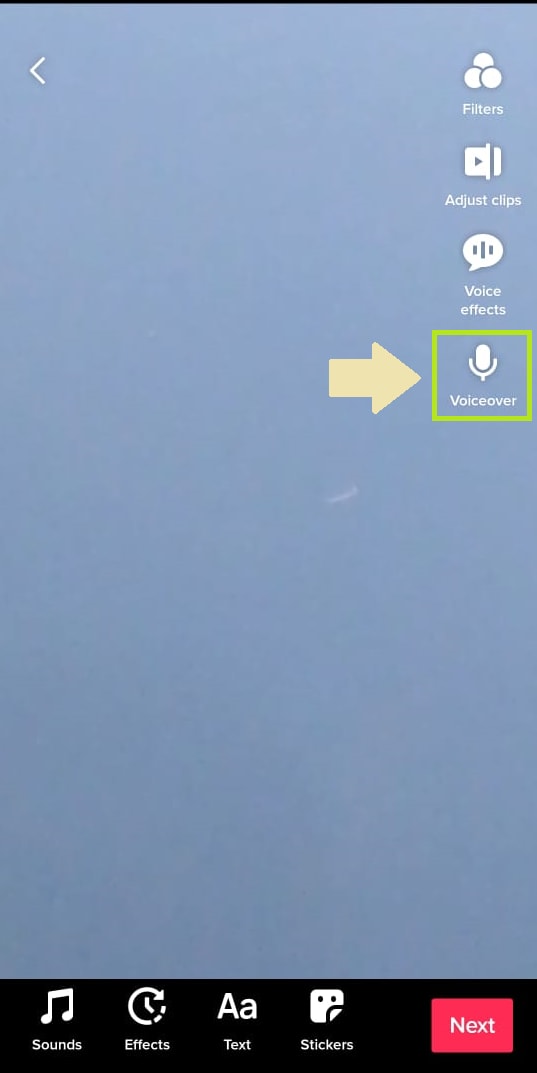
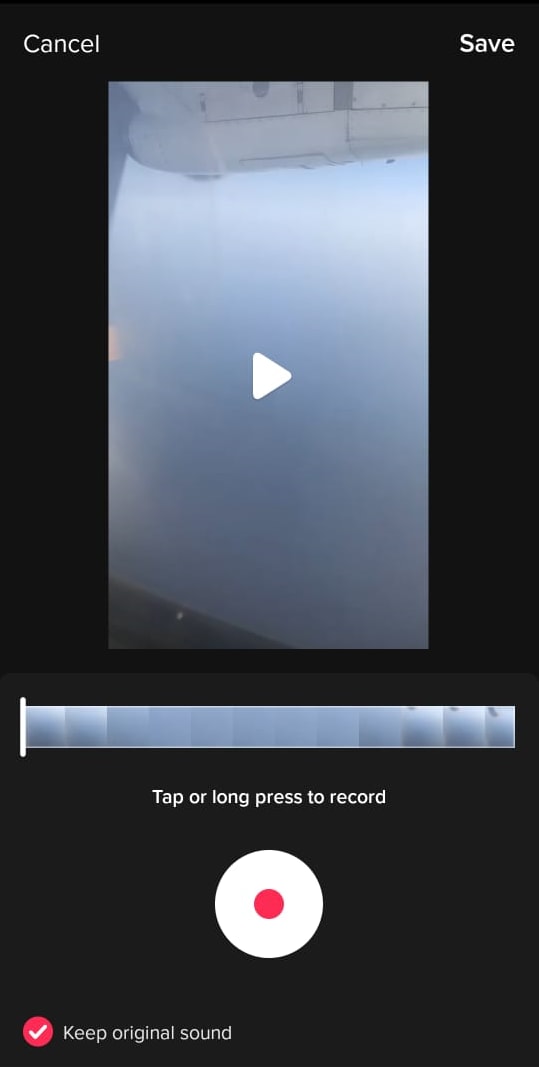
- You can also add voice effects to your videos by tapping on the “Voice Effects” button.
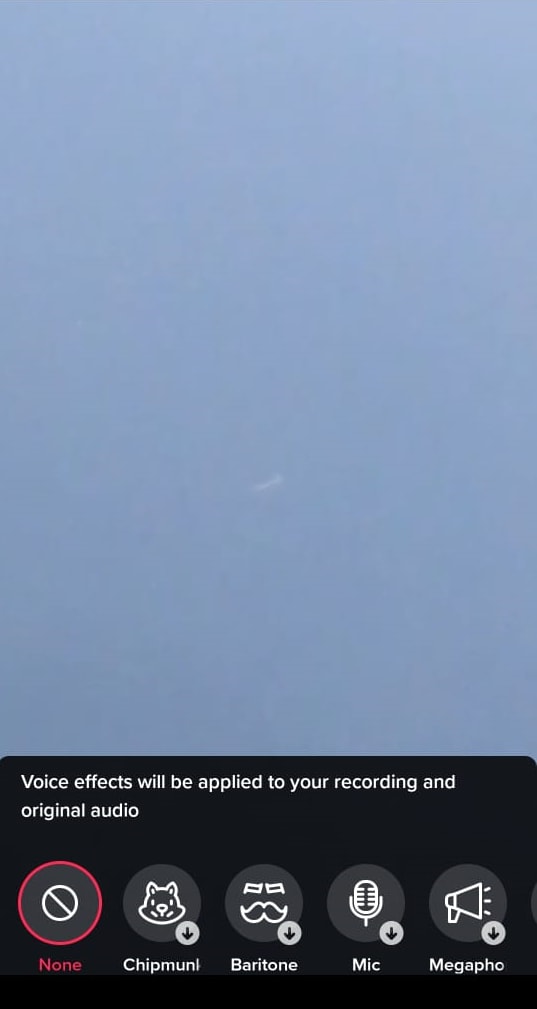
- If you want to explain something during the video, you can do so by adding a voiceover.
- To add effects to your video from Tiktok’s built-in effects library, tap on “Effects.”
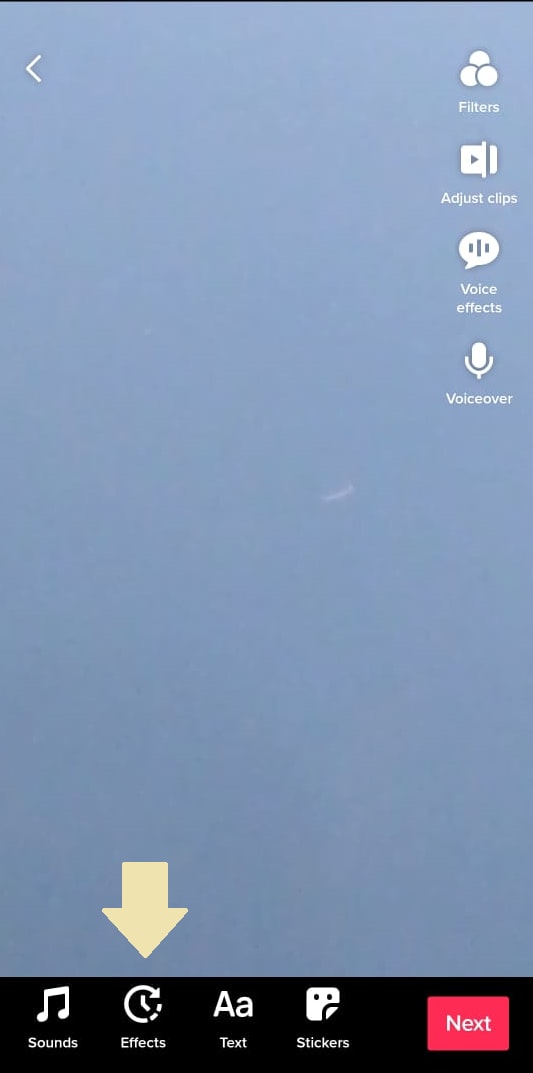
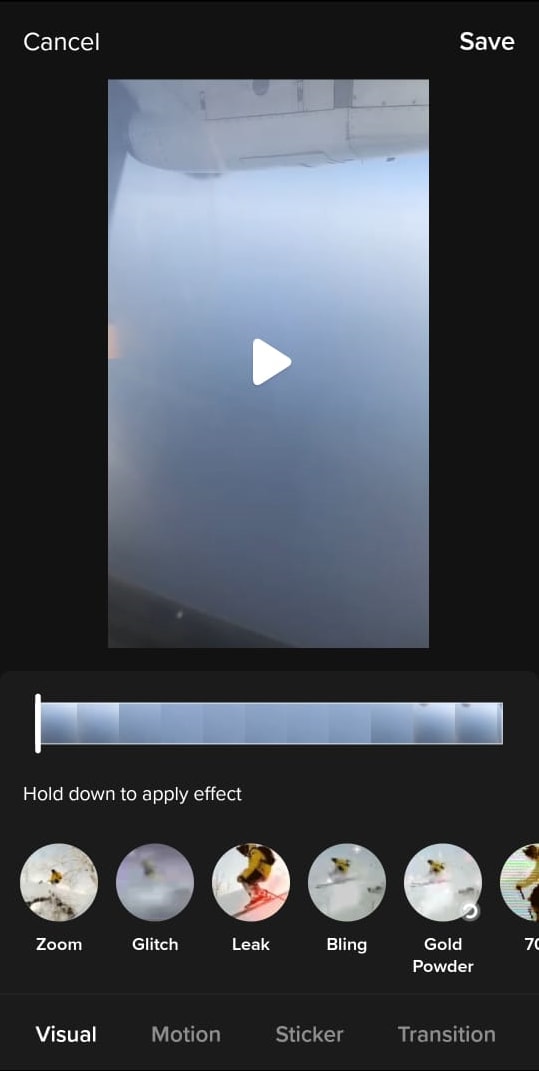
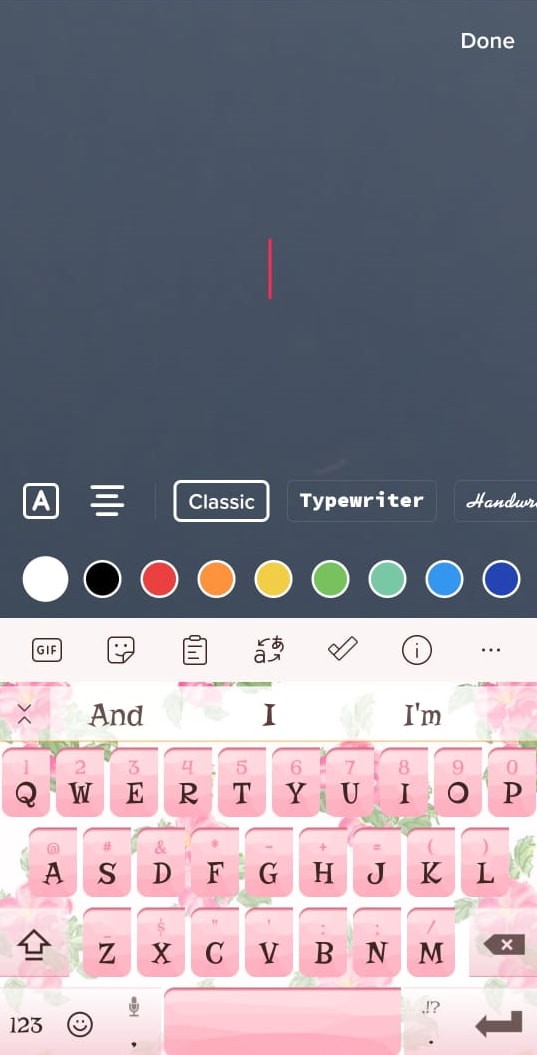
- To add text to your video, click on the “Text” button.
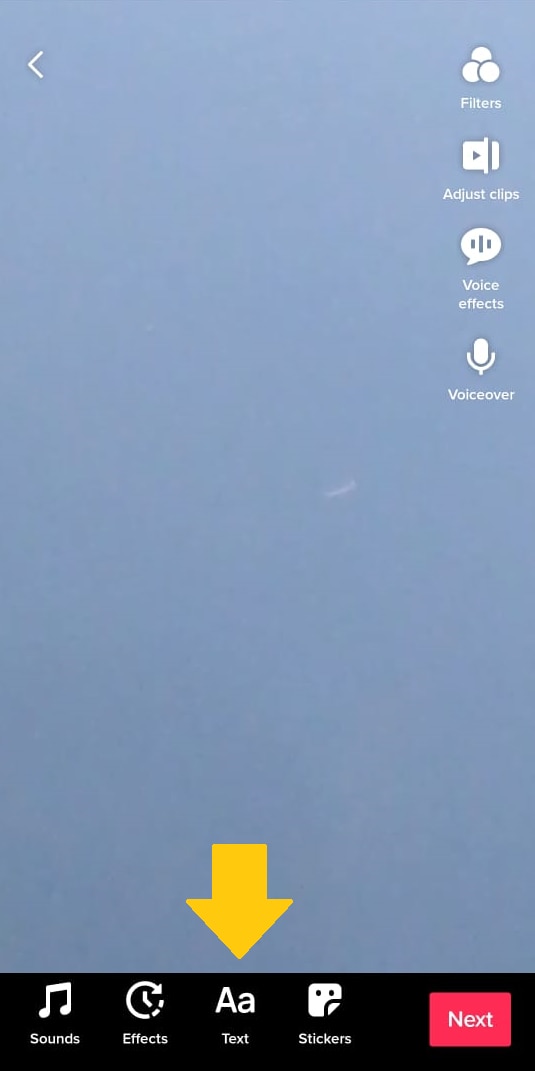
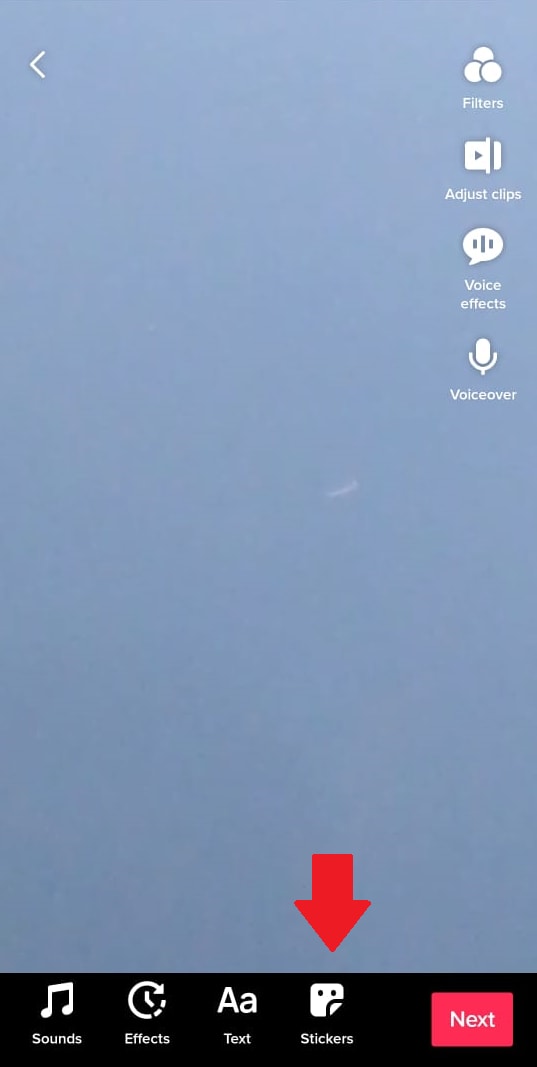
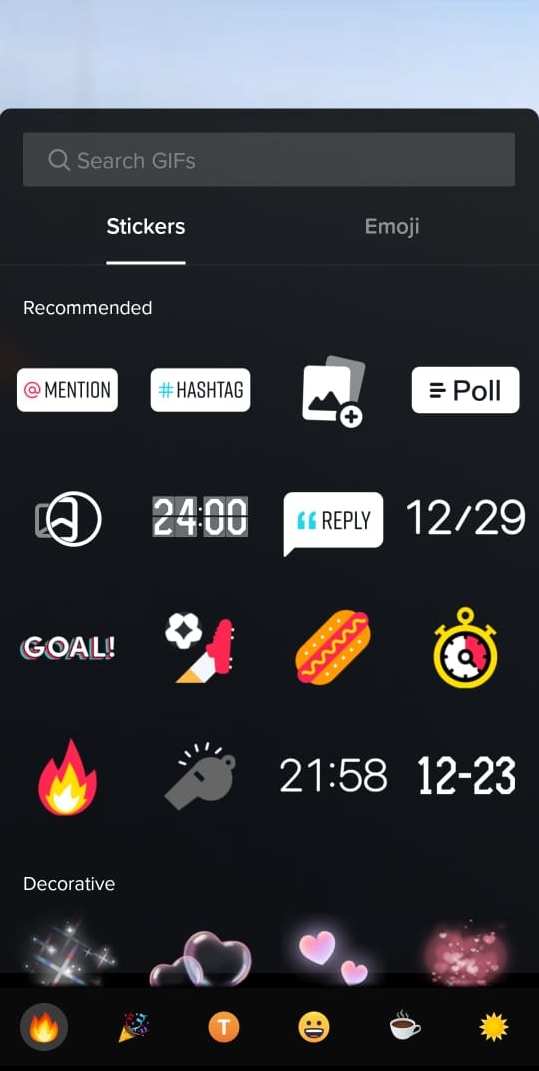
- Lastly, you can also add stickers to your videos by tapping on the “Stickers” icon.
Step 6
Once you’ve edited the video, tap “Next” and adjust the settings for posting the video. You can add a description, hashtags, tag friends, etc. You can also customize the viewers, and allow or restrict comments and duets.
Click “Post” to upload your video to Tiktok!
You have now successfully uploaded your video on Tiktok via Android or iPhone.
Conclusion
Gone are the days when there were only a handful of social media options. Now, there are many platforms that you need, to have a distinct online presence. And, some of them are too famous to ignore, like Tiktok!
In this article we have gone over several ways on how to upload Tiktok videos on Chrome, Android, and iPhone. We hope it will help you learn the basics of refining your videos before you put them out there for the world to see!
Step 2
You will get a popup asking you to either sign up to Tiktok or log in using your email, Facebook, Twitter, Google, Apple, or Instagram. You can choose whichever option you find convenient.
Step 3
Click on the “Upload” option indicated by a cloud with an arrow.
Step 4
Click on “Select Video to Upload” and choose a video from your PC’s storage.
Step 5
Once the video is uploaded, add a caption with hashtags and select the cover for your video.
Step 6
The next step is to choose whether your video can be viewed by the public or your friends or whether you want to keep it private from everyone.
Step 7
You can also allow or restrict users to comment on your video, make duets, or stitch your video.
Step 8
Once you have adjusted all the settings, click on “Post” to upload the video to Tiktok.
Your video will be uploaded on Tiktok and ready to receive comments and likes!
Wasn’t that easy?
Now, if you want to upload a Tiktok video on Android or iPhone, we have a tutorial for that too!
Upload Tiktok Videos on Android/iPhone
Here are the steps to upload Tiktok videos on Android or iPhone.
Step 1
Launch the Tiktok app on your Android or iOS device, and sign up using any of the given methods or log in if you already have an account.
Step 2
Click on the “+” sign to go to the video recording page.
Step 3
Click on the “Upload” option at the bottom right of the screen. This will take you to your device’s gallery/photos.
Step 4
Tap on the video you want to upload to Tiktok and click “Next.”
Step 5
On the next page, you will see several different options to edit your video.
- You can add filters to your video by tapping on the “Filter” option at the top.
- To trim, rotate, and set the playback speed of your video, tap on “Adjust Clips.”
- You can also add voice effects to your videos by tapping on the “Voice Effects” button.
- If you want to explain something during the video, you can do so by adding a voiceover.
- To add effects to your video from Tiktok’s built-in effects library, tap on “Effects.”
- To add text to your video, click on the “Text” button.
- Lastly, you can also add stickers to your videos by tapping on the “Stickers” icon.
Step 6
Once you’ve edited the video, tap “Next” and adjust the settings for posting the video. You can add a description, hashtags, tag friends, etc. You can also customize the viewers, and allow or restrict comments and duets.
Click “Post” to upload your video to Tiktok!
You have now successfully uploaded your video on Tiktok via Android or iPhone.
Conclusion
Gone are the days when there were only a handful of social media options. Now, there are many platforms that you need, to have a distinct online presence. And, some of them are too famous to ignore, like Tiktok!
In this article we have gone over several ways on how to upload Tiktok videos on Chrome, Android, and iPhone. We hope it will help you learn the basics of refining your videos before you put them out there for the world to see!
Perfect Your Patchwork on TikTok
Best Video Editor for Beginners on Windows and Mac
Wondershare Filmora is one of the most popular video editing software among TikTokers , download and have a try.
TikTok’s collaborative nature is one of its most appealing features. Your video is not finished the moment you publish it. They can be responded to, remixed, and re-shared by anybody. TikTok is meant to allow users to construct on other’s films shared on the network, whether you’re utilizing audio from some other video or making a duet.
Thanks to the stitch tool, creators may remix, remake, and reply to videos with a couple of taps. This article will tell you what you need to know about stitching videos on TikTok. Continue reading to learn more about Stitching and how to stitch on TikTok. Let’s get started!
In this article
02 How to Turn Stitch On or Off?
04 How to Stitch Any TikTok Video withFilmora Video Editor ?
05 FAQs About TikTok Video Stitch
Part 1: What is Stitch on TikTok?
TikTok’s latest video editing tool ‘Stitch,’ lets people incorporate video snippets from other people into their own. Creators may use Stitch to provide a five-second snippet from a TikTok video out of their own. Unlike duets that play videos together, stitched videos play in the sequence they were stitched. Videos containing open-ended questions have gained in popularity with the advent of the stitch.
Whenever you Stitch a clip-on TikTok, you are essentially inserting your video after yet another video that has already been submitted. People frequently utilize this to remark on or reply to other videos. And, when done well, it can add a lot more context to your movies.
The one limitation of the Stitch tool is that you may only publish up to five seconds from some other video. So, if you’re focusing on a Stitch, you must select the five seconds which are most critical to highlight your message.
Part 2: How to Turn Stitch On or Off?
By enabling the Stitch feature, you make your material available to millions of prospective collaborators. Consider the possibilities – it might be a fantastic approach to enhance reach and virility.
If you aren’t comfortable exposing your films to the whole TikTok community, users can opt out of allowing others to Stitch their work. You may modify them under the Privacy Controls. Here’s how to do a Stitch on TikTok:
Step 1: Launch the TikTok app and then head to your profile by clicking on the Profile option at the bottom right. After that, select the three dots to open the settings.
Step 2: After entering the settings, select Privacy to proceed, and then tap on the Stitch option to open the Stitch settings.
Step 3: Now, you will see three options that are No-one, Everyone, and Friends. If you want to allow the Stitching, select either Everyone or Friends. However, to restrict the people from stitching your videos, choose No-one. After you are done selecting, click on the back arrow to save the applied changes.
Part 3: How to Stitch on TikTok?
TikTok keeps giving creators more reasons to continue producing, and fans like us are more committed to continuing to open it. Stitch, a new app functionality from the famous social networking platform, makes things more straightforward than ever for artists to interact with each other.
But, you might be wondering, how to do a stitch on TikTok? Don’t worry; you’ve come to the right place. Here’s how:
Step 1: Launch TikTok and then go to the video that you want to stitch. Select the Share icon, which resembles an arrow. Select the Stitch symbol from the menu that displays, and then wait a few seconds for the video to complete. The lengthier the video is, the more the loading time.

Step 2: When it’s finished, you’ll be sent to a screen where you may take five seconds of the film and use it on your own. To navigate through the movie, use the sliders and the red bars to choose the portion you want. When you’re finished, tap Next.

Step 3: You’ll be sent to TikTok’s normal recording screen. Record the remainder of your TikTok video with all of the features you’re accustomed to utilizing. You may use whatever effects, stickers, texts, voiceovers, or captions you desire. After that, press the Next button.

Step 4: Make a title and hashtags for your TikTok video. You could also choose whether or not these users may Stitch your movie here – hit the toggle switch beside Allow Stitch to turn it off. Following that, hit the Post option, and your stitched video will be uploaded.

Part 4: How to Stitch Any TikTok Video with Filmora Video Editor ?
Before getting started, understand why people opt for Filmora video editor for stitching videos on TikTok when this can be done through the official TikTok application. TikTok app only allows you to stitch a video for up to five seconds which is quite frustrating if you wish to stitch an entire video.
One more reason is that, with TikTok, you cannot stitch the already existing video from the camera roll, which restricts creators from adding the already edited content to the existing video. So, to avoid the above problems, Filmora is used for stitching TikTok videos.
For Win 7 or later (64-bit)
For macOS 10.12 or later
To begin, download the video that you wish to stitch with from TikTok. After, follow the below stepwise guide:
Step 1: Launch the Filmora software on your PC and import the video files by clicking on the File and then Import/Export Media. You can simply drag and drop the videos as well.
Step 2: Drag the clips from the media library to the Timeline’s video track. All video files will be stitched into a single video with no transitions.

Note: To add a transition to the video , go to the Transition tab and drop the desired transition to the junction of two clips.

Step 3: Now, preview the stitched video and, when finished, click the Export option to save numerous video segments to a single file. Choose any format from the Format tab’s list.
Part 5: FAQs About TikTok Video Stitch
1. Can you do a Stitch on TikTok with a video from your Camera Roll?
Unfortunately, you cannot utilize a video from your Camera Roll in a Stitch at the time of this writing. So, whatever your reaction to a Stitch is, you must record 100% unique footage shot with the TikTok camera. However, you may download the video first and then stitch it with some third-party software such as Filmora.
2. Can you stitch longer than 5 seconds?
No, it is not possible to stitch a video for longer than five seconds using the built-in Stitching feature of the TikTok app. But this can be done by stitching the videos using third-party applications and software.
3. How do I see TikTok stitches?
Users who want to view as many stitches as possible can do it by browsing for them on the app. You must first browse to Discover, and from there to the search box. Then type #Stitch @username, where the username is the name of the account from which you wish to view stitches.
4. TikTok Stitch option not showing. How to fix it?
Users may choose whether or not someone else can Stitch their work in their settings. The option may be found under the Settings and Privacy tab, where users can activate or uncheck Stitch for all videos. So, if the Stitch option is not showing, the user may have disabled the Stitch option.
Conclusion
The Stitch feature is an excellent way to continue the discussion with your videos. You may leave comments on popular content on the site. Most importantly, it may be a fun method to generate material different from what you usually publish. And since you know How to Stitch on TikTok after reading this article, stitch the videos today and create unique content!
TikTok’s collaborative nature is one of its most appealing features. Your video is not finished the moment you publish it. They can be responded to, remixed, and re-shared by anybody. TikTok is meant to allow users to construct on other’s films shared on the network, whether you’re utilizing audio from some other video or making a duet.
Thanks to the stitch tool, creators may remix, remake, and reply to videos with a couple of taps. This article will tell you what you need to know about stitching videos on TikTok. Continue reading to learn more about Stitching and how to stitch on TikTok. Let’s get started!
In this article
02 How to Turn Stitch On or Off?
04 How to Stitch Any TikTok Video withFilmora Video Editor ?
05 FAQs About TikTok Video Stitch
Part 1: What is Stitch on TikTok?
TikTok’s latest video editing tool ‘Stitch,’ lets people incorporate video snippets from other people into their own. Creators may use Stitch to provide a five-second snippet from a TikTok video out of their own. Unlike duets that play videos together, stitched videos play in the sequence they were stitched. Videos containing open-ended questions have gained in popularity with the advent of the stitch.
Whenever you Stitch a clip-on TikTok, you are essentially inserting your video after yet another video that has already been submitted. People frequently utilize this to remark on or reply to other videos. And, when done well, it can add a lot more context to your movies.
The one limitation of the Stitch tool is that you may only publish up to five seconds from some other video. So, if you’re focusing on a Stitch, you must select the five seconds which are most critical to highlight your message.
Part 2: How to Turn Stitch On or Off?
By enabling the Stitch feature, you make your material available to millions of prospective collaborators. Consider the possibilities – it might be a fantastic approach to enhance reach and virility.
If you aren’t comfortable exposing your films to the whole TikTok community, users can opt out of allowing others to Stitch their work. You may modify them under the Privacy Controls. Here’s how to do a Stitch on TikTok:
Step 1: Launch the TikTok app and then head to your profile by clicking on the Profile option at the bottom right. After that, select the three dots to open the settings.
Step 2: After entering the settings, select Privacy to proceed, and then tap on the Stitch option to open the Stitch settings.
Step 3: Now, you will see three options that are No-one, Everyone, and Friends. If you want to allow the Stitching, select either Everyone or Friends. However, to restrict the people from stitching your videos, choose No-one. After you are done selecting, click on the back arrow to save the applied changes.
Part 3: How to Stitch on TikTok?
TikTok keeps giving creators more reasons to continue producing, and fans like us are more committed to continuing to open it. Stitch, a new app functionality from the famous social networking platform, makes things more straightforward than ever for artists to interact with each other.
But, you might be wondering, how to do a stitch on TikTok? Don’t worry; you’ve come to the right place. Here’s how:
Step 1: Launch TikTok and then go to the video that you want to stitch. Select the Share icon, which resembles an arrow. Select the Stitch symbol from the menu that displays, and then wait a few seconds for the video to complete. The lengthier the video is, the more the loading time.
Step 2: When it’s finished, you’ll be sent to a screen where you may take five seconds of the film and use it on your own. To navigate through the movie, use the sliders and the red bars to choose the portion you want. When you’re finished, tap Next.
Step 3: You’ll be sent to TikTok’s normal recording screen. Record the remainder of your TikTok video with all of the features you’re accustomed to utilizing. You may use whatever effects, stickers, texts, voiceovers, or captions you desire. After that, press the Next button.
Step 4: Make a title and hashtags for your TikTok video. You could also choose whether or not these users may Stitch your movie here – hit the toggle switch beside Allow Stitch to turn it off. Following that, hit the Post option, and your stitched video will be uploaded.
Part 4: How to Stitch Any TikTok Video with Filmora Video Editor ?
Before getting started, understand why people opt for Filmora video editor for stitching videos on TikTok when this can be done through the official TikTok application. TikTok app only allows you to stitch a video for up to five seconds which is quite frustrating if you wish to stitch an entire video.
One more reason is that, with TikTok, you cannot stitch the already existing video from the camera roll, which restricts creators from adding the already edited content to the existing video. So, to avoid the above problems, Filmora is used for stitching TikTok videos.
For Win 7 or later (64-bit)
For macOS 10.12 or later
To begin, download the video that you wish to stitch with from TikTok. After, follow the below stepwise guide:
Step 1: Launch the Filmora software on your PC and import the video files by clicking on the File and then Import/Export Media. You can simply drag and drop the videos as well.
Step 2: Drag the clips from the media library to the Timeline’s video track. All video files will be stitched into a single video with no transitions.
Note: To add a transition to the video , go to the Transition tab and drop the desired transition to the junction of two clips.
Step 3: Now, preview the stitched video and, when finished, click the Export option to save numerous video segments to a single file. Choose any format from the Format tab’s list.
Part 5: FAQs About TikTok Video Stitch
1. Can you do a Stitch on TikTok with a video from your Camera Roll?
Unfortunately, you cannot utilize a video from your Camera Roll in a Stitch at the time of this writing. So, whatever your reaction to a Stitch is, you must record 100% unique footage shot with the TikTok camera. However, you may download the video first and then stitch it with some third-party software such as Filmora.
2. Can you stitch longer than 5 seconds?
No, it is not possible to stitch a video for longer than five seconds using the built-in Stitching feature of the TikTok app. But this can be done by stitching the videos using third-party applications and software.
3. How do I see TikTok stitches?
Users who want to view as many stitches as possible can do it by browsing for them on the app. You must first browse to Discover, and from there to the search box. Then type #Stitch @username, where the username is the name of the account from which you wish to view stitches.
4. TikTok Stitch option not showing. How to fix it?
Users may choose whether or not someone else can Stitch their work in their settings. The option may be found under the Settings and Privacy tab, where users can activate or uncheck Stitch for all videos. So, if the Stitch option is not showing, the user may have disabled the Stitch option.
Conclusion
The Stitch feature is an excellent way to continue the discussion with your videos. You may leave comments on popular content on the site. Most importantly, it may be a fun method to generate material different from what you usually publish. And since you know How to Stitch on TikTok after reading this article, stitch the videos today and create unique content!
Also read:
- [New] In 2024, No Watermark, No Problem Top MP4 Conversion Services
- [New] 2024 Approved Maximizing Reach in TikTok Ads Methods & Highlighted Campaigns
- In 2024, Top 10 Must-Try TikTok Challenges
- In 2024, The Game Changer 2 Ways to Elevate Your TikTok Video Creations Using Filmora
- In 2024, Catchy Choreo TikTok's Favored Dance Hits
- Who Are The World's Most Captivating TikTok Personalities for 2024
- [New] 2024 Approved Mastering Vocal Customization Techniques in TikTok Videos
- Invisible Snapshotting Hidden Image Recording on Snapchat
- [New] Best MP3 Extractors From TikTok - Online & at Zero Price for 2024
- 2024 Approved Transformative Tips for a Dynamic TikTok Identity Update
- [New] In 2024, Essential Apps for Cleaning TikTok Video Logos
- 2024 Approved Unique and Personalized Approaches to Your TikTok PFP
- Best 10 Filter Combos To Make Your TikTok Unique
- 2024 Approved Avoid Legal Pitfalls Pre-Upload Video Copyright on TikTok
- [Updated] Captivating Creativity Top 30 Unique TikTok Profile Photos
- In 2024, Elevate Your TikTok Skills with Voiceover
- [Updated] The Complete Guide to Implementing Siri Speech on TikTok Platforms
- In 2024, Country Soundscapes to Soothe Your Soul (TikTok Edition)
- [New] Discovering the Charm #7 Most Popular TikTok Emojis & Secret Symbols for 2024
- Setting Up Snapchat on Apple Computers Step by Step
- Purity in Production Leading Watermark Erasers
- Become a Pro Voiceovers on TikTok
- Mastering the Art of Vocal Tweaks in TikTok Videos for 2024
- [New] Amplifying Your TikTok Voice Strategies for More Views and Likes
- [Updated] In 2024, Commanding Attention with the Most Powerful TikTok Caption Strategies
- [New] How to Exclude Unwanted Sounds in Your Recordings Using Audacity
- [New] Elevate Your Watch Time Master the TikTok Fast-Forward Feature
- From One to a Hundred A Guide to Creating Multiple TikToks of Youself
- Master TikTok Snap Enhancers Quickly & Virally for 2024
- [New] In 2024, Mouthwatering Moments 10 Viral Food Trends on TikTok
- 2024 Approved Relaxation Playlist 20 Sweetest Country Tunes on TikTok
- In 2024, Top 20 TikTok Anthems Discovering Today’s Hip-Hop Stars
- [Updated] Reimagining Video Sharing Top 5 Apps Outside of TikTok's Domain
- In 2024, Top 10 Ultra-Quality TikTok Videos - Clear & Free Download
- [Updated] In 2024, Culinary Content Kings & Queens of TikTok
- [New] In 2024, How to Make TikTok Big Head Effect
- [New] From Novice to Viral Video Creator 2023'S Desktop Guide
- [Updated] 2024 Approved Your Ultimate Guide to the Top 30 TikTok Deals on Amazon
- [Updated] 2024 Approved Immediate Relief for Frozen or Slowed Down TikTok on All Devices
- [New] Exploring Jujutsu Kaisen Through Creative TikTok Content for 2024
- [New] 2024 Approved Step Into 2023 A Comprehensive Guide to TikTok Elements
- [New] 2024 Approved Navigating Copyright Regulations Before You Upload on TikTok
- TikTok Mayhem The Hottest 10 Unusual Game Picks
- 2024 Approved Essential Guidelines for TikTok Web on a Mac
- [Updated] EpicureanExperts Top Chefs on TikTok for 2024
- [Updated] In 2024, Choreographing a Stellar TikTok Wrap-Up
- [New] Escaping TikTok's Silent Screens Methods to Unshadowban
- 5 Hassle-Free Solutions to Fake Location on Find My Friends Of Samsung Galaxy F54 5G | Dr.fone
- 2024 Approved Transform Your Footage A Beginners Guide to Flipping Clips in FCP
- iCloud Separation How To Disconnect Apple iPhone 8 Plus and iPad
- [Updated] In 2024, Visual Narratives Instagram Carousel
- Android Screen Stuck General Honor 100 Pro Partly Screen Unresponsive | Dr.fone
- [New] Ultimate Compilation of Leading 9 Mobile Meeting Services (iOS, Android)
- [Updated] In 2024, Minds on Trial Select Escapes That Challenge You
- 2024 Approved A Comprehensible Guide to Saving Hulu Programs on Multiple Devices
- In 2024, How PGSharp Save You from Ban While Spoofing Pokemon Go On Realme Narzo N55? | Dr.fone
- Review The Full Package of the Logitech 4K Webcam for 2024
- [New] The Ultimate Path to Link Integration on Instagram's Social Stage
- How to Track a Lost Nokia 105 Classic for Free? | Dr.fone
- New Make an Impact on LinkedIn Choosing the Right Video Aspect Ratio for 2024
- In 2024, Simple and Effective Ways to Change Your Country on YouTube App Of your Samsung Galaxy S23 Tactical Edition | Dr.fone
- [Updated] Unlocking Potential in FB Video Marketing A Definitive Overview for 2024
- Elevate Your Experience Top 5 Facebook Revelations for 2024
- The Ultimate Guide to 16X9 Ratio Calculations Top 5 Takeaways for 2024
- [New] In 2024, Mastering Social Snagging 5 Chrome HDL Vids
- [Updated] In 2024, High-End FB Photo & Film Artist (Free Access)
- 9 Solutions to Fix Nokia C32 System Crash Issue | Dr.fone
- [Updated] In-Game Magic Captured Advanced Methods for Logging Virtual Realities for 2024
- Will the iPogo Get You Banned and How to Solve It On Nokia G42 5G | Dr.fone
- [Updated] OBS-Driven Instagram Live Stream for 2024
- Updated Getting Started with LexisAudioEditor Basic Tips and Strategies
- How to Change Spotify Location After Moving to Another Country On Oppo Reno 8T | Dr.fone
- In 2024, Recommended Best Applications for Mirroring Your Samsung Galaxy A15 5G Screen | Dr.fone
- How to Change Spotify Location After Moving to Another Country On Infinix Hot 40 | Dr.fone
- Updated Video Orientation Made Easy A Quick Start Guide for 2024
- Memetic Mastery Creating Viral Content on Facebook and Insta for 2024
- Updated Transform Your Canon Footage A Comprehensive Guide to Video Editing
- [New] 2024 Approved Chromebook Screen Capture Simplified Into Four Methods
- Audience's Choice Prime Ubuntu Videographics
- [New] 2024 Approved The Art of Looking Back Unveiling Reversed Images on Social Media
- Updated 2024 Approved The Art of Slow Motion How to Create Breathtaking Videos on Kapwing
- 7 Solutions to Fix Chrome Crashes or Wont Open on Xiaomi Redmi 13C 5G | Dr.fone
- [Updated] 2024 Approved Best of the Best A Ranked List of Top 10 Video Call Apps
- Aural Adventures Next-Gen Devices
- How to find lost iPhone 15 Pro Max Backup files on Windows PC? | Stellar
- AVS Video Editor Review Does It Live Up to Expectations?
- In 2024, Full Guide to Unlock Apple iPhone XS Max with iTunes
- [Updated] Essential #Hashtags Boosting Your Instagram Presence Now
- In 2024, 5 Quick Methods to Bypass Asus FRP
- New In 2024, Dollar-Store DIY Hacks to Use for Filmmaking on a Budget
- Which is the Best Fake GPS Joystick App On Vivo S17? | Dr.fone
- [New] Sequential Image Storytelling on IG for 2024
- [Updated] 2024 Approved 7 Best Vocal Modification Software on the Market
- Title: [New] The Ultimate Guide to TikTok Video Sharing (Chrome, Android)
- Author: Gary
- Created at : 2024-05-23 06:53:11
- Updated at : 2024-05-24 06:53:11
- Link: https://tiktok-clips.techidaily.com/new-the-ultimate-guide-to-tiktok-video-sharing-chrome-android/
- License: This work is licensed under CC BY-NC-SA 4.0.
