
!["[New] The Ultimate Guide to TikTok Reaction Magic 2 Ways Using Filmora Tools for 2024"](https://www.lifewire.com/thmb/Ek5qs_J_CIp6KZPp1ZWJd1wdTv0=/400x300/filters:no_upscale():max_bytes(150000):strip_icc()/unnamed-d96179f6affc4fe0b0b2c49e89646bd9.png)
"[New] The Ultimate Guide to TikTok Reaction Magic 2 Ways Using Filmora Tools for 2024"
The Ultimate Guide to TikTok Reaction Magic: 2 Ways Using Filmora Tools
How to Make TikTok Reaction Videos Easily in 2 Ways

Shanoon Cox
Mar 27, 2024• Proven solutions
With all the videos of different moods and categories available on the platform, TikTok’s reaction is something that makes the footage more engaging. Available for both iOS and Android platforms, TikTok allows you to record, edit , and compile a video of up to 60 seconds, and apply a plethora of filters and animation effects to them along with adding relevant music to awe your audience.
Considering this, here you will learn how to make TikTok reaction videos with ease from within the app itself, and if that’s not enough, using one of the best and most efficient programs available in the market that can even allow you to add unique effects to the reactions you create.
- Part 1: How to Make React Videos on TikTok
- Part 2: How to Use Snap Filmora to Make TikTok Reaction Videos
Bonus: Create A More Attractive Video with Human Segmentation Effect
The human segmentation effect under AI Portrait allows you to isolate people from video background even without a green screen, and then you can composite it to make a reaction video easily. Watch the video tutorial below to find out more details.


Want to read the texts instead of watching videos? Check the complete guide to making a reaction video in 3 ways .
Part 1: How to React to a TikTok Video
After being equipped with all the worldly knowledge about TikTok reaction videos, you can follow the steps given below to learn how to react to the footage created by other people:
1. Tap Share and Record Your Reaction
Start TikTok, play the video you want to react on, tap the Share icon from the lower-right area, and tap the React option from the Share to menu. Tap Flip from the top-right corner of the Camera screen to switch between the front and rear camera as needed, optionally tap the Mic icon to disable or enable voice and system audio capture, drag and reposition React window according to the source footage, and tap the Record button from the bottom to start shooting your TikTok reaction. Wait while the source clip and your recording process are complete successfully before moving forward to the next step.

2. Apply Filters
Tap the Filters icon from the top-right corner, tap to pick a filter from those available at the bottom, and tap anywhere on the screen to accept the one you selected and to get back to the previous window.

3. Manage Audio
Tap the Mixer icon from the upper-right corner of the screen, drag the My Voice and Soundtrack Volume sliders to manage your voice recording and the internal audio respectively, and tap Done to save the changes once you’re through with the modifications. Back on the previous window, tap Next from the bottom-right corner.

4. Publish the Video
Tap the Who can view this video option to manage your reaction’s visibility settings (optional). Tap the Save to device toggle switch to prevent TikTok reaction from being stored on your mobile’s storage (optional). Next, tap the Post button from the bottom-right corner to publish the video to TikTok.

More creative tricks about TikTok video: Clone Yourself in TikTok
Part 2: How to Make Reaction Videos with Filmora
Even though you can make TikTok reaction videos using its own filters and audio mixing tools that work pretty well under ideal conditions, if you are a perfectionist and like precision in anything you do or create, you need a dedicated program that has been designed specifically for the purpose.
Although several such tools are available in the market and can be easily downloaded and used, the best among them is Filmora by Wondershare. Wondershare Filmora is an industry-standard production and post-production tool for both Mac and Windows PCs that the majority of users prefer over its competitors such as Adobe Premiere Pro, Final Cut Pro X, etc. This is because Filmora offers simple UI, is less resource-intensive, and is able to render the outputs significantly faster.
You can learn how to make TikTok reaction videos using Wondershare Filmora by following the steps given below:
Note: Before proceeding, make sure that you have already copied the source (and the reaction) video(s) from your smartphone to your computer.
1. Create New Project and Set Preferences
Start Wondershare Filmora on your Windows or Mac PC, go to File > New Project and click 9:16 (Portrait) from the submenu that appears.
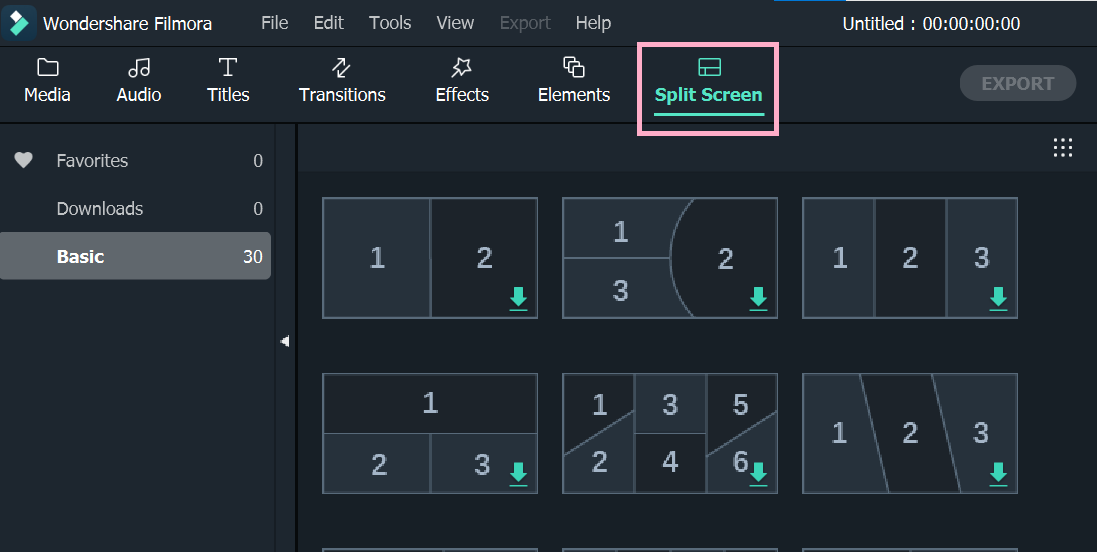
Click Split Screen from the standard toolbar at the top, hover mouse to the screen type preset you want to use, click the + ( Add to Project ) icon that appears at the bottom-right corner of the thumbnail, and click OK from the bottom-right corner once the preset is added to the Timeline.

2. Import and Add Video(s) Preview/Timeline
Click the Media button from the standard toolbar, click anywhere inside the Media window at the upper-left corner, and when the Open box comes up, select and import the video file(s) you want to participate in the TikTok reaction. Alternatively, you can also click Record from below the standard toolbar, and choose any of the options to record your own video or voice right from within Wondershare Filmora itself.
Next, click and drag each of the imported videos to their corresponding screen sections in the Preview window in the upper-right area. Notice how the files are automatically added to the Timeline at the bottom.
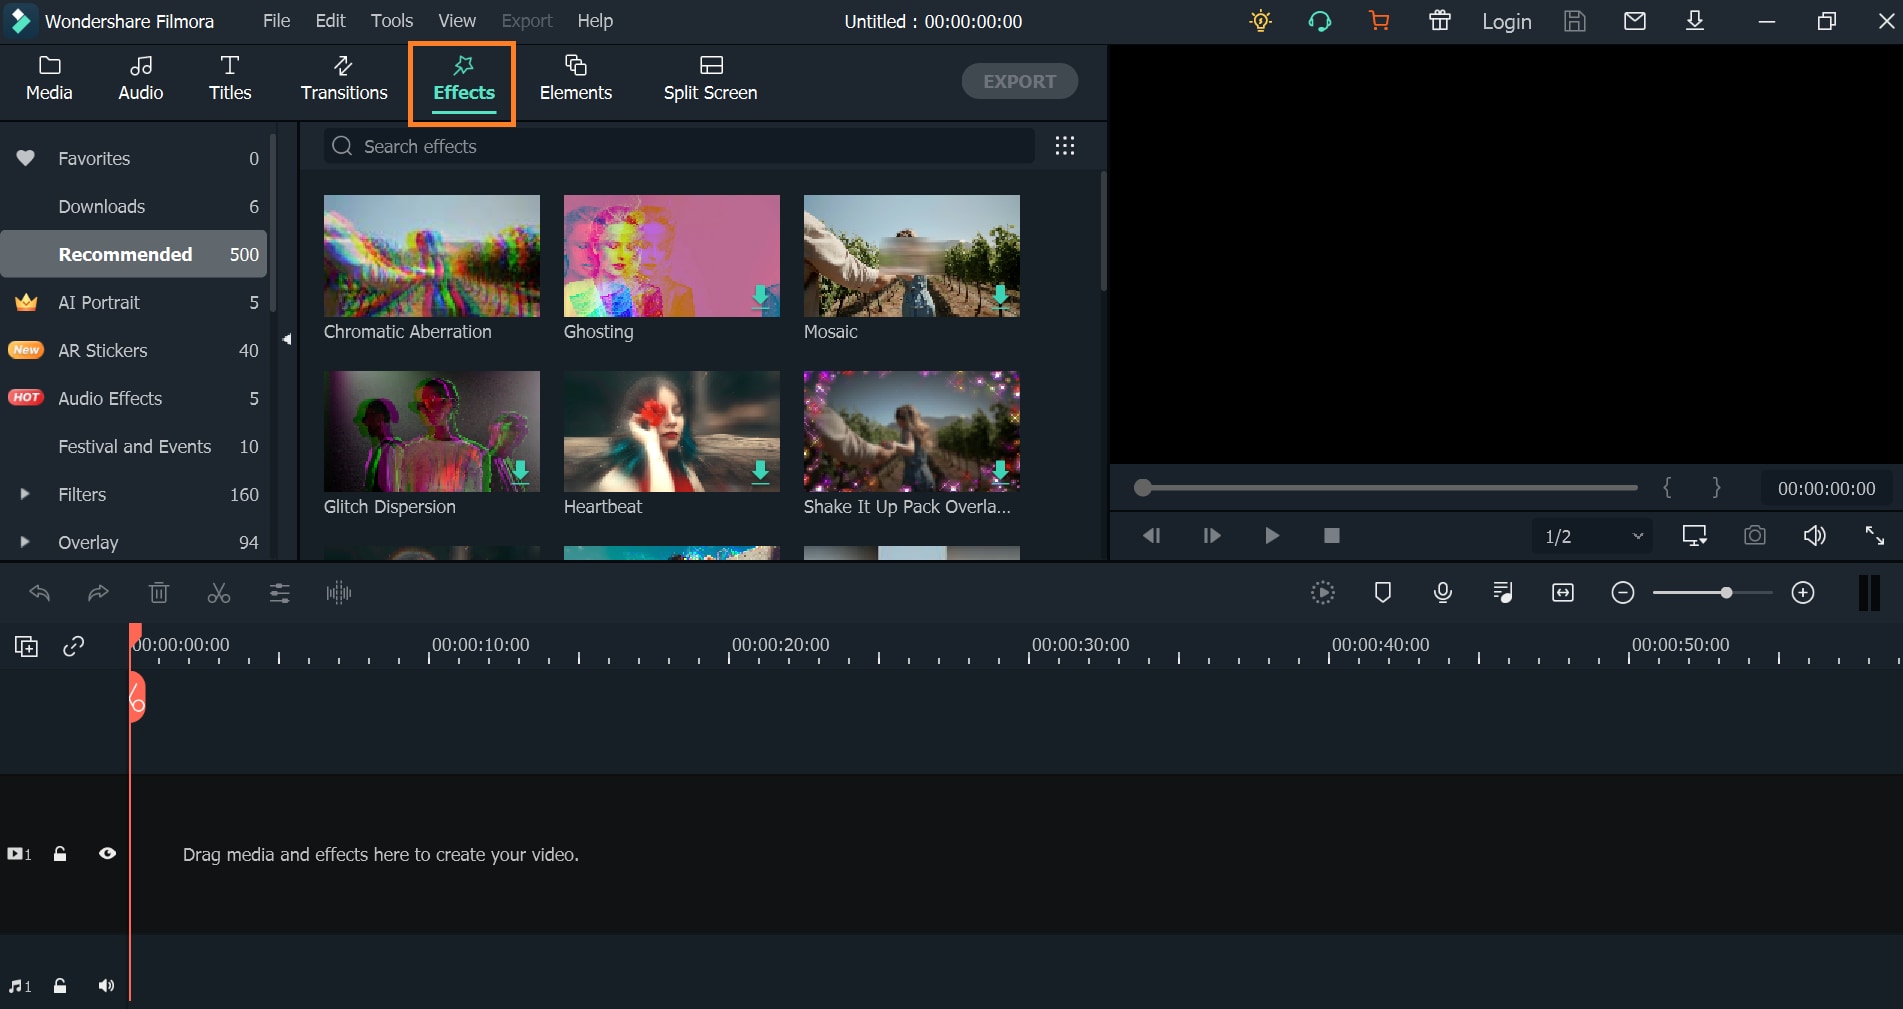
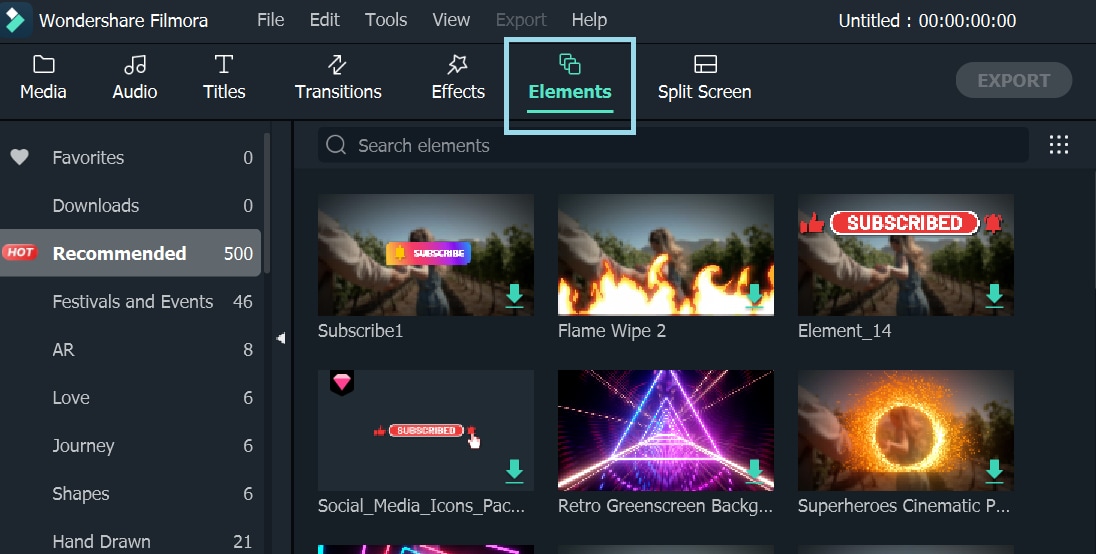
3. Add Elements and Titles
Click Elements from the standard toolbar, hover mouse to the element you want to add to the reaction, click the + icon that appears at the center of the thumbnail, and reposition the element in the Timeline to match the duration with that of the reaction you are creating.

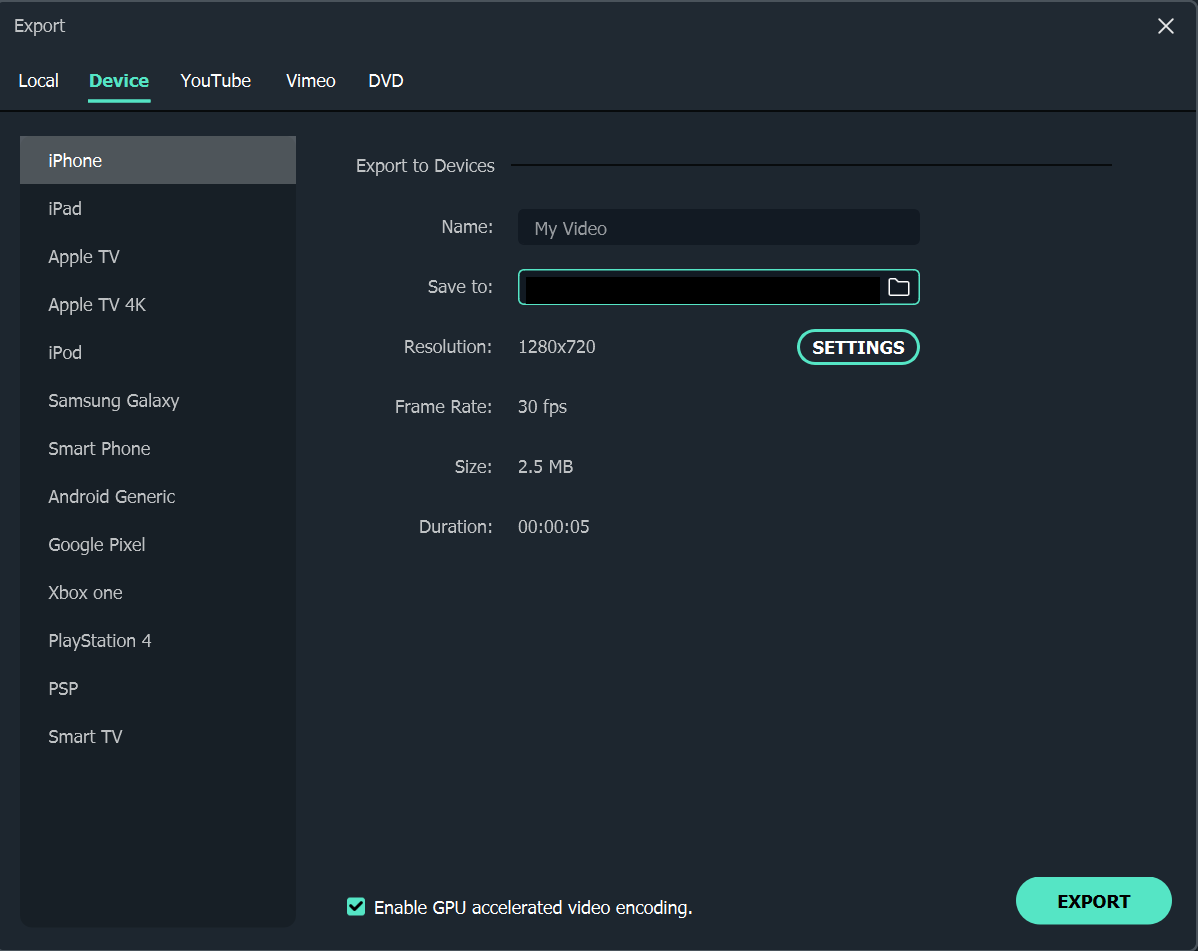
4. Export the Reaction

Click EXPORT from the top-middle section of the interface, go to the Local tab from the top of the Export box that appears next, select your preferred format from the left bar, optionally choose a destination folder from the right window, optionally click SETTINGS to fine-tune the output preferences as needed, and click EXPORT from the bottom-right corner to export the TikTok reaction. Or, you can save it in the settings perfect for iPhone or another device.
Below is a sample reaction video made with Filmora, you can do much better than that for your TikTok account:
Besides using Filmora to edit reaction videos with the split-screen presets, you can also use some other video editing software to create a reaction video . Filmora can empower your video creation with more creativity, watch the video below and download Filmora to try.
Conclusion
A TikTok reaction enables you to make the source videos more fun and entertaining. Luckily the app itself has a “React” button that helps you create TikTok reaction videos with merely a few simple taps. However, if you feel that the built-in options are not as robust as they should be, a third-party program like Wondershare Filmora is something you would definitely love to try your hands on as the software is not only easy to use, it is also lightweight, and doesn’t put any overhead on your computer hardware.
Shanoon Cox
Shanoon Cox is a writer and a lover of all things video.
Follow @Shanoon Cox
Shanoon Cox
Mar 27, 2024• Proven solutions
With all the videos of different moods and categories available on the platform, TikTok’s reaction is something that makes the footage more engaging. Available for both iOS and Android platforms, TikTok allows you to record, edit , and compile a video of up to 60 seconds, and apply a plethora of filters and animation effects to them along with adding relevant music to awe your audience.
Considering this, here you will learn how to make TikTok reaction videos with ease from within the app itself, and if that’s not enough, using one of the best and most efficient programs available in the market that can even allow you to add unique effects to the reactions you create.
- Part 1: How to Make React Videos on TikTok
- Part 2: How to Use Snap Filmora to Make TikTok Reaction Videos
Bonus: Create A More Attractive Video with Human Segmentation Effect
The human segmentation effect under AI Portrait allows you to isolate people from video background even without a green screen, and then you can composite it to make a reaction video easily. Watch the video tutorial below to find out more details.
Want to read the texts instead of watching videos? Check the complete guide to making a reaction video in 3 ways .
Part 1: How to React to a TikTok Video
After being equipped with all the worldly knowledge about TikTok reaction videos, you can follow the steps given below to learn how to react to the footage created by other people:
1. Tap Share and Record Your Reaction
Start TikTok, play the video you want to react on, tap the Share icon from the lower-right area, and tap the React option from the Share to menu. Tap Flip from the top-right corner of the Camera screen to switch between the front and rear camera as needed, optionally tap the Mic icon to disable or enable voice and system audio capture, drag and reposition React window according to the source footage, and tap the Record button from the bottom to start shooting your TikTok reaction. Wait while the source clip and your recording process are complete successfully before moving forward to the next step.
2. Apply Filters
Tap the Filters icon from the top-right corner, tap to pick a filter from those available at the bottom, and tap anywhere on the screen to accept the one you selected and to get back to the previous window.
3. Manage Audio
Tap the Mixer icon from the upper-right corner of the screen, drag the My Voice and Soundtrack Volume sliders to manage your voice recording and the internal audio respectively, and tap Done to save the changes once you’re through with the modifications. Back on the previous window, tap Next from the bottom-right corner.
4. Publish the Video
Tap the Who can view this video option to manage your reaction’s visibility settings (optional). Tap the Save to device toggle switch to prevent TikTok reaction from being stored on your mobile’s storage (optional). Next, tap the Post button from the bottom-right corner to publish the video to TikTok.
More creative tricks about TikTok video: Clone Yourself in TikTok
Part 2: How to Make Reaction Videos with Filmora
Even though you can make TikTok reaction videos using its own filters and audio mixing tools that work pretty well under ideal conditions, if you are a perfectionist and like precision in anything you do or create, you need a dedicated program that has been designed specifically for the purpose.
Although several such tools are available in the market and can be easily downloaded and used, the best among them is Filmora by Wondershare. Wondershare Filmora is an industry-standard production and post-production tool for both Mac and Windows PCs that the majority of users prefer over its competitors such as Adobe Premiere Pro, Final Cut Pro X, etc. This is because Filmora offers simple UI, is less resource-intensive, and is able to render the outputs significantly faster.
You can learn how to make TikTok reaction videos using Wondershare Filmora by following the steps given below:
Note: Before proceeding, make sure that you have already copied the source (and the reaction) video(s) from your smartphone to your computer.
1. Create New Project and Set Preferences
Start Wondershare Filmora on your Windows or Mac PC, go to File > New Project and click 9:16 (Portrait) from the submenu that appears.
Click Split Screen from the standard toolbar at the top, hover mouse to the screen type preset you want to use, click the + ( Add to Project ) icon that appears at the bottom-right corner of the thumbnail, and click OK from the bottom-right corner once the preset is added to the Timeline.
2. Import and Add Video(s) Preview/Timeline
Click the Media button from the standard toolbar, click anywhere inside the Media window at the upper-left corner, and when the Open box comes up, select and import the video file(s) you want to participate in the TikTok reaction. Alternatively, you can also click Record from below the standard toolbar, and choose any of the options to record your own video or voice right from within Wondershare Filmora itself.
Next, click and drag each of the imported videos to their corresponding screen sections in the Preview window in the upper-right area. Notice how the files are automatically added to the Timeline at the bottom.
3. Add Elements and Titles
Click Elements from the standard toolbar, hover mouse to the element you want to add to the reaction, click the + icon that appears at the center of the thumbnail, and reposition the element in the Timeline to match the duration with that of the reaction you are creating.
4. Export the Reaction
Click EXPORT from the top-middle section of the interface, go to the Local tab from the top of the Export box that appears next, select your preferred format from the left bar, optionally choose a destination folder from the right window, optionally click SETTINGS to fine-tune the output preferences as needed, and click EXPORT from the bottom-right corner to export the TikTok reaction. Or, you can save it in the settings perfect for iPhone or another device.
Below is a sample reaction video made with Filmora, you can do much better than that for your TikTok account:
Besides using Filmora to edit reaction videos with the split-screen presets, you can also use some other video editing software to create a reaction video . Filmora can empower your video creation with more creativity, watch the video below and download Filmora to try.
Conclusion
A TikTok reaction enables you to make the source videos more fun and entertaining. Luckily the app itself has a “React” button that helps you create TikTok reaction videos with merely a few simple taps. However, if you feel that the built-in options are not as robust as they should be, a third-party program like Wondershare Filmora is something you would definitely love to try your hands on as the software is not only easy to use, it is also lightweight, and doesn’t put any overhead on your computer hardware.
Shanoon Cox
Shanoon Cox is a writer and a lover of all things video.
Follow @Shanoon Cox
Maximizing Video Impact on TikTok Using Computer/Tablet
With the increasing trend of using Tiktok to make viral videos, every other person out there is trying their hand at this video-sharing platform. However, while Tiktok itself has many effects and editing options, there are some limitations. For instance, you cannot use the time-lapse effect on Tiktok, or you cannot make a video exceeding 60 seconds.
It becomes difficult to go all out with your videos with these limitations. Therefore, a third-party or external video editor is necessary to make better and different videos.
In this article, we will go over different ways how to create successful Tiktok videos on Desktop, Android, and iPhone.
Create Engaging Tiktok Videos on Desktop
If you want to create amazing Tiktok videos that might go viral on your desktop, you need a third-party video editor, like Wondershare Filmora.
Filmora is a video creating and editing software with plenty of tools, visual effects, and templates that help you create watch-worthy videos for video sharing platforms like YouTube, Facebook, and of course, Tiktok.
So, how do you create engaging Tiktok videos on desktop using Filmora? Here’s a step-by-step guide.
Step 1
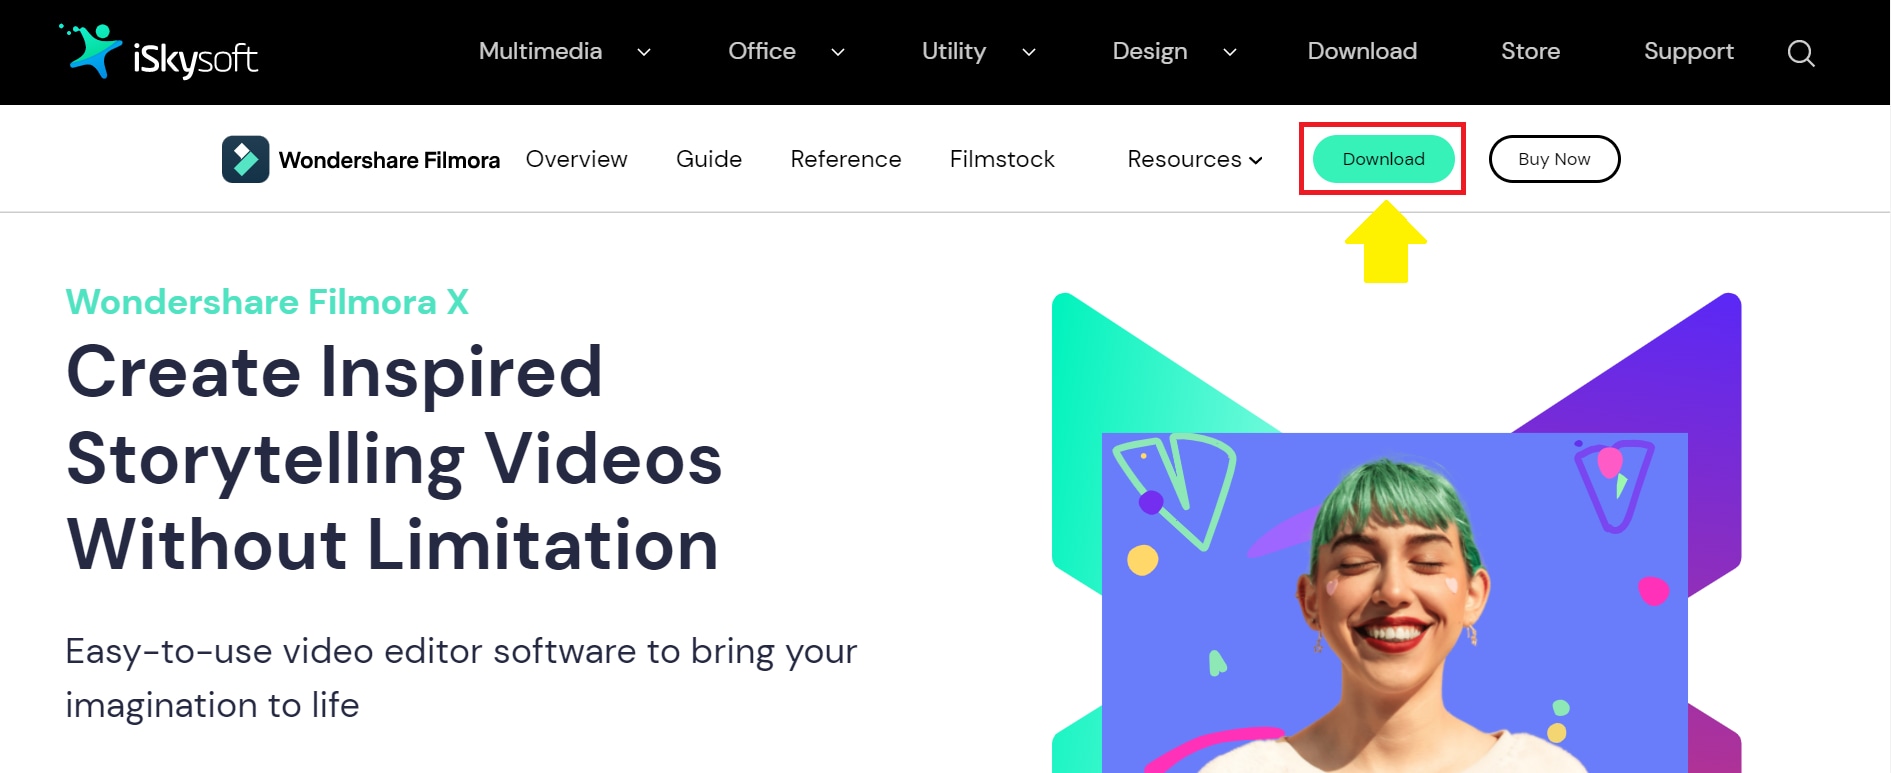
Visit the official website of Wondershare Filmora and download the software by clicking on the “Download” button at the top-right corner.
Step 2
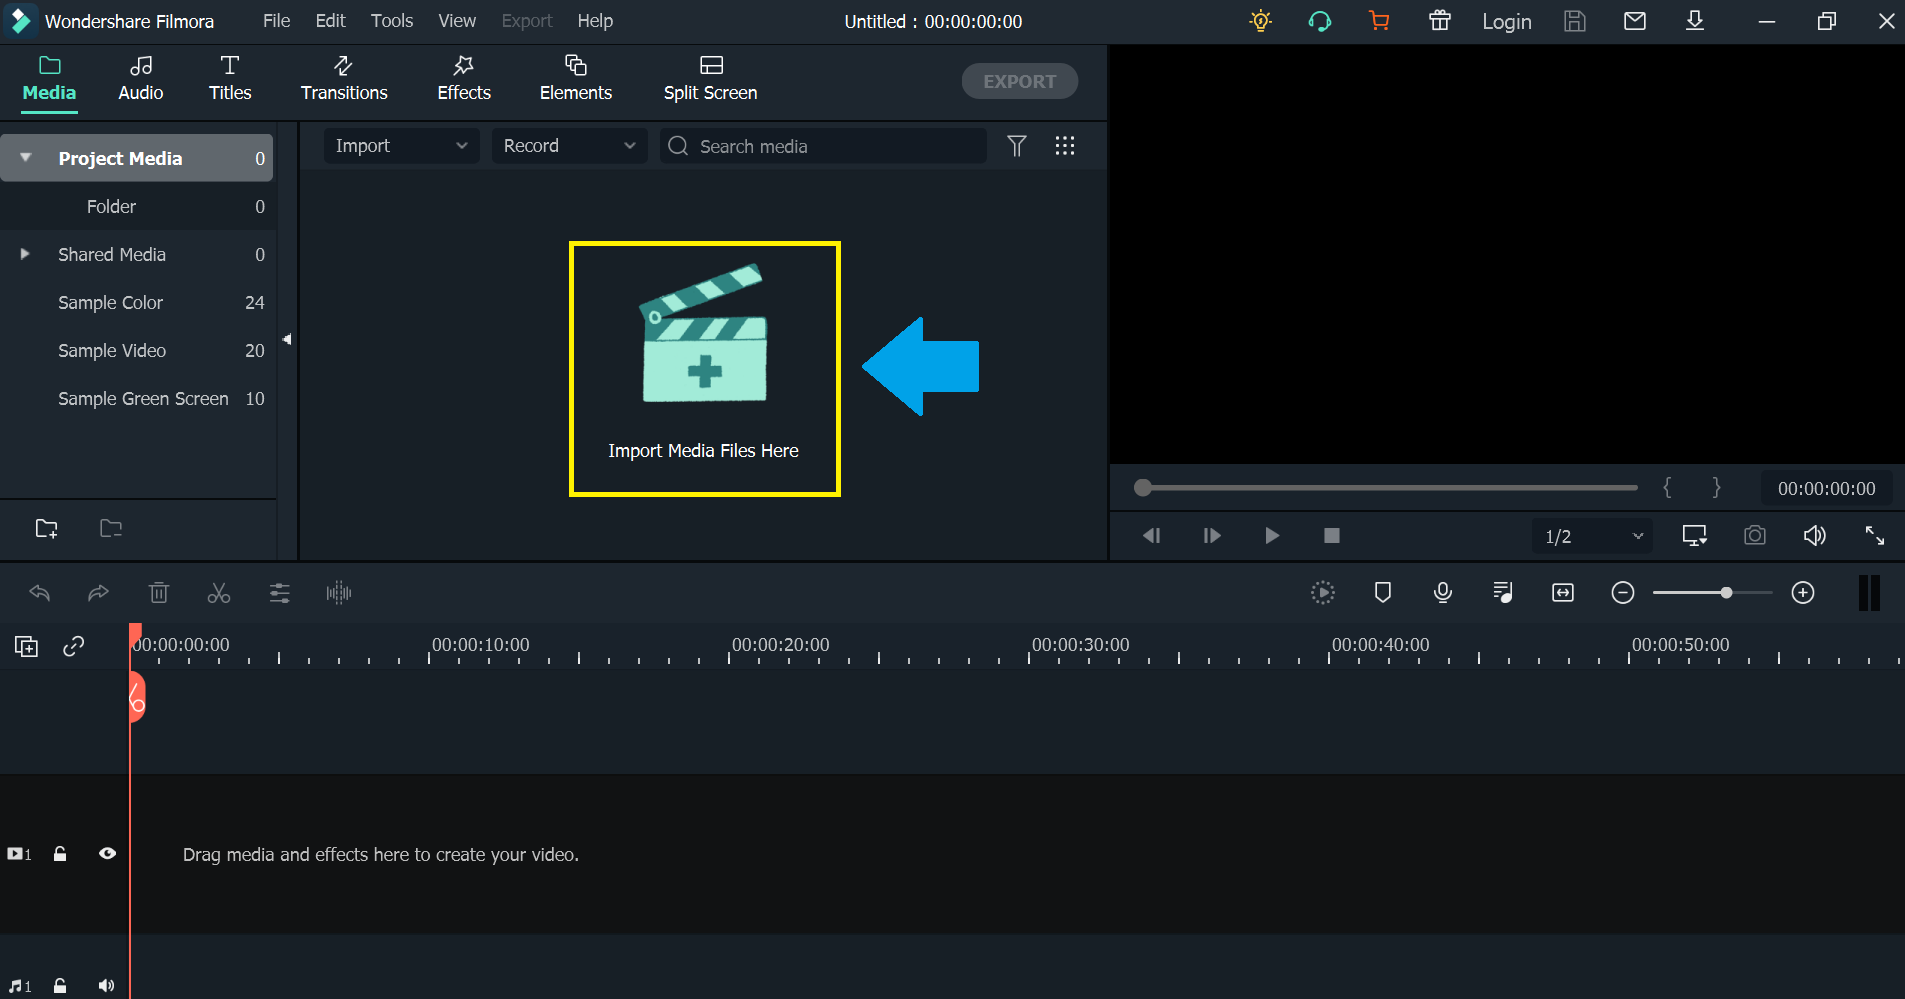
Launch the tool, and click on the “+” sign to import the Tiktok video you want to edit.
Step 3
Once your video clip is successfully imported to the timeline, it’s time to get editing! Filmora offers many basic and advanced editing tools to give a professional touch to your Tiktok videos.
For example, you can:
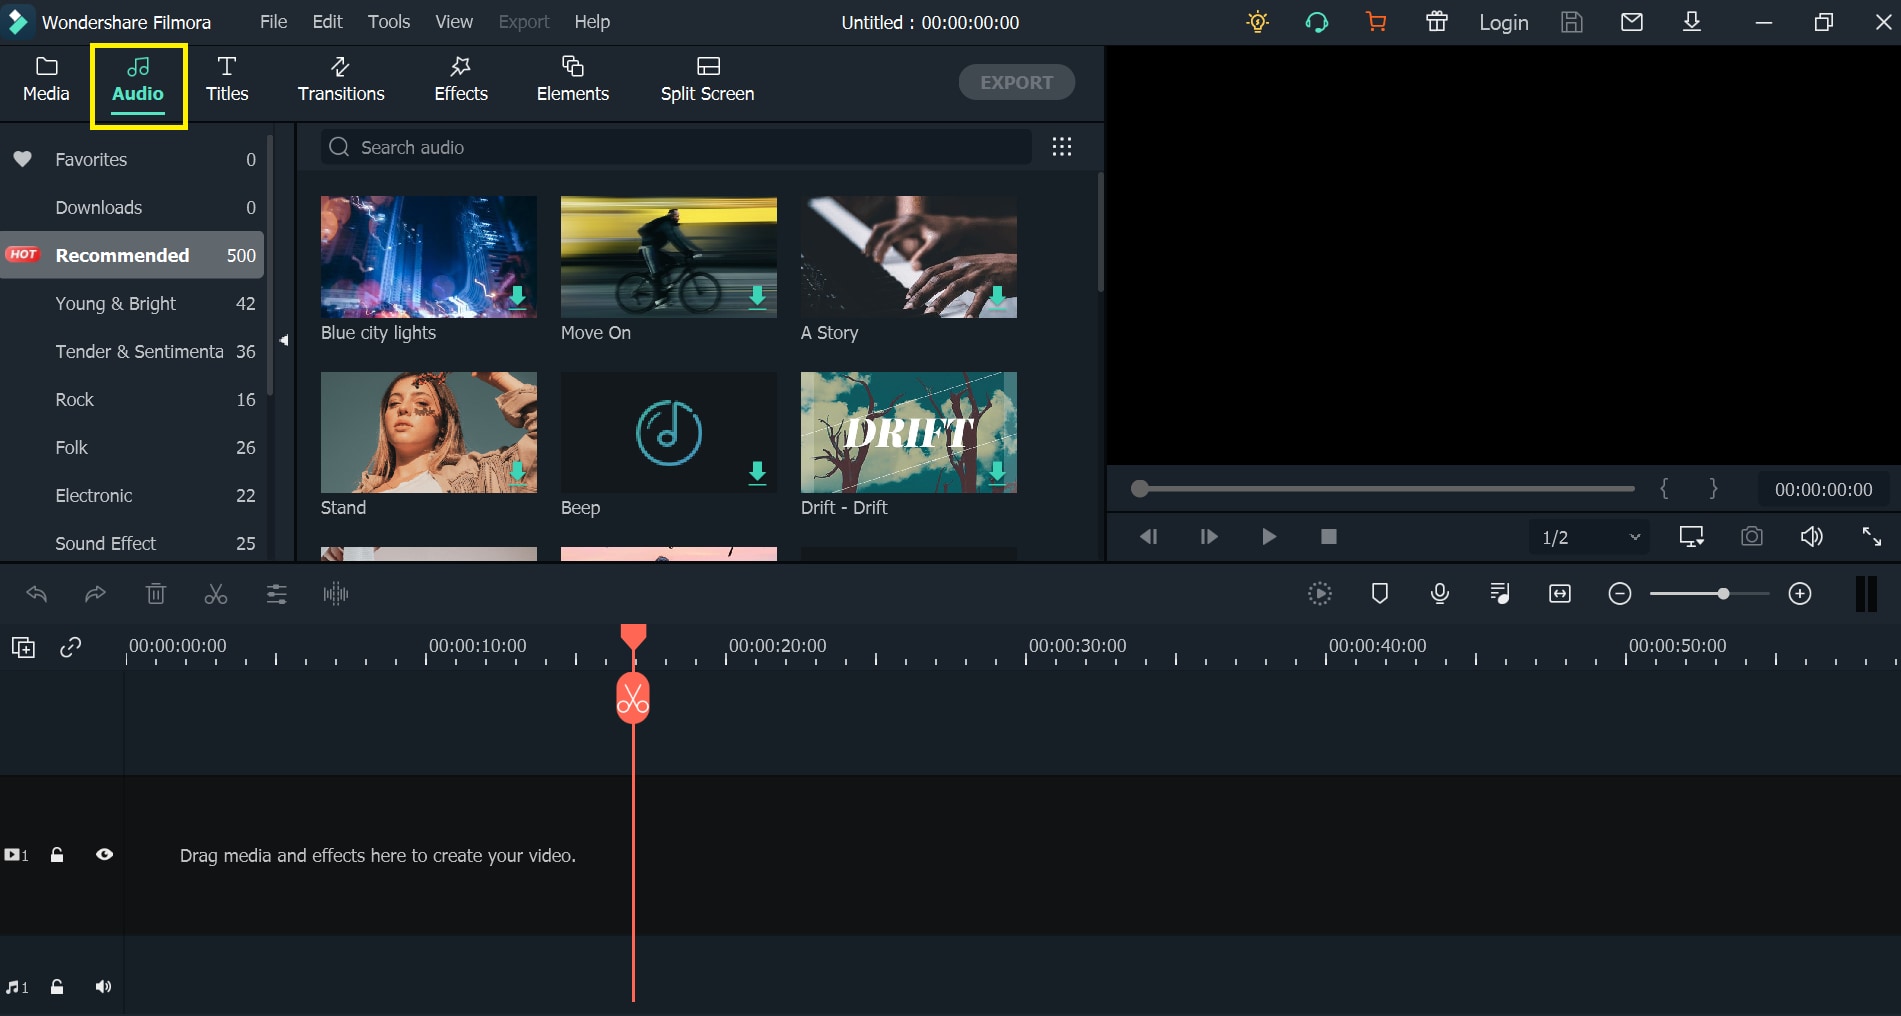
- Add audio to your videos from a vast library of tracks for all occasions.
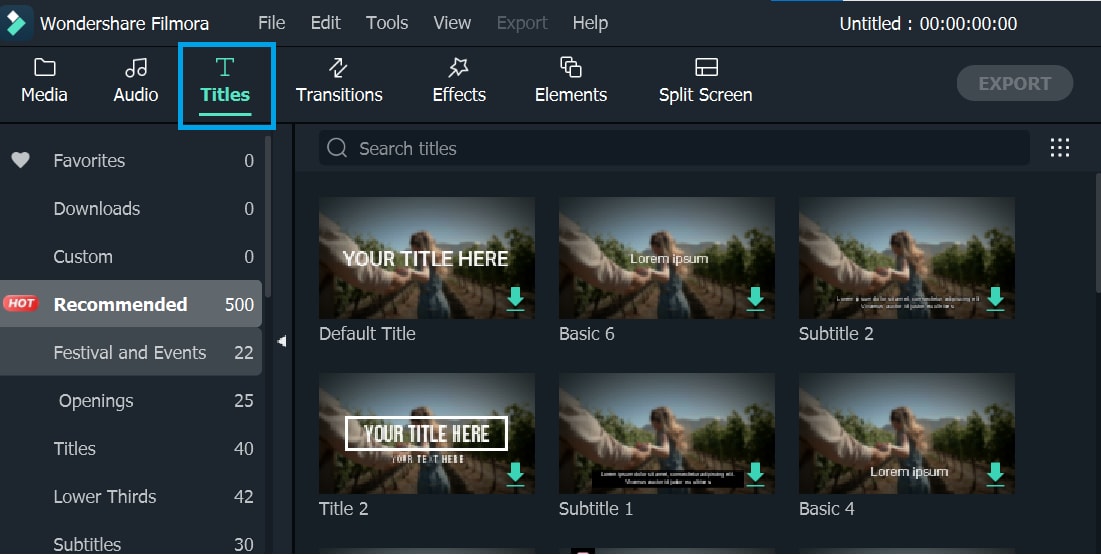
- Add titles and subtitles in different fonts and styles.
- Add unique transitions to make your videos enjoyable.
- Add various audio and visual effects to your videos.
- Add different elements in the video for a thrilling effect.
- Split the screen into several different shapes and styles.
Apart from this, you can also add the slo-mo effect and play the video backward for added fun.
Step 4
Once you have edited the Tiktok video to your heart’s content, you can preview it to see if any further changes are required. After that, you can export it to your Android or iOS device to upload directly from the Tiktok app.
And that’s how you edit a Tiktok video on a desktop.
Now, if you want to create successful Tiktok videos right from the palm of your hands, here is a tutorial for both Android and iPhone.
Create Successful Tiktok Videos on Android/iPhone
The steps to create an engaging Tiktok video using Android or iPhone are almost the same. So, follow the steps below to edit and record a Tiktok video on both devices:
Step 1
Download the Tiktok app from the Play Store for Android and App Store for iPhone.
Step 2
Launch the app and sign up using your phone number, Facebook or Gmail. If you already have an account, click on “Sign in” and enter the details.
Step 3
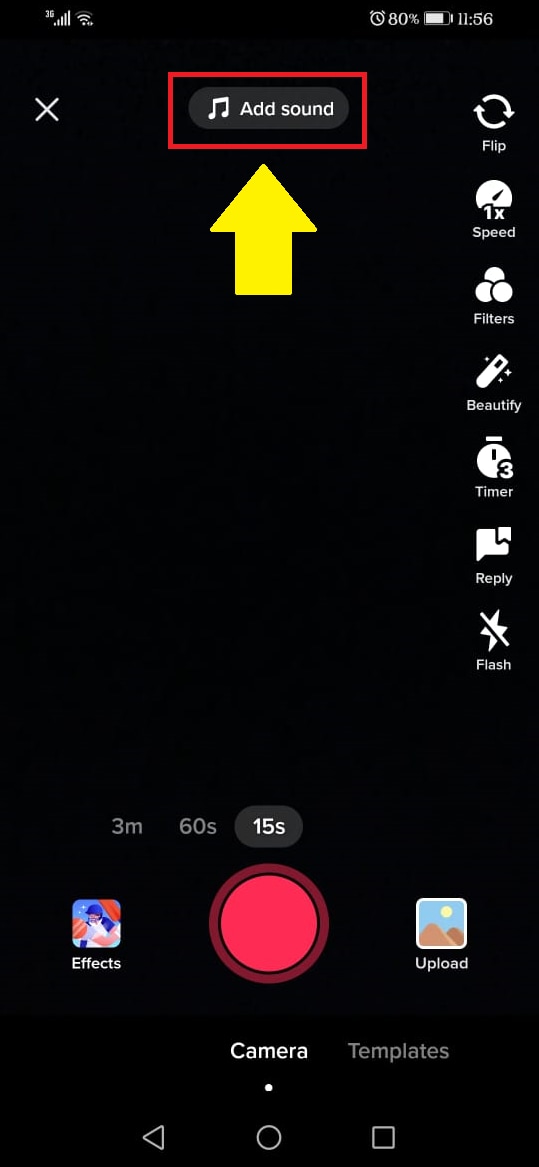
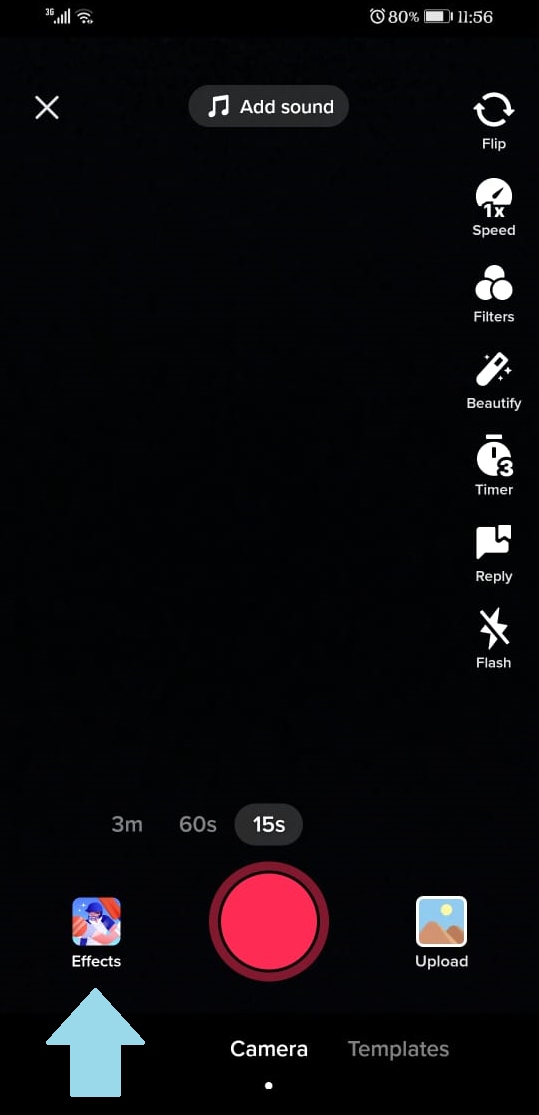
Tap on the “+” to record a video.

Step 4
Tap on “Add Sound” to add audio to your video. This will open a gallery of sounds available on Tiktok. Additionally, you can also click on “My Sound” to add audio from your device.

Step 5
You can select the duration of your video by tapping on the 3 timer options.
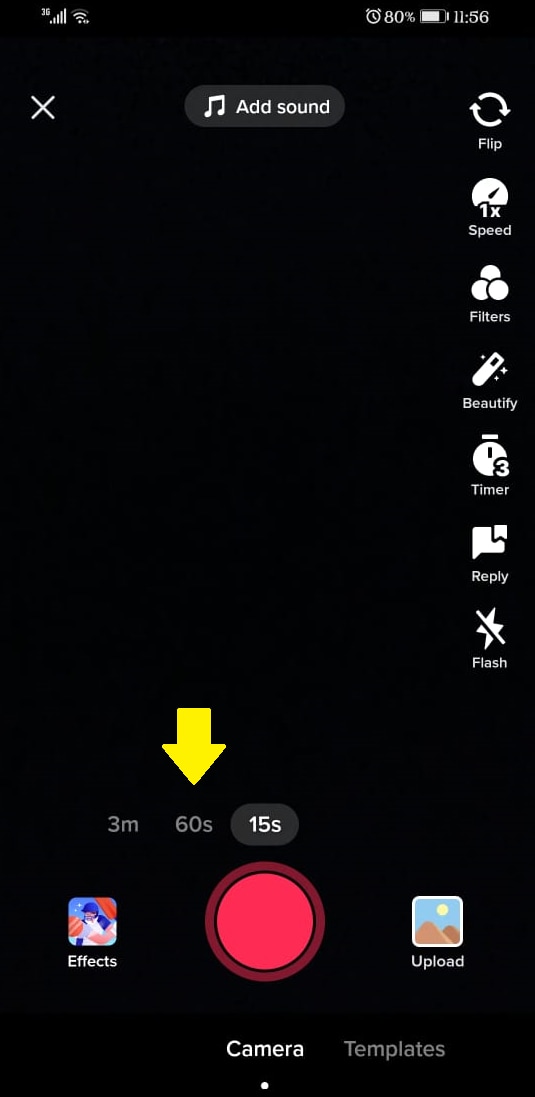
Step 6
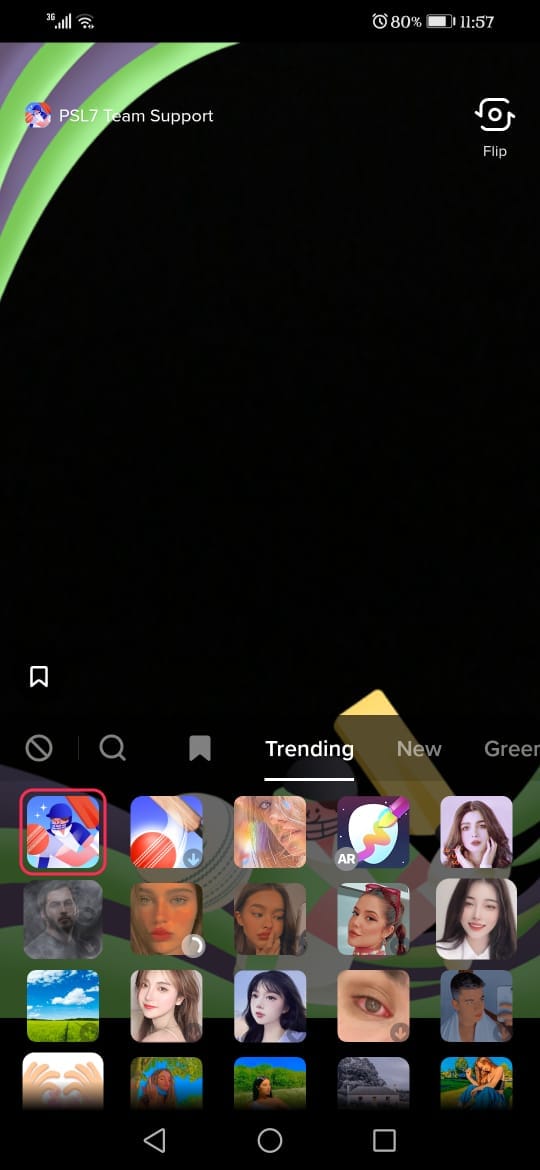
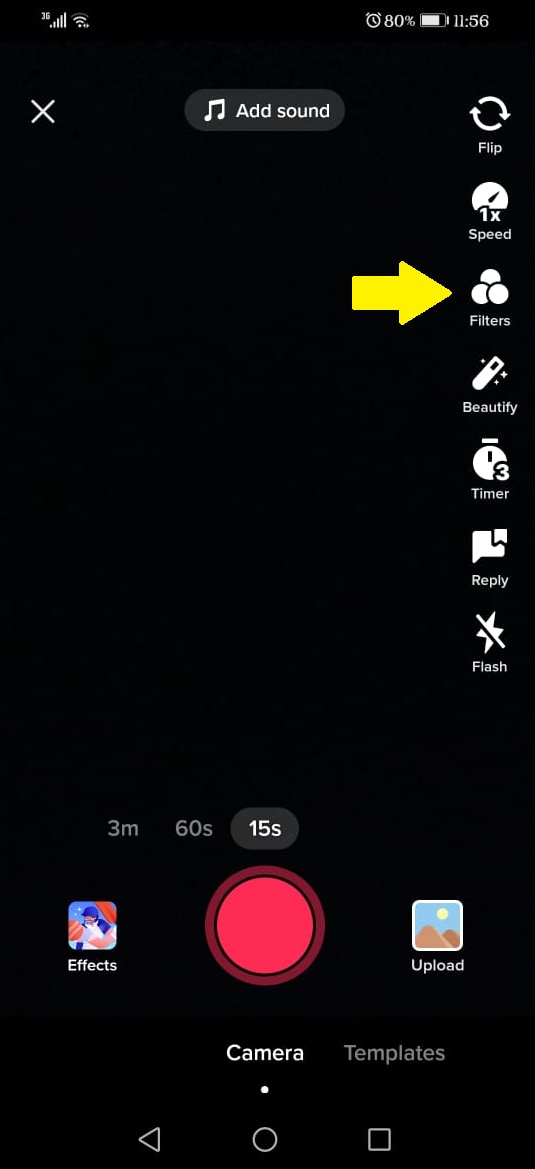
To add effects to your video, tap on “Effects” to open a gallery of built-in Tiktok effects. Select the effect you want to use.
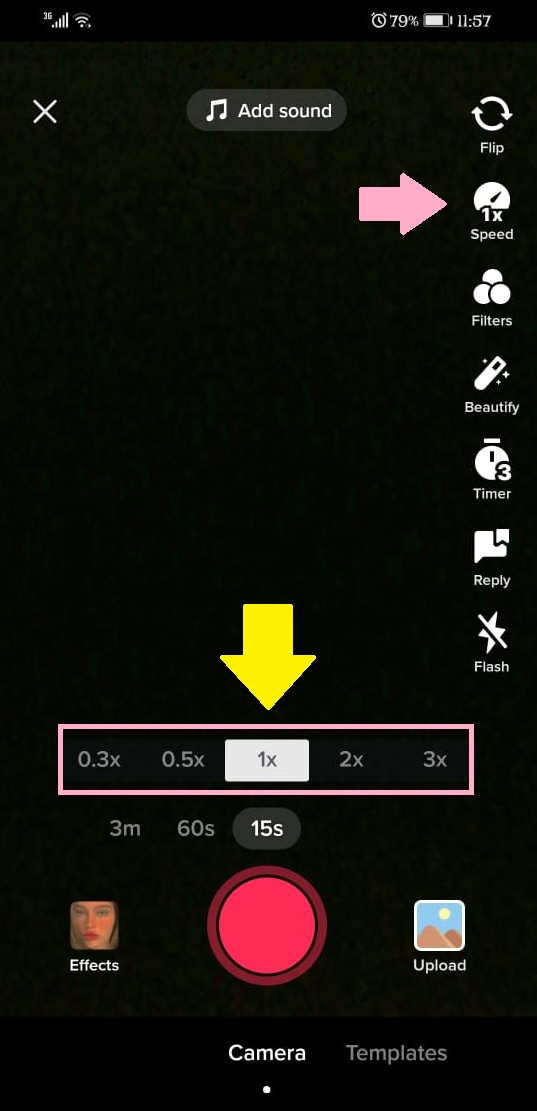
Step 7
Now click on the round red button to start recording. Once you have recorded your video, you can edit it. Like, by clicking on the “Speed” option, you can set the speed of your video.
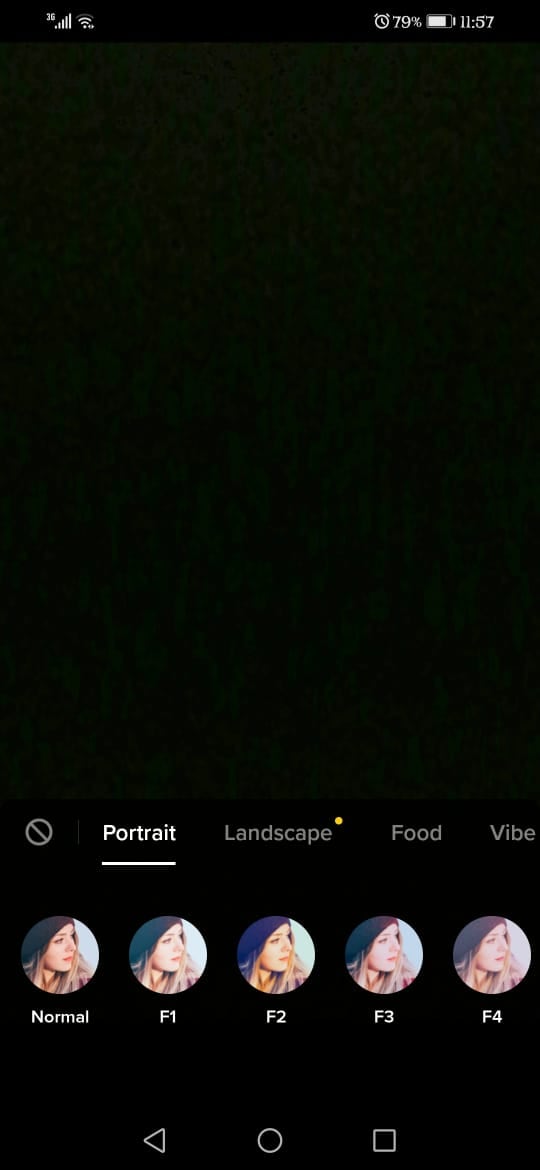
Similarly, by tapping on “Filters,” you can add different filters to your recorded video.
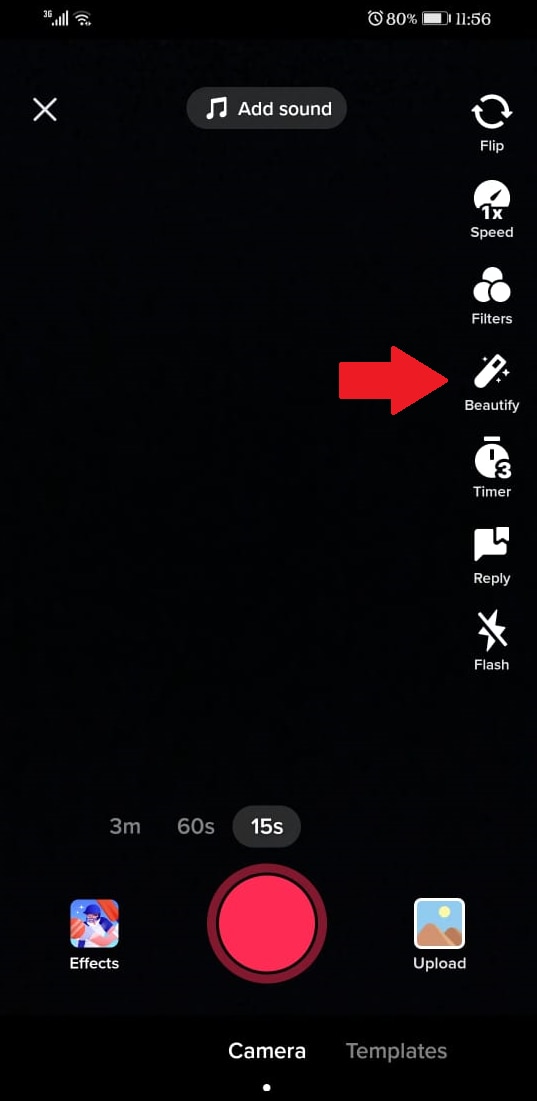
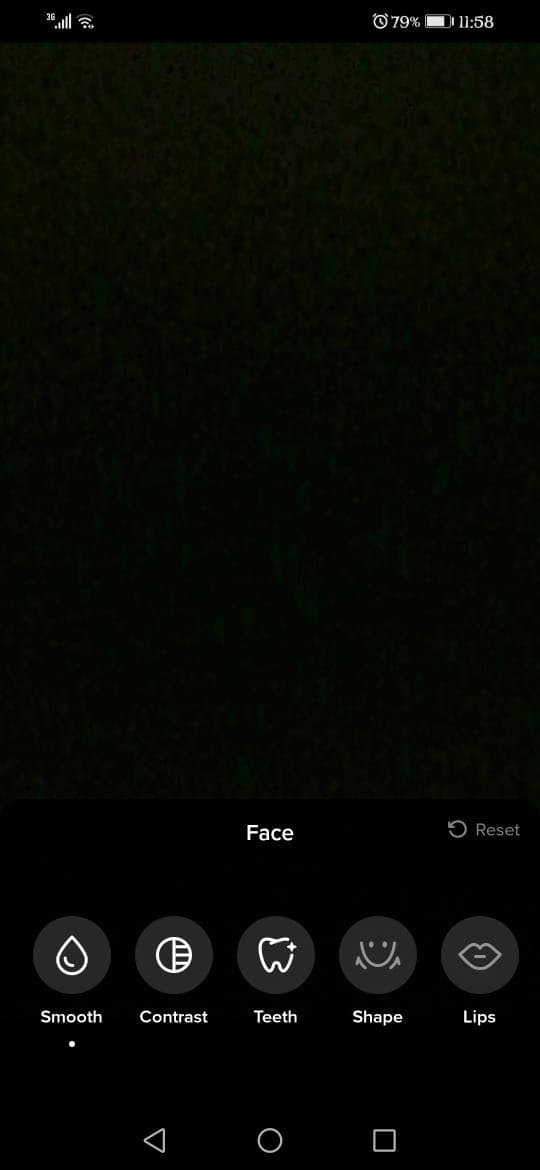
And, to fix any blemishes on your face or to smoothen the skin, you can tap on “Beautify” and do the magic!
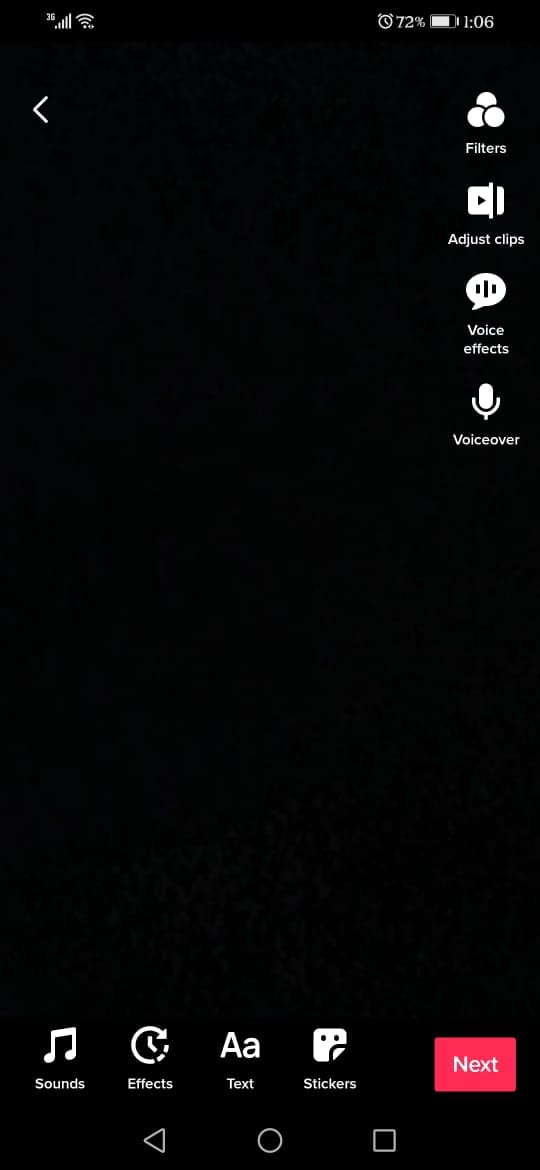
Step 8
Done with all the edits? Tap the red “tick” option to proceed to the next part, where you can add text, stickers, voice effects, and adjust the clips. Click “Next” to move on to posting the video.

Step 9
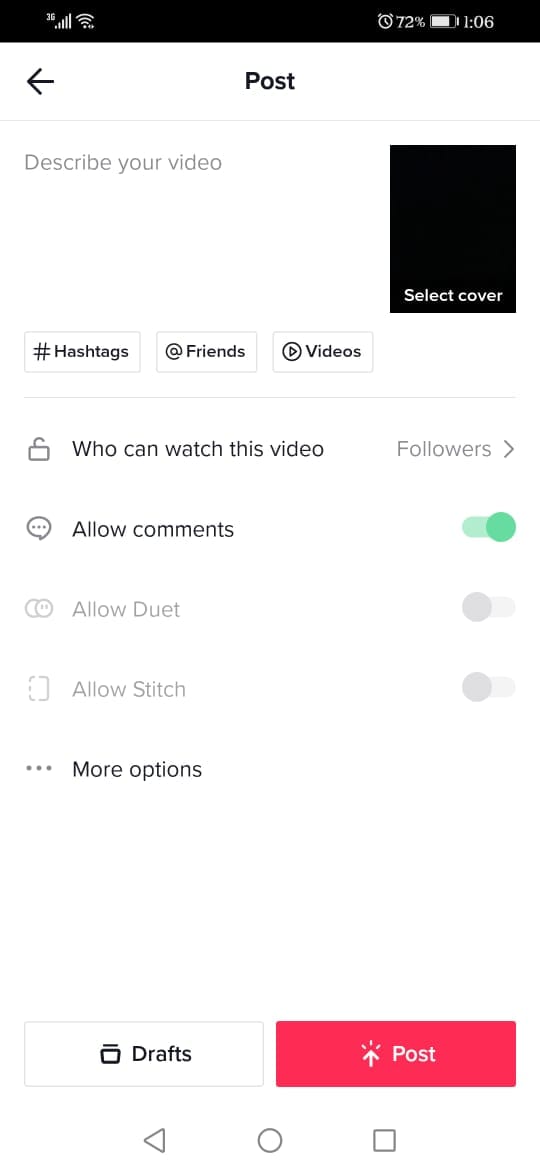
Before posting the video on Tiktok, you can add a description, hashtags, and tag friends in it. You can also adjust the settings of who can watch your video, who can comment, and if people can make duets.
Once all the settings have been finalized, click on “Post” to post the video to Tiktok.
And that’s how you create, edit, and post a Tiktok video on Android and iOS devices.
Conclusion
Tiktok videos are not only about following the trends; in fact, you can use them to create brand awareness, market your product or services, or engage with your audience in an effective way. However, the key is to make a video worth watching! And while Tiktok’s built-in editor has many tools, it comes with certain limitations.
If you want to make your video more exciting and different from the rest, you can always go for an external video editor, like Wondershare Filmora, and edit videos on your desktop. I hope our steps on how to create successful Tiktok videos on desktop, Android, and iPhone will come in handy and increase your Tiktok followers!
Step 2
Launch the tool, and click on the “+” sign to import the Tiktok video you want to edit.
Step 3
Once your video clip is successfully imported to the timeline, it’s time to get editing! Filmora offers many basic and advanced editing tools to give a professional touch to your Tiktok videos.
For example, you can:
- Add audio to your videos from a vast library of tracks for all occasions.
- Add titles and subtitles in different fonts and styles.
- Add unique transitions to make your videos enjoyable.
- Add various audio and visual effects to your videos.
- Add different elements in the video for a thrilling effect.
- Split the screen into several different shapes and styles.
Apart from this, you can also add the slo-mo effect and play the video backward for added fun.
Step 4
Once you have edited the Tiktok video to your heart’s content, you can preview it to see if any further changes are required. After that, you can export it to your Android or iOS device to upload directly from the Tiktok app.
And that’s how you edit a Tiktok video on a desktop.
Now, if you want to create successful Tiktok videos right from the palm of your hands, here is a tutorial for both Android and iPhone.
Create Successful Tiktok Videos on Android/iPhone
The steps to create an engaging Tiktok video using Android or iPhone are almost the same. So, follow the steps below to edit and record a Tiktok video on both devices:
Step 1
Download the Tiktok app from the Play Store for Android and App Store for iPhone.
Step 2
Launch the app and sign up using your phone number, Facebook or Gmail. If you already have an account, click on “Sign in” and enter the details.
Step 3
Tap on the “+” to record a video.
Step 4
Tap on “Add Sound” to add audio to your video. This will open a gallery of sounds available on Tiktok. Additionally, you can also click on “My Sound” to add audio from your device.
Step 5
You can select the duration of your video by tapping on the 3 timer options.
Step 6
To add effects to your video, tap on “Effects” to open a gallery of built-in Tiktok effects. Select the effect you want to use.
Step 7
Now click on the round red button to start recording. Once you have recorded your video, you can edit it. Like, by clicking on the “Speed” option, you can set the speed of your video.
Similarly, by tapping on “Filters,” you can add different filters to your recorded video.
And, to fix any blemishes on your face or to smoothen the skin, you can tap on “Beautify” and do the magic!
Step 8
Done with all the edits? Tap the red “tick” option to proceed to the next part, where you can add text, stickers, voice effects, and adjust the clips. Click “Next” to move on to posting the video.
Step 9
Before posting the video on Tiktok, you can add a description, hashtags, and tag friends in it. You can also adjust the settings of who can watch your video, who can comment, and if people can make duets.
Once all the settings have been finalized, click on “Post” to post the video to Tiktok.
And that’s how you create, edit, and post a Tiktok video on Android and iOS devices.
Conclusion
Tiktok videos are not only about following the trends; in fact, you can use them to create brand awareness, market your product or services, or engage with your audience in an effective way. However, the key is to make a video worth watching! And while Tiktok’s built-in editor has many tools, it comes with certain limitations.
If you want to make your video more exciting and different from the rest, you can always go for an external video editor, like Wondershare Filmora, and edit videos on your desktop. I hope our steps on how to create successful Tiktok videos on desktop, Android, and iPhone will come in handy and increase your Tiktok followers!
Also read:
- Essential Non-Discord Chat Platforms
- [New] 2024 Approved The Crème De La Reading List TikTok-Endorsed Bestsellers
- [New] In 2024, Professional Tips to Create Impressive Head Size in TikToks (3 Methods)
- [Updated] 2024 Approved Clear Up Creations Leading Emblem Eraser Tools
- [New] Exploring the World of TikTok Markers & Triggers for 2024
- [New] In 2024, Chrome-Based TikTok Video Submission for Devices
- Unlock TikTok's Secrets with #7 Must-Have Charms and Clandestine Messages for 2024
- [New] 2024 Approved Evasion Techniques for Breaking Free From Shadowban
- Winning at Desktop TikTok Strategies and Techniques for 2024
- [Updated] 2024 Approved Engaging with Jujutsu Kaisen Fans Through TikTok Challenges
- [New] In 2024, From Pantry to Fame TikTok's Culinary Stars
- The Secrets to Swiftly Skipping TikTok Content for 2024
- [New] 2024 Approved Expert Edits at a Click – 2 Ways to Rule the World of TikTok Reactions with Filmora
- [New] In 2024, Unique TikTok Persona Frame Projects to Increase Visibility
- 2024 Approved Gastronomic Geniuses on TikTok
- [Updated] In 2024, Spotlight Series The Best Gamers on TikTok
- [New] Explore the Power of Visuals Mastery over TikTok Video Backgrounds
- 2024 Approved Crafting Engaging TikTok Tracks with Visuals
- 2024 Approved Be the Trendsetter with These Exclusive TikTok Fonts
- [New] In 2024, Top 10 Edge-Enhancing TikTok Filters for Striking Visuals
- 2024 Approved Unique TikTok FP Concepts for Eye-Catching Profiles
- [Updated] Best TikTok Watermark Remover Apps for iPhone and Android
- 2024 Approved Expertly Calculated Earnings TikTok's Finest Tools
- Creating Viral Videos with Inspiring TikTok Phrases for 2024
- [New] Choreographing the Finale for Your TikTok Story
- [New] Innovative Approaches to Customizing Your TikTok Videos
- [New] In 2024, Worldwide Whisked Goods Recipes Uniting Countries
- [New] 2024 Approved Chuckle Census Latest Stars and Trends in TikTok Laughter
- [New] 2024 Approved Steps for a Never-to-Return From TikTok Space
- [New] Epicurean Epics The Hottest Food Trends on TikTok for 2024
- Navigating Like a Pro Tips for Mac/Windows TikTok Users
- [Updated] In 2024, The Ultimate TikTok Toolkit Increase Views and Engagement
- Snatching Your Secret Snaps Again
- [Updated] Navigating Away From TikTok's Silent Ban
- [Updated] In 2024, Breaking Down the Secrets to Successful Slow Mo Videos on TikTok
- [New] In 2024, Be a Guest in the Digital Arena Tips for Live Viewers
- Secrets of Creating a Bespoke TikTok Hashtag for 2024
- Avoiding Common Mistakes – How to Go Live On TikTok From PC for 2024
- [Updated] In 2024, Spotlight Series Celebrating Top 10 Game Bloggers
- [New] How to Pinpoint the Perfect Tag for Your Personalized TikTok Stream for 2024
- 2024 Approved The Ultimate Guide to Visiting Friends' Lives on TikTok
- [Updated] 2024 Approved Culinary Connections Global Eats, One TikTok at a Time
- [New] In 2024, The Ultimate List of TikTok's Most Popular & Secret Emojis
- [Updated] Maximizing Your Influence A Selection of Expert Instagram Analytics Software
- [New] 2024 Approved The New Short-Form FB Story
- How to restore wiped messages on Lava Blaze 2 5G
- [New] In 2024, Investigating Authenticity’s Role in Social Media Selfie Presentation
- [New] 2024 Approved Precision in Video Calls The Art of Border Reduction
- New Unleash Your Creativity Top 3D Video Makers for All Budgets
- New Camtasia Video Editing Essentials How to Adjust Playback Speed for 2024
- [New] In 2024, Perfectly Preserved Your Ultimate Guide to Saving Tweet Animations
- 2024 Approved The Anatomy of a Perfect Lower Third FCPX Best Practices
- In 2024, New Multiple Ways How To Remove iCloud Activation Lock On your Apple iPhone 15
- In 2024, Proven Ways in How To Hide Location on Life360 For Poco C65 | Dr.fone
- OnePlus Ace 2V Bootloop Problem, How to Fix it Without Data Loss | Dr.fone
- Lock Your Poco C51 Phone in Style The Top 5 Gesture Lock Screen Apps
- In 2024, 4 Ways to Sync Contacts from Apple iPhone 8 Plus to iPad Easily | Dr.fone
- In 2024, How I Transferred Messages from Vivo Y27 5G to iPhone 12/XS (Max) in Seconds | Dr.fone
- In 2024, Foremost Strategies for Stream and Store Game Moments
- New In 2024, Top-Rated Online WebM Video Minifiers
- 2 Ways to Transfer Text Messages from Xiaomi 13 Ultra to iPhone 15/14/13/12/11/X/8/ | Dr.fone
- Best Ways on How to Unlock/Bypass/Swipe/Remove Google Pixel 8 Pro Fingerprint Lock
- In 2024, What to do if your iPhone 14 Pro has bad ESN or blacklisted IMEI?
- How To Activate and Use Life360 Ghost Mode On Honor Magic 5 | Dr.fone
- Updated Reaching a Wider Audience Using Video Translation in Tamil
- In 2024, Diving Into Zoom Breakout Room Setups
- Title: "[New] The Ultimate Guide to TikTok Reaction Magic 2 Ways Using Filmora Tools for 2024"
- Author: Gary
- Created at : 2024-05-23 08:04:14
- Updated at : 2024-05-24 08:04:14
- Link: https://tiktok-clips.techidaily.com/new-the-ultimate-guide-to-tiktok-reaction-magic-2-ways-using-filmora-tools-for-2024/
- License: This work is licensed under CC BY-NC-SA 4.0.
