
![[New] The Efficient TikTok Watcher's Toolkit (Fast Forward Edition)](https://www.lifewire.com/thmb/jcDMD7YP-90SNEWHDVuuC4ooVT8=/400x300/filters:no_upscale():max_bytes(150000):strip_icc()/broken-camera-2-56a0e0f85f9b58eba4b4be7f.JPG)
[New] The Efficient TikTok Watcher's Toolkit (Fast Forward Edition)
The Efficient TikTok Watcher’s Toolkit (Fast Forward Edition)
When we state that TikTok is a gift, we know that we speak for many, if not all. Undoubtedly, it made the summer of 2020 much more bearable, and today it has become a leader in entertainment for the rest of the globe. The software has had a profound impact on many people’s daily lives.
Only a few factors hold TikTok back from becoming the finest among the best. One of the drawbacks is that it doesn’t allow you to pause or fast-forward. There are instances when you would like to go back and review a particular video from a TikTok and wouldn’t want to have to watch the entire thing again to see it. So far, it appears like that’s the case. Or is it? We have come here with the answers to all of your questions in this ‘How to Fast Forward on TikTok’ guide. Let’s explore!
In this article
01 How to Fast Forward on Tiktok When Playing?
02 How to Record Fast Motion Video on TikTok on iPhone and Android?
03 How to Add Fast Motion Effect to Uploaded Video on TikTok?
04 How to Download A TikTok Video to Fast Forward on iPhone and Android?
05 How to Fast Forward Videos in TikTok on a PC?
Part 1: How to Fast Forward on Tiktok When Playing?
TikTok videos include a progress bar, which allows you to jump between them; nevertheless, this feature is not accessible for all videos. For the time being, the function is only visible on lengthier films.
Although it is unlikely, it is also possible to download a TikTok clip and then fast forward or rewind it at your convenience without using the TikTok app. But how to do it is the real question here. Follow the steps below to learn the trick:
Step 1: Find a white progress bar at the bottom of the clip on TikTok by opening the app and selecting it.

Step 2: The dot on the progress bar that appears like a white line may be moved forward or backward by tapping and dragging it along the bar. Note that the revised location will be reflected above the bar in the first timecode number.
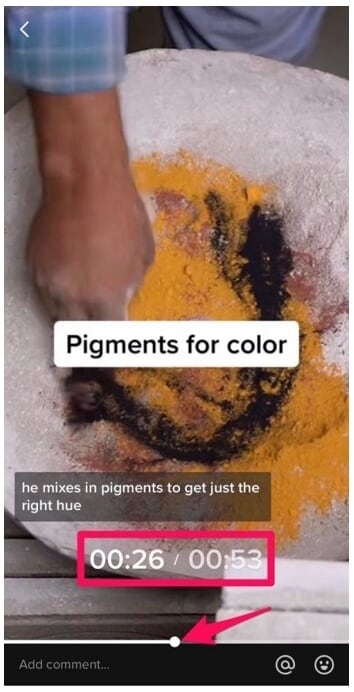
Step 3: Using your finger, touch on the White circle and move it forward or backward to the place indicated by the timecode figure displayed above it.
Step 4: When you let go of the dot, you would have shifted your position in the clip.
Part 2: How to Record Fast Motion Video on TikTok on iPhone and Android?
A rapid-motion movie must be recorded with an increased speed between each frame to get a faster playback speed. Videos that move at a high rate of speed have a hypnotic impact on viewers. The procedures of creating a fast-motion video in TikTok for Android are outlined in the following section.
Record fast motion video on TikTok Android
Step 1: After launching the app, the feed area will appear. It would help if you touched on the “+” option in the feed area to get to the “Add new“ section.
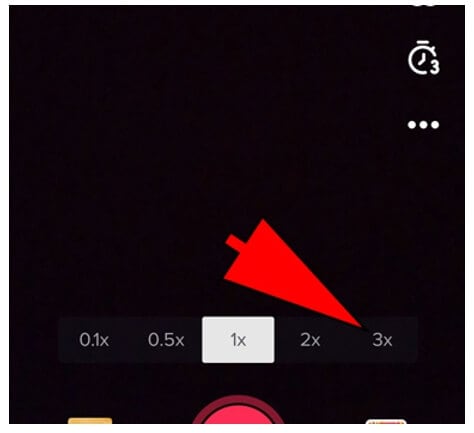
Step 2: Speed control must be enabled when adding a new option. To change the speed, use the speed control option in the upper right corner of the screen.
![]()
Step 3: The next step is to decide on the video’s frame rate. The rectangular bar lets you choose a speed. Tap on the chosen speed from here.
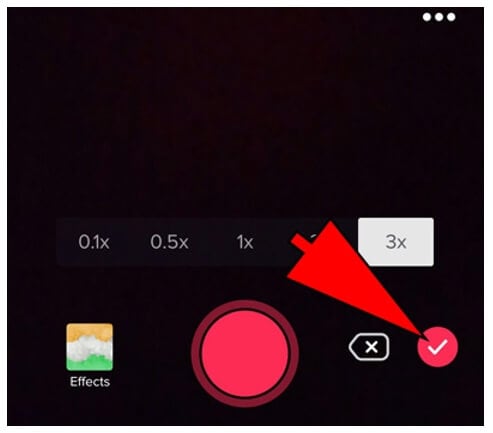
Step 4: You may begin recording your video after selecting the required frame rate. You may accomplish this by holding down the red circular recording option as indicated in the image below while tapping and holding.
Step 5: The next step is to go on to the next stage. Tap the Red color checkmark option in the bottom right corner as indicated in the image below to proceed. Only once you’ve finished recording a video will you see the Tick mark.
Step 6: You’ll get this screen once you press the tick option provided below. In this section, you may apply various effects and filters.
(Note: There is nothing you can adjust here that will influence the speed of the movie. Finally, it would help if you pressed the “Next“ button shown by clicking on it).
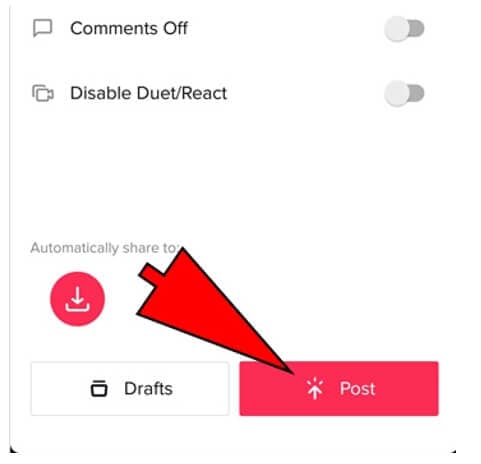
Step 7: The screen below will appear after selecting the next option. On this page, you’ll see a Post button where you may share the video with your followers.
Record TikTok Video with Fast Motion Effect on iPhone
Step 1: Launch TikTok app. At the bottom of the screen, click on the “+” symbol. That link will lead you to a page where you can start creating a new video.
Step 2: The right-hand side of the screen has several icons that represent various recording choices. Choose the second option, Speed.
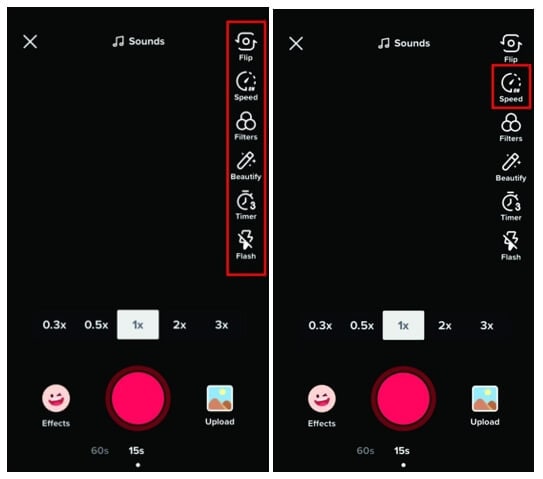
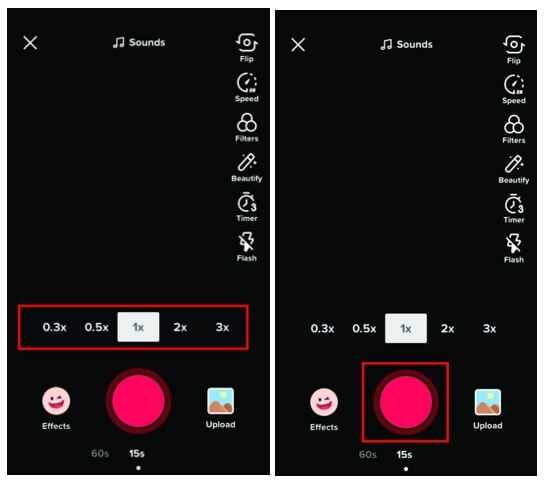
Step 3: Select the ideal recording speed at which you wish to capture your video. For a video with fast motion effect, you should choose 2X or 3X. To record a video, click on the red circle symbol on the screen.
Part 3: How to Add Fast Motion Effect to Uploaded Video on TikTok?
TikTok offers an almost limitless amount of unique features, which combine to make it one of the most engaging platforms available on the internet today. Read the information below to find out how to speed up a video on TikTok after it has been recorded on your smartphone is one of the best ways you can utilize to take your videos to the next level.
Step 1: Make a new video by opening your TikTok app and clicking the + sign at the bottom of the screen to start from scratch.
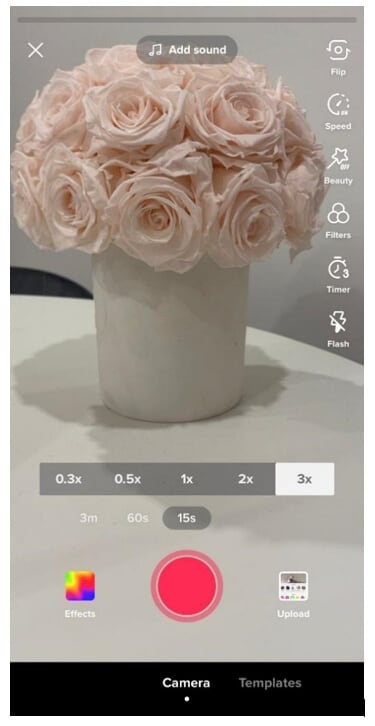
Step 2: Prior to pressing the red record button, however, make sure you have the “Speed“ symbol on the right-hand side of the display selected. You may change the game’s speed to be up to three times quicker than it would generally be.
Step 3: After you’ve made the necessary adjustments, press the red record button to begin recording your clip. There is no need for you to do anything else since everything will be automatically sped up.
Part 4: How to Download A TikTok Video to Fast Forward on iPhone and Android?
TikTok users were not allowed to fast forward or rewind videos inside the app for the longest time. TikTok recently added this feature; however, this new feature is not accessible for all users.
So, for those of you without this feature, we have found a way around it to let you fast forward and rewind your favorite TikTok videos; download them and that too without watermark on your iPhone or Android. Here’s how.
Step 1: Open the TikTok app, and select the video that you wish to download for fast-forwarding or rewinding.
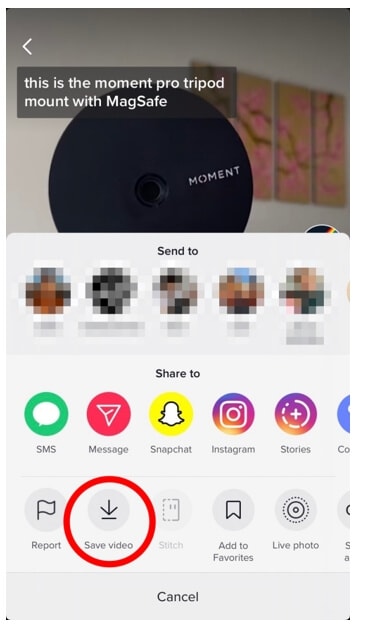
Step 2: Share this video page by clicking on the arrow icon located at the bottom-right of the page. If the publisher has enabled the download feature, you’ll be able to save the video to your gallery.
Step 3: If you’re an iPhone user, press on the Live Photo icon in the share tab.
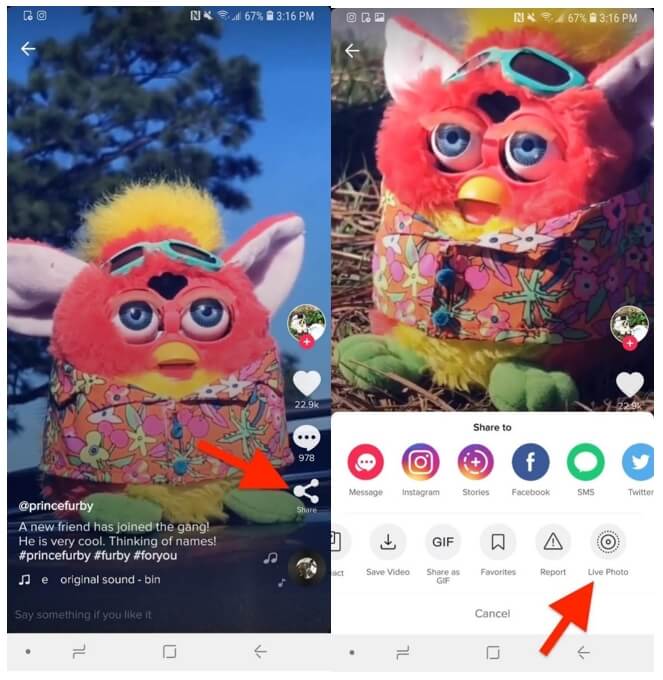
Step 4: Now open your camera roll and go to the Live Photo you saved. Simply share the video after selecting the Save as Video option. Once saved, you may fast forward or rewind the video as often as you like!
Check this article to find out how to speed up a video on iPhone.
Part 5: How to Fast Forward Videos in TikTok on a PC?
Following its meteoric increase in popularity, most users expressed a desire to utilize it on their PC to connect with friends and explore new musical and video compositions by like-minded individuals. This is why TikTok made significant improvements in its PC version. The majority of the features formerly restricted to mobile applications can now be accessed using a web browser.
Even though certain features are still restricted for PC TikTok, there is little need to utilize additional features to get the most out of your TikTok use. In addition, you can simply fast forward and rewind video recordings on a computer with relative ease. To learn more, just follow these easy steps:
Step 1: Log in to your TikTok account by going to the TikTok website on your PC.
Step 2: Once you’re on the home page, click on any video that you may wish to view.
Step 3: Once the video opens, you will see a progress meter at the bottom of the video. The bar continues to thicken throughout the video. A white dot will emerge if you hold your cursor above the bar. Now, you can conveniently fast forward and rewind any video just by moving the white dot forward or backward.
Find out more details about how to use TikTok o n computer.
Conclusion
Well, there you have it – your How to Fast Forward On TikTo k guide. We have tried to cover every aspect of the fast forward TikTok videos that would enable you to have more entertainment in a short time by increasing the playback speed of your videos. Whether you’re an iPhone or an Android user or like to use TikTok on your PC, fast-forwarding videos have become much easier!
02 How to Record Fast Motion Video on TikTok on iPhone and Android?
03 How to Add Fast Motion Effect to Uploaded Video on TikTok?
04 How to Download A TikTok Video to Fast Forward on iPhone and Android?
05 How to Fast Forward Videos in TikTok on a PC?
Part 1: How to Fast Forward on Tiktok When Playing?
TikTok videos include a progress bar, which allows you to jump between them; nevertheless, this feature is not accessible for all videos. For the time being, the function is only visible on lengthier films.
Although it is unlikely, it is also possible to download a TikTok clip and then fast forward or rewind it at your convenience without using the TikTok app. But how to do it is the real question here. Follow the steps below to learn the trick:
Step 1: Find a white progress bar at the bottom of the clip on TikTok by opening the app and selecting it.
Step 2: The dot on the progress bar that appears like a white line may be moved forward or backward by tapping and dragging it along the bar. Note that the revised location will be reflected above the bar in the first timecode number.
Step 3: Using your finger, touch on the White circle and move it forward or backward to the place indicated by the timecode figure displayed above it.
Step 4: When you let go of the dot, you would have shifted your position in the clip.
Part 2: How to Record Fast Motion Video on TikTok on iPhone and Android?
A rapid-motion movie must be recorded with an increased speed between each frame to get a faster playback speed. Videos that move at a high rate of speed have a hypnotic impact on viewers. The procedures of creating a fast-motion video in TikTok for Android are outlined in the following section.
Record fast motion video on TikTok Android
Step 1: After launching the app, the feed area will appear. It would help if you touched on the “+” option in the feed area to get to the “Add new“ section.
Step 2: Speed control must be enabled when adding a new option. To change the speed, use the speed control option in the upper right corner of the screen.
![]()
Step 3: The next step is to decide on the video’s frame rate. The rectangular bar lets you choose a speed. Tap on the chosen speed from here.
Step 4: You may begin recording your video after selecting the required frame rate. You may accomplish this by holding down the red circular recording option as indicated in the image below while tapping and holding.
Step 5: The next step is to go on to the next stage. Tap the Red color checkmark option in the bottom right corner as indicated in the image below to proceed. Only once you’ve finished recording a video will you see the Tick mark.
Step 6: You’ll get this screen once you press the tick option provided below. In this section, you may apply various effects and filters.
(Note: There is nothing you can adjust here that will influence the speed of the movie. Finally, it would help if you pressed the “Next“ button shown by clicking on it).
Step 7: The screen below will appear after selecting the next option. On this page, you’ll see a Post button where you may share the video with your followers.
Record TikTok Video with Fast Motion Effect on iPhone
Step 1: Launch TikTok app. At the bottom of the screen, click on the “+” symbol. That link will lead you to a page where you can start creating a new video.
Step 2: The right-hand side of the screen has several icons that represent various recording choices. Choose the second option, Speed.
Step 3: Select the ideal recording speed at which you wish to capture your video. For a video with fast motion effect, you should choose 2X or 3X. To record a video, click on the red circle symbol on the screen.
Part 3: How to Add Fast Motion Effect to Uploaded Video on TikTok?
TikTok offers an almost limitless amount of unique features, which combine to make it one of the most engaging platforms available on the internet today. Read the information below to find out how to speed up a video on TikTok after it has been recorded on your smartphone is one of the best ways you can utilize to take your videos to the next level.
Step 1: Make a new video by opening your TikTok app and clicking the + sign at the bottom of the screen to start from scratch.
Step 2: Prior to pressing the red record button, however, make sure you have the “Speed“ symbol on the right-hand side of the display selected. You may change the game’s speed to be up to three times quicker than it would generally be.
Step 3: After you’ve made the necessary adjustments, press the red record button to begin recording your clip. There is no need for you to do anything else since everything will be automatically sped up.
Part 4: How to Download A TikTok Video to Fast Forward on iPhone and Android?
TikTok users were not allowed to fast forward or rewind videos inside the app for the longest time. TikTok recently added this feature; however, this new feature is not accessible for all users.
So, for those of you without this feature, we have found a way around it to let you fast forward and rewind your favorite TikTok videos; download them and that too without watermark on your iPhone or Android. Here’s how.
Step 1: Open the TikTok app, and select the video that you wish to download for fast-forwarding or rewinding.
Step 2: Share this video page by clicking on the arrow icon located at the bottom-right of the page. If the publisher has enabled the download feature, you’ll be able to save the video to your gallery.
Step 3: If you’re an iPhone user, press on the Live Photo icon in the share tab.
Step 4: Now open your camera roll and go to the Live Photo you saved. Simply share the video after selecting the Save as Video option. Once saved, you may fast forward or rewind the video as often as you like!
Check this article to find out how to speed up a video on iPhone.
Part 5: How to Fast Forward Videos in TikTok on a PC?
Following its meteoric increase in popularity, most users expressed a desire to utilize it on their PC to connect with friends and explore new musical and video compositions by like-minded individuals. This is why TikTok made significant improvements in its PC version. The majority of the features formerly restricted to mobile applications can now be accessed using a web browser.
Even though certain features are still restricted for PC TikTok, there is little need to utilize additional features to get the most out of your TikTok use. In addition, you can simply fast forward and rewind video recordings on a computer with relative ease. To learn more, just follow these easy steps:
Step 1: Log in to your TikTok account by going to the TikTok website on your PC.
Step 2: Once you’re on the home page, click on any video that you may wish to view.
Step 3: Once the video opens, you will see a progress meter at the bottom of the video. The bar continues to thicken throughout the video. A white dot will emerge if you hold your cursor above the bar. Now, you can conveniently fast forward and rewind any video just by moving the white dot forward or backward.
Find out more details about how to use TikTok o n computer.
Conclusion
Well, there you have it – your How to Fast Forward On TikTo k guide. We have tried to cover every aspect of the fast forward TikTok videos that would enable you to have more entertainment in a short time by increasing the playback speed of your videos. Whether you’re an iPhone or an Android user or like to use TikTok on your PC, fast-forwarding videos have become much easier!
The Insider’s Tale on TikTok Mastery: Two Ways with Filmora
How to Make TikTok Reaction Videos Easily in 2 Ways

Shanoon Cox
Mar 27, 2024• Proven solutions
With all the videos of different moods and categories available on the platform, TikTok’s reaction is something that makes the footage more engaging. Available for both iOS and Android platforms, TikTok allows you to record, edit , and compile a video of up to 60 seconds, and apply a plethora of filters and animation effects to them along with adding relevant music to awe your audience.
Considering this, here you will learn how to make TikTok reaction videos with ease from within the app itself, and if that’s not enough, using one of the best and most efficient programs available in the market that can even allow you to add unique effects to the reactions you create.
- Part 1: How to Make React Videos on TikTok
- Part 2: How to Use Snap Filmora to Make TikTok Reaction Videos
Bonus: Create A More Attractive Video with Human Segmentation Effect
The human segmentation effect under AI Portrait allows you to isolate people from video background even without a green screen, and then you can composite it to make a reaction video easily. Watch the video tutorial below to find out more details.


Want to read the texts instead of watching videos? Check the complete guide to making a reaction video in 3 ways .
Part 1: How to React to a TikTok Video
After being equipped with all the worldly knowledge about TikTok reaction videos, you can follow the steps given below to learn how to react to the footage created by other people:
1. Tap Share and Record Your Reaction
Start TikTok, play the video you want to react on, tap the Share icon from the lower-right area, and tap the React option from the Share to menu. Tap Flip from the top-right corner of the Camera screen to switch between the front and rear camera as needed, optionally tap the Mic icon to disable or enable voice and system audio capture, drag and reposition React window according to the source footage, and tap the Record button from the bottom to start shooting your TikTok reaction. Wait while the source clip and your recording process are complete successfully before moving forward to the next step.

2. Apply Filters
Tap the Filters icon from the top-right corner, tap to pick a filter from those available at the bottom, and tap anywhere on the screen to accept the one you selected and to get back to the previous window.

3. Manage Audio
Tap the Mixer icon from the upper-right corner of the screen, drag the My Voice and Soundtrack Volume sliders to manage your voice recording and the internal audio respectively, and tap Done to save the changes once you’re through with the modifications. Back on the previous window, tap Next from the bottom-right corner.

4. Publish the Video
Tap the Who can view this video option to manage your reaction’s visibility settings (optional). Tap the Save to device toggle switch to prevent TikTok reaction from being stored on your mobile’s storage (optional). Next, tap the Post button from the bottom-right corner to publish the video to TikTok.

More creative tricks about TikTok video: Clone Yourself in TikTok
Part 2: How to Make Reaction Videos with Filmora
Even though you can make TikTok reaction videos using its own filters and audio mixing tools that work pretty well under ideal conditions, if you are a perfectionist and like precision in anything you do or create, you need a dedicated program that has been designed specifically for the purpose.
Although several such tools are available in the market and can be easily downloaded and used, the best among them is Filmora by Wondershare. Wondershare Filmora is an industry-standard production and post-production tool for both Mac and Windows PCs that the majority of users prefer over its competitors such as Adobe Premiere Pro, Final Cut Pro X, etc. This is because Filmora offers simple UI, is less resource-intensive, and is able to render the outputs significantly faster.
You can learn how to make TikTok reaction videos using Wondershare Filmora by following the steps given below:
Note: Before proceeding, make sure that you have already copied the source (and the reaction) video(s) from your smartphone to your computer.
1. Create New Project and Set Preferences
Start Wondershare Filmora on your Windows or Mac PC, go to File > New Project and click 9:16 (Portrait) from the submenu that appears.
Click Split Screen from the standard toolbar at the top, hover mouse to the screen type preset you want to use, click the + ( Add to Project ) icon that appears at the bottom-right corner of the thumbnail, and click OK from the bottom-right corner once the preset is added to the Timeline.

2. Import and Add Video(s) Preview/Timeline
Click the Media button from the standard toolbar, click anywhere inside the Media window at the upper-left corner, and when the Open box comes up, select and import the video file(s) you want to participate in the TikTok reaction. Alternatively, you can also click Record from below the standard toolbar, and choose any of the options to record your own video or voice right from within Wondershare Filmora itself.
Next, click and drag each of the imported videos to their corresponding screen sections in the Preview window in the upper-right area. Notice how the files are automatically added to the Timeline at the bottom.
3. Add Elements and Titles
Click Elements from the standard toolbar, hover mouse to the element you want to add to the reaction, click the + icon that appears at the center of the thumbnail, and reposition the element in the Timeline to match the duration with that of the reaction you are creating.

4. Export the Reaction

Click EXPORT from the top-middle section of the interface, go to the Local tab from the top of the Export box that appears next, select your preferred format from the left bar, optionally choose a destination folder from the right window, optionally click SETTINGS to fine-tune the output preferences as needed, and click EXPORT from the bottom-right corner to export the TikTok reaction. Or, you can save it in the settings perfect for iPhone or another device.
Below is a sample reaction video made with Filmora, you can do much better than that for your TikTok account:
Besides using Filmora to edit reaction videos with the split-screen presets, you can also use some other video editing software to create a reaction video . Filmora can empower your video creation with more creativity, watch the video below and download Filmora to try.
Conclusion
A TikTok reaction enables you to make the source videos more fun and entertaining. Luckily the app itself has a “React” button that helps you create TikTok reaction videos with merely a few simple taps. However, if you feel that the built-in options are not as robust as they should be, a third-party program like Wondershare Filmora is something you would definitely love to try your hands on as the software is not only easy to use, it is also lightweight, and doesn’t put any overhead on your computer hardware.
Shanoon Cox
Shanoon Cox is a writer and a lover of all things video.
Follow @Shanoon Cox
Shanoon Cox
Mar 27, 2024• Proven solutions
With all the videos of different moods and categories available on the platform, TikTok’s reaction is something that makes the footage more engaging. Available for both iOS and Android platforms, TikTok allows you to record, edit , and compile a video of up to 60 seconds, and apply a plethora of filters and animation effects to them along with adding relevant music to awe your audience.
Considering this, here you will learn how to make TikTok reaction videos with ease from within the app itself, and if that’s not enough, using one of the best and most efficient programs available in the market that can even allow you to add unique effects to the reactions you create.
- Part 1: How to Make React Videos on TikTok
- Part 2: How to Use Snap Filmora to Make TikTok Reaction Videos
Bonus: Create A More Attractive Video with Human Segmentation Effect
The human segmentation effect under AI Portrait allows you to isolate people from video background even without a green screen, and then you can composite it to make a reaction video easily. Watch the video tutorial below to find out more details.
Want to read the texts instead of watching videos? Check the complete guide to making a reaction video in 3 ways .
Part 1: How to React to a TikTok Video
After being equipped with all the worldly knowledge about TikTok reaction videos, you can follow the steps given below to learn how to react to the footage created by other people:
1. Tap Share and Record Your Reaction
Start TikTok, play the video you want to react on, tap the Share icon from the lower-right area, and tap the React option from the Share to menu. Tap Flip from the top-right corner of the Camera screen to switch between the front and rear camera as needed, optionally tap the Mic icon to disable or enable voice and system audio capture, drag and reposition React window according to the source footage, and tap the Record button from the bottom to start shooting your TikTok reaction. Wait while the source clip and your recording process are complete successfully before moving forward to the next step.
2. Apply Filters
Tap the Filters icon from the top-right corner, tap to pick a filter from those available at the bottom, and tap anywhere on the screen to accept the one you selected and to get back to the previous window.
3. Manage Audio
Tap the Mixer icon from the upper-right corner of the screen, drag the My Voice and Soundtrack Volume sliders to manage your voice recording and the internal audio respectively, and tap Done to save the changes once you’re through with the modifications. Back on the previous window, tap Next from the bottom-right corner.
4. Publish the Video
Tap the Who can view this video option to manage your reaction’s visibility settings (optional). Tap the Save to device toggle switch to prevent TikTok reaction from being stored on your mobile’s storage (optional). Next, tap the Post button from the bottom-right corner to publish the video to TikTok.
More creative tricks about TikTok video: Clone Yourself in TikTok
Part 2: How to Make Reaction Videos with Filmora
Even though you can make TikTok reaction videos using its own filters and audio mixing tools that work pretty well under ideal conditions, if you are a perfectionist and like precision in anything you do or create, you need a dedicated program that has been designed specifically for the purpose.
Although several such tools are available in the market and can be easily downloaded and used, the best among them is Filmora by Wondershare. Wondershare Filmora is an industry-standard production and post-production tool for both Mac and Windows PCs that the majority of users prefer over its competitors such as Adobe Premiere Pro, Final Cut Pro X, etc. This is because Filmora offers simple UI, is less resource-intensive, and is able to render the outputs significantly faster.
You can learn how to make TikTok reaction videos using Wondershare Filmora by following the steps given below:
Note: Before proceeding, make sure that you have already copied the source (and the reaction) video(s) from your smartphone to your computer.
1. Create New Project and Set Preferences
Start Wondershare Filmora on your Windows or Mac PC, go to File > New Project and click 9:16 (Portrait) from the submenu that appears.
Click Split Screen from the standard toolbar at the top, hover mouse to the screen type preset you want to use, click the + ( Add to Project ) icon that appears at the bottom-right corner of the thumbnail, and click OK from the bottom-right corner once the preset is added to the Timeline.
2. Import and Add Video(s) Preview/Timeline
Click the Media button from the standard toolbar, click anywhere inside the Media window at the upper-left corner, and when the Open box comes up, select and import the video file(s) you want to participate in the TikTok reaction. Alternatively, you can also click Record from below the standard toolbar, and choose any of the options to record your own video or voice right from within Wondershare Filmora itself.
Next, click and drag each of the imported videos to their corresponding screen sections in the Preview window in the upper-right area. Notice how the files are automatically added to the Timeline at the bottom.
3. Add Elements and Titles
Click Elements from the standard toolbar, hover mouse to the element you want to add to the reaction, click the + icon that appears at the center of the thumbnail, and reposition the element in the Timeline to match the duration with that of the reaction you are creating.
4. Export the Reaction
Click EXPORT from the top-middle section of the interface, go to the Local tab from the top of the Export box that appears next, select your preferred format from the left bar, optionally choose a destination folder from the right window, optionally click SETTINGS to fine-tune the output preferences as needed, and click EXPORT from the bottom-right corner to export the TikTok reaction. Or, you can save it in the settings perfect for iPhone or another device.
Below is a sample reaction video made with Filmora, you can do much better than that for your TikTok account:
Besides using Filmora to edit reaction videos with the split-screen presets, you can also use some other video editing software to create a reaction video . Filmora can empower your video creation with more creativity, watch the video below and download Filmora to try.
Conclusion
A TikTok reaction enables you to make the source videos more fun and entertaining. Luckily the app itself has a “React” button that helps you create TikTok reaction videos with merely a few simple taps. However, if you feel that the built-in options are not as robust as they should be, a third-party program like Wondershare Filmora is something you would definitely love to try your hands on as the software is not only easy to use, it is also lightweight, and doesn’t put any overhead on your computer hardware.
Shanoon Cox
Shanoon Cox is a writer and a lover of all things video.
Follow @Shanoon Cox
Also read:
- [New] 2024 Approved Ensuring Your Content Is Safe for TikTok Uploading
- [New] In 2024, Legitimate Solutions for TikTok Following
- [New] Elevate Your TikTok Experience with Proficient Voicework for 2024
- Savory Sensations Pioneers of Online Cuisine for 2024
- [New] In 2024, Craft Engaging TikTok Audio A Step-by-Step Guide
- [Updated] TikTok Visual Transformation Switch Backgrounds with 3 Simple Tricks for 2024
- [New] Top-Tier TikTok Analytics 10 Tools to Enhance Your Social Media Strategy for 2024
- [Updated] Streamline Video Creation Incorporating Apple's Siri Into TikTok
- [Updated] In 2024, Dance Your Way to Fame The Hottest TikTok Patterns
- [New] Bite-Sized Masterpieces The Best of TikTok Cooking Trends for 2024
- [Updated] In 2024, Get Unbranded TikTok Content Free, Full Quality Download
- [New] The Ultimate Guide to TikTok's Most Engaging Rap Songs for 2024
- [New] Crossing the Line Guesting in Friends' TikTok Shows for 2024
- [Updated] Journey Through TikTok's Most Iconic Creators Worldwide
- In 2024, Navigating the Best Tools for TikTok-to-GIF Conversion Expertise
- 2024 Approved TikTop to MP4 Prime Video Conversion Tools
- [New] 2024 Approved Step-by-Step Guide to PC-Based Live Broadcasts on TikTok
- Trustful Growth How to Properly Buy TikTok Followers for 2024
- Best Bites TikTok's Top Chefs
- [New] In 2024, Mastering On-Screen Captions in TikTok Videos
- [Updated] Top 10 Effortless Yet Striking TikFilters for All
- [Updated] In 2024, Strategic Planning for Success in the Digital Lands Marketplace
- [Updated] 2024 Approved Engaging Enthusiasts Top Biographical Approaches for Growing Followers, Inspired by Filmora
- [New] 2024 Approved Engaging Audiences with Jujutsu Kaisen TikTok Content
- [New] 2024 Approved Decoding Social Media Success - Navigate the Best & Hidden TikTok Glyphs
- Enhancing Conversations The Essential Guide to Using GIFs on Discord
- In 2024, Dominating Desktops Secrets to Viral TikTok Videos
- [New] 2024 Approved Profile Makeover Tips for an Updated TikTok Presence
- [New] Quick Guide Reversing an Unintended TikTok Refresh for 2024
- [Updated] Top Strategies for High-Quality TikTok Filming
- [New] Mastering Movies The Best of Viral TikTok Creations (Top 10)
- [Updated] Complete TikTok Termination Protocol Unveiled
- [New] The Artisan's Guide to Essential Tools and Techniques in TikTok for 2024
- 2024 Approved Accelerating Videos in TikTok Quick Tips
- [Updated] 2024 Approved Efficiency in Consuming TikTok Media
- [New] In 2024, Discover TikTok's Top 15 Books That Define a Generation
- [Updated] Leading Edge TikTok Editing Tools for Windows Users
- [Updated] In 2024, Spotlight on the Most Shared Videos TikTok Reactions
- [New] 2024 Approved Premier's Picks No Watermark, Excellent TikTok Downloader Tools
- [New] 2024 Approved Must-Know Basics for Mac Users on TikTok
- [Updated] 2024 Approved Step-by-Step Conquering TikTok Edit Mastery
- [Updated] In 2024, Beam Into Collaborative Spaces Within TikTok
- [Updated] In 2024, Guide to Outstanding TikTok Content via Computer/iOS
- [New] Swift Playback in TikTok Enhancing Performance for 2024
- 2024 Approved Surprise Refresh on TikTok – Can I See Old Videos?
- [New] Epic Battles & Dynamic Choreography for TikToks
- 2024 Approved Unlock the Code of Conversation - Master #7 Popular and Secrets Emojis
- [Updated] In 2024, Unlocking the Potential of Slow Motion Video on TikTok Detailed Steps
- [New] In 2024, Beat the Heat Learn Trending, Easy TikTok Moves
- In 2024, Did Your iPhone 15 Pro Max Passcode Change Itself? Unlock It Now | Dr.fone
- Updated Beginners Guide How to Use Voice Changer Plus on Your iPhone for 2024
- [Updated] In 2024, Cost-Effective OBS Tuning Steps
- Unlocking the Power of Smart Lock A Beginners Guide for Realme 11 5G Users
- [New] The Ultimate Guide to Professional Screen Recording Methods for 2024
- New Rap Music Selection for Beginners How to Select Beats and Bases
- In 2024, Hacks to do pokemon go trainer battles For Google Pixel Fold | Dr.fone
- How To Fix Apple iPhone 6s Unavailable Issue With Ease
- New In 2024, Generating the Roll Safe-Think About It Meme
- Crafting Captivating Reels Musical Integration Strategies for 2024
- In 2024, 9 Mind-Blowing Tricks to Hatch Eggs in Pokemon Go Without Walking On Honor 100 | Dr.fone
- How to Send and Fake Live Location on Facebook Messenger Of your Samsung Galaxy XCover 7 | Dr.fone
- Bypassing Google Account With vnROM Bypass For Oppo K11x
- [New] United Reviews The Expert on EaseUS
- Latest way to get Shiny Meltan Box in Pokémon Go Mystery Box On OnePlus Ace 2V | Dr.fone
- In 2024, Unveiling the Premier 10 Audio Reversal Tools for Personal Computers & Mobile Devices
- [Updated] 2024 Approved Tweet Titans Social Network’s 10 Most Shared Posts
- [New] A Guide to Mastering Steam's Switch Pro Controller for 2024
- In 2024, Watching Outdated Facebook Chronicles (Mobile/Laptop)
- New 2024 Approved This Article Shows the Detail Steps to Add Titles in Final Cut Pro X
- In 2024, 5 Solutions For Realme 12 5G Unlock Without Password
- Looking For A Location Changer On Nokia C12 Plus? Look No Further | Dr.fone
- In 2024, Mastering OBS for Android Streaming
- In 2024, Catch or Beat Sleeping Snorlax on Pokemon Go For Tecno Pop 8 | Dr.fone
- In 2024, The Transformation of User Interaction Understanding the Update
- In 2024, Downloading SamFw FRP Tool 3.0 for Motorola Moto G04
- [Updated] In 2024, Comparing the Leading No-Cost Video Communication Apps (iOS/Android)
- In 2024, 3 Things You Must Know about Fake Snapchat Location On Samsung Galaxy S24 Ultra | Dr.fone
- In 2024, How to Transfer Data from Realme 12 Pro 5G to Other Android Devices? | Dr.fone
- In 2024, 4 Simplified Ways to Screen Record Lenovo
- Methods to Change GPS Location On Oppo Find X7 Ultra | Dr.fone
- Professional-Grade Grid Tools for Striking Instagram Posts
- In 2024, Crafting Compelling Game Replays A Detailed Guide for Sony PlayStation 4
- Fix Unfortunately Settings Has Stopped on Realme 10T 5G Quickly | Dr.fone
- In 2024, Overview of the Best Tecno Camon 20 Screen Mirroring App | Dr.fone
- 10 Free Location Spoofers to Fake GPS Location on your Honor X9b | Dr.fone
- In 2024, How To Unlock iPhone 14 Plus Without Passcode? 4 Easy Methods
- Expert Strategies for Choosing Valheim Crops for 2024
- [Updated] Awesome Free Webcam Games for Computer for 2024
- In 2024, Will Pokémon Go Ban the Account if You Use PGSharp On Samsung Galaxy S23 FE | Dr.fone
- How can I get more stardust in pokemon go On Infinix Note 30 Pro? | Dr.fone
- Title: [New] The Efficient TikTok Watcher's Toolkit (Fast Forward Edition)
- Author: Gary
- Created at : 2024-05-23 06:50:19
- Updated at : 2024-05-24 06:50:19
- Link: https://tiktok-clips.techidaily.com/new-the-efficient-tiktok-watchers-toolkit-fast-forward-edition/
- License: This work is licensed under CC BY-NC-SA 4.0.
