![[New] Stepwise Journey to Master Large Heads in TikTok Filmmaking (3 Strategies) for 2024](https://thmb.techidaily.com/3a8d29dc752129bc6cecd890184a07ba60927370b95afc8af67003c49b108b72.jpg)
[New] Stepwise Journey to Master Large Heads in TikTok Filmmaking (3 Strategies) for 2024
Stepwise Journey to Master Large Heads in TikTok Filmmaking (3 Strategies)
On TikTok, the Big head effect is commonly employed by content producers to generate humorous videos. In particular, the Big head filter may be utilized for various creative production projects, including caricature films, memes, and teaching.
How to get that TikTok Big Head effect? Would you like to make your head look larger than your body in TikTok videos or photos? It’s effortless to do on your Android smartphone. The best part is that we will show you how to use a Big head filter on different applications in this article and how to edit it. Aside from TikTok, there’s another software you can use to enlarge your head in videos or images. Let’s show you!
In this article
01 How to Get the Big Head Filter on TikTok?
02 How to Make a Big Head Effect in CapCut?
03 How to Add Big Head Effect in Filmora Video Editor? [3 Ways]
Part 1: How to Get the Big Head Filter on TikTok?
The TikTok Big Head effect is an extremely entertaining filter. TikTok is a social media platform that specializes in sharing short video content. Its consumer subscription has surpassed Facebook, Instagram, Twitter, and even Snapchat, and its download percentages are much greater than those of the above said social networking sites.
The TikTok Big Head effect on TikTok, on the other hand, was so widespread that it began to be used by more prominent ‘TikTokers.’ Afterward, in a single glance, all users of the social networking in concern began to use it on TikTok live broadcasts. This is how you can use the TikTok Big Head effect:
Step 1: Go to TikTok’s Discover menu to access the Big Head effects.
Step 2: Type “Big Head“ or #bighead into the search bar and choose the top hashtag**_, #bighead_**. Each TikTok video that employs a Big Head filter would then be displayed.
Step 3: To test out a filter, choose one of the numerous videos available and look for the filter’s name in the lower-left corner.
Step 4: Try pressing on the filter’s title, then touch on the Camera icon at the bottom of the display to make a TikTok video employing the Big Head filter in concern.
Here is a detailed video tutorial about how to make a big head effect in TikTok directly.
Part 2: How to Make a Big Head Effect in CapCut?
CapCut is a content creation application that lets users apply various stickers, filters , and effects to their videos. It also has an essential green screen function, a zooming capability that acts like a Ken Burns effect , and many more features.
With the CapCut software, you can quickly enlarge your head in videos. With a single click of the big head effect, your head would instantly become larger than your body. Here’s how to do it step by step:
Step 1: In the CapCut software, create a New Project and then upload a video in which you will enlarge your head.
Step 2: Click the Effects option at the bottom of the display, and then tap the Facial or Body Effects option.
Step 3: Locate and choose the Big Head effect from the Emotions effect section.
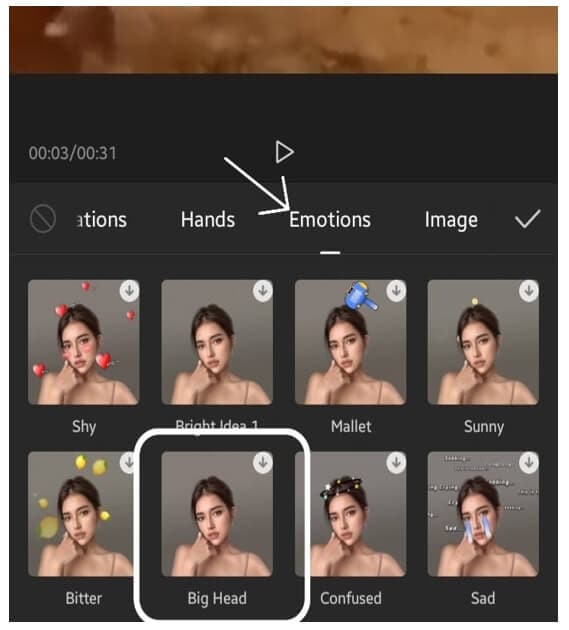
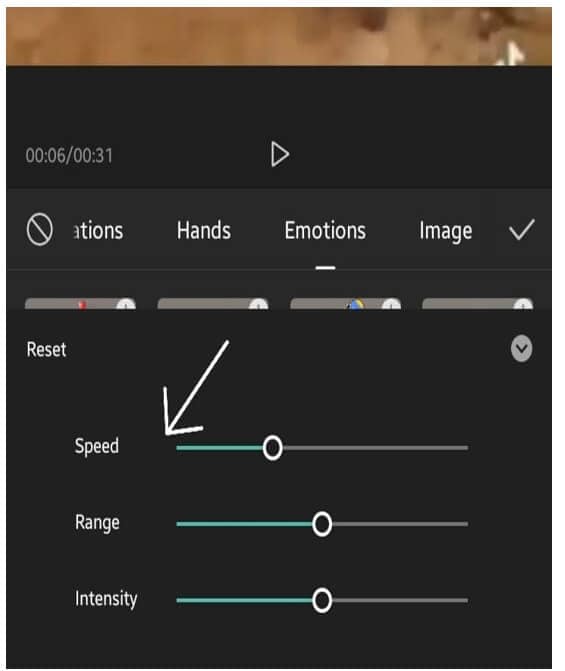
Step 4: The big head effect may be modified in speed, range, and intensity. Finally, adjust the duration of the Big head effect to match the video’s length.
You can check the video tutorial below to find out more details in creating big head and small body effect on video with CapCut.
Part 3: How to Add Big Head Effect in Filmora Video Editor? [3 Ways]
Filmora video editor by Wondershare includes the typical overlays, transitions, trimming, as well as the effects that we’ve grown to expect from the enthusiast-level video editor. It features a user-friendly interface that is clean, minimalistic, and dark. If that wasn’t enough, we’re sure you’ll be pleased to learn that the Filmora program can be used to create the TikTok big head effect in several ways.
With all of the characteristics we’ve discussed so far, you may further customize the Big Head effect with various Filmora effects. Let’s show you how:
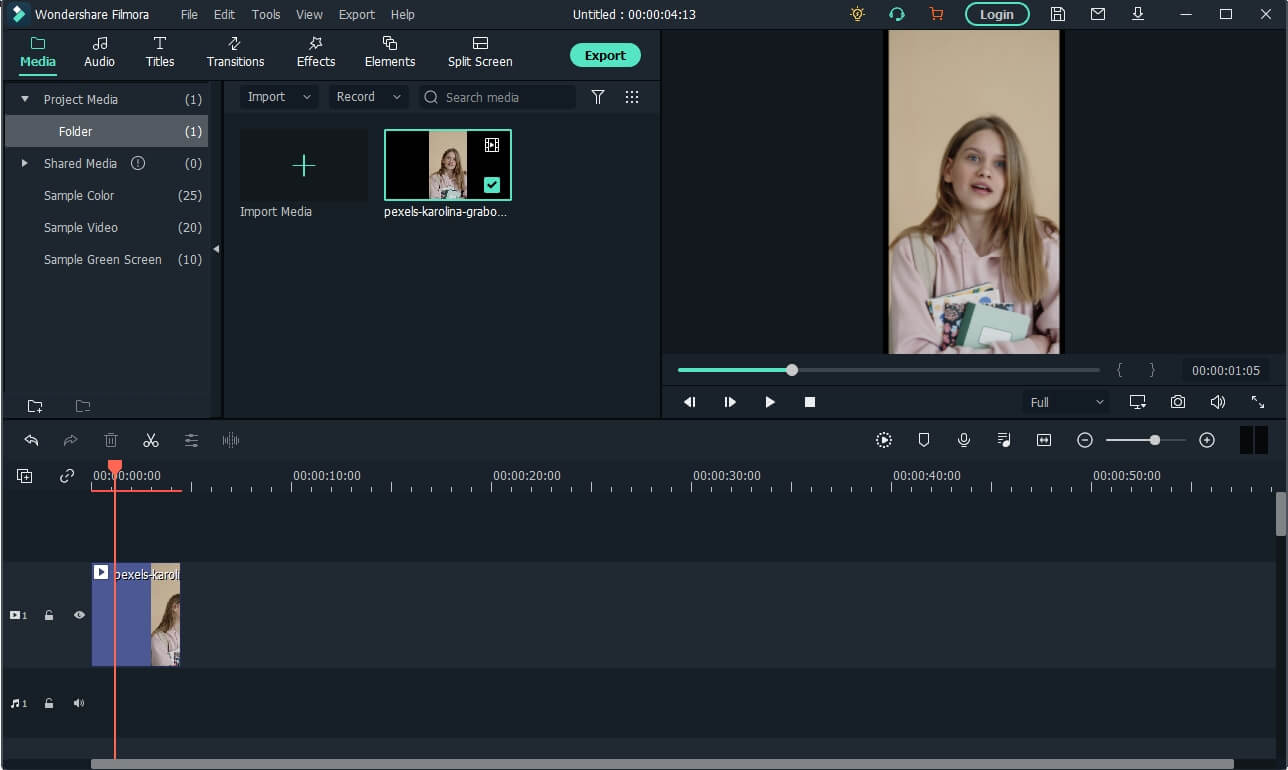
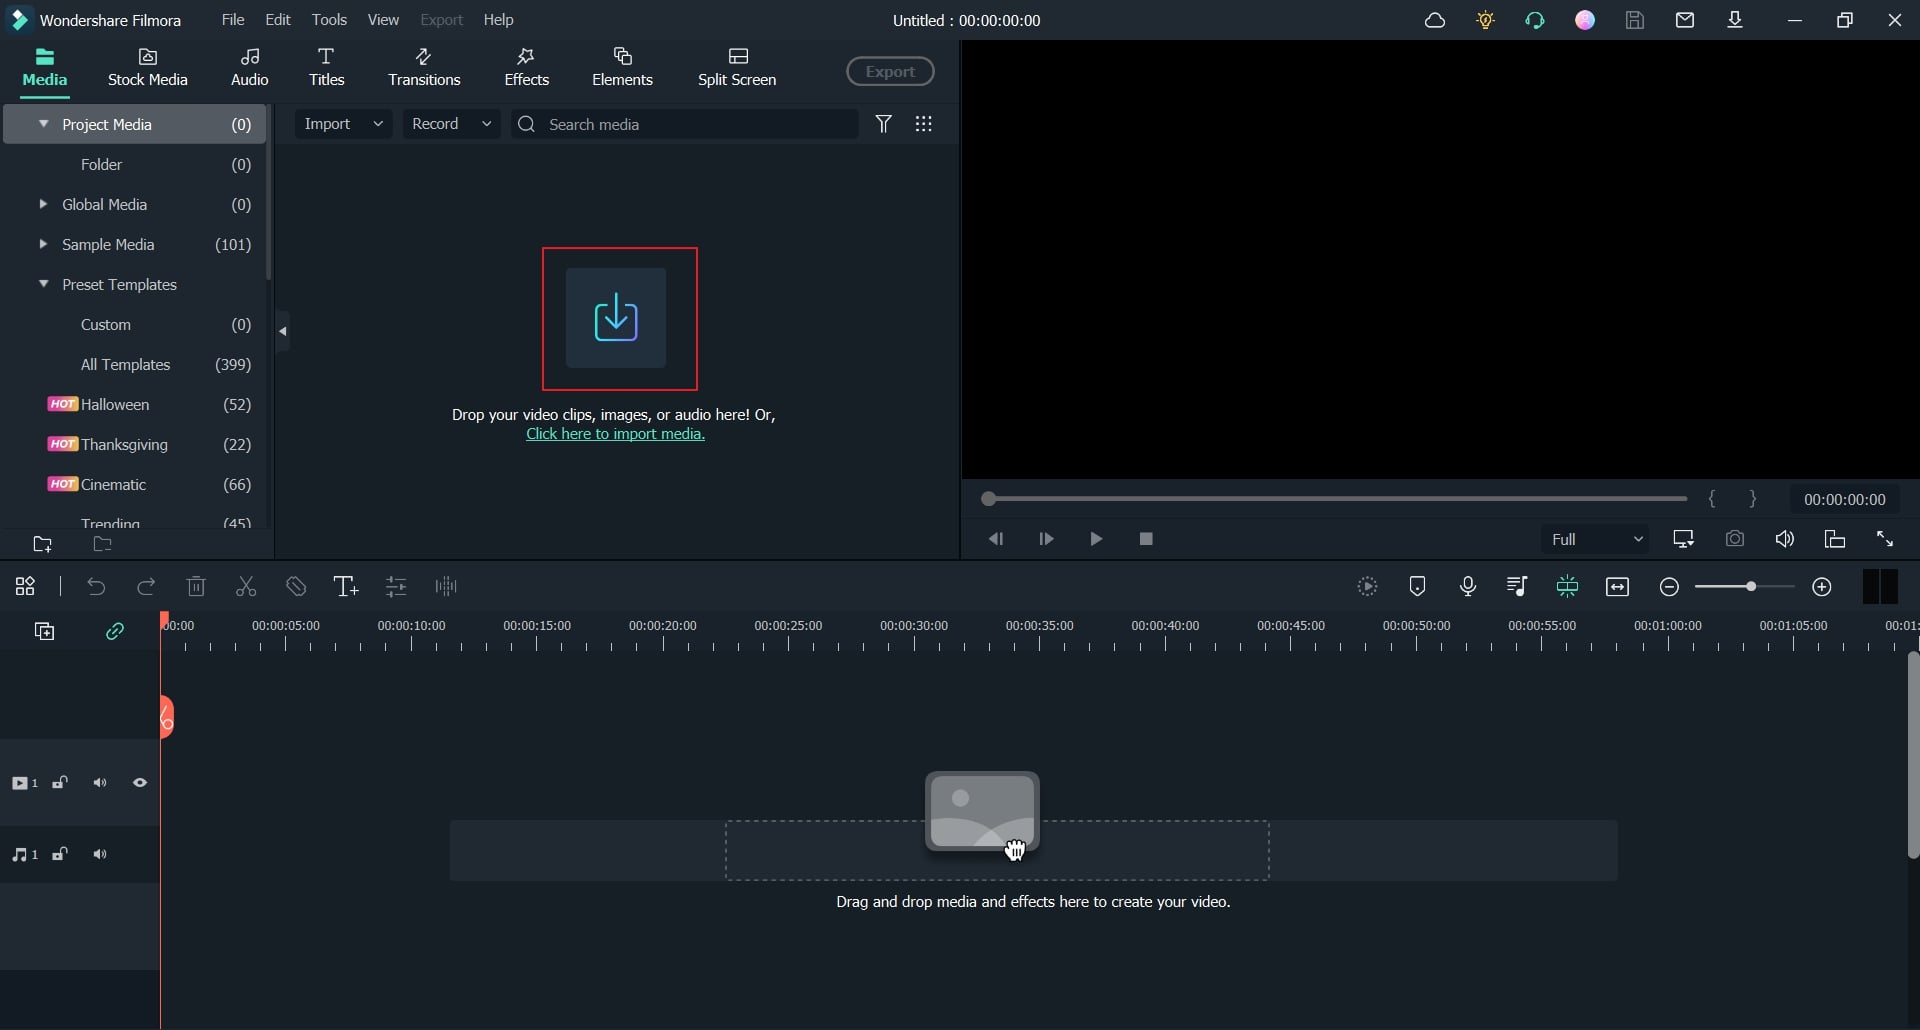
Launch Filmora and click on the Import tab to select the video file you want to use. And then drag and drop the imported media file onto the timeline panel.
For Win 7 or later (64-bit)
For macOS 10.12 or later
Method 1: Create Big Head with AR Stick Bubble Head Effect in Filmora Video Editor
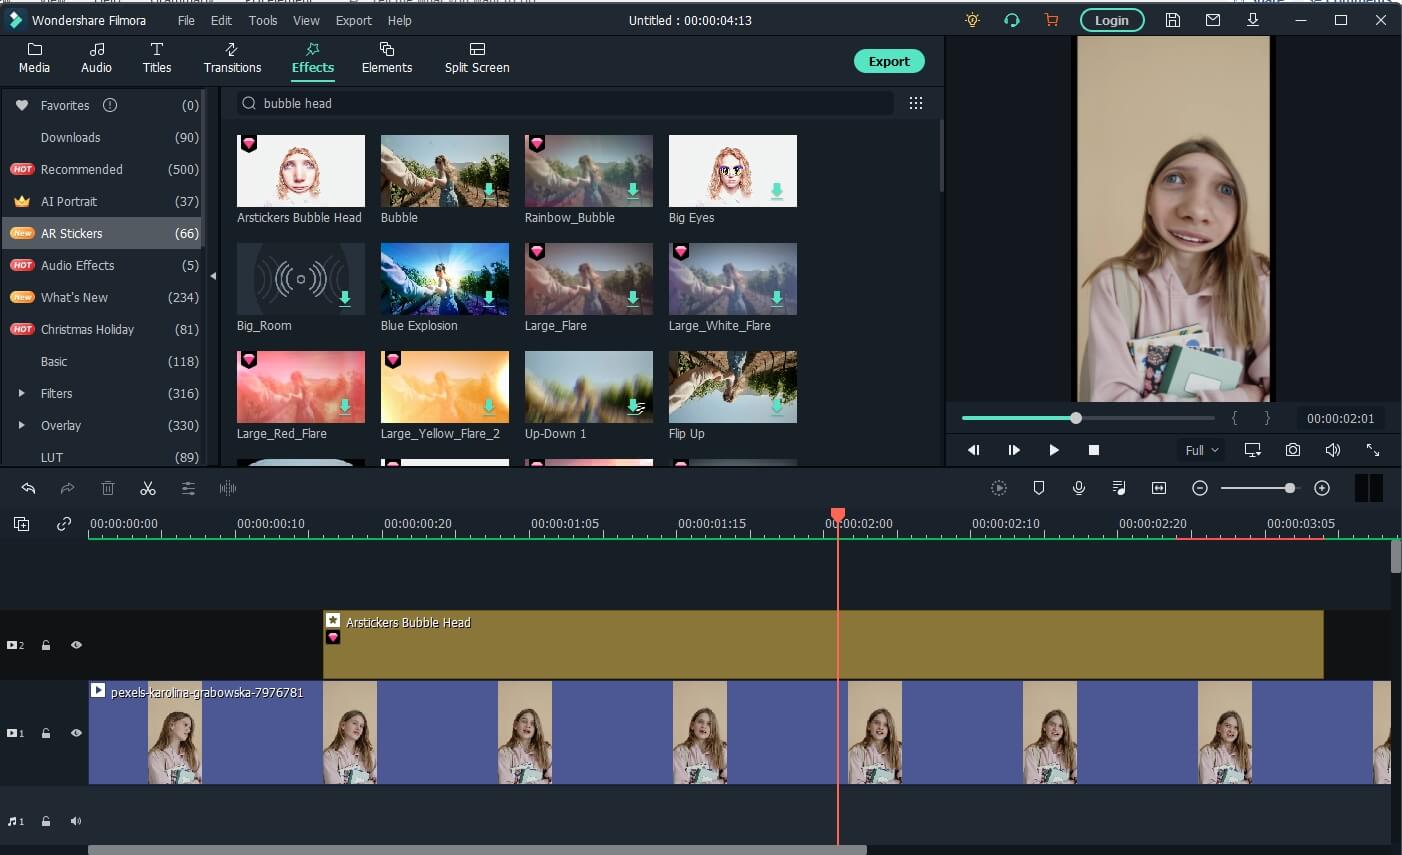
To add the Big Head effect on Filmora, click on the Effects option and select the AR Stickers option. Type bubble head in the search bar and then you will see it in the screen. Then, drag and drop the AR Stickers Bubble Head effect onto the timeline**,** specifically to the portion of the video where you want to add the Big Head filter on the person. As you do that, you will see a Bubble present on the video.
Besides the bubble head effect, there are many more AR stickers available, such as heart eyes, censor bar, emojis, and big eyes. Download the Filmora video editor now and check it yourself.
For Win 7 or later (64-bit)
For macOS 10.12 or later
Method 2: Add Magnify Effect to Video
In the Effects tab, go to the Recommended category, and then you will see the magnify effect. Drag and drop it to the timeline above the video track, and you will see part of the video has been magnified accordingly.
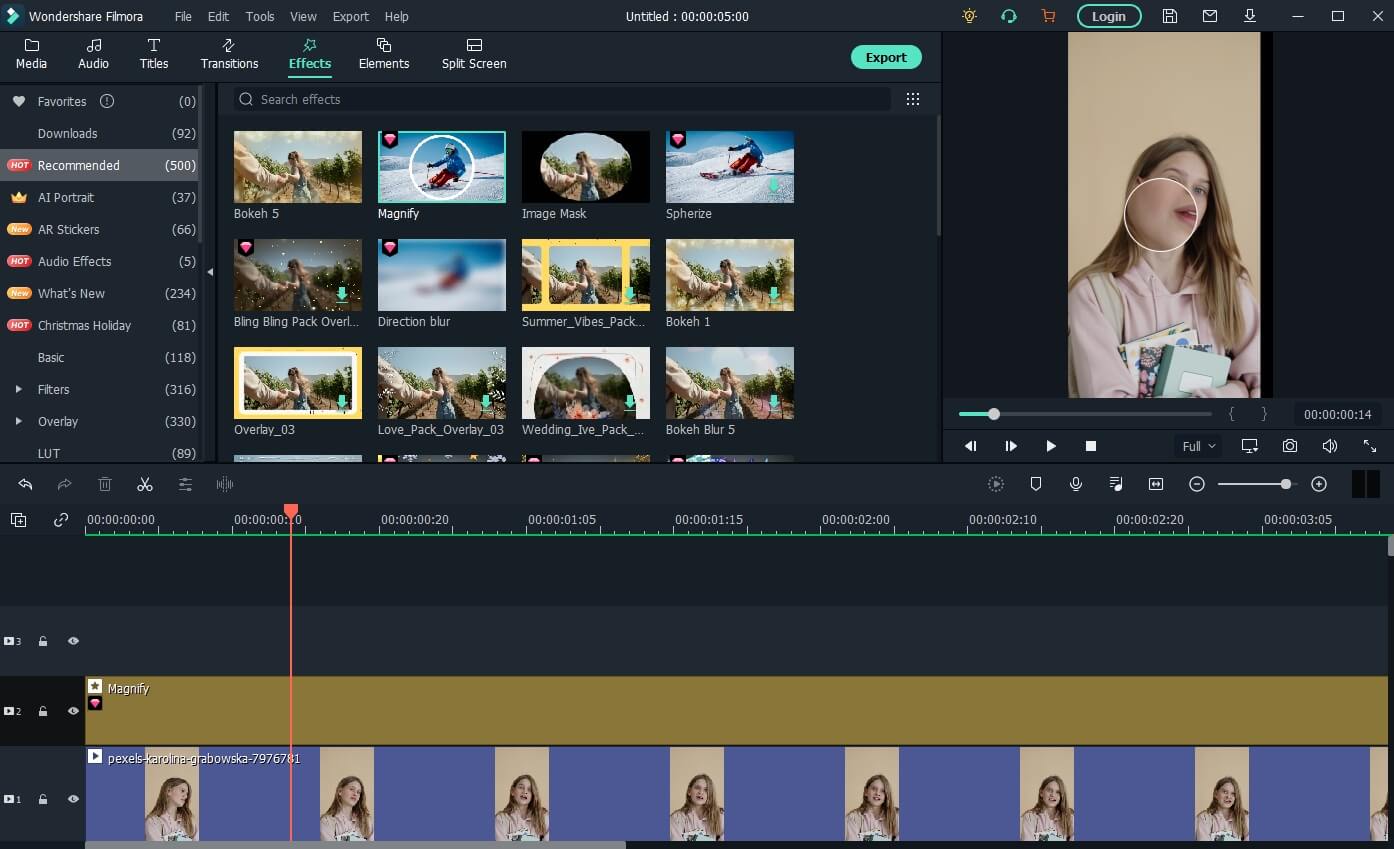
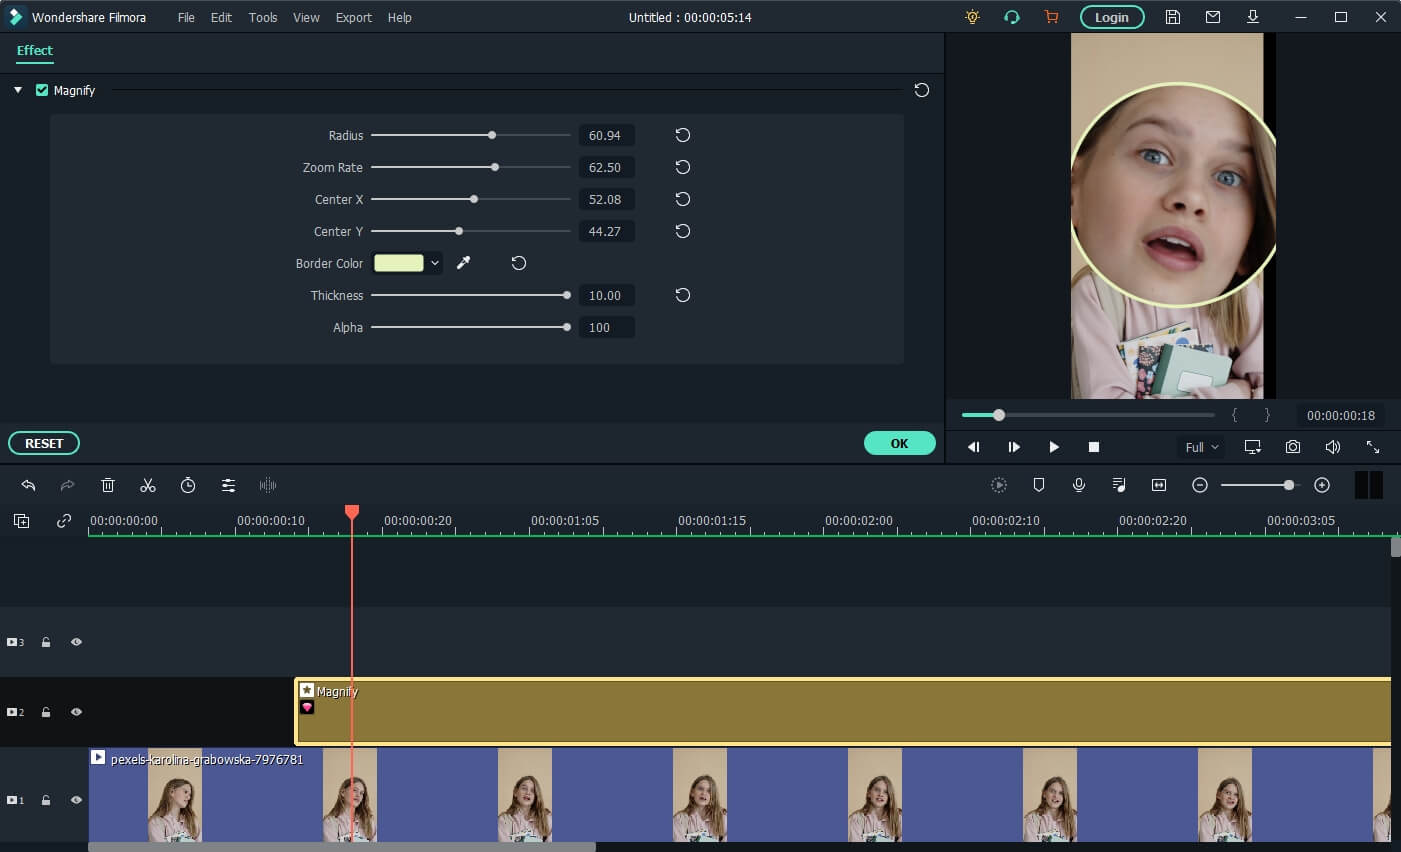
Now, double click on the effect in the timeline and open the Properties of the magnify effect. From the Properties section, you can adjust the size of the bubble using functions such as the Radius, CenterY, CenterX, Alpha, Zoom rate, etc to get a better video with big head effects.
Note: If you’re unable to locate the Magnify option in the Effects tab, please download and install the latest version of Filmora, and then type “Magnify” in the search bar, and the system will directly take you to where the option is present.
Method 3: Use Mask and Scale to Make a Video with Big Head Effect
Besides adding magnify effects and bubblehead effects, you can also use the mask preset to create a big head effect in Filmora.
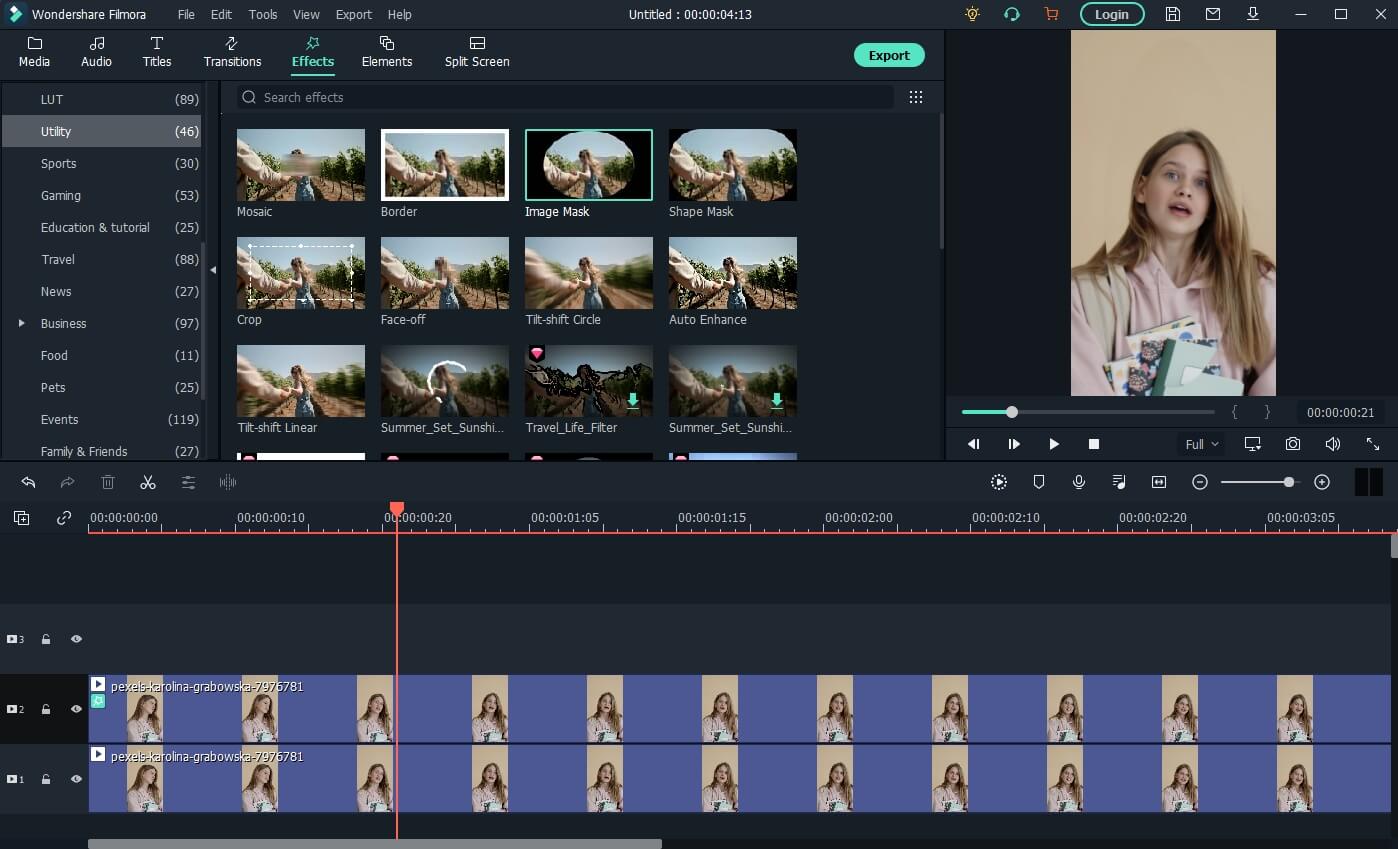
Drag and drop the video to video track 1 and video track 2 respectively in Filmora. Then go to the Effect tab, and scroll down to the Utility category, and place the Image Mask effect to the video above. Or, you can type image mask in the search bar to locate it quickly.

Now, double-click the video with the image mask to adjust the properties. Scroll down to the Video Effects field, and you will see the Image Mask. Click the arrow icon to choose a mask preset, adjust its position and size settings to fit the video.
Tips: You can hide the video in track 1 by clicking the eye icon so you can adjust the video with the image mask conveniently. Click it again then you will see the video.
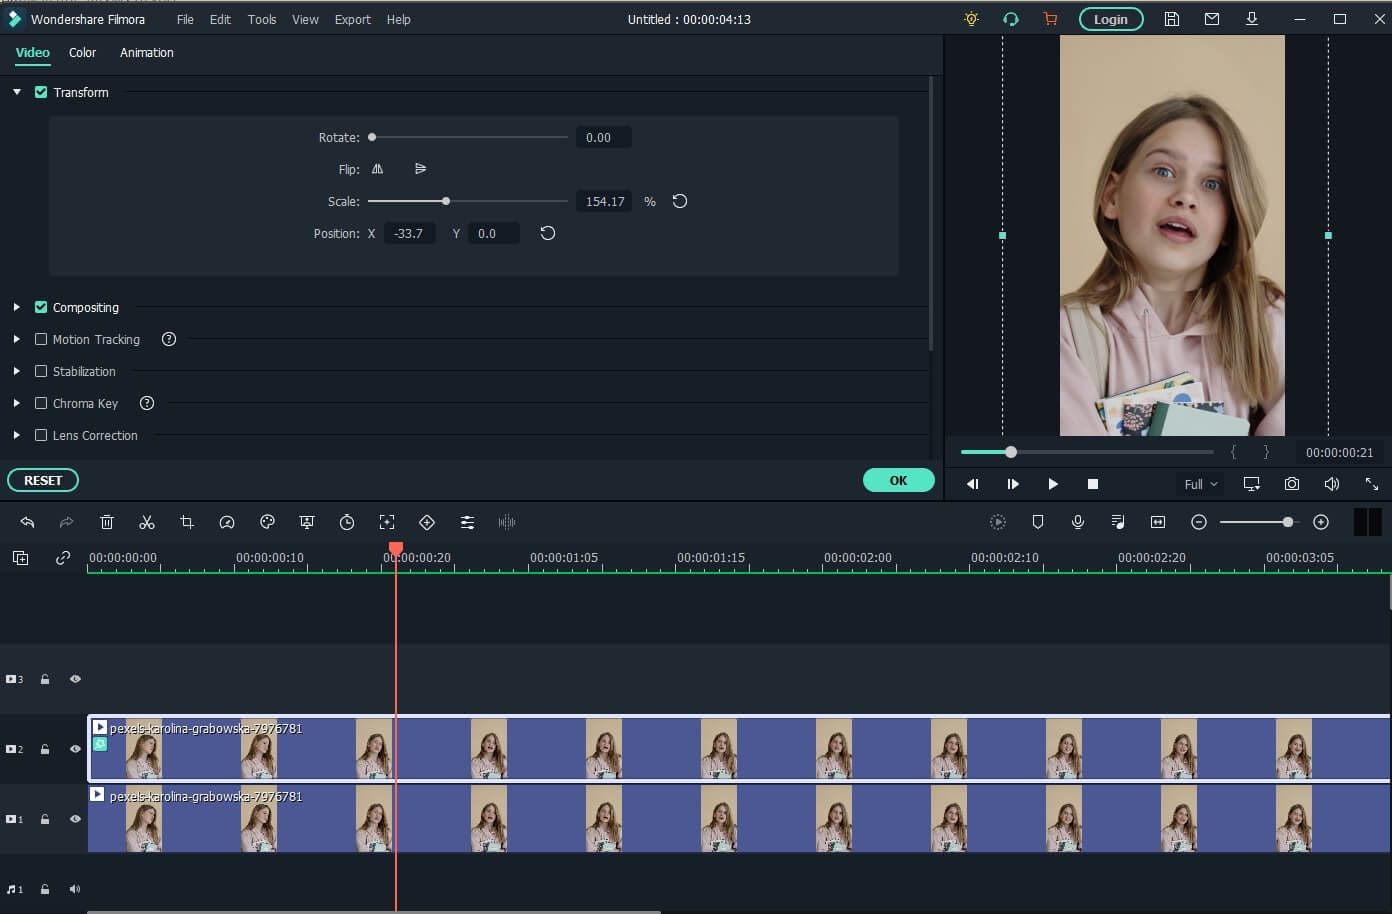
Next, click the video in track 2 again, and then go to the Transform tab, use the Scale slider to adjust the video size to make a big head effect.
Watch the video tutorial below to find out how to use the Image Mask effect to create a video with a big head effect in Filmora.
For Win 7 or later (64-bit)
For macOS 10.12 or later
After creating the video with a big head effect, click the Export button on the screen to save the video on the computer, and then upload it to TikTok from your computer directly.
Conclusion
This article demonstrates the steps you need to take to add the TikTok Big Head filter to your videos. Remember, the Big Head filter is used to make videos more amusing for entertainment purposes.
Not only TikTok, but different apps such as CapCut on Android and Wondershare Filmora on PC can be of great use to you. Especially in Filmora, you get tons of video editing features that unlock your way into the editing world!
02 How to Make a Big Head Effect in CapCut?
03 How to Add Big Head Effect in Filmora Video Editor? [3 Ways]
Part 1: How to Get the Big Head Filter on TikTok?
The TikTok Big Head effect is an extremely entertaining filter. TikTok is a social media platform that specializes in sharing short video content. Its consumer subscription has surpassed Facebook, Instagram, Twitter, and even Snapchat, and its download percentages are much greater than those of the above said social networking sites.
The TikTok Big Head effect on TikTok, on the other hand, was so widespread that it began to be used by more prominent ‘TikTokers.’ Afterward, in a single glance, all users of the social networking in concern began to use it on TikTok live broadcasts. This is how you can use the TikTok Big Head effect:
Step 1: Go to TikTok’s Discover menu to access the Big Head effects.
Step 2: Type “Big Head“ or #bighead into the search bar and choose the top hashtag**_, #bighead_**. Each TikTok video that employs a Big Head filter would then be displayed.
Step 3: To test out a filter, choose one of the numerous videos available and look for the filter’s name in the lower-left corner.
Step 4: Try pressing on the filter’s title, then touch on the Camera icon at the bottom of the display to make a TikTok video employing the Big Head filter in concern.
Here is a detailed video tutorial about how to make a big head effect in TikTok directly.
Part 2: How to Make a Big Head Effect in CapCut?
CapCut is a content creation application that lets users apply various stickers, filters , and effects to their videos. It also has an essential green screen function, a zooming capability that acts like a Ken Burns effect , and many more features.
With the CapCut software, you can quickly enlarge your head in videos. With a single click of the big head effect, your head would instantly become larger than your body. Here’s how to do it step by step:
Step 1: In the CapCut software, create a New Project and then upload a video in which you will enlarge your head.
Step 2: Click the Effects option at the bottom of the display, and then tap the Facial or Body Effects option.
Step 3: Locate and choose the Big Head effect from the Emotions effect section.
Step 4: The big head effect may be modified in speed, range, and intensity. Finally, adjust the duration of the Big head effect to match the video’s length.
You can check the video tutorial below to find out more details in creating big head and small body effect on video with CapCut.
Part 3: How to Add Big Head Effect in Filmora Video Editor? [3 Ways]
Filmora video editor by Wondershare includes the typical overlays, transitions, trimming, as well as the effects that we’ve grown to expect from the enthusiast-level video editor. It features a user-friendly interface that is clean, minimalistic, and dark. If that wasn’t enough, we’re sure you’ll be pleased to learn that the Filmora program can be used to create the TikTok big head effect in several ways.
With all of the characteristics we’ve discussed so far, you may further customize the Big Head effect with various Filmora effects. Let’s show you how:
Launch Filmora and click on the Import tab to select the video file you want to use. And then drag and drop the imported media file onto the timeline panel.
For Win 7 or later (64-bit)
For macOS 10.12 or later
Method 1: Create Big Head with AR Stick Bubble Head Effect in Filmora Video Editor
To add the Big Head effect on Filmora, click on the Effects option and select the AR Stickers option. Type bubble head in the search bar and then you will see it in the screen. Then, drag and drop the AR Stickers Bubble Head effect onto the timeline**,** specifically to the portion of the video where you want to add the Big Head filter on the person. As you do that, you will see a Bubble present on the video.
Besides the bubble head effect, there are many more AR stickers available, such as heart eyes, censor bar, emojis, and big eyes. Download the Filmora video editor now and check it yourself.
For Win 7 or later (64-bit)
For macOS 10.12 or later
Method 2: Add Magnify Effect to Video
In the Effects tab, go to the Recommended category, and then you will see the magnify effect. Drag and drop it to the timeline above the video track, and you will see part of the video has been magnified accordingly.
Now, double click on the effect in the timeline and open the Properties of the magnify effect. From the Properties section, you can adjust the size of the bubble using functions such as the Radius, CenterY, CenterX, Alpha, Zoom rate, etc to get a better video with big head effects.
Note: If you’re unable to locate the Magnify option in the Effects tab, please download and install the latest version of Filmora, and then type “Magnify” in the search bar, and the system will directly take you to where the option is present.
Method 3: Use Mask and Scale to Make a Video with Big Head Effect
Besides adding magnify effects and bubblehead effects, you can also use the mask preset to create a big head effect in Filmora.
Drag and drop the video to video track 1 and video track 2 respectively in Filmora. Then go to the Effect tab, and scroll down to the Utility category, and place the Image Mask effect to the video above. Or, you can type image mask in the search bar to locate it quickly.
Now, double-click the video with the image mask to adjust the properties. Scroll down to the Video Effects field, and you will see the Image Mask. Click the arrow icon to choose a mask preset, adjust its position and size settings to fit the video.
Tips: You can hide the video in track 1 by clicking the eye icon so you can adjust the video with the image mask conveniently. Click it again then you will see the video.
Next, click the video in track 2 again, and then go to the Transform tab, use the Scale slider to adjust the video size to make a big head effect.
Watch the video tutorial below to find out how to use the Image Mask effect to create a video with a big head effect in Filmora.
For Win 7 or later (64-bit)
For macOS 10.12 or later
After creating the video with a big head effect, click the Export button on the screen to save the video on the computer, and then upload it to TikTok from your computer directly.
Conclusion
This article demonstrates the steps you need to take to add the TikTok Big Head filter to your videos. Remember, the Big Head filter is used to make videos more amusing for entertainment purposes.
Not only TikTok, but different apps such as CapCut on Android and Wondershare Filmora on PC can be of great use to you. Especially in Filmora, you get tons of video editing features that unlock your way into the editing world!
Crafting Compelling Narratives in TikTok: The Top 5 Caption Techniques to Try
TikTok is one of the most famous social media apps as it creates various trends frequently that engage users continuously. Every week, you can explore various TikTok trends, such as dance videos, pranks, challenges, or quick hacks. These trends are a great entertainment source for people and motivate them to create engaging content.
However, adding captions is mandatory if you want to make TikTok trend videos for a diverse audience. This article will guide you if you are unaware of how to add captions on TikTok. We will provide 5 different ways to create TikTok captions effectively.
- Way 1: Auto-Generate Captions with TikTok’s Built-in Feature
- Way 2: Use Auto Captions in CapCut
- Way 3: Add Captions to TikTok Videos Manually
- Way 4: Automatically Add Subtitles to TikTok Videos with Online Editor
Part 1: Why Should You Add Captions to TikTok Videos?
Adding captions on TikTok videos can bring you multiple advantages. To learn more about the benefits of adding captions on TikTok, read this section:
1. Increases Comprehension
It may be possible that viewers won’t be able to understand a particular dialogue in your TikTok video. To make your TikTok content more understandable, adding captions can prove to be a great option. Moreover, if some viewers can’t turn on the sound of TikTok videos, they can easily read the captions to understand the content.
2. Enhances Focus
Captions have the ability to grasp the attention of a viewer automatically. Adding captions to your TikTok video lets your viewers focus more properly. Thus, you can engage your audience throughout the TikTok video effortlessly.
3. Helps During Audio Problems
Audio problems may arise unexpectedly. In such situations, added captions on TikTok videos can offer great convenience. Moreover, people who have auditory disabilities can also enjoy your TikTok videos.
4. Attracts Diverse Audience
If some foreigners can’t understand or speak your native language, TikTok captions are necessary for them. By doing so, a broad and diverse audience can watch your TikTok videos easily.
Part 2: How to Add Captions on TikTok?
There are various ways through which you can generate TikTok captions effortlessly. Read this section to discover multiple and convenient ways to create TikTok captions easily.
Way 1: Auto-Generate Captions with TikTok’s Built-in Feature
If you don’t want to download video editing software, you can utilize the built-in feature of TikTok to create auto-captions. This will save you from the hassle of launching or accessing a professional subtitle editor. Moreover, it will also save you time and effort from creating subtitles manually. To use the built-in feature of TikTok automatic captions, check the following instructions:
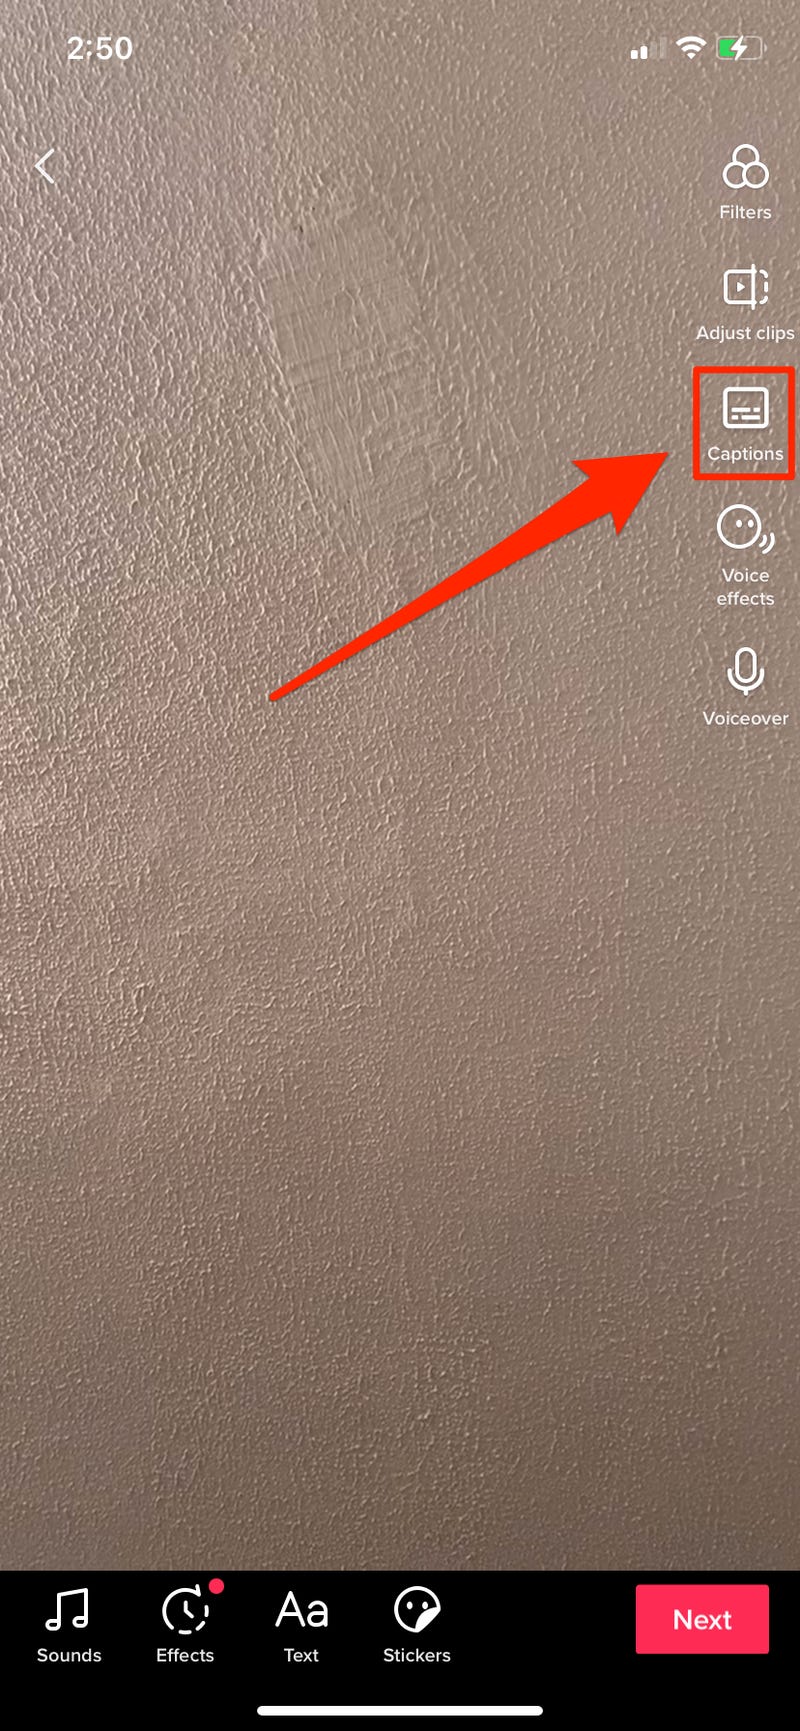
Step1 Once you have captured a video on TikTok, tap the “Tick” icon from the bottom right side. This will redirect you to the editing mode.
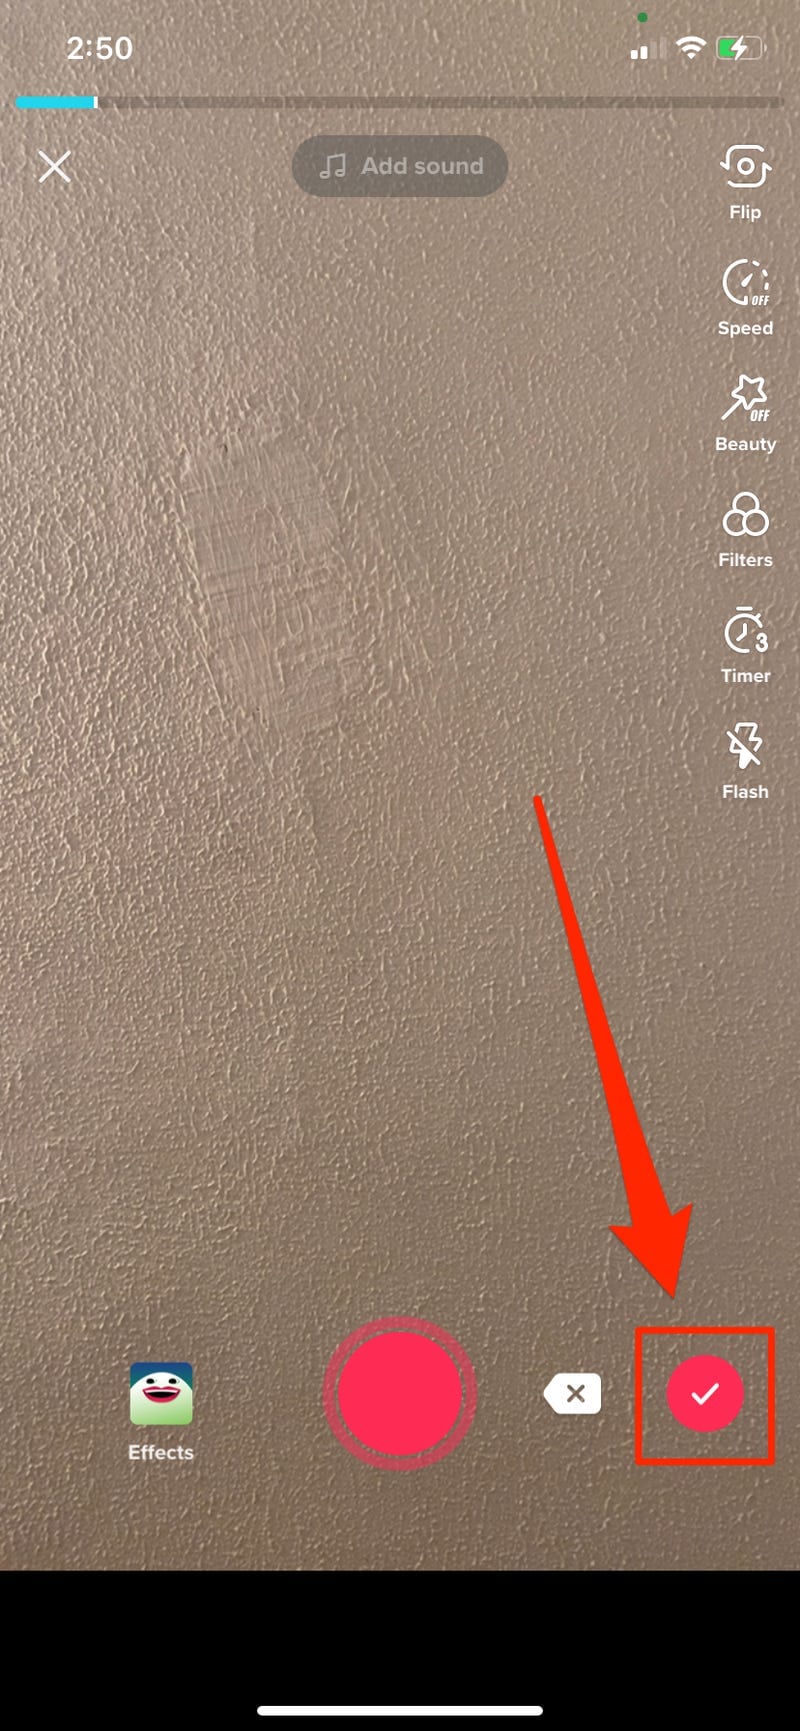
Step2 On the editing mode, locate the “Captions” option from the right side. After tapping on it, TikTok will instantly generate the subtitles automatically. Make sure that all the captions are correctly created. Once you are done, hit the “Save” button displayed at the top right side. Afterward, you can quickly post your TikTok video with captions.
Way 2: Use Auto Captions in CapCut
CapCut and TikTok are closely related to each other as they both have the same parent company called ByteDance. Thus, using CapCut to create captions for your TikTok videos can bring high-quality results. You can easily download CapCut on Android and iOS devices without any complications. The interface of this tool is clean that allows you to generate subtitles efficiently.
The auto caption feature in CapCut enables you to produce subtitles instantly. It uses advanced algorithms that ensure high accuracy while creating subtitles. To use this advanced feature of CapCut, read the below steps:
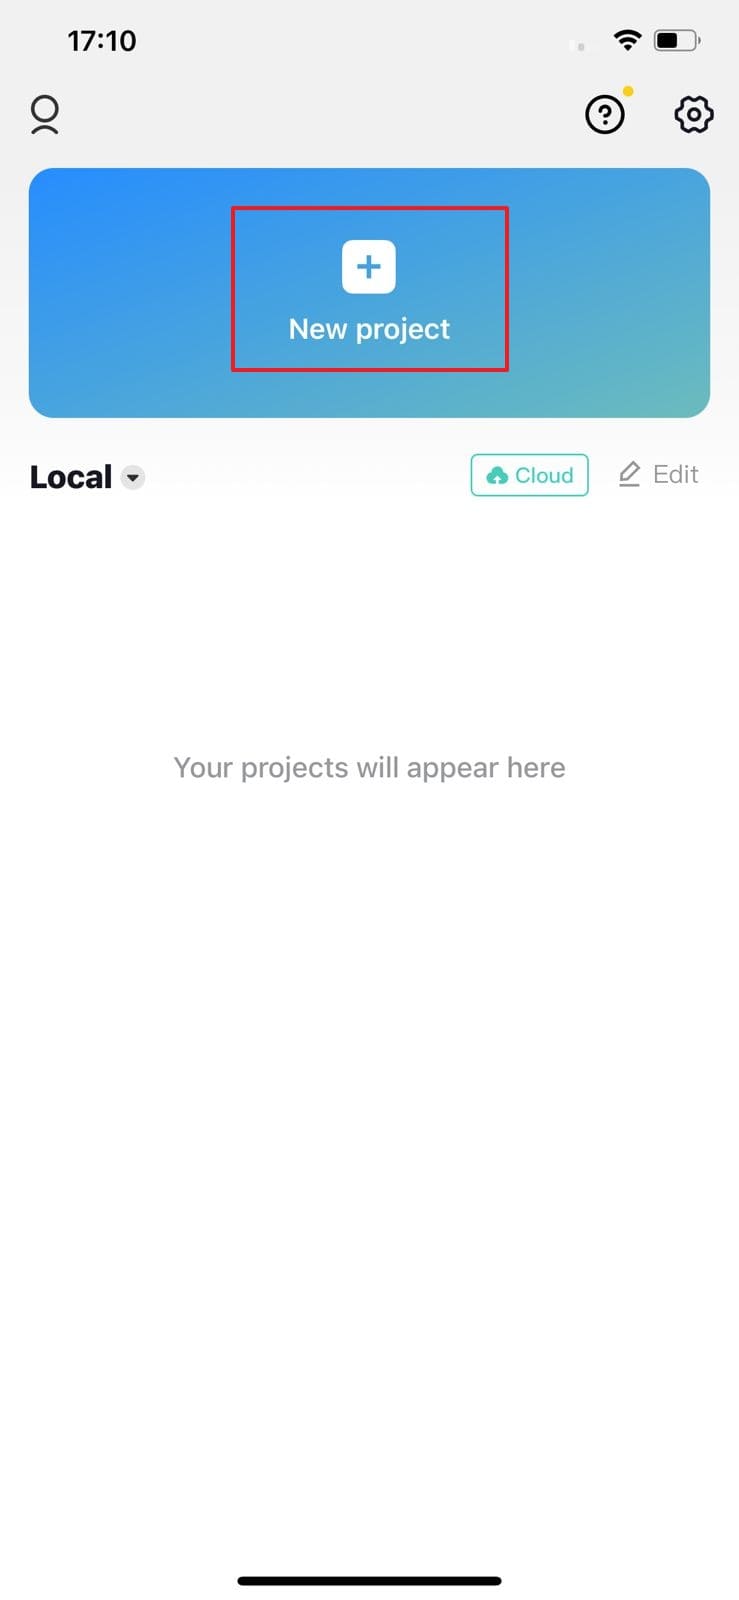
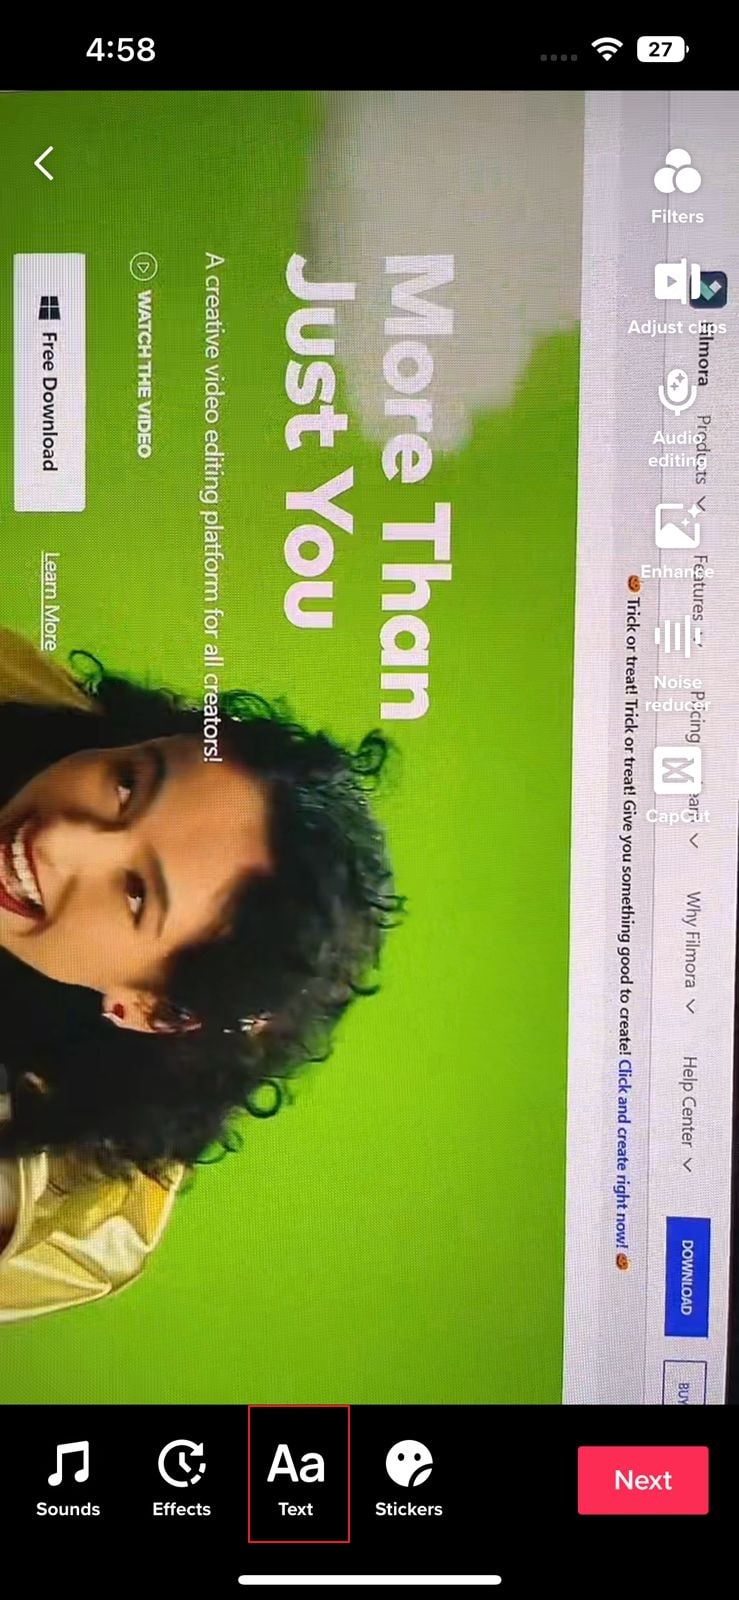
Step1 Download and launch CapCut on your phone. To import, tap on “New Project” and select the video from your phone’s gallery. Tap on “Add” to head to the editing mode of CapCut.
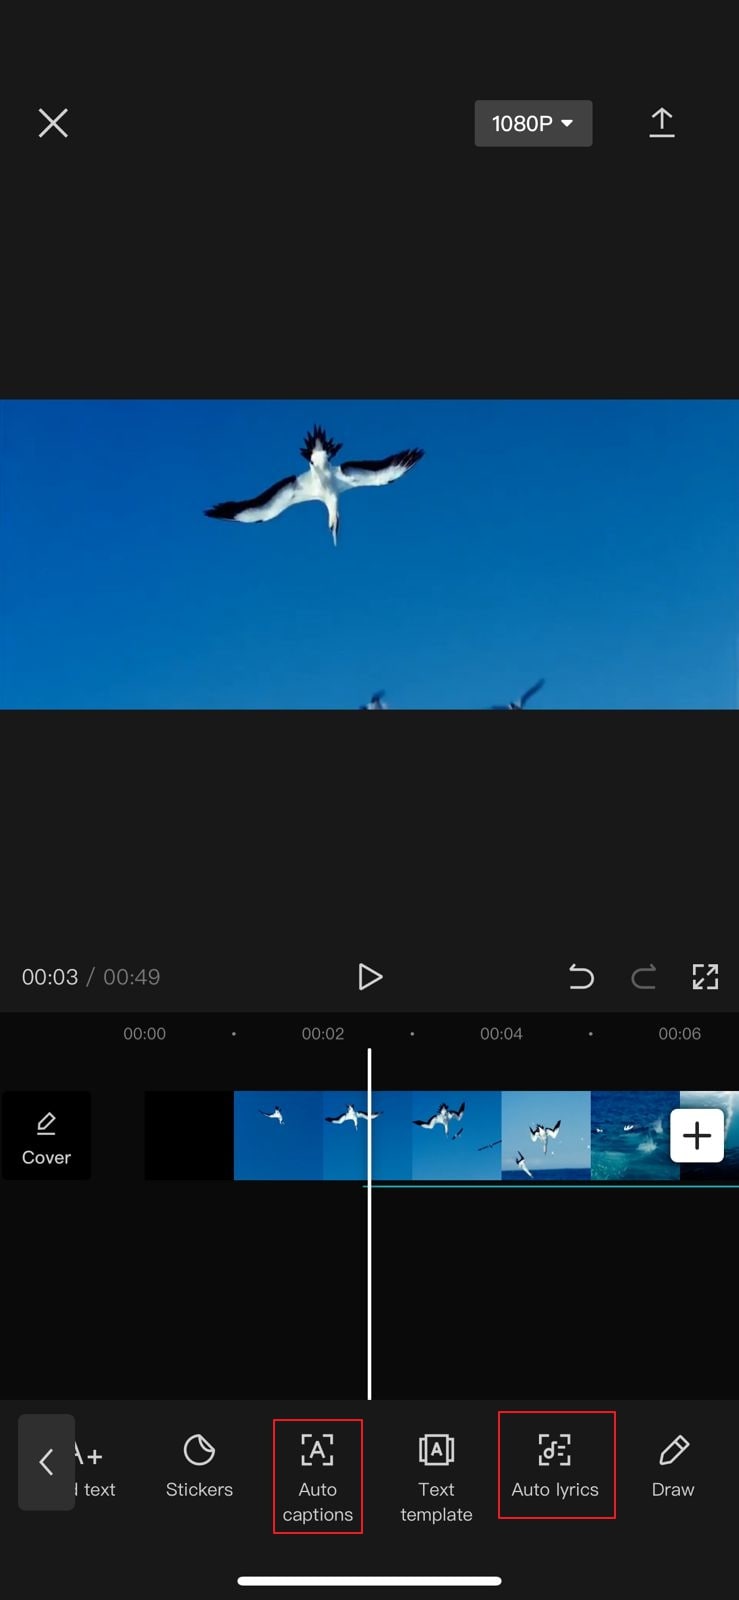
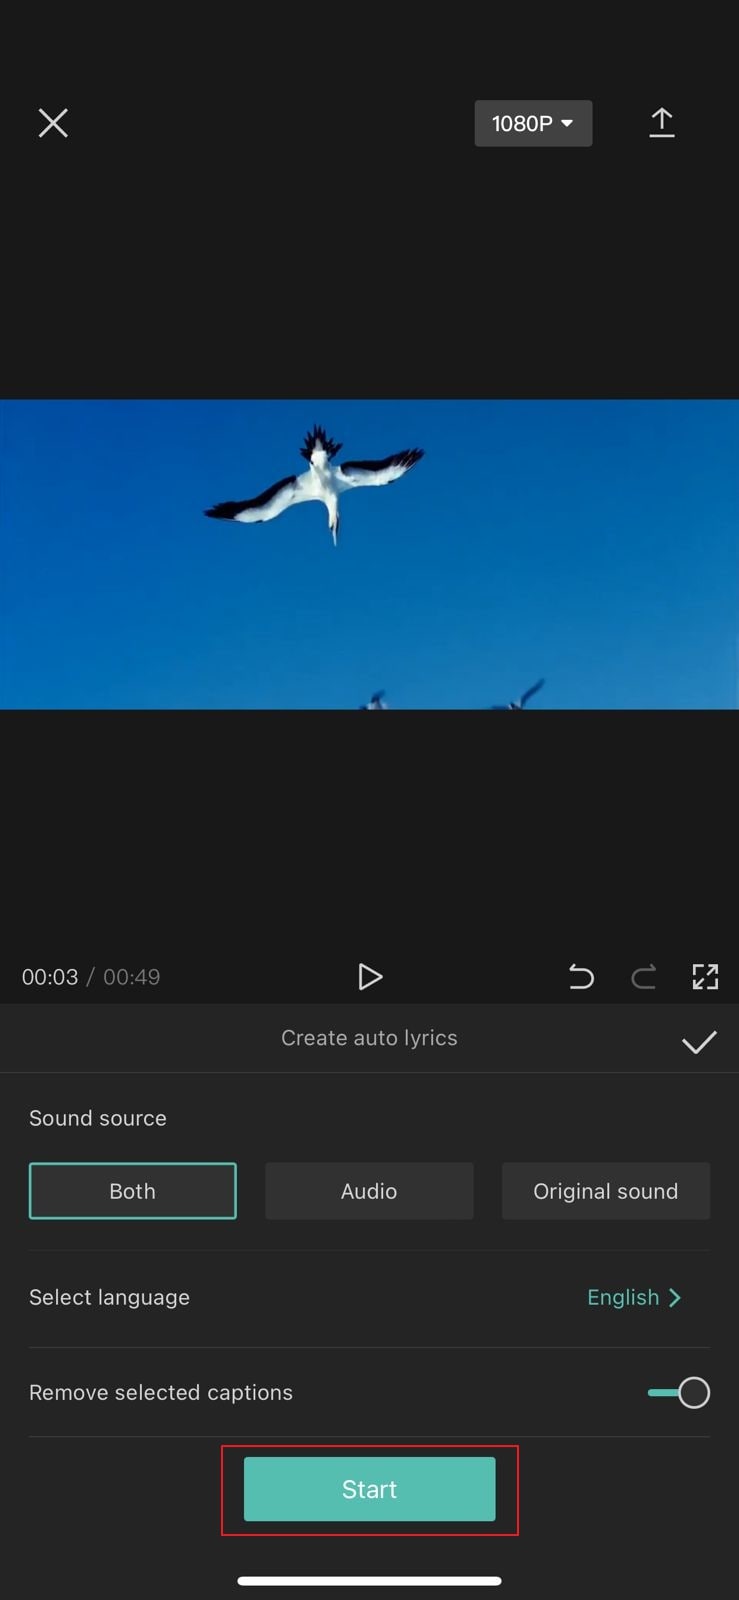
Step2 Afterward, select “Text” options from which you can either choose “Auto Lyrics” or “Auto Captions.” Using the Auto Lyrics option, you can generate captions for a song automatically. On the other hand, by using the Auto Captions option, you can transcribe the voice in your video to create subtitles. From the pop-up menus, choose the sound source and language to proceed.
Step3 Once you are done adjusting the settings, hit the “Start” button. After some seconds, CapCut will create captions for your TikTok video efficiently. Afterward, you can choose video resolution and hit the “Arrow” icon to export the video.
Way 3: Add Captions to TikTok Videos Manually
If you want to create captions for TikTok briefly, you can manually add them using the instructions given below. This method is extremely simple and helpful if you want to create small captions for your TikTok videos. Moreover, you can efficiently choose the font, color, and style of your captions in this manual method:
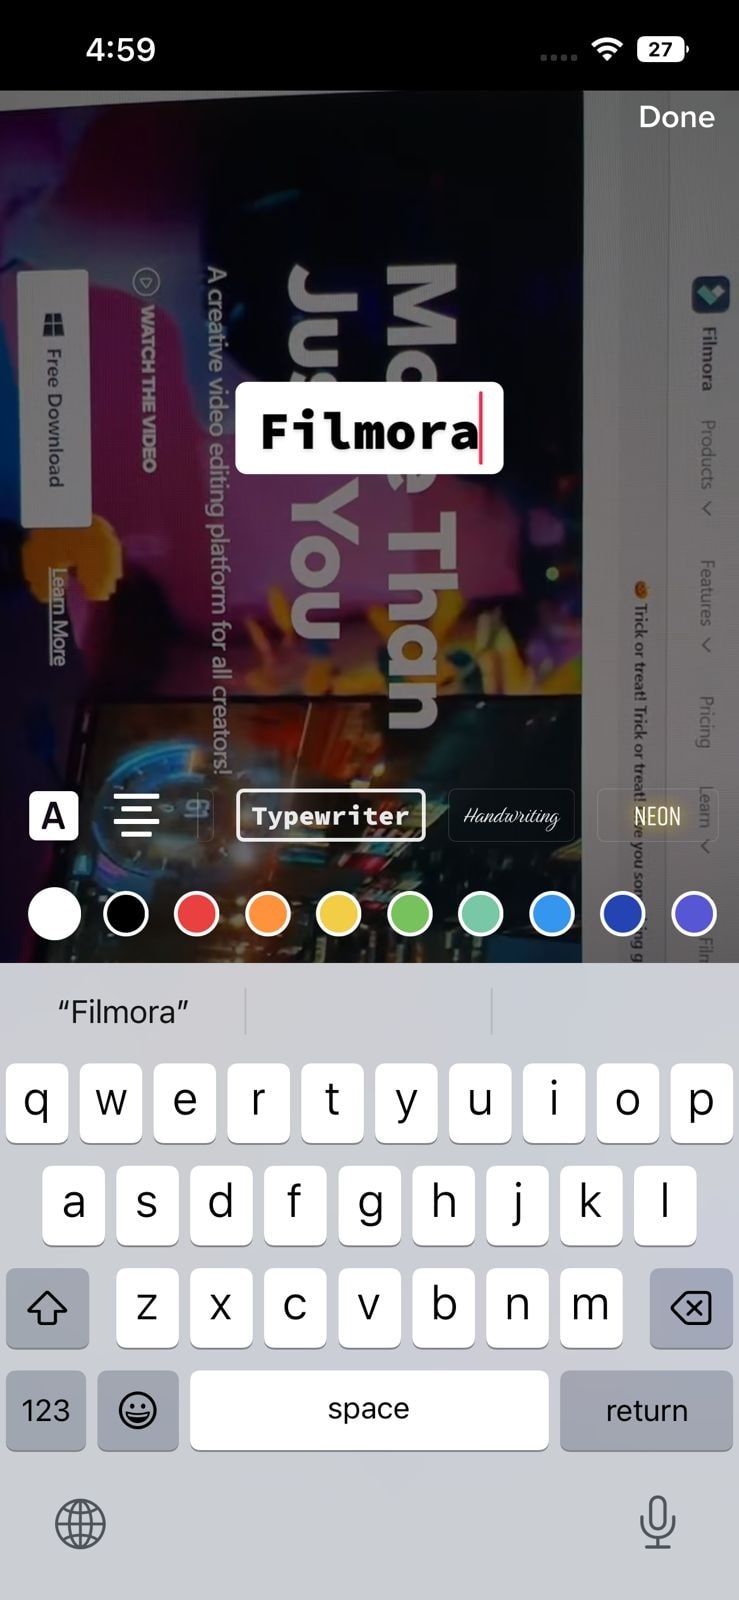
Step1 Open your TikTok app and create a video to begin. Tap on the “Tick” icon to enter the editing mode. Select “Text” given on the bottom toolbar of your screen.
Step2 Now, choose the style for your captions from the available options. Select the color and start writing your captions carefully. Once you are done, you can save and publish your created TikTok video.
Way 4: Automatically Add Subtitles to TikTok Videos with Online Editor
There are various online editors that can create captions for TikTok videos automatically. They use the Auto Transcription feature, through which the tool can create subtitles by recognizing the voice used in a TikTok video. One of the reliable online tools that can produce auto-subtitles is Veed.io.
Veed.io is an online tool that is capable of creating TikTok automatic captions efficiently. You can easily access this online tool from your web browsers. Moreover, it supports more than 100 languages and accents that you can choose to create auto-captions. Also, you can translate your captions into different languages using this tool. To use this tool flawlessly, check the below steps:
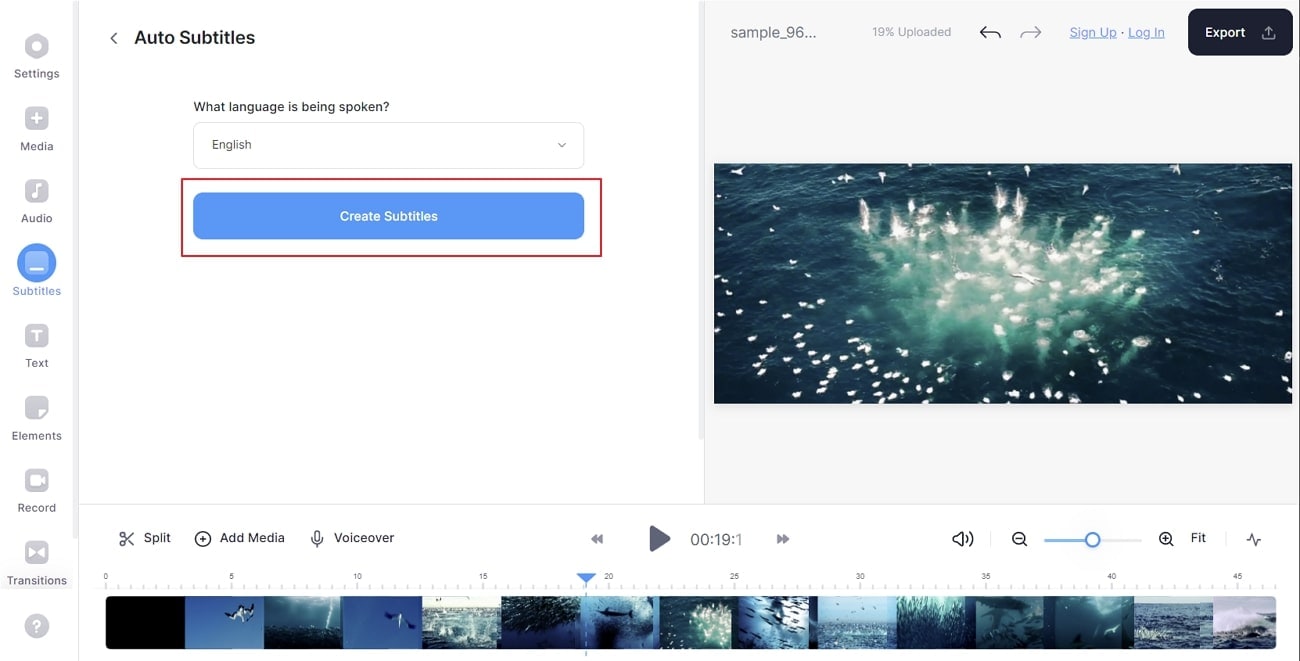
Step1 Begin by reaching the official website of Veed.io. Go to its Tools and locate the “Auto Subtitle Generator” option. It will redirect you to another page that consists of the tool information.

Step2 Click “Get Started” and upload a video from your system. Once you are done, tap on “Subtitles” and select “Auto Subtitle” from the given options. Choose your preferred language and tap on “Create Subtitles.”
Step3 After waiting some time, you can see your auto-captions. You can choose the text color, effect, size, and alignment from the given options. Once you are satisfied with the TikTok captions, hit the “Export” button.
Part 3: How to Add Captions to Your TikTok Videos with Filmora
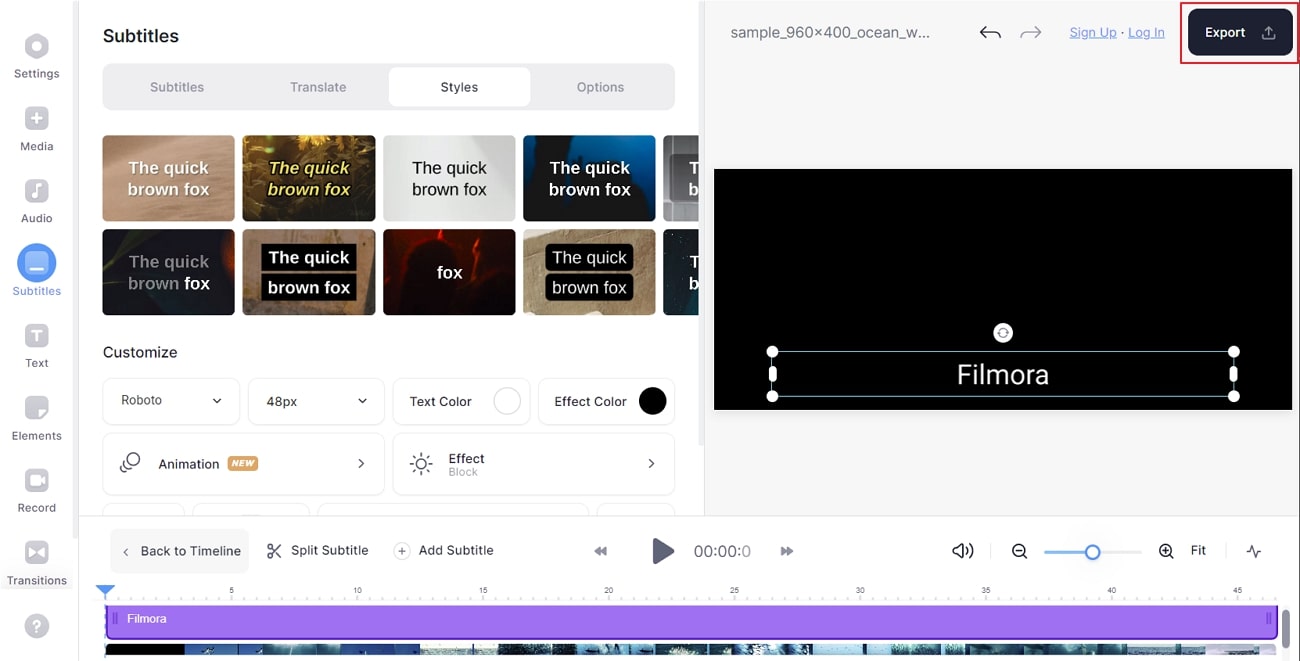
If you want to add further enhancements to your TikTok captions, you can use an offline tool like Wondershare Filmora . Using this platform, you can manually add captions by choosing the suitable style from the presets. Moreover, you can also add customizations to the captions through Filomora easily. You can also upload SRT files on this tool to produce TikTok captions.
Free Download For Win 7 or later(64-bit)
Free Download For macOS 10.14 or later
TikTok automatic captions can be easily generated from Filmora as it offers excellent results through its Speech-to-Text feature. Using this unique feature, you can transcribe the voice in your TikTok videos in up to 16 different languages. To use this feature conveniently, follow the below steps:
Step 1 Import the TikTok Video
Once done with launching and creating the Filmora project on your PC, hit the “Arrow” icon to import your video file on this tool. Now drag and drop the video file to the timeline in order to proceed.
Step 2 Initiate the Automatic Subtitle Feature
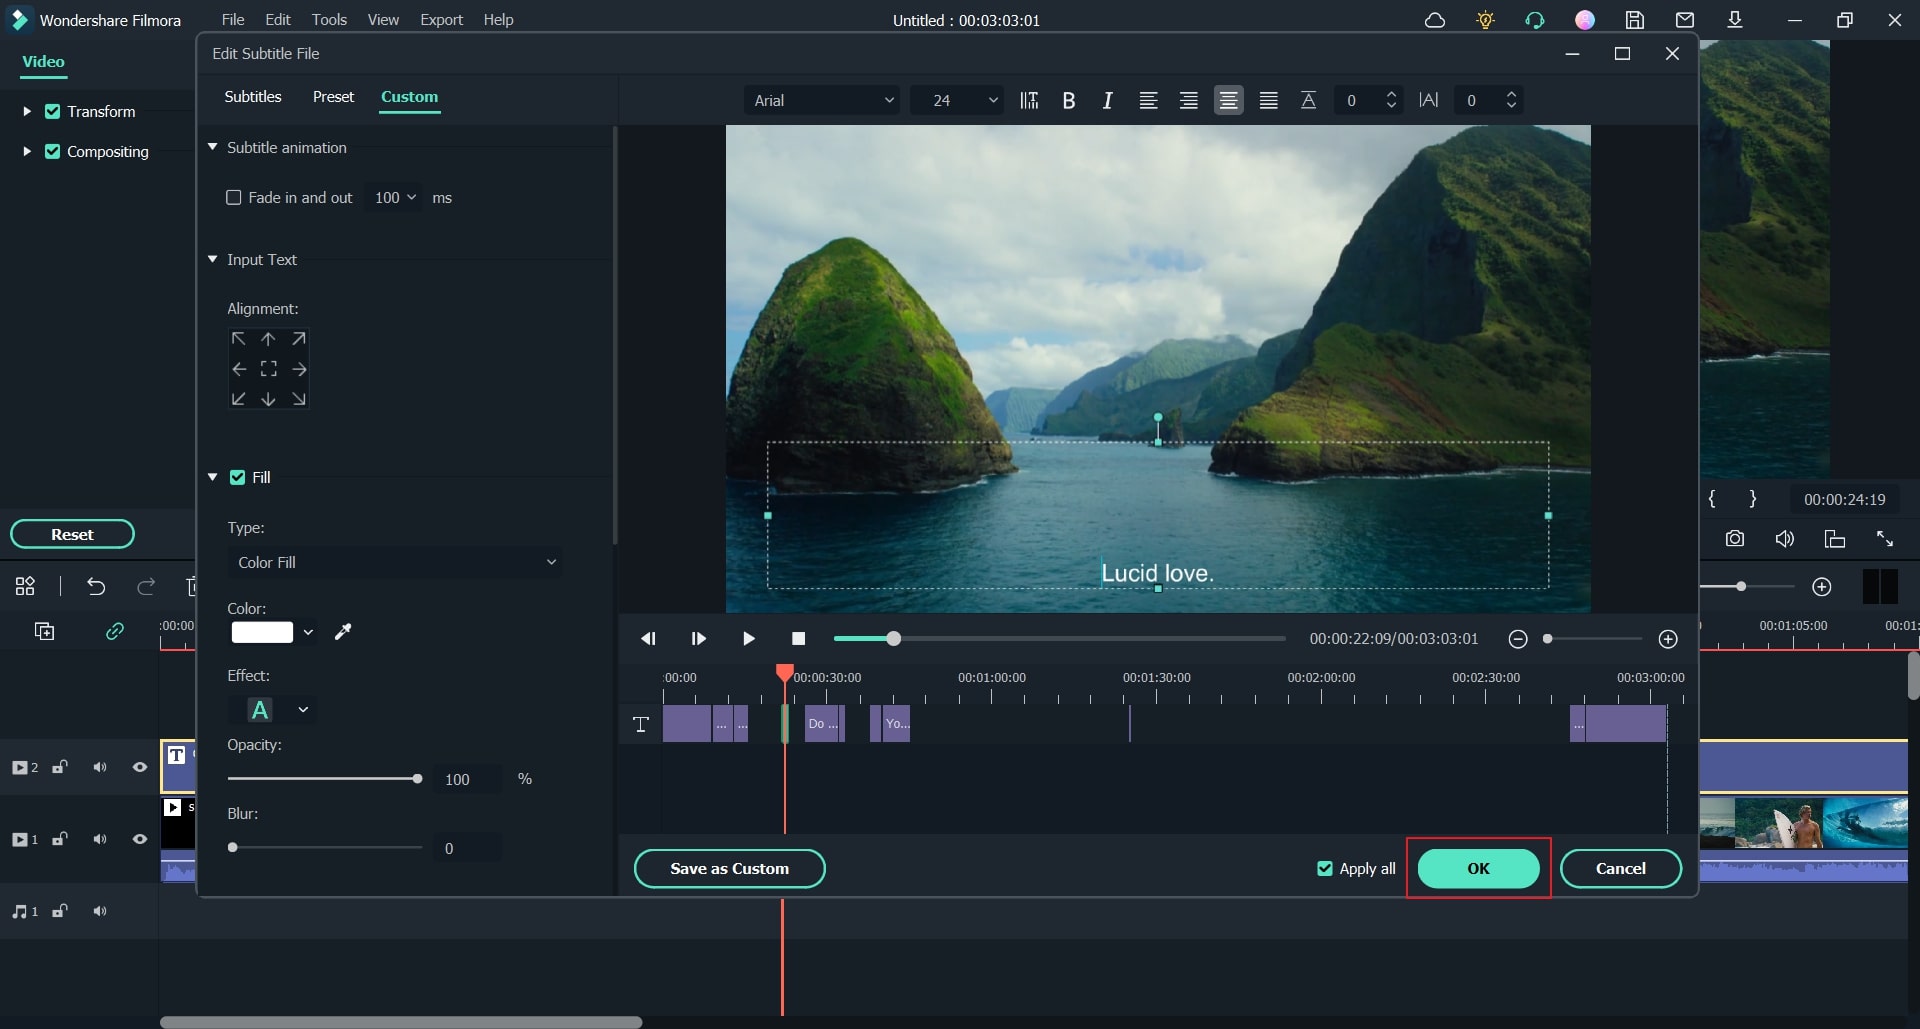
On your timeline, tap on the “Speech-to-Text” feature. Choose your language and video clip from the pop-up menu. Wait for some seconds, and the subtitles will be generated automatically. Double-click on the created TikTok automatic captions to open the editing settings. Here, you can select subtitles style and respective time duration. You can also add customizations efficiently.
Step 3 Export the TikTok Video
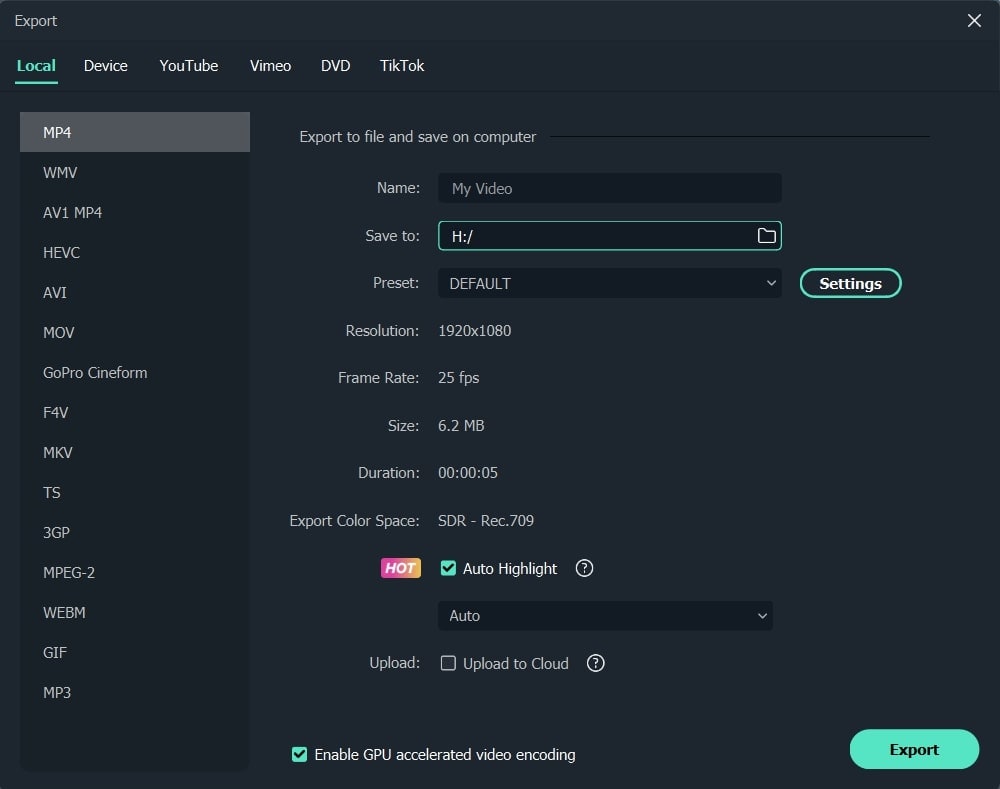
After completing all the settings, you can click on the “Export” button. Before exporting, you can choose the video resolution and file formats easily. Also, this tool gives you the facility to export the video file directly to your TikTok account.
Part 4: People Also Want to Know
1. How to add captions to TikTok?
To add TikTok captions, you can choose the manual or automatic way. TikTok has a built-in auto-generator through which you can add captions automatically. Moreover, there are different offline and online tools, such as Filmora, CapCut, and Veed.io, through which you can add captions on TikTok flawlessly.
2. How to add captions to TikTok after posting?
If you want to add TikTok captions after posting, you have to download the video on your phone first. Afterward, hit the Plus icon to re-upload the video from your gallery. Choose that particular video again and tap on the Post button. Now you can write the captions on the given space easily. Afterward, tap on the “Post” button.
Last Words
This article has shed light on various ways how to add captions on TikTok efficiently. You can add TikTok captions manually or use the auto-generator for ease. Moreover, we have also highlighted an online tool to create subtitles that can be accessed from any web browser. However, if you want a professional caption editor for a longer run, Wondershare Filmora is the best choice among other tools. It has an easy-to-use interface and achieves accurate results comfortably.
Part 1: Why Should You Add Captions to TikTok Videos?
Adding captions on TikTok videos can bring you multiple advantages. To learn more about the benefits of adding captions on TikTok, read this section:
1. Increases Comprehension
It may be possible that viewers won’t be able to understand a particular dialogue in your TikTok video. To make your TikTok content more understandable, adding captions can prove to be a great option. Moreover, if some viewers can’t turn on the sound of TikTok videos, they can easily read the captions to understand the content.
2. Enhances Focus
Captions have the ability to grasp the attention of a viewer automatically. Adding captions to your TikTok video lets your viewers focus more properly. Thus, you can engage your audience throughout the TikTok video effortlessly.
3. Helps During Audio Problems
Audio problems may arise unexpectedly. In such situations, added captions on TikTok videos can offer great convenience. Moreover, people who have auditory disabilities can also enjoy your TikTok videos.
4. Attracts Diverse Audience
If some foreigners can’t understand or speak your native language, TikTok captions are necessary for them. By doing so, a broad and diverse audience can watch your TikTok videos easily.
Part 2: How to Add Captions on TikTok?
There are various ways through which you can generate TikTok captions effortlessly. Read this section to discover multiple and convenient ways to create TikTok captions easily.
Way 1: Auto-Generate Captions with TikTok’s Built-in Feature
If you don’t want to download video editing software, you can utilize the built-in feature of TikTok to create auto-captions. This will save you from the hassle of launching or accessing a professional subtitle editor. Moreover, it will also save you time and effort from creating subtitles manually. To use the built-in feature of TikTok automatic captions, check the following instructions:
Step1 Once you have captured a video on TikTok, tap the “Tick” icon from the bottom right side. This will redirect you to the editing mode.
Step2 On the editing mode, locate the “Captions” option from the right side. After tapping on it, TikTok will instantly generate the subtitles automatically. Make sure that all the captions are correctly created. Once you are done, hit the “Save” button displayed at the top right side. Afterward, you can quickly post your TikTok video with captions.
Way 2: Use Auto Captions in CapCut
CapCut and TikTok are closely related to each other as they both have the same parent company called ByteDance. Thus, using CapCut to create captions for your TikTok videos can bring high-quality results. You can easily download CapCut on Android and iOS devices without any complications. The interface of this tool is clean that allows you to generate subtitles efficiently.
The auto caption feature in CapCut enables you to produce subtitles instantly. It uses advanced algorithms that ensure high accuracy while creating subtitles. To use this advanced feature of CapCut, read the below steps:
Step1 Download and launch CapCut on your phone. To import, tap on “New Project” and select the video from your phone’s gallery. Tap on “Add” to head to the editing mode of CapCut.
Step2 Afterward, select “Text” options from which you can either choose “Auto Lyrics” or “Auto Captions.” Using the Auto Lyrics option, you can generate captions for a song automatically. On the other hand, by using the Auto Captions option, you can transcribe the voice in your video to create subtitles. From the pop-up menus, choose the sound source and language to proceed.
Step3 Once you are done adjusting the settings, hit the “Start” button. After some seconds, CapCut will create captions for your TikTok video efficiently. Afterward, you can choose video resolution and hit the “Arrow” icon to export the video.
Way 3: Add Captions to TikTok Videos Manually
If you want to create captions for TikTok briefly, you can manually add them using the instructions given below. This method is extremely simple and helpful if you want to create small captions for your TikTok videos. Moreover, you can efficiently choose the font, color, and style of your captions in this manual method:
Step1 Open your TikTok app and create a video to begin. Tap on the “Tick” icon to enter the editing mode. Select “Text” given on the bottom toolbar of your screen.
Step2 Now, choose the style for your captions from the available options. Select the color and start writing your captions carefully. Once you are done, you can save and publish your created TikTok video.
Way 4: Automatically Add Subtitles to TikTok Videos with Online Editor
There are various online editors that can create captions for TikTok videos automatically. They use the Auto Transcription feature, through which the tool can create subtitles by recognizing the voice used in a TikTok video. One of the reliable online tools that can produce auto-subtitles is Veed.io.
Veed.io is an online tool that is capable of creating TikTok automatic captions efficiently. You can easily access this online tool from your web browsers. Moreover, it supports more than 100 languages and accents that you can choose to create auto-captions. Also, you can translate your captions into different languages using this tool. To use this tool flawlessly, check the below steps:
Step1 Begin by reaching the official website of Veed.io. Go to its Tools and locate the “Auto Subtitle Generator” option. It will redirect you to another page that consists of the tool information.
Step2 Click “Get Started” and upload a video from your system. Once you are done, tap on “Subtitles” and select “Auto Subtitle” from the given options. Choose your preferred language and tap on “Create Subtitles.”
Step3 After waiting some time, you can see your auto-captions. You can choose the text color, effect, size, and alignment from the given options. Once you are satisfied with the TikTok captions, hit the “Export” button.
Part 3: How to Add Captions to Your TikTok Videos with Filmora
If you want to add further enhancements to your TikTok captions, you can use an offline tool like Wondershare Filmora . Using this platform, you can manually add captions by choosing the suitable style from the presets. Moreover, you can also add customizations to the captions through Filomora easily. You can also upload SRT files on this tool to produce TikTok captions.
Free Download For Win 7 or later(64-bit)
Free Download For macOS 10.14 or later
TikTok automatic captions can be easily generated from Filmora as it offers excellent results through its Speech-to-Text feature. Using this unique feature, you can transcribe the voice in your TikTok videos in up to 16 different languages. To use this feature conveniently, follow the below steps:
Step 1 Import the TikTok Video
Once done with launching and creating the Filmora project on your PC, hit the “Arrow” icon to import your video file on this tool. Now drag and drop the video file to the timeline in order to proceed.
Step 2 Initiate the Automatic Subtitle Feature
On your timeline, tap on the “Speech-to-Text” feature. Choose your language and video clip from the pop-up menu. Wait for some seconds, and the subtitles will be generated automatically. Double-click on the created TikTok automatic captions to open the editing settings. Here, you can select subtitles style and respective time duration. You can also add customizations efficiently.
Step 3 Export the TikTok Video
After completing all the settings, you can click on the “Export” button. Before exporting, you can choose the video resolution and file formats easily. Also, this tool gives you the facility to export the video file directly to your TikTok account.
Part 4: People Also Want to Know
1. How to add captions to TikTok?
To add TikTok captions, you can choose the manual or automatic way. TikTok has a built-in auto-generator through which you can add captions automatically. Moreover, there are different offline and online tools, such as Filmora, CapCut, and Veed.io, through which you can add captions on TikTok flawlessly.
2. How to add captions to TikTok after posting?
If you want to add TikTok captions after posting, you have to download the video on your phone first. Afterward, hit the Plus icon to re-upload the video from your gallery. Choose that particular video again and tap on the Post button. Now you can write the captions on the given space easily. Afterward, tap on the “Post” button.
Last Words
This article has shed light on various ways how to add captions on TikTok efficiently. You can add TikTok captions manually or use the auto-generator for ease. Moreover, we have also highlighted an online tool to create subtitles that can be accessed from any web browser. However, if you want a professional caption editor for a longer run, Wondershare Filmora is the best choice among other tools. It has an easy-to-use interface and achieves accurate results comfortably.
Also read:
- [New] 2024 Approved Uncover the Future Leading Innovations in VR Handwear
- [New] Food for the Followers Top TikTok Cuisine Craze
- [New] Navigating the Nuances of Snapchat Spotlight for 2024
- [Updated] From Kitchen to Feeds The 10 Hottest TikTok Treats
- [Updated] The Beat of Branding Mixing Music Into Your InstaReel for 2024
- Enhance Your Gaming Experience - Tackle Warhammer's Stutter Problems
- How to Perform Hard Reset on Vivo T2 Pro 5G? | Dr.fone
- In 2024, How to Unlock Vivo X Flip Pattern Lock if Forgotten? 6 Ways
- Intuitive Camera Roll Consolidation Step-by-Step Snapchat Guide
- Netgear Nighthawk C7000: A Game-Changing Wireless Router with Unmatched Speeds – An Expert Review
- The Insider's Path to Joining Others' TikTok Gigs
- Unleashing Your Content's Potential Journey Towards Gaining Sponsorship Revenue
- Updated Revolutionize Your Job Search Best Video Resume Software (Free Templates)
- Title: [New] Stepwise Journey to Master Large Heads in TikTok Filmmaking (3 Strategies) for 2024
- Author: Gary
- Created at : 2024-10-16 17:51:32
- Updated at : 2024-10-18 16:37:03
- Link: https://tiktok-clips.techidaily.com/new-stepwise-journey-to-master-large-heads-in-tiktok-filmmaking-3-strategies-for-2024/
- License: This work is licensed under CC BY-NC-SA 4.0.