
!["[New] Perfect Pairings Adding Captions that Enhance Your TikToks"](https://www.lifewire.com/thmb/uT-JrexZYyu0j4zBmYw9mc5APb0=/400x300/filters:no_upscale():max_bytes(150000):strip_icc()/elisa-ventur-bmJAXAz6ads-unsplash-66563177490249cd8a8c896e48ff4d8e.jpg)
"[New] Perfect Pairings Adding Captions that Enhance Your TikToks"
Perfect Pairings: Adding Captions that Enhance Your TikToks
TikTok is one of the most famous social media apps as it creates various trends frequently that engage users continuously. Every week, you can explore various TikTok trends, such as dance videos, pranks, challenges, or quick hacks. These trends are a great entertainment source for people and motivate them to create engaging content.
However, adding captions is mandatory if you want to make TikTok trend videos for a diverse audience. This article will guide you if you are unaware of how to add captions on TikTok. We will provide 5 different ways to create TikTok captions effectively.
- Way 1: Auto-Generate Captions with TikTok’s Built-in Feature
- Way 2: Use Auto Captions in CapCut
- Way 3: Add Captions to TikTok Videos Manually
- Way 4: Automatically Add Subtitles to TikTok Videos with Online Editor
Part 1: Why Should You Add Captions to TikTok Videos?
Adding captions on TikTok videos can bring you multiple advantages. To learn more about the benefits of adding captions on TikTok, read this section:
1. Increases Comprehension
It may be possible that viewers won’t be able to understand a particular dialogue in your TikTok video. To make your TikTok content more understandable, adding captions can prove to be a great option. Moreover, if some viewers can’t turn on the sound of TikTok videos, they can easily read the captions to understand the content.
2. Enhances Focus
Captions have the ability to grasp the attention of a viewer automatically. Adding captions to your TikTok video lets your viewers focus more properly. Thus, you can engage your audience throughout the TikTok video effortlessly.
3. Helps During Audio Problems
Audio problems may arise unexpectedly. In such situations, added captions on TikTok videos can offer great convenience. Moreover, people who have auditory disabilities can also enjoy your TikTok videos.
4. Attracts Diverse Audience
If some foreigners can’t understand or speak your native language, TikTok captions are necessary for them. By doing so, a broad and diverse audience can watch your TikTok videos easily.
Part 2: How to Add Captions on TikTok?
There are various ways through which you can generate TikTok captions effortlessly. Read this section to discover multiple and convenient ways to create TikTok captions easily.
Way 1: Auto-Generate Captions with TikTok’s Built-in Feature
If you don’t want to download video editing software, you can utilize the built-in feature of TikTok to create auto-captions. This will save you from the hassle of launching or accessing a professional subtitle editor. Moreover, it will also save you time and effort from creating subtitles manually. To use the built-in feature of TikTok automatic captions, check the following instructions:
Step1 Once you have captured a video on TikTok, tap the “Tick” icon from the bottom right side. This will redirect you to the editing mode.
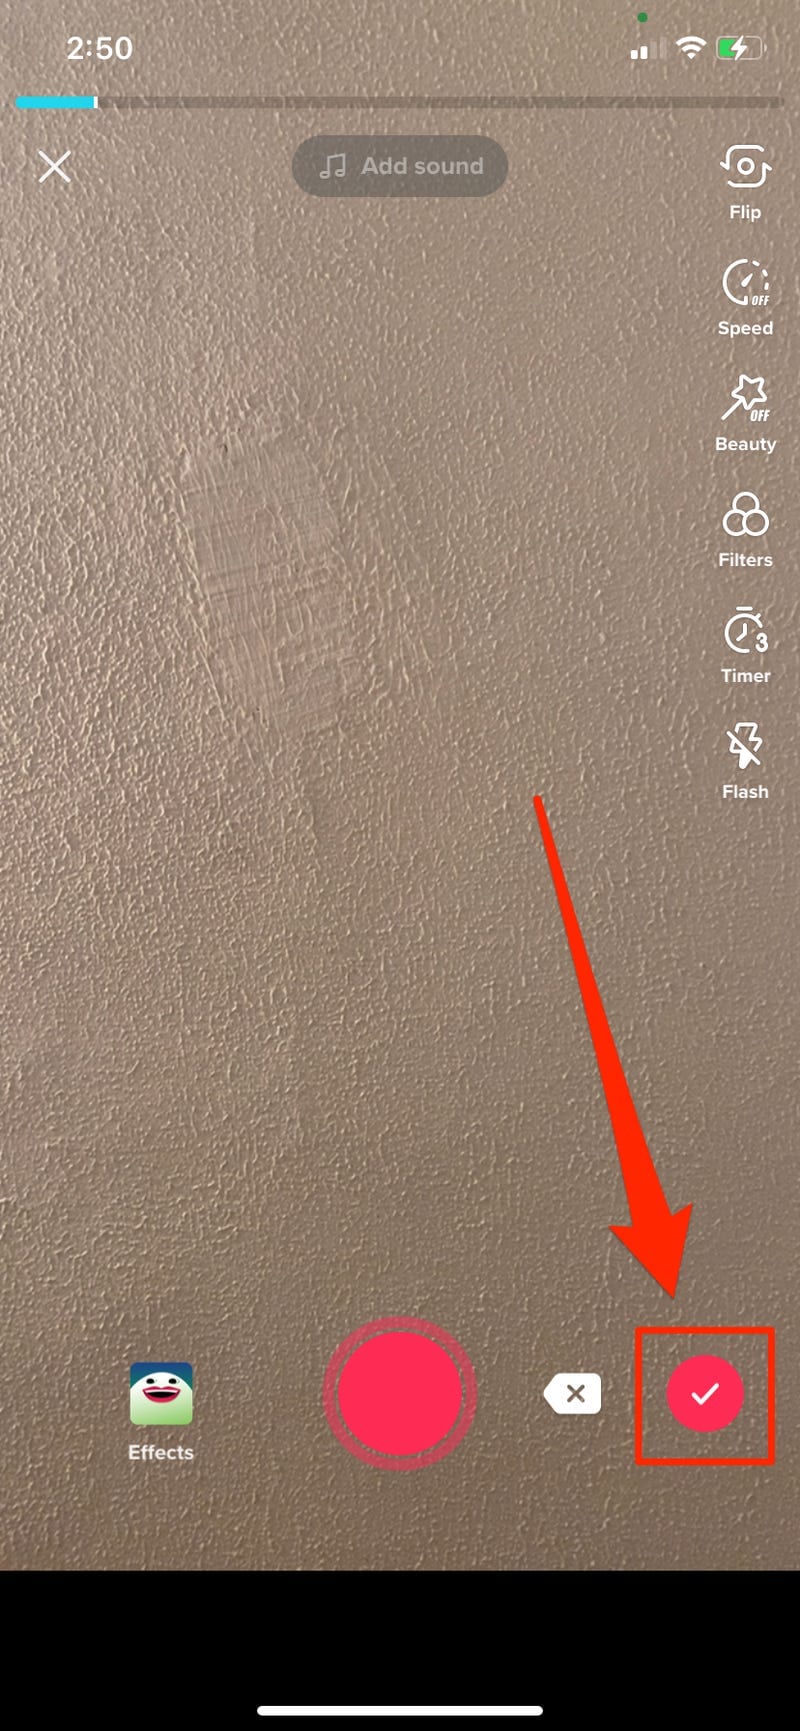
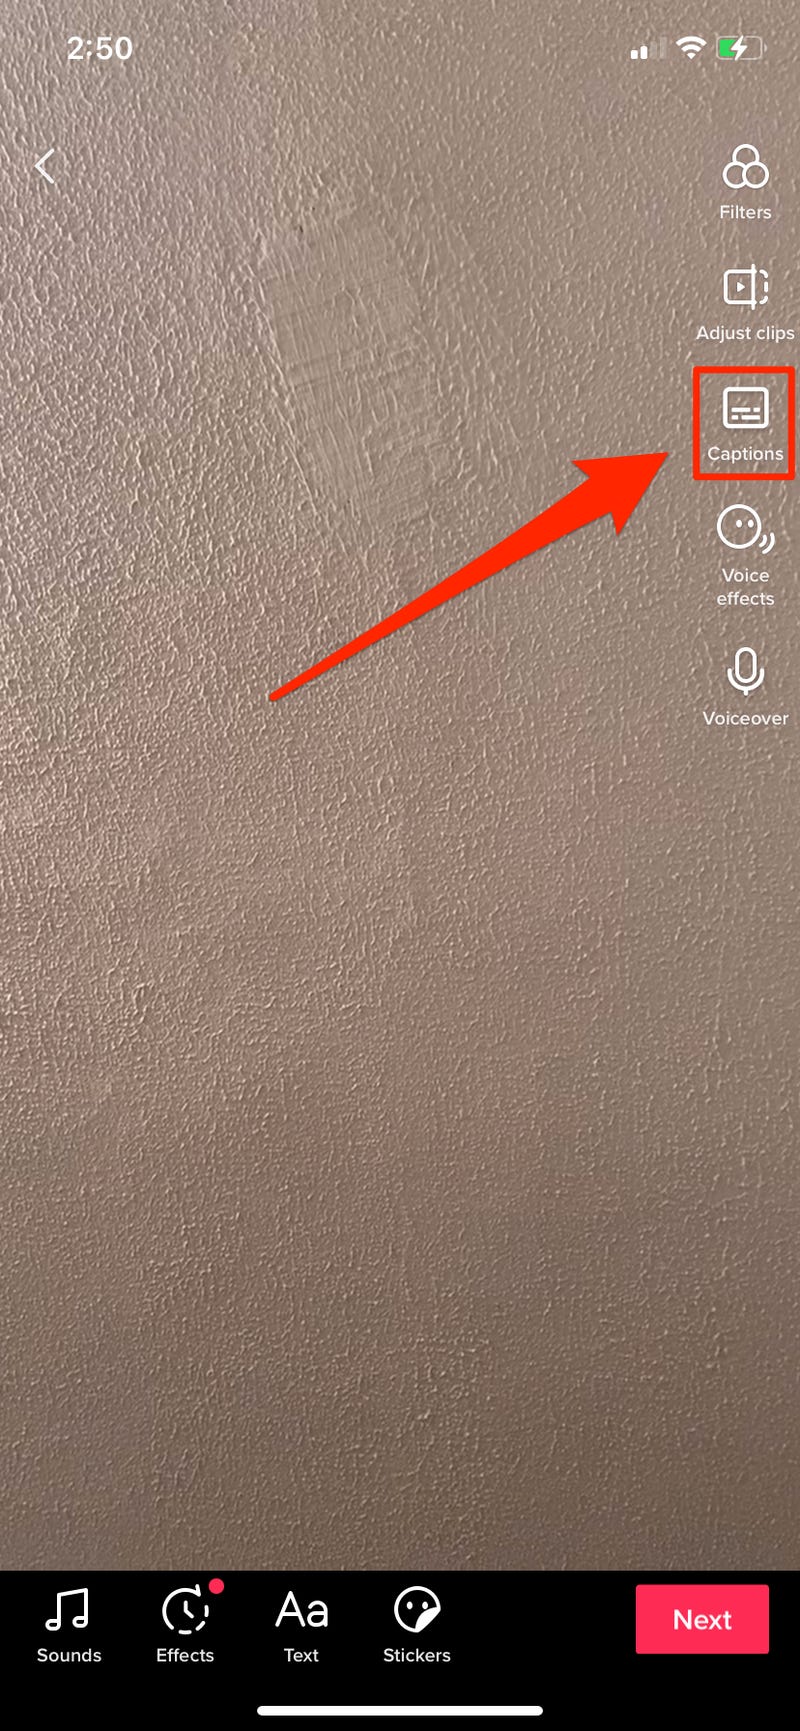
Step2 On the editing mode, locate the “Captions” option from the right side. After tapping on it, TikTok will instantly generate the subtitles automatically. Make sure that all the captions are correctly created. Once you are done, hit the “Save” button displayed at the top right side. Afterward, you can quickly post your TikTok video with captions.
Way 2: Use Auto Captions in CapCut
CapCut and TikTok are closely related to each other as they both have the same parent company called ByteDance. Thus, using CapCut to create captions for your TikTok videos can bring high-quality results. You can easily download CapCut on Android and iOS devices without any complications. The interface of this tool is clean that allows you to generate subtitles efficiently.
The auto caption feature in CapCut enables you to produce subtitles instantly. It uses advanced algorithms that ensure high accuracy while creating subtitles. To use this advanced feature of CapCut, read the below steps:
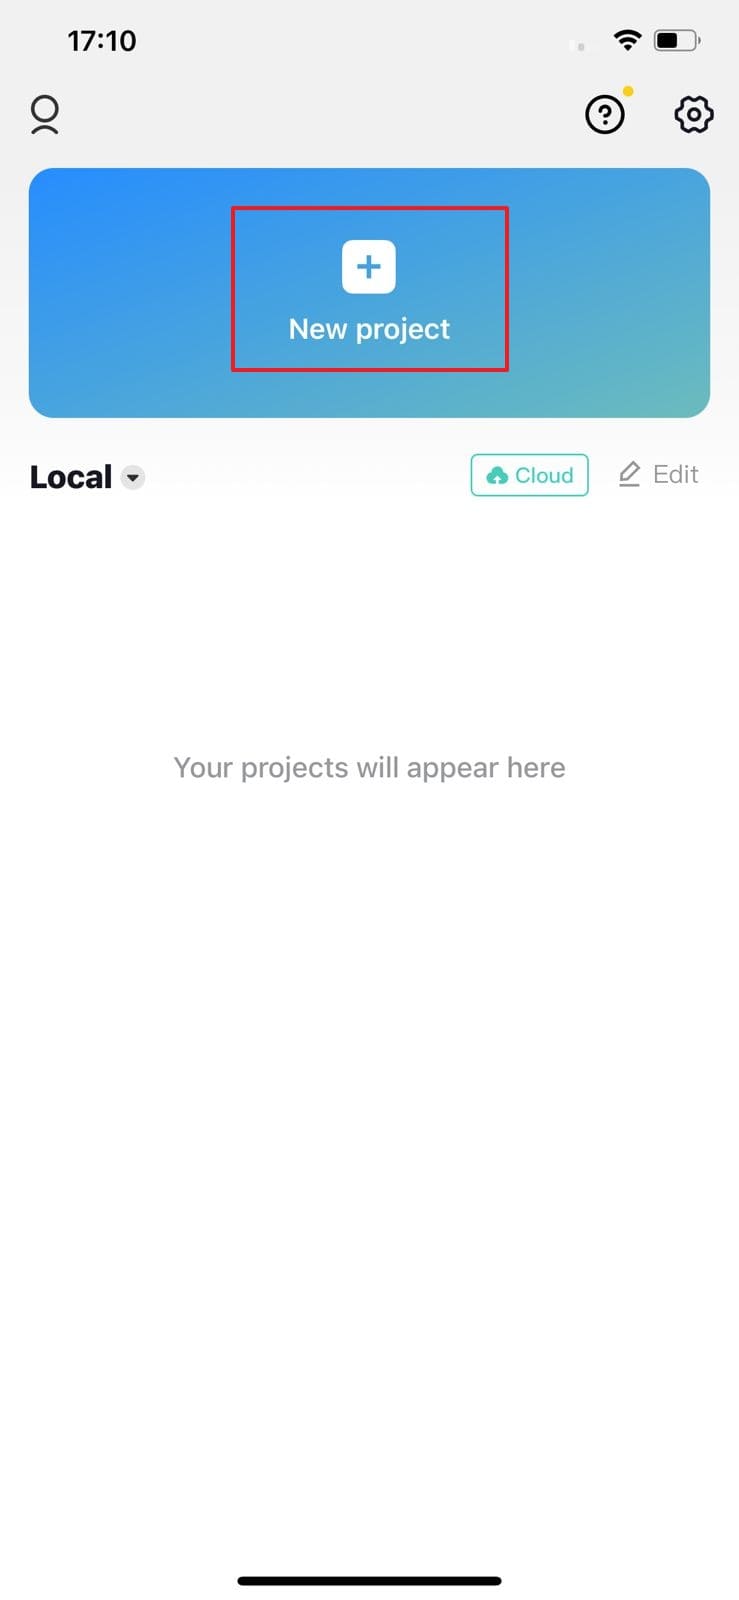
Step1 Download and launch CapCut on your phone. To import, tap on “New Project” and select the video from your phone’s gallery. Tap on “Add” to head to the editing mode of CapCut.
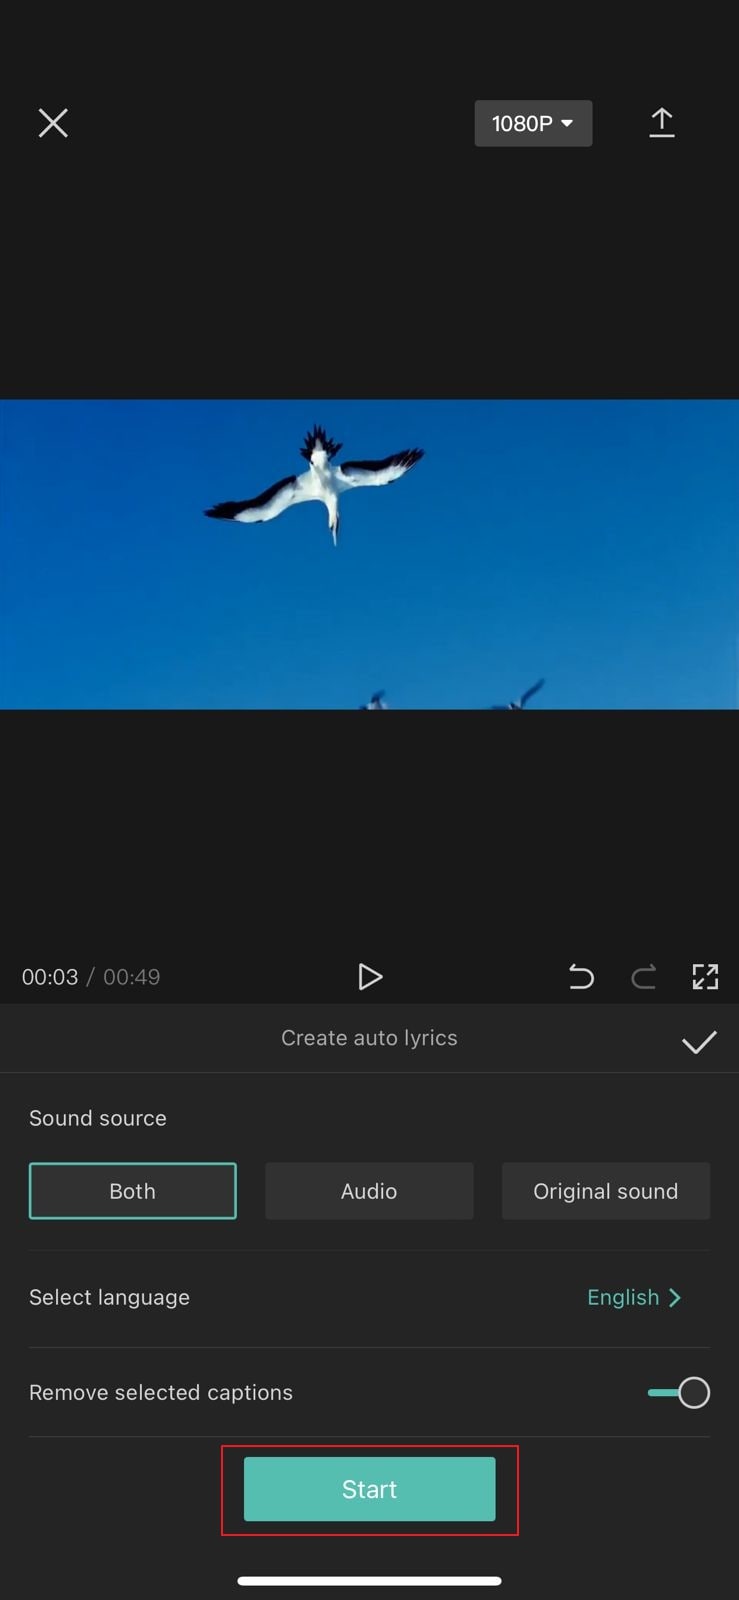
Step2 Afterward, select “Text” options from which you can either choose “Auto Lyrics” or “Auto Captions.” Using the Auto Lyrics option, you can generate captions for a song automatically. On the other hand, by using the Auto Captions option, you can transcribe the voice in your video to create subtitles. From the pop-up menus, choose the sound source and language to proceed.
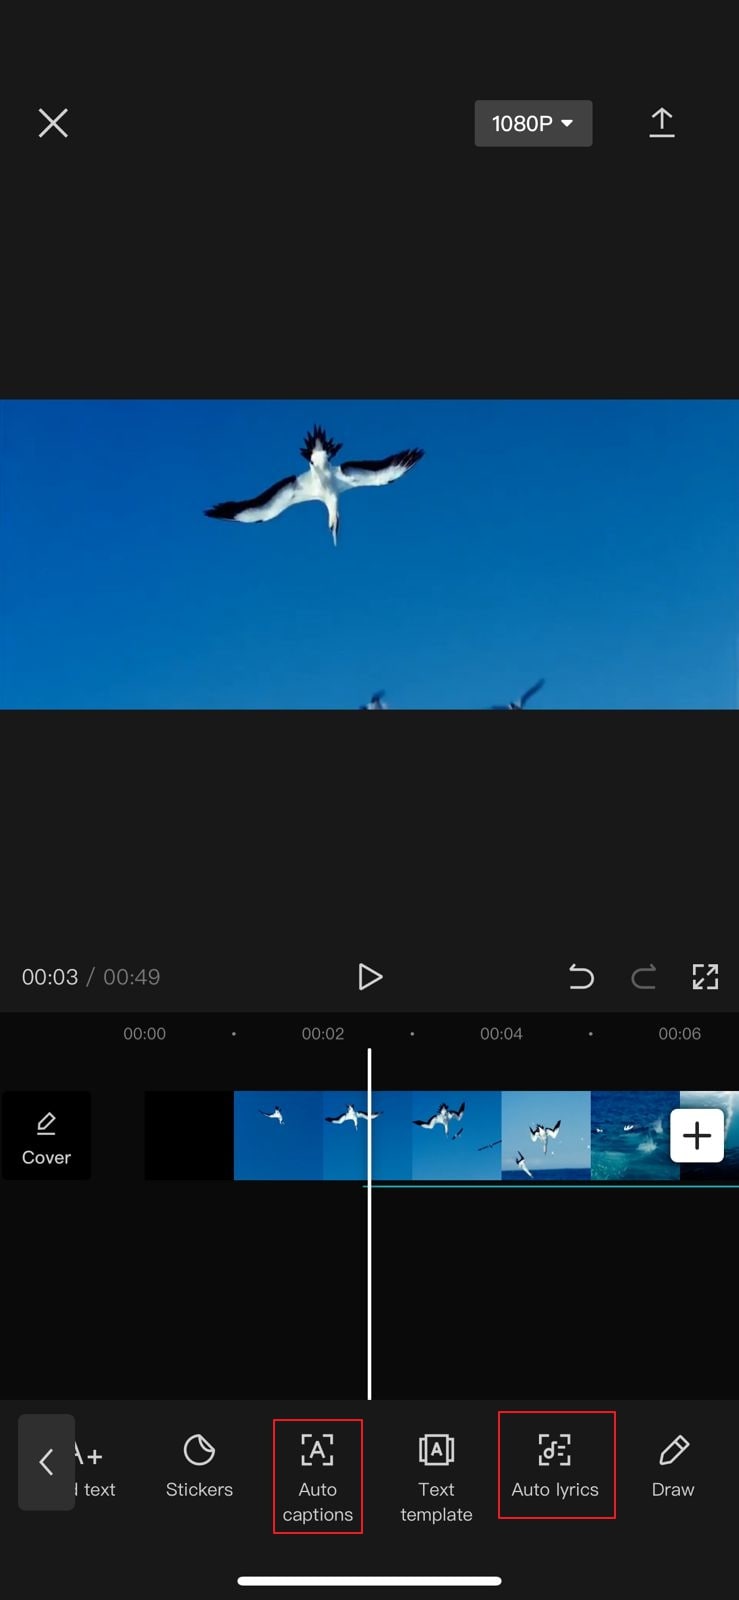
Step3 Once you are done adjusting the settings, hit the “Start” button. After some seconds, CapCut will create captions for your TikTok video efficiently. Afterward, you can choose video resolution and hit the “Arrow” icon to export the video.
Way 3: Add Captions to TikTok Videos Manually
If you want to create captions for TikTok briefly, you can manually add them using the instructions given below. This method is extremely simple and helpful if you want to create small captions for your TikTok videos. Moreover, you can efficiently choose the font, color, and style of your captions in this manual method:
Step1 Open your TikTok app and create a video to begin. Tap on the “Tick” icon to enter the editing mode. Select “Text” given on the bottom toolbar of your screen.
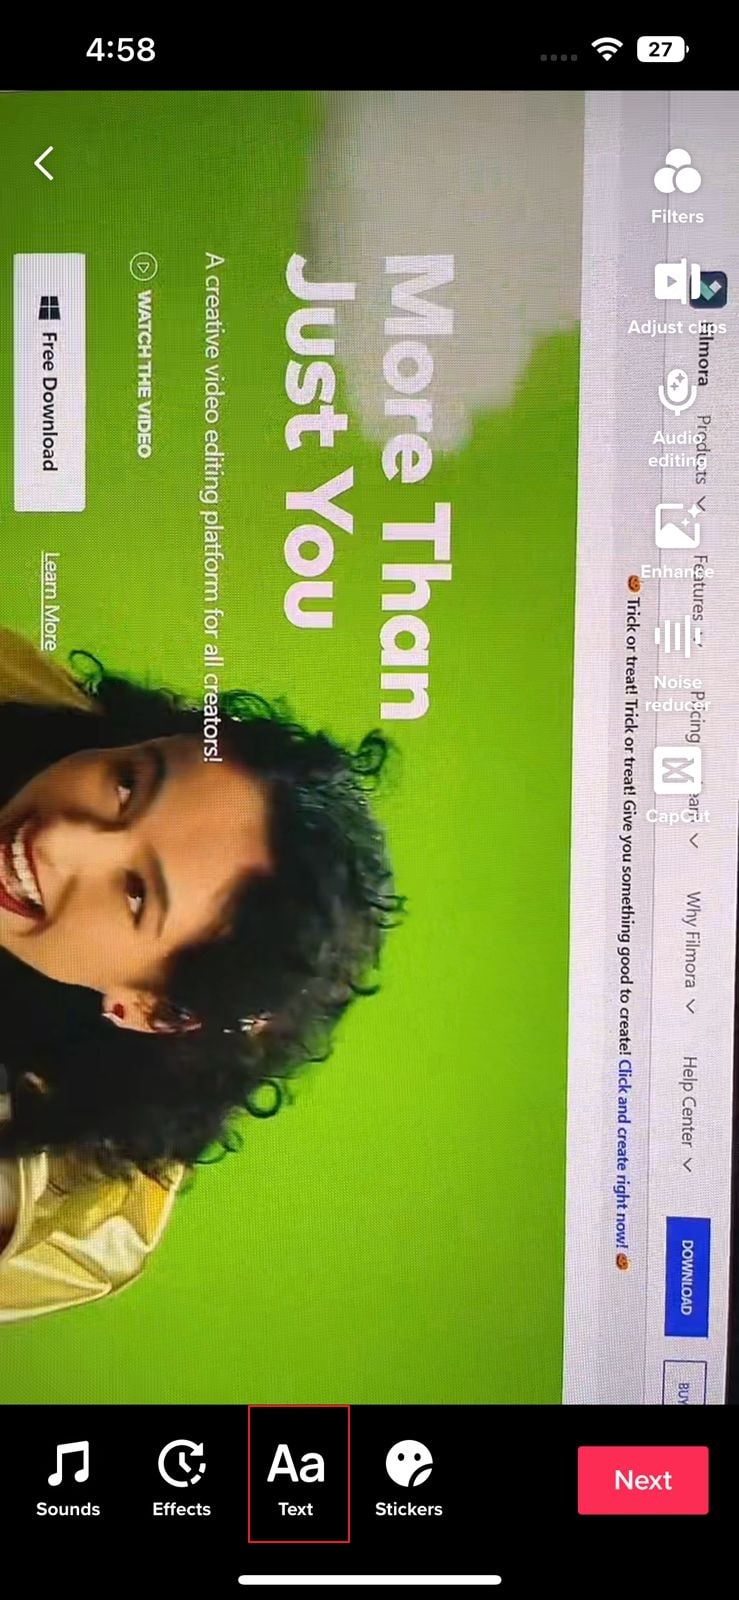
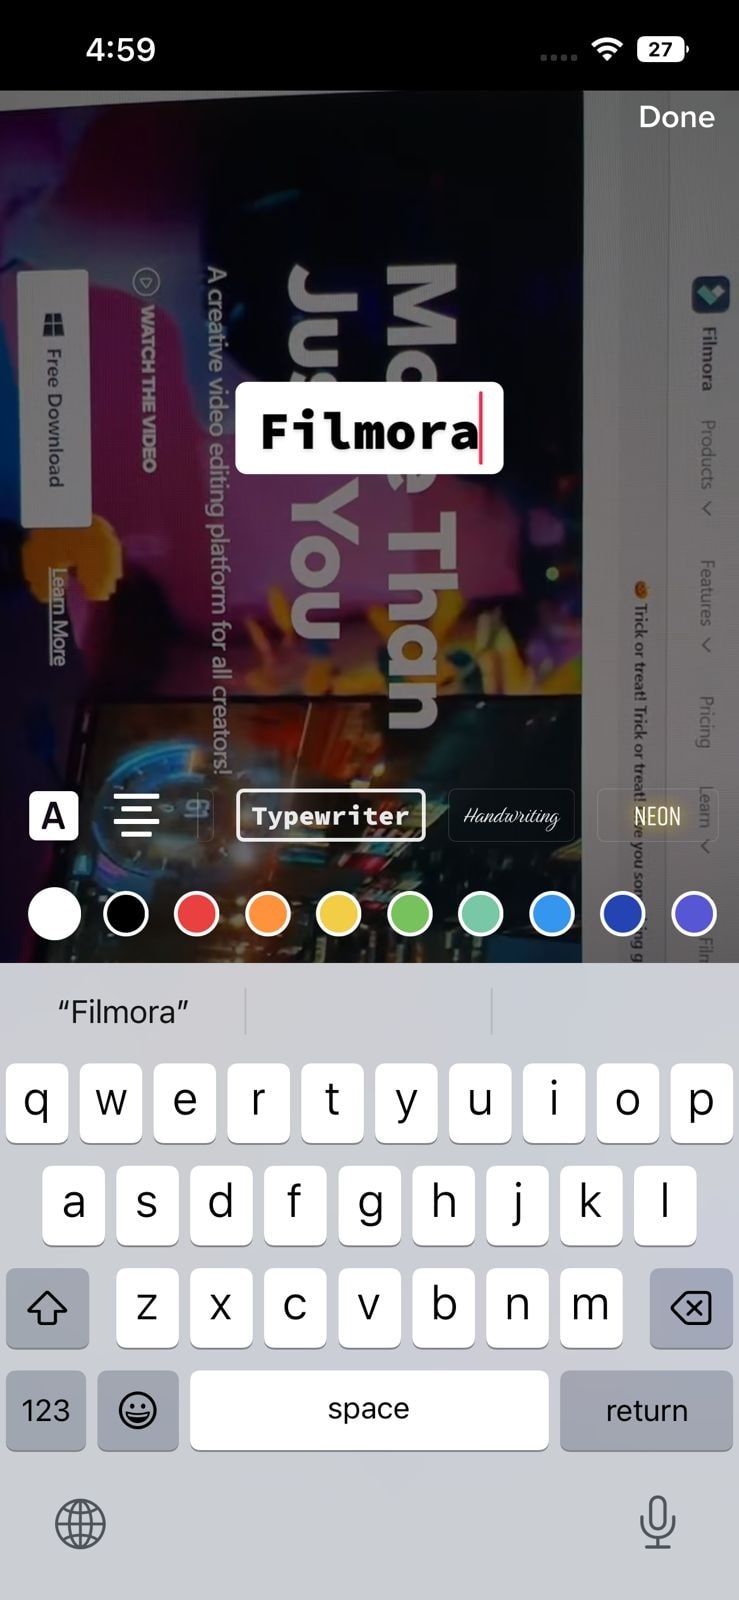
Step2 Now, choose the style for your captions from the available options. Select the color and start writing your captions carefully. Once you are done, you can save and publish your created TikTok video.
Way 4: Automatically Add Subtitles to TikTok Videos with Online Editor
There are various online editors that can create captions for TikTok videos automatically. They use the Auto Transcription feature, through which the tool can create subtitles by recognizing the voice used in a TikTok video. One of the reliable online tools that can produce auto-subtitles is Veed.io.
Veed.io is an online tool that is capable of creating TikTok automatic captions efficiently. You can easily access this online tool from your web browsers. Moreover, it supports more than 100 languages and accents that you can choose to create auto-captions. Also, you can translate your captions into different languages using this tool. To use this tool flawlessly, check the below steps:
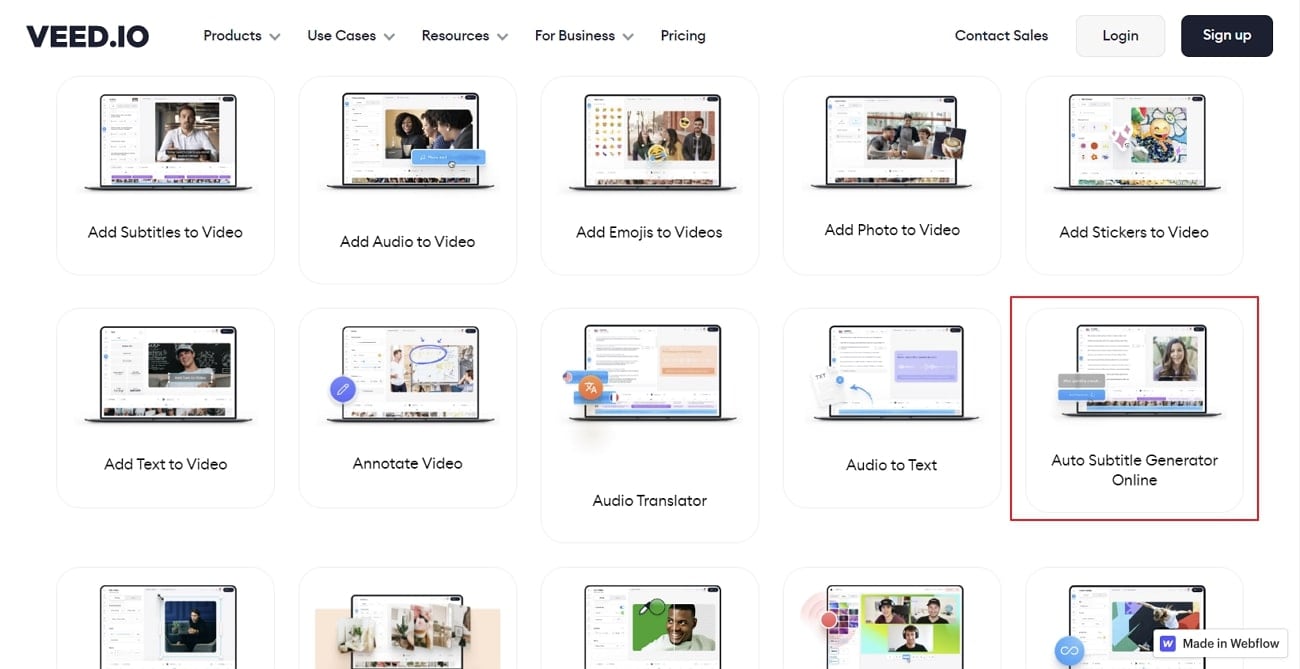
Step1 Begin by reaching the official website of Veed.io. Go to its Tools and locate the “Auto Subtitle Generator” option. It will redirect you to another page that consists of the tool information.
Step2 Click “Get Started” and upload a video from your system. Once you are done, tap on “Subtitles” and select “Auto Subtitle” from the given options. Choose your preferred language and tap on “Create Subtitles.”
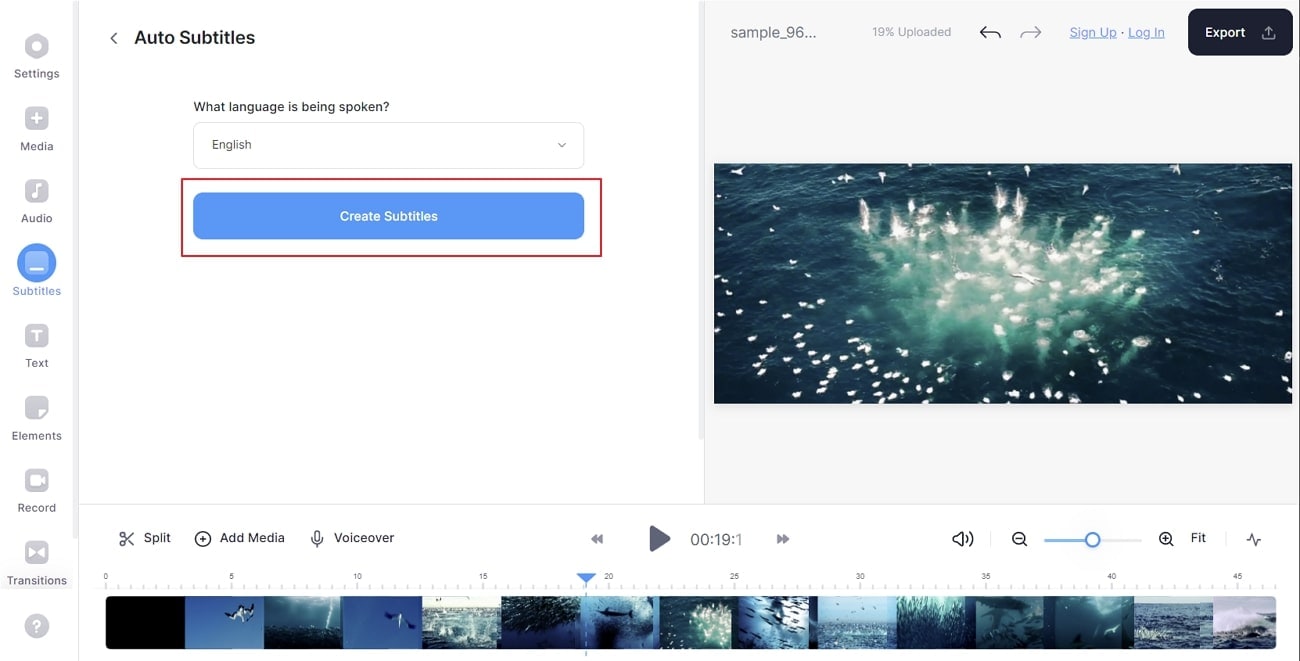
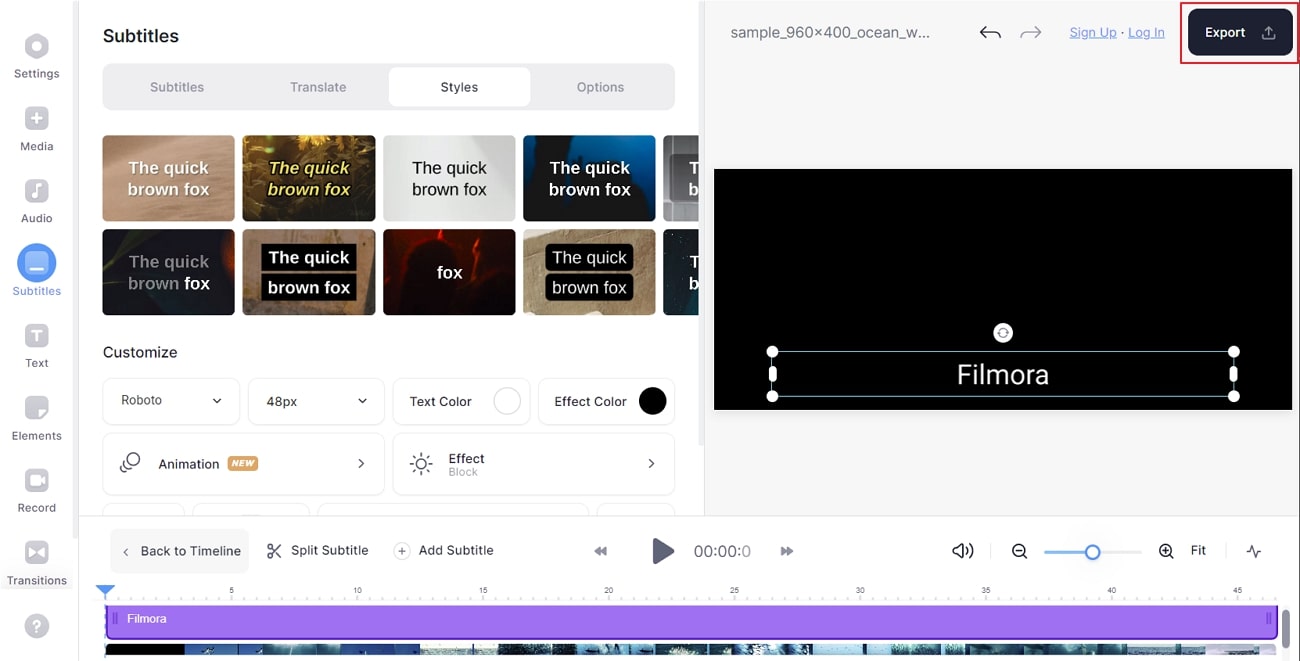
Step3 After waiting some time, you can see your auto-captions. You can choose the text color, effect, size, and alignment from the given options. Once you are satisfied with the TikTok captions, hit the “Export” button.
Part 3: How to Add Captions to Your TikTok Videos with Filmora
If you want to add further enhancements to your TikTok captions, you can use an offline tool like Wondershare Filmora . Using this platform, you can manually add captions by choosing the suitable style from the presets. Moreover, you can also add customizations to the captions through Filomora easily. You can also upload SRT files on this tool to produce TikTok captions.
Free Download For Win 7 or later(64-bit)
Free Download For macOS 10.14 or later
TikTok automatic captions can be easily generated from Filmora as it offers excellent results through its Speech-to-Text feature. Using this unique feature, you can transcribe the voice in your TikTok videos in up to 16 different languages. To use this feature conveniently, follow the below steps:
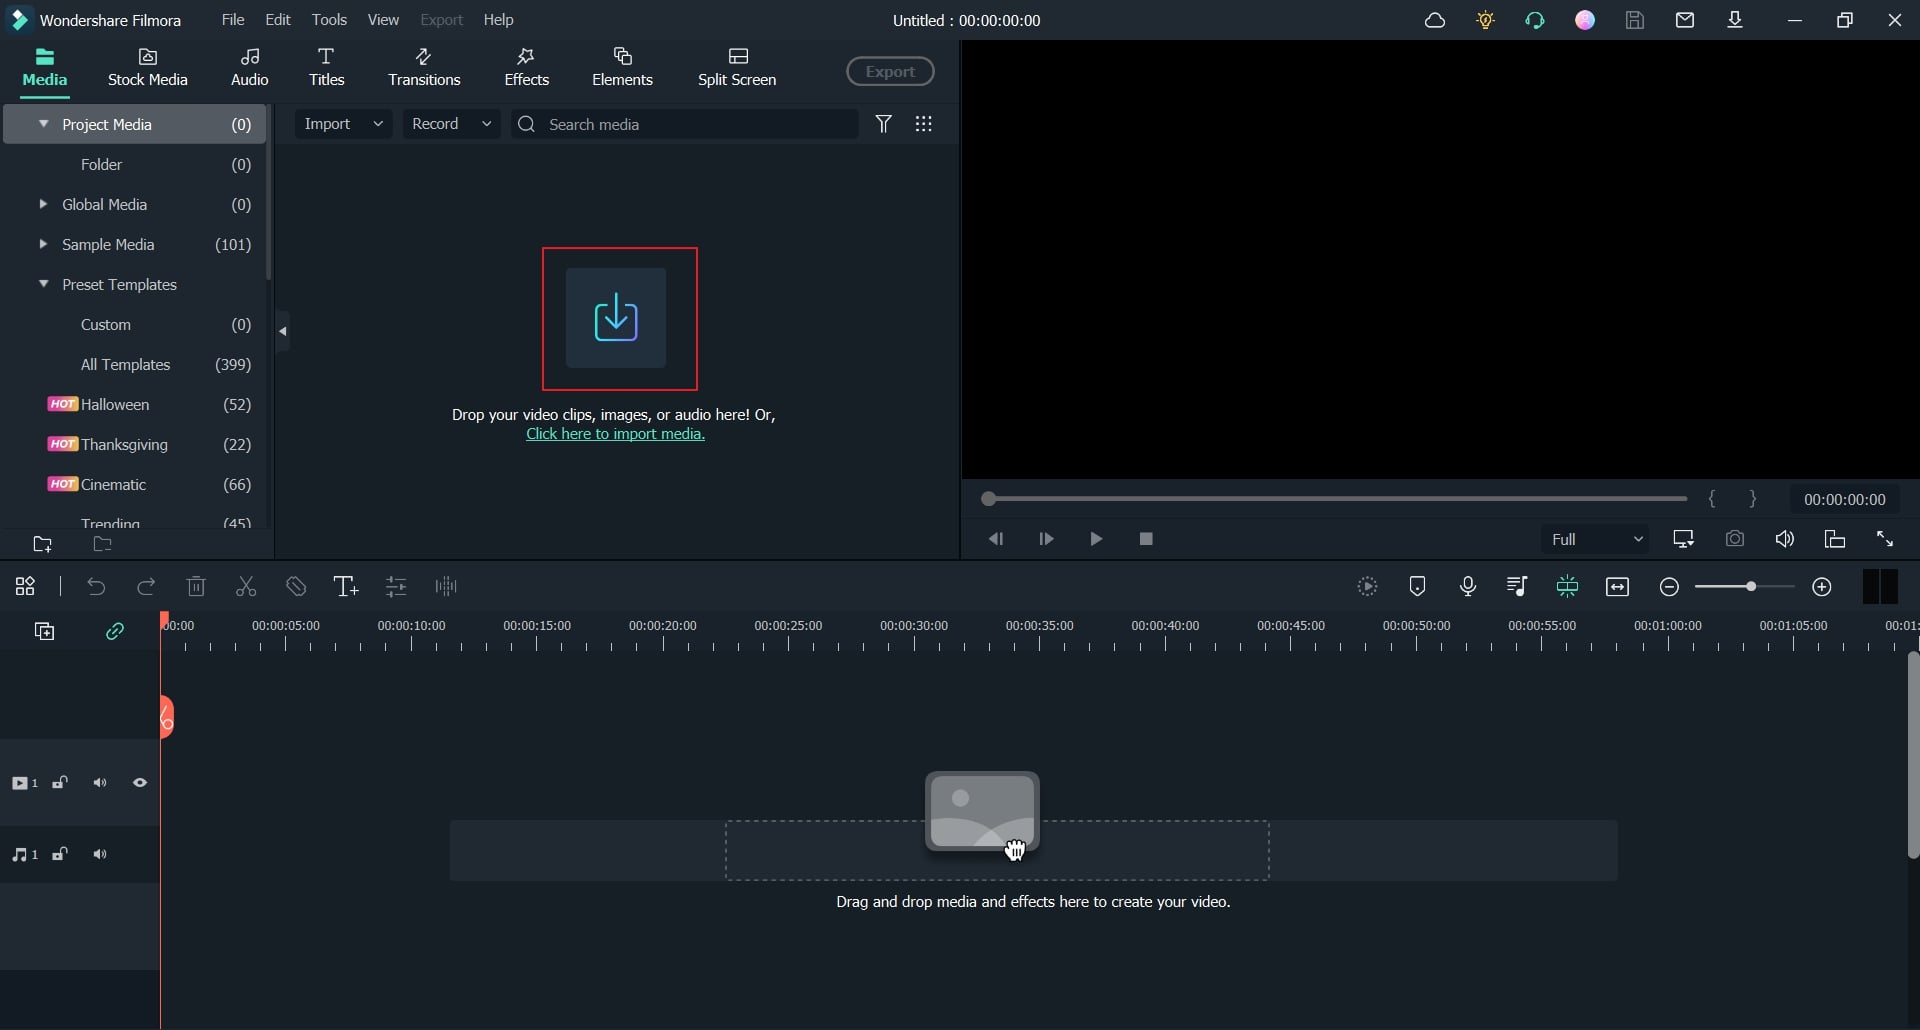
Step 1 Import the TikTok Video
Once done with launching and creating the Filmora project on your PC, hit the “Arrow” icon to import your video file on this tool. Now drag and drop the video file to the timeline in order to proceed.
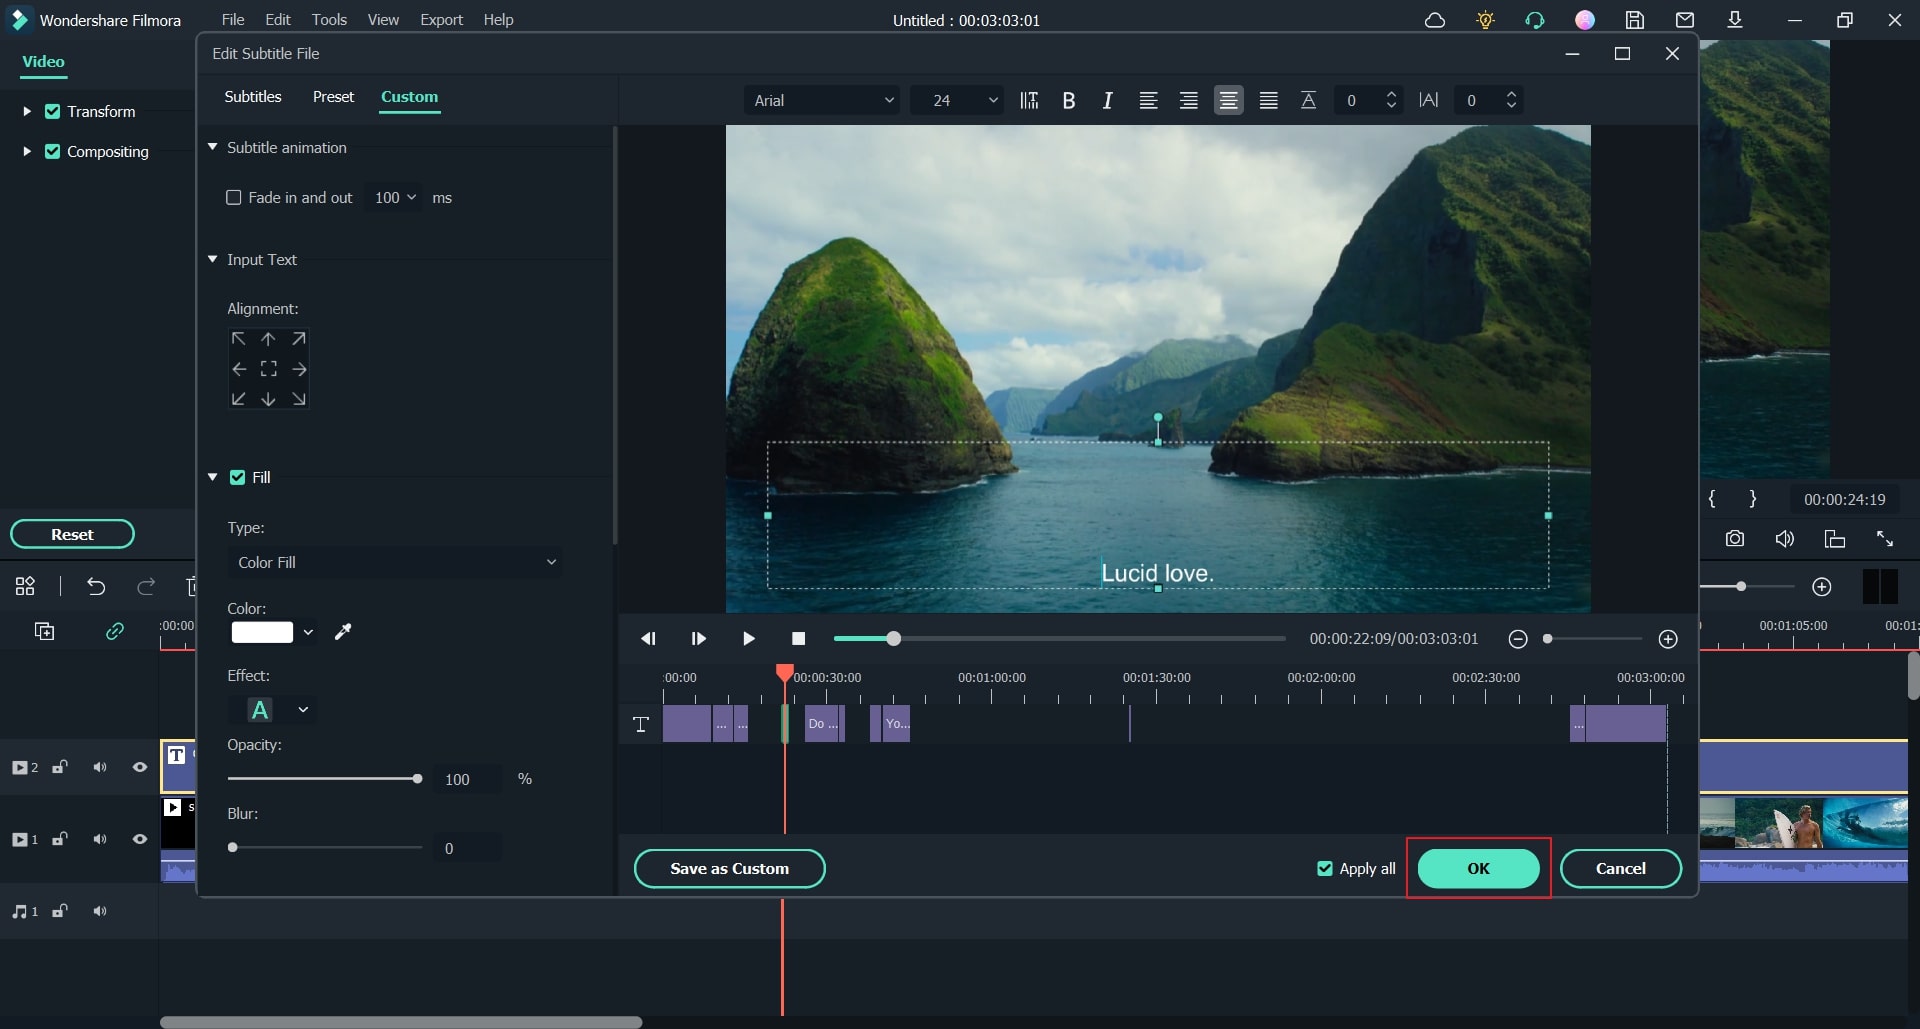
Step 2 Initiate the Automatic Subtitle Feature
On your timeline, tap on the “Speech-to-Text” feature. Choose your language and video clip from the pop-up menu. Wait for some seconds, and the subtitles will be generated automatically. Double-click on the created TikTok automatic captions to open the editing settings. Here, you can select subtitles style and respective time duration. You can also add customizations efficiently.
Step 3 Export the TikTok Video
After completing all the settings, you can click on the “Export” button. Before exporting, you can choose the video resolution and file formats easily. Also, this tool gives you the facility to export the video file directly to your TikTok account.
Part 4: People Also Want to Know
1. How to add captions to TikTok?
To add TikTok captions, you can choose the manual or automatic way. TikTok has a built-in auto-generator through which you can add captions automatically. Moreover, there are different offline and online tools, such as Filmora, CapCut, and Veed.io, through which you can add captions on TikTok flawlessly.
2. How to add captions to TikTok after posting?
If you want to add TikTok captions after posting, you have to download the video on your phone first. Afterward, hit the Plus icon to re-upload the video from your gallery. Choose that particular video again and tap on the Post button. Now you can write the captions on the given space easily. Afterward, tap on the “Post” button.
Last Words
This article has shed light on various ways how to add captions on TikTok efficiently. You can add TikTok captions manually or use the auto-generator for ease. Moreover, we have also highlighted an online tool to create subtitles that can be accessed from any web browser. However, if you want a professional caption editor for a longer run, Wondershare Filmora is the best choice among other tools. It has an easy-to-use interface and achieves accurate results comfortably.
Part 1: Why Should You Add Captions to TikTok Videos?
Adding captions on TikTok videos can bring you multiple advantages. To learn more about the benefits of adding captions on TikTok, read this section:
1. Increases Comprehension
It may be possible that viewers won’t be able to understand a particular dialogue in your TikTok video. To make your TikTok content more understandable, adding captions can prove to be a great option. Moreover, if some viewers can’t turn on the sound of TikTok videos, they can easily read the captions to understand the content.
2. Enhances Focus
Captions have the ability to grasp the attention of a viewer automatically. Adding captions to your TikTok video lets your viewers focus more properly. Thus, you can engage your audience throughout the TikTok video effortlessly.
3. Helps During Audio Problems
Audio problems may arise unexpectedly. In such situations, added captions on TikTok videos can offer great convenience. Moreover, people who have auditory disabilities can also enjoy your TikTok videos.
4. Attracts Diverse Audience
If some foreigners can’t understand or speak your native language, TikTok captions are necessary for them. By doing so, a broad and diverse audience can watch your TikTok videos easily.
Part 2: How to Add Captions on TikTok?
There are various ways through which you can generate TikTok captions effortlessly. Read this section to discover multiple and convenient ways to create TikTok captions easily.
Way 1: Auto-Generate Captions with TikTok’s Built-in Feature
If you don’t want to download video editing software, you can utilize the built-in feature of TikTok to create auto-captions. This will save you from the hassle of launching or accessing a professional subtitle editor. Moreover, it will also save you time and effort from creating subtitles manually. To use the built-in feature of TikTok automatic captions, check the following instructions:
Step1 Once you have captured a video on TikTok, tap the “Tick” icon from the bottom right side. This will redirect you to the editing mode.
Step2 On the editing mode, locate the “Captions” option from the right side. After tapping on it, TikTok will instantly generate the subtitles automatically. Make sure that all the captions are correctly created. Once you are done, hit the “Save” button displayed at the top right side. Afterward, you can quickly post your TikTok video with captions.
Way 2: Use Auto Captions in CapCut
CapCut and TikTok are closely related to each other as they both have the same parent company called ByteDance. Thus, using CapCut to create captions for your TikTok videos can bring high-quality results. You can easily download CapCut on Android and iOS devices without any complications. The interface of this tool is clean that allows you to generate subtitles efficiently.
The auto caption feature in CapCut enables you to produce subtitles instantly. It uses advanced algorithms that ensure high accuracy while creating subtitles. To use this advanced feature of CapCut, read the below steps:
Step1 Download and launch CapCut on your phone. To import, tap on “New Project” and select the video from your phone’s gallery. Tap on “Add” to head to the editing mode of CapCut.
Step2 Afterward, select “Text” options from which you can either choose “Auto Lyrics” or “Auto Captions.” Using the Auto Lyrics option, you can generate captions for a song automatically. On the other hand, by using the Auto Captions option, you can transcribe the voice in your video to create subtitles. From the pop-up menus, choose the sound source and language to proceed.
Step3 Once you are done adjusting the settings, hit the “Start” button. After some seconds, CapCut will create captions for your TikTok video efficiently. Afterward, you can choose video resolution and hit the “Arrow” icon to export the video.
Way 3: Add Captions to TikTok Videos Manually
If you want to create captions for TikTok briefly, you can manually add them using the instructions given below. This method is extremely simple and helpful if you want to create small captions for your TikTok videos. Moreover, you can efficiently choose the font, color, and style of your captions in this manual method:
Step1 Open your TikTok app and create a video to begin. Tap on the “Tick” icon to enter the editing mode. Select “Text” given on the bottom toolbar of your screen.
Step2 Now, choose the style for your captions from the available options. Select the color and start writing your captions carefully. Once you are done, you can save and publish your created TikTok video.
Way 4: Automatically Add Subtitles to TikTok Videos with Online Editor
There are various online editors that can create captions for TikTok videos automatically. They use the Auto Transcription feature, through which the tool can create subtitles by recognizing the voice used in a TikTok video. One of the reliable online tools that can produce auto-subtitles is Veed.io.
Veed.io is an online tool that is capable of creating TikTok automatic captions efficiently. You can easily access this online tool from your web browsers. Moreover, it supports more than 100 languages and accents that you can choose to create auto-captions. Also, you can translate your captions into different languages using this tool. To use this tool flawlessly, check the below steps:
Step1 Begin by reaching the official website of Veed.io. Go to its Tools and locate the “Auto Subtitle Generator” option. It will redirect you to another page that consists of the tool information.
Step2 Click “Get Started” and upload a video from your system. Once you are done, tap on “Subtitles” and select “Auto Subtitle” from the given options. Choose your preferred language and tap on “Create Subtitles.”
Step3 After waiting some time, you can see your auto-captions. You can choose the text color, effect, size, and alignment from the given options. Once you are satisfied with the TikTok captions, hit the “Export” button.
Part 3: How to Add Captions to Your TikTok Videos with Filmora
If you want to add further enhancements to your TikTok captions, you can use an offline tool like Wondershare Filmora . Using this platform, you can manually add captions by choosing the suitable style from the presets. Moreover, you can also add customizations to the captions through Filomora easily. You can also upload SRT files on this tool to produce TikTok captions.
Free Download For Win 7 or later(64-bit)
Free Download For macOS 10.14 or later
TikTok automatic captions can be easily generated from Filmora as it offers excellent results through its Speech-to-Text feature. Using this unique feature, you can transcribe the voice in your TikTok videos in up to 16 different languages. To use this feature conveniently, follow the below steps:
Step 1 Import the TikTok Video
Once done with launching and creating the Filmora project on your PC, hit the “Arrow” icon to import your video file on this tool. Now drag and drop the video file to the timeline in order to proceed.
Step 2 Initiate the Automatic Subtitle Feature
On your timeline, tap on the “Speech-to-Text” feature. Choose your language and video clip from the pop-up menu. Wait for some seconds, and the subtitles will be generated automatically. Double-click on the created TikTok automatic captions to open the editing settings. Here, you can select subtitles style and respective time duration. You can also add customizations efficiently.
Step 3 Export the TikTok Video
After completing all the settings, you can click on the “Export” button. Before exporting, you can choose the video resolution and file formats easily. Also, this tool gives you the facility to export the video file directly to your TikTok account.
Part 4: People Also Want to Know
1. How to add captions to TikTok?
To add TikTok captions, you can choose the manual or automatic way. TikTok has a built-in auto-generator through which you can add captions automatically. Moreover, there are different offline and online tools, such as Filmora, CapCut, and Veed.io, through which you can add captions on TikTok flawlessly.
2. How to add captions to TikTok after posting?
If you want to add TikTok captions after posting, you have to download the video on your phone first. Afterward, hit the Plus icon to re-upload the video from your gallery. Choose that particular video again and tap on the Post button. Now you can write the captions on the given space easily. Afterward, tap on the “Post” button.
Last Words
This article has shed light on various ways how to add captions on TikTok efficiently. You can add TikTok captions manually or use the auto-generator for ease. Moreover, we have also highlighted an online tool to create subtitles that can be accessed from any web browser. However, if you want a professional caption editor for a longer run, Wondershare Filmora is the best choice among other tools. It has an easy-to-use interface and achieves accurate results comfortably.
Top Strategies for High-Quality TikTok Filming
Whether sardonic, informative, or both, voiceovers can improve a TikTok video for humor and clarity.
What do sewing how-to videos, cooking tutorials, and daily vlogs have in common? They all probably are dependent on TikTok’s voiceover feature, which can be helpful in the inbuilt editing suite of the TikTok app.
Ever wished to record a TikTok and save it for later without letting the publisher know? Then, it is always the best idea to learn how to screen record on TikTok. This article will help you learn multiple ways of screen recording on TikTok without you having to worry about the other person knowing.
And, we’ll also look at how to do a voiceover on TikTok using the step-by-step guide mentioned below.
In this article
01 How to Screen Record on TikTok?
02 How to Add Voiceover to the TikTok Video?
03 Add Voiceover to TikTok Video with Extra Fusion: Wondershare Filmora
Part 1: How to Screen Record on TikTok?
Have you ever accidentally taken a screenshot of someone’s Instagram story or screen recorded it for future reference and got scared that the person may have got notified?
While Instagram had the feature of notifying users if their story or picture has been screen recorded, it has recently changed to restrict this notification to images and videos sent via private DMs.
However, TikTokers can rest assured as TikTok has never had a similar notification feature, and you can safely screen record TikTok without mentioning the publisher.
How to Record Computer Screens on Windows
PCs allow software products useful for various purposes. For example, if you would like to record your PC screen while using Windows-based software, you’ll be required a powerful screen recorder that lets you set up a new screencasting session in just a few simple steps.
Here are some of the steps you need to consider!
Step 1: Download Wondershare Filmora
Download Wondershare Filmora onto your computer and then launch the software.
Wondershare Filmora
Get started easily with Filmora’s powerful performance, intuitive interface, and countless effects!
Try It Free Try It Free Try It Free Learn More >

Just visit the browser and type the URL ‘tiktok.com’ in the search bar. Then, look for the TikTok video you would like to record.
Besides providing functions that activate you to control the screen recording procedure entirely, Wondershare Filmora is also a video editor program that lets you manipulate your videos in any way you want.
You must double-click on its desktop icon and open the Full Feature mode right after launching the software. Now, hit the Record tab and choose the Record PC screen option.
The Wondershare Screen Recorder window will appear on the screen so you can modify the settings for your upcoming screencasting session.

You’ll see the Settings icon in the window’s lower right corner and then click it. For example, you can select the computer’s hard drive destination where the recording will be saved, modify the frame rate or set the quality of the recording from the Quality drop-down menu.

Hit the Microphone icon to choose the mic you’ll be using to record narration, and you can select the Speakers icon if you want to disable or enable the computer’s speakers during the session of screen recording.
You’ll see the Settings icon in the window’s lower right corner and then click it. For example, you can select the computer’s hard drive destination where the recording will be saved, modify the frame rate or set the quality of the recording from the Quality drop-down menu.

Mark the Mouse checkbox if you wish the mouse clicks to display in the recording, and you can easily place the maximum duration of a recording session. It is done by inserting the preferred default screen recording duration into the Record Timer box.

Hit the Rec button to begin a new screencasting session, and the software will start recording after a three-second countdown.
Tap the F9 button on the keyboard to stop recording. It will automatically open the file in Filmora’s video editor so you can edit it before publishing online.
Part 2: How to Add Voiceover to the TikTok Video?
Steps to add a voiceover to your TikTok video.
Upload or record a new video by hitting the + at the menu’s center at the screen’s bottom area.
Hit the microphone icon on the screen’s upper right corner once you’re over with the recording and trimming clips to your desired edit. Beneath, the microphone icon must mention “Voiceover.”

Source: mashable.com
Now, you can record a voiceover timed to Video’s every frame here.
Hit the “Save“ button once you’re satisfied with the voiceover

Hitting the “Save“ button will offer you back to the video’s preview, where you can add filters, text, stickers, and various sounds.
It is needed to add effects to your voiceover by hitting the “voice effects”. Here, you can control the narrator’s volume as well.
Also, make sure to enable automatic captions to make sure your video is more accessible!
Tap the Next button once you’re over with your Video. Then, you can edit the Video’s privacy settings, add a caption, and select a cover.
Part 3: Add Voiceover to TikTok Video with Extra Fusion: Wondershare Filmora
Do you want to include your voice in a video, create a voiceover demo for sharing and uploading on social networking platforms, or frame a documentary for important content?
All you need is an ideal video editing program similar to the Wondershare Filmora Video Editor.
The Filmora’s voiceover feature allows you to record your voice or add voice-over files to Video easily. In addition, you can customize the pitch, speed, and volume of the recorded voiceover and apply fade-in and fade-out effects. I’ll share how to register and add voiceover to a video with Filmora on your computer in this post.
Firstly, you can edit your Video in Filmora and then record the voiceover afterward. Or, you can first record the voiceover and then edit the Video around.
Check the steps below on how to make TikTok videos with voiceover via Wondershare Filmora.
Wondershare Filmora
Get started easily with Filmora’s powerful performance, intuitive interface, and countless effects!
Try It Free Try It Free Try It Free Learn More >
Record Voiceover and Add it to Video
We suggest you record the voiceover first in most cases so the sound will become pretty natural.
Step 1: Connect Microphone to PC or laptop
Connect the microphone to your laptop/PC when you’re ready to begin. It’s advisable to use some professional external microphones to capture high-quality sound.
Step 2: Record voiceover
Tap the Wondershare Filmora icon to launch this software. Then, select the New Project option in the beginning interface to create a new one.
Enter the Record tab and choose the “Record a Voiceover” option to arouse the Record Audio windows.
Or hit the microphone icon, and you only need 3 seconds of countdown to begin speaking.
Click the microphone icon again after you finish the above. Then, a new Record file option will be automatically present on the audio track.
Step 3: Edit Recorded Voiceover to Video
To edit the recorded voiceover, you can adjust audio settings, such as changing the Speed, Pitch, Volume, etc.

You can cut and trim out unnecessary sound sections from the recorded voiceover or apply the fade effects to the voiceover for a smoother transition.
Step 4: Sync Voiceover to Video
Now, it’s time to synchronize the recorded voiceover to video to create a compelling video.
The Wondershare Filmora allows up to 100 audio tracks; you can also add some background music to the voiceover.
Then import and drag-n-drop the video content to the video track, drag and drop the soundtrack to the video’s right-side position. Keep the voice and video track in the exact video duration if required.
Here’s how to sync voiceover to video!
Now, sync the recorded voiceover to Video to create a video. Since Filmora is compatible with 100 plus audio tracks, you can add different background music to the voiceover.
Then import and drag-n-drop the video content to the video track, drag and drop the soundtrack to the Video’s right side position. You can keep the Video and audio track in the same video duration.

Note: If you’ve recorded the iPhone voiceover or other device already, you can import it in the Project Library if you wish to add it to the Video and then sync it to Video.
Here is the ultimate step-by-step guide about adding titles to videos after knowing how to do a voiceover on TikTok.
Step 5: Export and save the new file
Click the “Export“ tab to export your new video file after you complete the project. You can either save the Video to different formats or directly share it on other social media platforms.
Additionally, you can even burn a DVD in minutes to watch it on TV.
How to Record and Add Voice over File during Filmora’s Video Editing Process
If you’ve recorded the voice over on your iPhone or another device already, even via the Wondershare Filmora, and wish to add it to the Video, visit the steps mentioned below:
1. Upload the video to Filmora
After logging in to Filmora’s main editing interface, click “Import” or drag-drop your video and voiceover file to the project library.
Filmora video editing software is compatible with a vast range of formats, so there will be no need to convert the files before import.
Drag and drop the files or video content to the Video Timeline when all the files get imported.
2. Record Voiceover in Video Editing
3. Edit voiceover and Export
You can then edit the recorded voiceover for TikTok to perfectly fit the Video and export it to your laptop/PC or directly upload it to YouTube.
For improving the sound, Filmora features more audio editing tools.
Conclusion
This article offered you a step-by-step guide on how to record a TikTok. It also displays four different screen recording methods, along with how to do a voiceover on TikTok.
Now, don’t ever worry about losing out on your favorite TikTok without the original publisher knowing via screen record TikTok via Wondershare Filmora.
02 How to Add Voiceover to the TikTok Video?
03 Add Voiceover to TikTok Video with Extra Fusion: Wondershare Filmora
Part 1: How to Screen Record on TikTok?
Have you ever accidentally taken a screenshot of someone’s Instagram story or screen recorded it for future reference and got scared that the person may have got notified?
While Instagram had the feature of notifying users if their story or picture has been screen recorded, it has recently changed to restrict this notification to images and videos sent via private DMs.
However, TikTokers can rest assured as TikTok has never had a similar notification feature, and you can safely screen record TikTok without mentioning the publisher.
How to Record Computer Screens on Windows
PCs allow software products useful for various purposes. For example, if you would like to record your PC screen while using Windows-based software, you’ll be required a powerful screen recorder that lets you set up a new screencasting session in just a few simple steps.
Here are some of the steps you need to consider!
Step 1: Download Wondershare Filmora
Download Wondershare Filmora onto your computer and then launch the software.
Wondershare Filmora
Get started easily with Filmora’s powerful performance, intuitive interface, and countless effects!
Try It Free Try It Free Try It Free Learn More >
Just visit the browser and type the URL ‘tiktok.com’ in the search bar. Then, look for the TikTok video you would like to record.
Besides providing functions that activate you to control the screen recording procedure entirely, Wondershare Filmora is also a video editor program that lets you manipulate your videos in any way you want.
You must double-click on its desktop icon and open the Full Feature mode right after launching the software. Now, hit the Record tab and choose the Record PC screen option.
The Wondershare Screen Recorder window will appear on the screen so you can modify the settings for your upcoming screencasting session.
You’ll see the Settings icon in the window’s lower right corner and then click it. For example, you can select the computer’s hard drive destination where the recording will be saved, modify the frame rate or set the quality of the recording from the Quality drop-down menu.
Hit the Microphone icon to choose the mic you’ll be using to record narration, and you can select the Speakers icon if you want to disable or enable the computer’s speakers during the session of screen recording.
You’ll see the Settings icon in the window’s lower right corner and then click it. For example, you can select the computer’s hard drive destination where the recording will be saved, modify the frame rate or set the quality of the recording from the Quality drop-down menu.
Mark the Mouse checkbox if you wish the mouse clicks to display in the recording, and you can easily place the maximum duration of a recording session. It is done by inserting the preferred default screen recording duration into the Record Timer box.
Hit the Rec button to begin a new screencasting session, and the software will start recording after a three-second countdown.
Tap the F9 button on the keyboard to stop recording. It will automatically open the file in Filmora’s video editor so you can edit it before publishing online.
Part 2: How to Add Voiceover to the TikTok Video?
Steps to add a voiceover to your TikTok video.
Upload or record a new video by hitting the + at the menu’s center at the screen’s bottom area.
Hit the microphone icon on the screen’s upper right corner once you’re over with the recording and trimming clips to your desired edit. Beneath, the microphone icon must mention “Voiceover.”
Source: mashable.com
Now, you can record a voiceover timed to Video’s every frame here.
Hit the “Save“ button once you’re satisfied with the voiceover
Hitting the “Save“ button will offer you back to the video’s preview, where you can add filters, text, stickers, and various sounds.
It is needed to add effects to your voiceover by hitting the “voice effects”. Here, you can control the narrator’s volume as well.
Also, make sure to enable automatic captions to make sure your video is more accessible!
Tap the Next button once you’re over with your Video. Then, you can edit the Video’s privacy settings, add a caption, and select a cover.
Part 3: Add Voiceover to TikTok Video with Extra Fusion: Wondershare Filmora
Do you want to include your voice in a video, create a voiceover demo for sharing and uploading on social networking platforms, or frame a documentary for important content?
All you need is an ideal video editing program similar to the Wondershare Filmora Video Editor.
The Filmora’s voiceover feature allows you to record your voice or add voice-over files to Video easily. In addition, you can customize the pitch, speed, and volume of the recorded voiceover and apply fade-in and fade-out effects. I’ll share how to register and add voiceover to a video with Filmora on your computer in this post.
Firstly, you can edit your Video in Filmora and then record the voiceover afterward. Or, you can first record the voiceover and then edit the Video around.
Check the steps below on how to make TikTok videos with voiceover via Wondershare Filmora.
Wondershare Filmora
Get started easily with Filmora’s powerful performance, intuitive interface, and countless effects!
Try It Free Try It Free Try It Free Learn More >
Record Voiceover and Add it to Video
We suggest you record the voiceover first in most cases so the sound will become pretty natural.
Step 1: Connect Microphone to PC or laptop
Connect the microphone to your laptop/PC when you’re ready to begin. It’s advisable to use some professional external microphones to capture high-quality sound.
Step 2: Record voiceover
Tap the Wondershare Filmora icon to launch this software. Then, select the New Project option in the beginning interface to create a new one.
Enter the Record tab and choose the “Record a Voiceover” option to arouse the Record Audio windows.
Or hit the microphone icon, and you only need 3 seconds of countdown to begin speaking.
Click the microphone icon again after you finish the above. Then, a new Record file option will be automatically present on the audio track.
Step 3: Edit Recorded Voiceover to Video
To edit the recorded voiceover, you can adjust audio settings, such as changing the Speed, Pitch, Volume, etc.
You can cut and trim out unnecessary sound sections from the recorded voiceover or apply the fade effects to the voiceover for a smoother transition.
Step 4: Sync Voiceover to Video
Now, it’s time to synchronize the recorded voiceover to video to create a compelling video.
The Wondershare Filmora allows up to 100 audio tracks; you can also add some background music to the voiceover.
Then import and drag-n-drop the video content to the video track, drag and drop the soundtrack to the video’s right-side position. Keep the voice and video track in the exact video duration if required.
Here’s how to sync voiceover to video!
Now, sync the recorded voiceover to Video to create a video. Since Filmora is compatible with 100 plus audio tracks, you can add different background music to the voiceover.
Then import and drag-n-drop the video content to the video track, drag and drop the soundtrack to the Video’s right side position. You can keep the Video and audio track in the same video duration.
Note: If you’ve recorded the iPhone voiceover or other device already, you can import it in the Project Library if you wish to add it to the Video and then sync it to Video.
Here is the ultimate step-by-step guide about adding titles to videos after knowing how to do a voiceover on TikTok.
Step 5: Export and save the new file
Click the “Export“ tab to export your new video file after you complete the project. You can either save the Video to different formats or directly share it on other social media platforms.
Additionally, you can even burn a DVD in minutes to watch it on TV.
How to Record and Add Voice over File during Filmora’s Video Editing Process
If you’ve recorded the voice over on your iPhone or another device already, even via the Wondershare Filmora, and wish to add it to the Video, visit the steps mentioned below:
1. Upload the video to Filmora
After logging in to Filmora’s main editing interface, click “Import” or drag-drop your video and voiceover file to the project library.
Filmora video editing software is compatible with a vast range of formats, so there will be no need to convert the files before import.
Drag and drop the files or video content to the Video Timeline when all the files get imported.
2. Record Voiceover in Video Editing
3. Edit voiceover and Export
You can then edit the recorded voiceover for TikTok to perfectly fit the Video and export it to your laptop/PC or directly upload it to YouTube.
For improving the sound, Filmora features more audio editing tools.
Conclusion
This article offered you a step-by-step guide on how to record a TikTok. It also displays four different screen recording methods, along with how to do a voiceover on TikTok.
Now, don’t ever worry about losing out on your favorite TikTok without the original publisher knowing via screen record TikTok via Wondershare Filmora.
Also read:
- 2024 Approved How to Clone Yourself on TikTok - a Simple Guide
- [New] Exclusive Look at Top 10 Gamers on TikTok for 2024
- [Updated] 2024 Approved Enter the TikTok Live Arena Procedures for Participation
- [New] Enhancing TikTok Metrics with Innovative and Memorable Usernames
- [Updated] In 2024, Meet the Top 15 Global TikTok Icons You Should Know
- [New] Ultimate Guide to TikTok Video Editors for 2024
- [New] 2024 Approved Crafting Memorable Content The Essentials of 20 Intriguing TikTok Captions
- [Updated] Copyright Quest for Content Creators (TikTok Edition) for 2024
- [New] In 2024, A Countdown of the Most Memorable Animated TikToks
- [New] Unmatched Visual Appeal Top 5 Tools for Enhancing Your TikTok Texts for 2024
- [Updated] In 2024, Drafting a Compelling Closing Statement for TikTok
- [Updated] 2024 Approved Hot TikTok Picks for Your Amazon Shopping Spree
- [New] In 2024, Stepping Into the Spotlight Joining TikTok Sessions
- Discovering the Vibrant Spectacle of TikTok’s Anime World Dance Beats & Memes Galore
- [Updated] Expand Reach on TikTok with Powerful Hashtags for 2024
- Hitching a Ride in High-Flying TikTok Live Shows for 2024
- [Updated] In 2024, Quick Access Installing and Using TikTok App on MacBook
- [New] Virtual Performances on Kuaishou for 2024
- [New] Become a Voice Customization Guru on TikTok for 2024
- [Updated] In 2024, Engaging Enthusiasts 30+ Revolutionary Bio Strategies for Maximum Popularity on Filmora's TikTok Platform
- In 2024, Quick Guide to Boost Your TikTok Production Speed
- [Updated] In 2024, Step-By Point Process of Perfect Slow Motion Videos on TikTok
- [Updated] Propel Your TikTok Storytelling Through Voiceovers
- [New] Pandemonium Playgrounds Unleashing the Most Outrageous TikTok Games
- [New] In 2024, Unlocking the Art of Guesting on Social TikTok Lives
- [New] Restoring a Non-Functioning TikTok Account for 2024
- [Updated] 2024 Approved Reimagining Your TikTok Visage Complete Profile Update Manual
- 2024 Approved The Insider's Guide to Creating Impressive Slow Motion Content on TikTok
- The Ultimate Guide to TikTok Income Predictors
- Essential 10 Dynamic TikTok Filters For Fresh Looks
- Effortless Video Preservation Android & iOS Solutions for 2024
- In 2024, Revolutionize Your TikTok Videos The Ultimate Filter List
- Elevating Your Edits – A Step-by-Step Guide to Captivating TikTok React Videos in Filmora for 2024
- In 2024, Mastering TikTok Top Video Editing Tools Released
- [Updated] Dive Into Today's Hottest TikTok Trials for 2024
- [Updated] Exploring the Vibrant Realm of TikTok's Anime Dances & Sounds that Speak a Universal Language for 2024
- In 2024, Master Your TikTok Content Best Free Apps for MacEditing
- Updated Best 10 Emoji Makers to Create Your Own EmojisPC/Online/Android/iPhone for 2024
- How to Transfer Music from Poco M6 Pro 4G to iPod | Dr.fone
- 2024 Approved How to Turn Off Suggested Posts on Instagram?
- Complete guide for recovering video files on Magic 5 Lite
- [New] How Can I Watch Facebook Videos on My Apple TV, In 2024
- [New] Jotunheim's Gambit Warriors of Ragnarok
- 3 Things You Must Know about Fake Snapchat Location On OnePlus Nord CE 3 5G | Dr.fone
- In 2024, Converting Sounds to Words The Ultimate Free Guide with Top 3 Strategies
- In 2024, 10 Easy-to-Use FRP Bypass Tools for Unlocking Google Accounts On Poco C50
- In 2024, How To Unlock Any Vivo V30 Pro Phone Password Using Emergency Call
- In 2024, Here are Some of the Best Pokemon Discord Servers to Join On Vivo Y78+ | Dr.fone
- [New] Expert Strategies for Effective Zoom Sharing for 2024
- 3 Solutions to Find Your Motorola Edge 40 Pro Current Location of a Mobile Number | Dr.fone
- New Discover the Top 12 Audio Converters A Comprehensive Guide
- In 2024, Easiest Guide How to Clone Tecno Spark 20C Phone? | Dr.fone
- New Unleash Your Creativity Best Vignette Maker Apps for iOS and Android
- In 2024, How To Fix Apple ID Verification Code Not Working On iPhone 6 Plus
- New 2024 Approved 6 Must-Have Tools for Successful Game Streaming
- Reveal the Disenchanted Instagram's Unfollowers
- In 2024, The Magnificent Art of Pokemon Go Streaming On OnePlus Nord N30 5G? | Dr.fone
- Updated Sizing Up Success The Perfect Facebook Video Cover Formula for 2024
- Recover lost data from Vivo Y78t
- [New] Instagram's Latest Filters Use and Applications 2023 for 2024
- Updated 2024 Approved The Best of the Best 8 Mac Movie Creation Tools You Need
- In 2024, CatchEmAll Celebrate National Pokémon Day with Virtual Location On Vivo T2x 5G | Dr.fone
- [Updated] 2024 Approved Masterclass in Visual Updates IGTV Cover Photos
- [New] Amplifying Instagram Video Reach & Traffic for 2024
- [Updated] In 2024, Blocking Facebook's Advertising Overload in Real Time
- Updated In 2024, YouTube Live Selling Boost Your Sales With These Tips
- [New] WebCamSavvy EssentialRecordingHacks for 2024
- The Complete Stardew Compendium Focus on Ginger Isle
- Complete guide for recovering video files on Meizu
- How To Transfer Data From Apple iPhone XS Max To Other iPhone 11 devices? | Dr.fone
- In 2024, Top Voice-Ovation Creators Online and Desktop Recommendations
- In 2024, Delete Gmail Account With/Without Password On Vivo Y100t
- Title: "[New] Perfect Pairings Adding Captions that Enhance Your TikToks"
- Author: Gary
- Created at : 2024-05-23 06:39:25
- Updated at : 2024-05-24 06:39:25
- Link: https://tiktok-clips.techidaily.com/new-perfect-pairings-adding-captions-that-enhance-your-tiktoks/
- License: This work is licensed under CC BY-NC-SA 4.0.
