
![[New] Navigating the World of TikTok Audio and Visuals](https://www.lifewire.com/thmb/eXU8L3bMAi0ePBeQEWrihnQeMGk=/400x300/filters:no_upscale():max_bytes(150000):strip_icc()/GettyImages-693026992-5aac69963128340037290560.jpg)
[New] Navigating the World of TikTok Audio and Visuals
Navigating the World of TikTok Audio and Visuals
Edit TikTok Videos with Filmora
Wondershare Filmora is one of the best video editors to level up your TikTok video with stunning effects. Download and have a try.
TikTok is becoming increasingly popular among digital content creators. It has provided an opportunity to millions of content makers to produce captivating and creative digital stories. In addition, this app is also continuously upgrading its platform to help you create compelling content.
One such unique addition to its framework is the TikTok voice-over. Voiceovers are added to TikTok videos for narration purposes. So, if you are making a vlog, a voiceover is a must. Likewise, the TikTok voice-over also helps you add sounds and effects to the videos. If you want to know how to do voiceover on TikTok, the following article will explain everything in a step-by-step guide.
Part 1: How to Add Voiceover on TikTok When Recording Video?
TikTok helps you polish your content in a number of ways. Voiceover is one such method to add spice and life to your video content. TikTok allows in-app voiceover addition to the videos. This means you can directly add voiceover when recording video in TikTok. The process is pretty simple. Learn to add a voiceover in a step-by-step guide below.
Step 1: Open TikTok app, and add voice
Launch the TikTok application and click on the + button to open a new window. Tap the voiceover option at the top right corner of the screen.
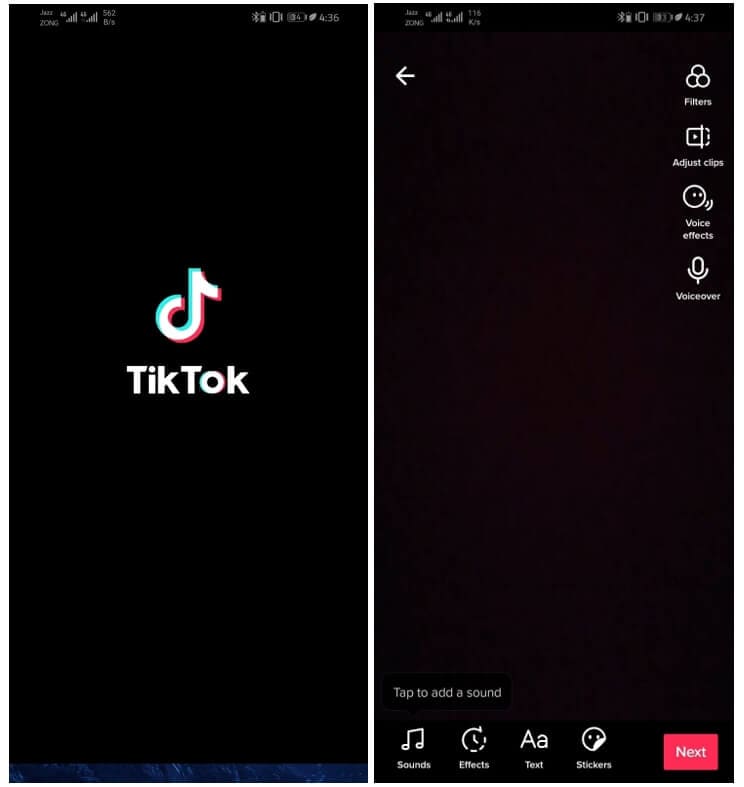
Step 2: Record video and Save
Long-press the record button to add the voice to the video. Click on the Save option at the top of the screen.
Note: The original sound of the video can also be removed when recording voiceover. However, if you want to keep the original video sound, tick the keep original sound box.
Part 2: How to Add Voiceover on TikTok After Video Recorded?
Videos can be imported to TikTok from your gallery or local files. This means you can use TikTok to edit the pre-recorded videos. Video content can be enhanced using filters, texts, and effects available in TikTok in-built library. Moreover, it also enables you to add voiceovers to videos already saved in your gallery. If you want to know how to do voiceover on TikTok, the process is summarized in the simple steps below.
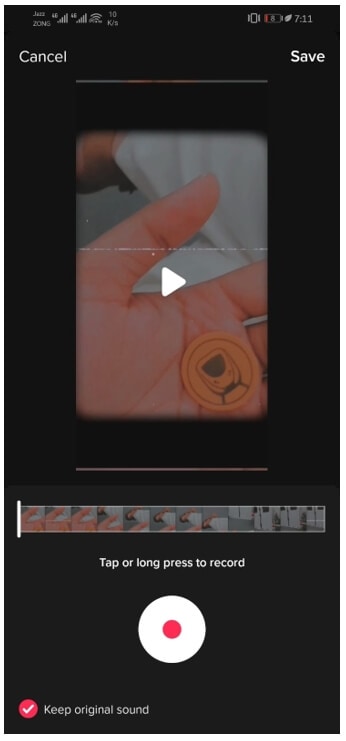
Step 1: launch TikTok and upload a video
Open the application and click the upload button after pressing the + option.
Note: Performing the above step will direct you to your gallery. Select the videos that you want to import to TikTok for adding a voiceover.

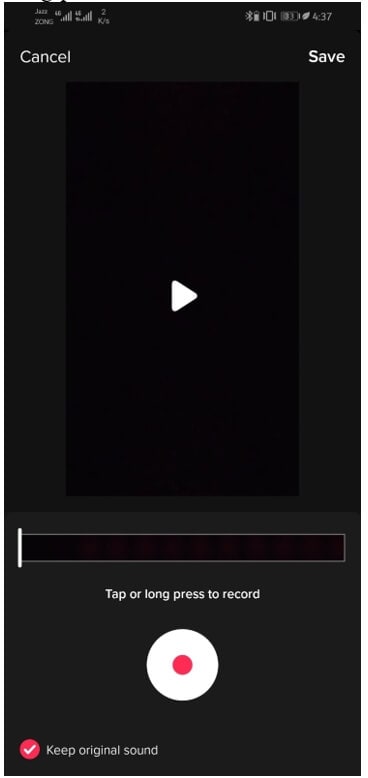
Step 2: Add Voiceover
Click on the voiceover option and keep the record button pressed. Select the save option after finishing the voiceover.
Note: The imported video can be trimmed before the voiceover is added. Trim the video to the desired size and click on the Next button.
Part 3: Why You Should Add a Voiceover to a TikTok Video
Using TikTok is fun. You can enjoy exciting features on TikTok, such as sharing your content, enhancing your videos using filters and effects, and much more. In addition to this, you may also create your own content using TikTok versatile tools. One of the state-of-the-art tools that TikTok has added to its toolkit is the voiceover facility. Voiceover plays an important role in making video content clear and compelling. TikTok videos are no exception. If you want to know about the benefits of TikTok voiceovers, we have got you covered in the following section. Let’s get started.
1. Connects content creators to their audience
Voiceover facilitates you to communicate with your audience. There are high chances that the idea you are trying to present in your video content might not be clear to the viewers. So, voiceovers are effective in adding clarity to your content.
2. Create impact
The primary objective of sharing video content is to influence your followers. However, sometimes visuals are not enough to create impact. Thus, you may need an explanation or narration to convey your message in TikTok videos. So, voiceover is the only way of translating your imagination.
3. Humor
In addition to instructional content and storytelling, TikTok is also known for adding humor. Humorous content can be enhanced further by adding a voiceover. So, the voiceover feature gives you a chance to show your humor skills in TikTok videos.
Part 4: How to Record Voiceover for TikTok on Desktop?
TikTok videos are commonly recorded using its smartphone application. However, this does not imply that you have to perform all the video editing on your phone. You can easily do it on your desktop too. But, what if you are in the middle of editing a TikTok video in some video editing tool on your desktop and want to add a voiceover to it? Don’t worry!! You can also record the voiceover for TikTok on the desktop as well.
Wondershare Filmora is one such advanced video editing tool that allows you to record a voiceover. Do you want to know how to do a voiceover on TikTok? If yes, follow the simple steps below.
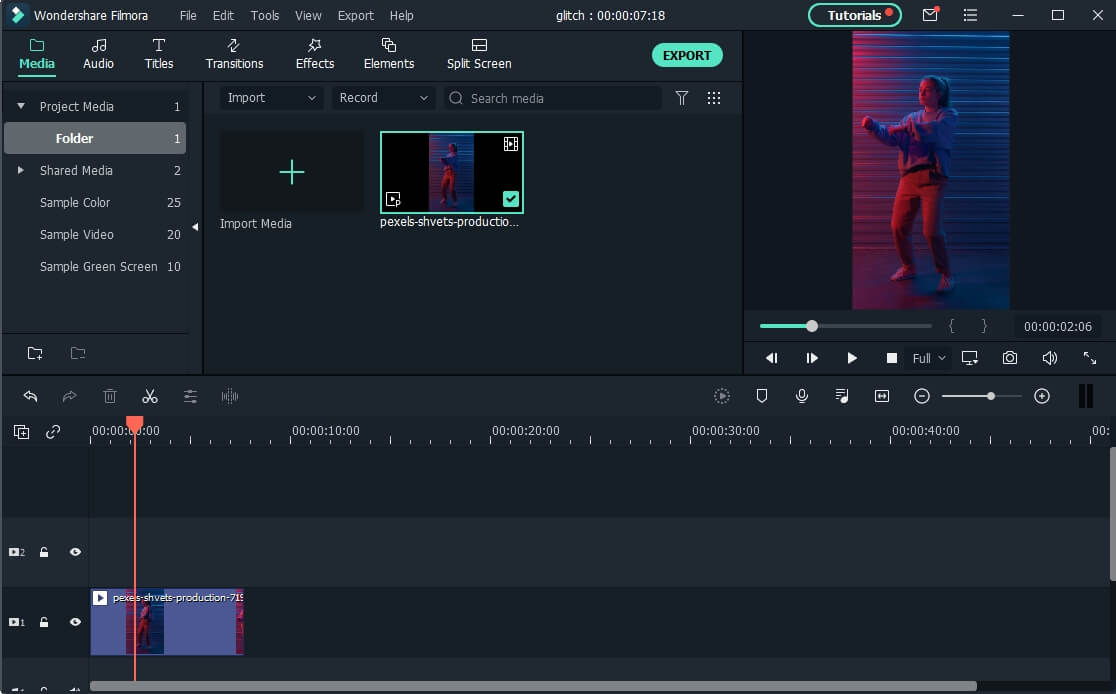
Step 1: Make a video for TikTok with Filmora
Launch Filmora, and then import the TikTok video to the timeline by dragging and dropping.
Note: Filmora also has the camera recording feature , if your computer has a camera, you can also record a video in Filmora.
Step 2: Record a voiceover
Open the Record tab and click on the record a voiceover from the list of options. Or click the microphone icon on the screen to start the voiceover recording.
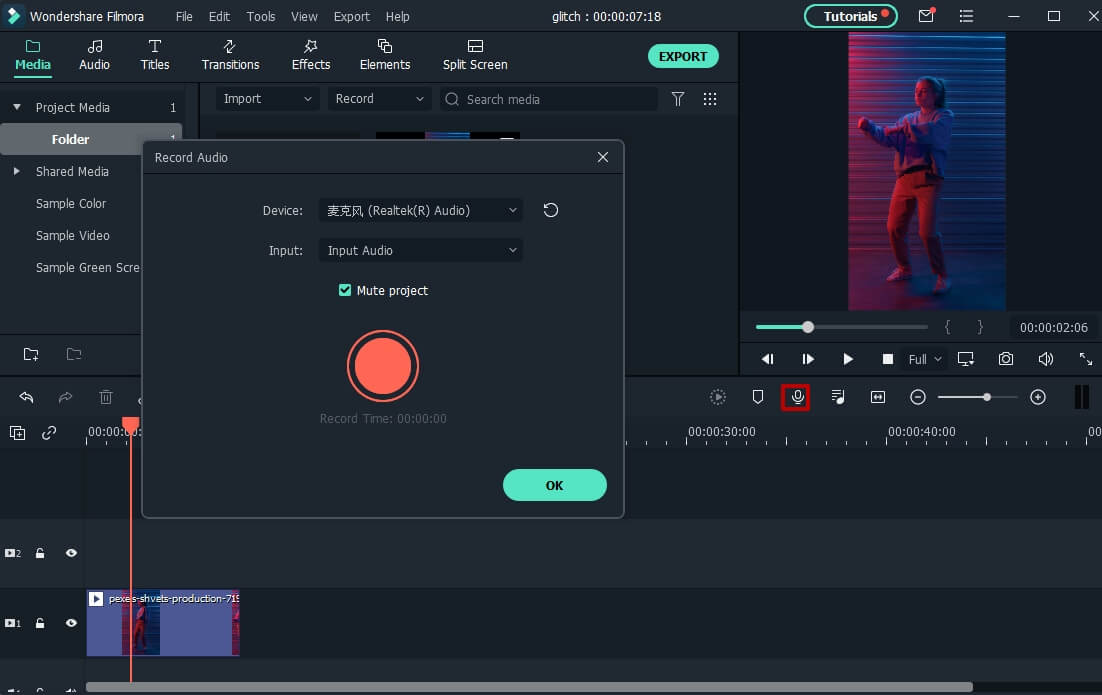
After recording, you can try the audio editing features to change the voice from a female to male, or adjust the speed of voiceover.
Step 3: Export the video
Sync the voiceover to the video and select the export button to save and share the video file.

Now, you can upload the edited video to your TikTok account on a desktop computer.
Step 1: Log in to your TikTok on desktop
Go to the official TikTok website and press the red Login button.
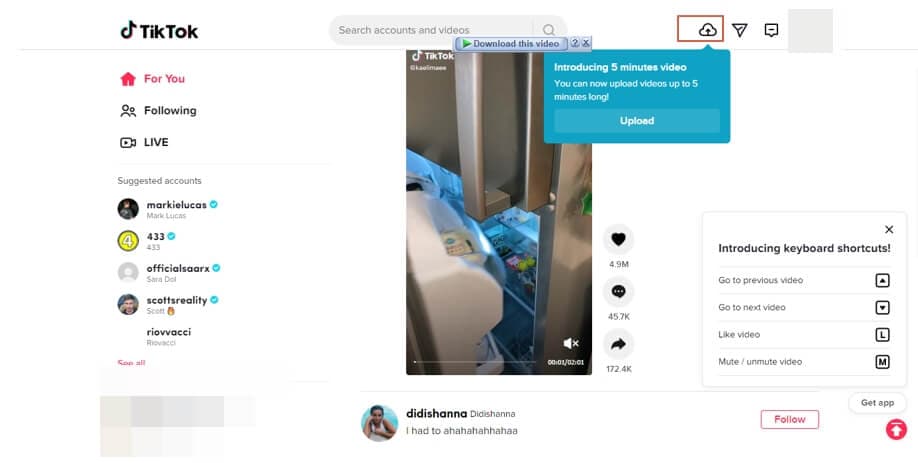
Step 2: Click on Upload video
Click on the cloud button at the top left corner to upload your edited video.
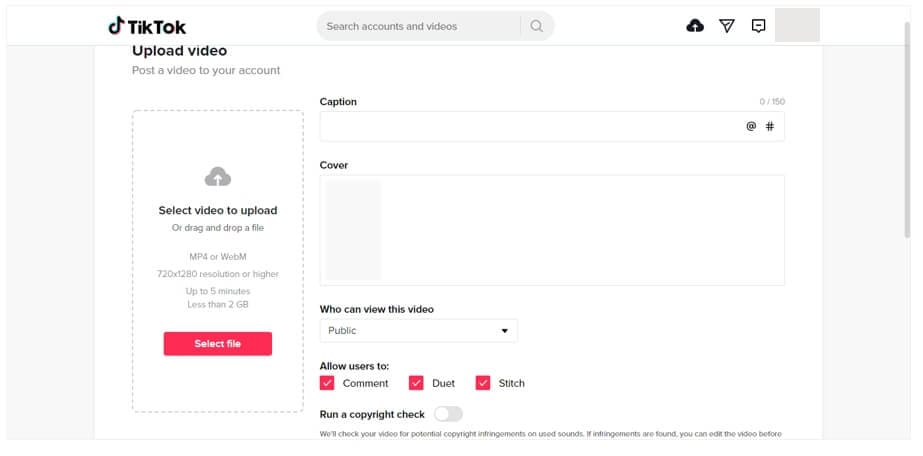
Step 3: Upload video
Select the video from your PC, add the caption and fill in other information before you upload the video.
FAQs about TikTok Voiceover
1. Where can I find the Voiceover Tool on TikTok?
The voiceover tool is incorporated in the TikTok video editing toolkit. The tool can be accessed by clicking the drop-down menu appearing on the right side of the editing window.
2. How to make voiceover louder on TikTok?
Volume can be enhanced using the volume tool in the same drop-down menu where voiceover is found. This allows you to make the voiceover louder on TikTok. So, you can adjust the volume as per your requirements.
Conclusion
TikTok has several features to make your content exciting. Voiceover is one of such features that can polish your video content and make storytelling easy for you. So, we have summarized all the relevant information to give you a detailed insight into how to do a voiceover on TikTok. Hopefully, all concerns will be addressed after reading this article.
TikTok is becoming increasingly popular among digital content creators. It has provided an opportunity to millions of content makers to produce captivating and creative digital stories. In addition, this app is also continuously upgrading its platform to help you create compelling content.
One such unique addition to its framework is the TikTok voice-over. Voiceovers are added to TikTok videos for narration purposes. So, if you are making a vlog, a voiceover is a must. Likewise, the TikTok voice-over also helps you add sounds and effects to the videos. If you want to know how to do voiceover on TikTok, the following article will explain everything in a step-by-step guide.
Part 1: How to Add Voiceover on TikTok When Recording Video?
TikTok helps you polish your content in a number of ways. Voiceover is one such method to add spice and life to your video content. TikTok allows in-app voiceover addition to the videos. This means you can directly add voiceover when recording video in TikTok. The process is pretty simple. Learn to add a voiceover in a step-by-step guide below.
Step 1: Open TikTok app, and add voice
Launch the TikTok application and click on the + button to open a new window. Tap the voiceover option at the top right corner of the screen.
Step 2: Record video and Save
Long-press the record button to add the voice to the video. Click on the Save option at the top of the screen.
Note: The original sound of the video can also be removed when recording voiceover. However, if you want to keep the original video sound, tick the keep original sound box.
Part 2: How to Add Voiceover on TikTok After Video Recorded?
Videos can be imported to TikTok from your gallery or local files. This means you can use TikTok to edit the pre-recorded videos. Video content can be enhanced using filters, texts, and effects available in TikTok in-built library. Moreover, it also enables you to add voiceovers to videos already saved in your gallery. If you want to know how to do voiceover on TikTok, the process is summarized in the simple steps below.
Step 1: launch TikTok and upload a video
Open the application and click the upload button after pressing the + option.
Note: Performing the above step will direct you to your gallery. Select the videos that you want to import to TikTok for adding a voiceover.
Step 2: Add Voiceover
Click on the voiceover option and keep the record button pressed. Select the save option after finishing the voiceover.
Note: The imported video can be trimmed before the voiceover is added. Trim the video to the desired size and click on the Next button.
Part 3: Why You Should Add a Voiceover to a TikTok Video
Using TikTok is fun. You can enjoy exciting features on TikTok, such as sharing your content, enhancing your videos using filters and effects, and much more. In addition to this, you may also create your own content using TikTok versatile tools. One of the state-of-the-art tools that TikTok has added to its toolkit is the voiceover facility. Voiceover plays an important role in making video content clear and compelling. TikTok videos are no exception. If you want to know about the benefits of TikTok voiceovers, we have got you covered in the following section. Let’s get started.
1. Connects content creators to their audience
Voiceover facilitates you to communicate with your audience. There are high chances that the idea you are trying to present in your video content might not be clear to the viewers. So, voiceovers are effective in adding clarity to your content.
2. Create impact
The primary objective of sharing video content is to influence your followers. However, sometimes visuals are not enough to create impact. Thus, you may need an explanation or narration to convey your message in TikTok videos. So, voiceover is the only way of translating your imagination.
3. Humor
In addition to instructional content and storytelling, TikTok is also known for adding humor. Humorous content can be enhanced further by adding a voiceover. So, the voiceover feature gives you a chance to show your humor skills in TikTok videos.
Part 4: How to Record Voiceover for TikTok on Desktop?
TikTok videos are commonly recorded using its smartphone application. However, this does not imply that you have to perform all the video editing on your phone. You can easily do it on your desktop too. But, what if you are in the middle of editing a TikTok video in some video editing tool on your desktop and want to add a voiceover to it? Don’t worry!! You can also record the voiceover for TikTok on the desktop as well.
Wondershare Filmora is one such advanced video editing tool that allows you to record a voiceover. Do you want to know how to do a voiceover on TikTok? If yes, follow the simple steps below.
Step 1: Make a video for TikTok with Filmora
Launch Filmora, and then import the TikTok video to the timeline by dragging and dropping.
Note: Filmora also has the camera recording feature , if your computer has a camera, you can also record a video in Filmora.
Step 2: Record a voiceover
Open the Record tab and click on the record a voiceover from the list of options. Or click the microphone icon on the screen to start the voiceover recording.
After recording, you can try the audio editing features to change the voice from a female to male, or adjust the speed of voiceover.
Step 3: Export the video
Sync the voiceover to the video and select the export button to save and share the video file.
Now, you can upload the edited video to your TikTok account on a desktop computer.
Step 1: Log in to your TikTok on desktop
Go to the official TikTok website and press the red Login button.
Step 2: Click on Upload video
Click on the cloud button at the top left corner to upload your edited video.
Step 3: Upload video
Select the video from your PC, add the caption and fill in other information before you upload the video.
FAQs about TikTok Voiceover
1. Where can I find the Voiceover Tool on TikTok?
The voiceover tool is incorporated in the TikTok video editing toolkit. The tool can be accessed by clicking the drop-down menu appearing on the right side of the editing window.
2. How to make voiceover louder on TikTok?
Volume can be enhanced using the volume tool in the same drop-down menu where voiceover is found. This allows you to make the voiceover louder on TikTok. So, you can adjust the volume as per your requirements.
Conclusion
TikTok has several features to make your content exciting. Voiceover is one of such features that can polish your video content and make storytelling easy for you. So, we have summarized all the relevant information to give you a detailed insight into how to do a voiceover on TikTok. Hopefully, all concerns will be addressed after reading this article.
Harness Filmora: Transforming Your TikTok React Videos Instantly
How to Make TikTok Reaction Videos Easily in 2 Ways

Shanoon Cox
Mar 27, 2024• Proven solutions
With all the videos of different moods and categories available on the platform, TikTok’s reaction is something that makes the footage more engaging. Available for both iOS and Android platforms, TikTok allows you to record, edit , and compile a video of up to 60 seconds, and apply a plethora of filters and animation effects to them along with adding relevant music to awe your audience.
Considering this, here you will learn how to make TikTok reaction videos with ease from within the app itself, and if that’s not enough, using one of the best and most efficient programs available in the market that can even allow you to add unique effects to the reactions you create.
- Part 1: How to Make React Videos on TikTok
- Part 2: How to Use Snap Filmora to Make TikTok Reaction Videos
Bonus: Create A More Attractive Video with Human Segmentation Effect
The human segmentation effect under AI Portrait allows you to isolate people from video background even without a green screen, and then you can composite it to make a reaction video easily. Watch the video tutorial below to find out more details.


Want to read the texts instead of watching videos? Check the complete guide to making a reaction video in 3 ways .
Part 1: How to React to a TikTok Video
After being equipped with all the worldly knowledge about TikTok reaction videos, you can follow the steps given below to learn how to react to the footage created by other people:
1. Tap Share and Record Your Reaction
Start TikTok, play the video you want to react on, tap the Share icon from the lower-right area, and tap the React option from the Share to menu. Tap Flip from the top-right corner of the Camera screen to switch between the front and rear camera as needed, optionally tap the Mic icon to disable or enable voice and system audio capture, drag and reposition React window according to the source footage, and tap the Record button from the bottom to start shooting your TikTok reaction. Wait while the source clip and your recording process are complete successfully before moving forward to the next step.

2. Apply Filters
Tap the Filters icon from the top-right corner, tap to pick a filter from those available at the bottom, and tap anywhere on the screen to accept the one you selected and to get back to the previous window.

3. Manage Audio
Tap the Mixer icon from the upper-right corner of the screen, drag the My Voice and Soundtrack Volume sliders to manage your voice recording and the internal audio respectively, and tap Done to save the changes once you’re through with the modifications. Back on the previous window, tap Next from the bottom-right corner.

4. Publish the Video
Tap the Who can view this video option to manage your reaction’s visibility settings (optional). Tap the Save to device toggle switch to prevent TikTok reaction from being stored on your mobile’s storage (optional). Next, tap the Post button from the bottom-right corner to publish the video to TikTok.

More creative tricks about TikTok video: Clone Yourself in TikTok
Part 2: How to Make Reaction Videos with Filmora
Even though you can make TikTok reaction videos using its own filters and audio mixing tools that work pretty well under ideal conditions, if you are a perfectionist and like precision in anything you do or create, you need a dedicated program that has been designed specifically for the purpose.
Although several such tools are available in the market and can be easily downloaded and used, the best among them is Filmora by Wondershare. Wondershare Filmora is an industry-standard production and post-production tool for both Mac and Windows PCs that the majority of users prefer over its competitors such as Adobe Premiere Pro, Final Cut Pro X, etc. This is because Filmora offers simple UI, is less resource-intensive, and is able to render the outputs significantly faster.
You can learn how to make TikTok reaction videos using Wondershare Filmora by following the steps given below:
Note: Before proceeding, make sure that you have already copied the source (and the reaction) video(s) from your smartphone to your computer.
1. Create New Project and Set Preferences
Start Wondershare Filmora on your Windows or Mac PC, go to File > New Project and click 9:16 (Portrait) from the submenu that appears.
Click Split Screen from the standard toolbar at the top, hover mouse to the screen type preset you want to use, click the + ( Add to Project ) icon that appears at the bottom-right corner of the thumbnail, and click OK from the bottom-right corner once the preset is added to the Timeline.

2. Import and Add Video(s) Preview/Timeline
Click the Media button from the standard toolbar, click anywhere inside the Media window at the upper-left corner, and when the Open box comes up, select and import the video file(s) you want to participate in the TikTok reaction. Alternatively, you can also click Record from below the standard toolbar, and choose any of the options to record your own video or voice right from within Wondershare Filmora itself.
Next, click and drag each of the imported videos to their corresponding screen sections in the Preview window in the upper-right area. Notice how the files are automatically added to the Timeline at the bottom.
3. Add Elements and Titles
Click Elements from the standard toolbar, hover mouse to the element you want to add to the reaction, click the + icon that appears at the center of the thumbnail, and reposition the element in the Timeline to match the duration with that of the reaction you are creating.

4. Export the Reaction

Click EXPORT from the top-middle section of the interface, go to the Local tab from the top of the Export box that appears next, select your preferred format from the left bar, optionally choose a destination folder from the right window, optionally click SETTINGS to fine-tune the output preferences as needed, and click EXPORT from the bottom-right corner to export the TikTok reaction. Or, you can save it in the settings perfect for iPhone or another device.
Below is a sample reaction video made with Filmora, you can do much better than that for your TikTok account:
Besides using Filmora to edit reaction videos with the split-screen presets, you can also use some other video editing software to create a reaction video . Filmora can empower your video creation with more creativity, watch the video below and download Filmora to try.
Conclusion
A TikTok reaction enables you to make the source videos more fun and entertaining. Luckily the app itself has a “React” button that helps you create TikTok reaction videos with merely a few simple taps. However, if you feel that the built-in options are not as robust as they should be, a third-party program like Wondershare Filmora is something you would definitely love to try your hands on as the software is not only easy to use, it is also lightweight, and doesn’t put any overhead on your computer hardware.
Shanoon Cox
Shanoon Cox is a writer and a lover of all things video.
Follow @Shanoon Cox
Shanoon Cox
Mar 27, 2024• Proven solutions
With all the videos of different moods and categories available on the platform, TikTok’s reaction is something that makes the footage more engaging. Available for both iOS and Android platforms, TikTok allows you to record, edit , and compile a video of up to 60 seconds, and apply a plethora of filters and animation effects to them along with adding relevant music to awe your audience.
Considering this, here you will learn how to make TikTok reaction videos with ease from within the app itself, and if that’s not enough, using one of the best and most efficient programs available in the market that can even allow you to add unique effects to the reactions you create.
- Part 1: How to Make React Videos on TikTok
- Part 2: How to Use Snap Filmora to Make TikTok Reaction Videos
Bonus: Create A More Attractive Video with Human Segmentation Effect
The human segmentation effect under AI Portrait allows you to isolate people from video background even without a green screen, and then you can composite it to make a reaction video easily. Watch the video tutorial below to find out more details.
Want to read the texts instead of watching videos? Check the complete guide to making a reaction video in 3 ways .
Part 1: How to React to a TikTok Video
After being equipped with all the worldly knowledge about TikTok reaction videos, you can follow the steps given below to learn how to react to the footage created by other people:
1. Tap Share and Record Your Reaction
Start TikTok, play the video you want to react on, tap the Share icon from the lower-right area, and tap the React option from the Share to menu. Tap Flip from the top-right corner of the Camera screen to switch between the front and rear camera as needed, optionally tap the Mic icon to disable or enable voice and system audio capture, drag and reposition React window according to the source footage, and tap the Record button from the bottom to start shooting your TikTok reaction. Wait while the source clip and your recording process are complete successfully before moving forward to the next step.
2. Apply Filters
Tap the Filters icon from the top-right corner, tap to pick a filter from those available at the bottom, and tap anywhere on the screen to accept the one you selected and to get back to the previous window.
3. Manage Audio
Tap the Mixer icon from the upper-right corner of the screen, drag the My Voice and Soundtrack Volume sliders to manage your voice recording and the internal audio respectively, and tap Done to save the changes once you’re through with the modifications. Back on the previous window, tap Next from the bottom-right corner.
4. Publish the Video
Tap the Who can view this video option to manage your reaction’s visibility settings (optional). Tap the Save to device toggle switch to prevent TikTok reaction from being stored on your mobile’s storage (optional). Next, tap the Post button from the bottom-right corner to publish the video to TikTok.
More creative tricks about TikTok video: Clone Yourself in TikTok
Part 2: How to Make Reaction Videos with Filmora
Even though you can make TikTok reaction videos using its own filters and audio mixing tools that work pretty well under ideal conditions, if you are a perfectionist and like precision in anything you do or create, you need a dedicated program that has been designed specifically for the purpose.
Although several such tools are available in the market and can be easily downloaded and used, the best among them is Filmora by Wondershare. Wondershare Filmora is an industry-standard production and post-production tool for both Mac and Windows PCs that the majority of users prefer over its competitors such as Adobe Premiere Pro, Final Cut Pro X, etc. This is because Filmora offers simple UI, is less resource-intensive, and is able to render the outputs significantly faster.
You can learn how to make TikTok reaction videos using Wondershare Filmora by following the steps given below:
Note: Before proceeding, make sure that you have already copied the source (and the reaction) video(s) from your smartphone to your computer.
1. Create New Project and Set Preferences
Start Wondershare Filmora on your Windows or Mac PC, go to File > New Project and click 9:16 (Portrait) from the submenu that appears.
Click Split Screen from the standard toolbar at the top, hover mouse to the screen type preset you want to use, click the + ( Add to Project ) icon that appears at the bottom-right corner of the thumbnail, and click OK from the bottom-right corner once the preset is added to the Timeline.
2. Import and Add Video(s) Preview/Timeline
Click the Media button from the standard toolbar, click anywhere inside the Media window at the upper-left corner, and when the Open box comes up, select and import the video file(s) you want to participate in the TikTok reaction. Alternatively, you can also click Record from below the standard toolbar, and choose any of the options to record your own video or voice right from within Wondershare Filmora itself.
Next, click and drag each of the imported videos to their corresponding screen sections in the Preview window in the upper-right area. Notice how the files are automatically added to the Timeline at the bottom.
3. Add Elements and Titles
Click Elements from the standard toolbar, hover mouse to the element you want to add to the reaction, click the + icon that appears at the center of the thumbnail, and reposition the element in the Timeline to match the duration with that of the reaction you are creating.
4. Export the Reaction
Click EXPORT from the top-middle section of the interface, go to the Local tab from the top of the Export box that appears next, select your preferred format from the left bar, optionally choose a destination folder from the right window, optionally click SETTINGS to fine-tune the output preferences as needed, and click EXPORT from the bottom-right corner to export the TikTok reaction. Or, you can save it in the settings perfect for iPhone or another device.
Below is a sample reaction video made with Filmora, you can do much better than that for your TikTok account:
Besides using Filmora to edit reaction videos with the split-screen presets, you can also use some other video editing software to create a reaction video . Filmora can empower your video creation with more creativity, watch the video below and download Filmora to try.
Conclusion
A TikTok reaction enables you to make the source videos more fun and entertaining. Luckily the app itself has a “React” button that helps you create TikTok reaction videos with merely a few simple taps. However, if you feel that the built-in options are not as robust as they should be, a third-party program like Wondershare Filmora is something you would definitely love to try your hands on as the software is not only easy to use, it is also lightweight, and doesn’t put any overhead on your computer hardware.
Shanoon Cox
Shanoon Cox is a writer and a lover of all things video.
Follow @Shanoon Cox
Also read:
- TikTok Trends Hit Amazon - Your Must-Have List
- [Updated] Discover TikTok's Top 15 Books That Define a Generation for 2024
- Seamless Transformation From TikTok Videos to Engaging GIFs
- [New] Streamlining Your Video Creation OOTD on a Mac
- [Updated] Engineering A Standout TikTok Endcap for 2024
- [Updated] In 2024, Dominate the Digital Landscape Commerce via TikTok
- [New] 2024 Approved Unbeatable Top 10 Video Editors on Your PC/Windows (TikTok)
- Enabling Screenshots and Recordings of Snaps
- [Updated] 2024 Approved Delving Into TikTok's Unique Visual Language (Filters)
- [Updated] How to Get TikTok Working Again After a Crash
- [New] Purity in Production Leading Watermark Erasers for 2024
- [New] 2024 Approved Strategies for Signature Content Against Dominant TikTok Figures
- [New] Unveiling the #Booktik's Favorite Reads of 2023 for 2024
- [Updated] In 2024, The Essential Explanation Understanding TikTok's PFP Code
- [New] Essential Techniques for Captivating Slow Motion Videos on TikTok for 2024
- Boosting Your TikTok Presence A Guide to Higher Views & Likes
- [Updated] A Step-by-Step Journey Mac & PC's Path to TikTok Videos for 2024
- In 2024, Mastering the Mac Essential Tips for TikTok Users
- [New] The Ultimate PC Guide to Starting Live on TikTok
- [Updated] 2024 Approved Most Reliable Free Online Tools for TikTok Video to MP3 Downloads
- [Updated] Essential Steps for Top-Tier TikTok Intros - Mac Edition
- [New] In 2024, Meme Mayhem The Ultimate List of Crazy TikTok Challenges
- [Updated] From Your Computer's Vision Mastering TikTok Video Uploads for 2024
- [Updated] Traversing TikTok’s Animated Landscape Music, Dance & Memes
- [New] In 2024, Master the Art of TikTok PFPs 30 Game-Changing Concepts
- Culinary Craze Best TikTok Eats
- 2024 Approved Echoes of Harmony in a Social Sphere
- [Updated] Building Brands Exclusive 30+ TikTok Bio Approaches with Filmora Insight for 2024
- [New] 2024 Approved Expert Tips to Bypass a Stuck TikTok on Chrome & Devices
- [New] Proven Methods for Crafting Big Head Effects in TikTok (3 Approaches)
- In 2024, Copyright Quest for Content Creators (TikTok Edition)
- [New] Quick Fixes for a Larger TikTok Following Must-Know Hacks
- [New] In 2024, Essential Profit Calculators for Aspiring TikTok Stars
- Easygoing Sounds Scores of Country Music to Dance and Relax On (TikTok)
- In 2024, Mastering TikTok Essential Factors for Mac Users
- [New] In 2024, TikTok's Best Practices for Engaging Ad Content and Influential Examples
- [New] 2024 Approved Skyrocket Views Unique TikTok Bio Formats to Triple Your Followers on Filmora
- [New] In 2024, Exploring User Experiences Triller & TikTok Compared (Max 156 Chars)
- [New] 2024 Approved Excavating the Treasure Trove of TikTok's Anime World Dance Beats & Visual Trends
- 2024 Approved Revolutionize Your TikTok Photos with Proven Hacks
- [Updated] In 2024, Discover These Top 15 Viral TikTok Recipes Craving Fans Will Love
- The Social Media Marketer's Handbook TikTok Success Story
- [Updated] In 2024, The Essential Guide to Affordable Video Conferencing Tools For Corporate/Educational Use
- 2024 Approved S Top Picks Android Video Editor Apps Compatible with Chromebook
- How to recover data from dead iPhone 11 Pro Max | Stellar
- [Updated] 2024 Approved The Meme Titans Reddit & Twitter's Biggest Sensations
- 2024 Approved Leading Tips to Record Videos in Silence
- How To Remove or Bypass Knox Enrollment Service On Realme 11 Pro
- New Audio Removal Guide for MP4 Files
- In 2024, 8 Ways to Transfer Photos from Sony Xperia 5 V to iPhone Easily | Dr.fone
- 2024 Approved Mobile Mastery Best Video Editing Apps for iOS and Android
- 2024 Approved Cheap but Powerful Video Editing Software
- [Updated] How to Record and Save Your Workscreen on Windows 8
- [New] 2024 Approved The Ultimate Guide to Reverse Playbacks on InstaVids
- New The Top Gaming Destinations Best Sites to Download PC Games for 2024
- In 2024, Does Life360 Notify When You Log Out On Infinix Smart 7 HD? | Dr.fone
- Top 15 Augmented Reality Games Like Pokémon GO To Play On Xiaomi Redmi Note 12 Pro 5G | Dr.fone
- [New] 2024 Approved Breaking Barriers Watching Live Events on Your Roku Screen
- New 2024 Approved Convert and Download 4K Videos in MP4 Format A Beginners Guide
- 2024 Approved Stepping Into the Spotlight 5 Core Principles for Social Media Promotion
- [New] In 2024, High-Quality Captures at a Click Top 5 Browsers' Screen Recorders
- 2024 Approved Unveiling The Foremost Android Alternatives for PlayStation 2 Emulation
- New Snipping the Best Moments of Melodies Building Your Own Caller ID Tunes for 2024
- Updated 2024 Approved Quest for Humorous Auditory Patterns
- [Updated] Unlock YouTube Potential with Top IGTV Editors for 2024
- Updated In 2024, Unleash Your Creativity GoPro Video Editing on Mac Made Easy
- Cutting-Edge Techniques for Improved Ram in Minecraft for 2024
- Want to Uninstall Google Play Service from Realme Narzo 60x 5G? Here is How | Dr.fone
- Updated 2024 Approved YouTube Live Selling Boost Your Sales With These Tips
- How to Track Vivo Y100t Location by Number | Dr.fone
- [New] DIY Tips Getting Started with Voice Over Filming
- [New] Accessing Google Meet via Device
- [Updated] 2024 Approved How to Sprinkle New Colors Into Your Past Media with Instagram
- [Updated] In 2024, Enhancing Visuals in Remote Collaborations with Google Meet
- Wondering the Best Alternative to Hola On Motorola Moto G04? Here Is the Answer | Dr.fone
- [Updated] Activating Built-In Screen Recorders Mate 10/20 & P-Series Devices (P20, P10).
- The Ultimate Guide to Screen Capture via Screencastify
- Title: [New] Navigating the World of TikTok Audio and Visuals
- Author: Gary
- Created at : 2024-05-23 06:38:17
- Updated at : 2024-05-24 06:38:17
- Link: https://tiktok-clips.techidaily.com/new-navigating-the-world-of-tiktok-audio-and-visuals/
- License: This work is licensed under CC BY-NC-SA 4.0.
