![[New] Legitimacy in the Limelight Copyright Verification Before Upload for 2024](https://thmb.techidaily.com/9f88f4d439bd19afe08962ae532d3a6f41b689b2a4dc10b0fa384c3313d41768.jpg)
"[New] Legitimacy in the Limelight Copyright Verification Before Upload for 2024"
Legitimacy in the Limelight: Copyright Verification Before Upload
So, you have successfully created an awesome TikTok video with the perfect dance moves and accurate lip-sync. But what’s this? Your video gets muted or taken down! What a bummer!
The reason?
Copyright infringement, or in simple words, using music without the permission of the singer!
This includes external sounds that are not a part of the TikTok library.
So, what should we do to avoid this, you ask?
To avoid this, you need to learn how to check TikTok video copyright before uploading.
And, in this article, we will tell you exactly why you need to follow TikTok copyright, and how to check it before posting a video.
Why Do You Need to Follow Tiktok Copyright?
To avoid getting banned!
You see, TikTok has a vast library of sounds with proper legal authorization that is available for the users to use in their videos. However, sometimes people use their own music in the videos.
The external sound may or may not be copyrighted.
If it does not have any copyrights on it, all is good. But in case you accidentally use a copyrighted video, TikTok automatically detects it, and either mutes your video or takes it down entirely. If the copyright is detected while posting, the platform will prevent you from uploading it in the first place.
To be on the safe side, we recommend using sounds already present in the TikTok library.
But, what if you want to use an external sound? Is there a way to check TikTok video copyright before uploading?
Yes, there is! And in the next section, we will tell you all about it.
Wondershare Filmora
Get started easily with Filmora’s powerful performance, intuitive interface, and countless effects!
Try It Free Try It Free Try It Free

Check Tiktok Video Copyright Before Uploading
Whenever you’re posting a video to TikTok, you get the option of running a copyright check on it. But this option is only available on desktop browsers.
Therefore, if you’re posting a sound other than one from TikTok’s library, you can check if it’s copyrighted or not from your PC.
Here’s how:
Step 1
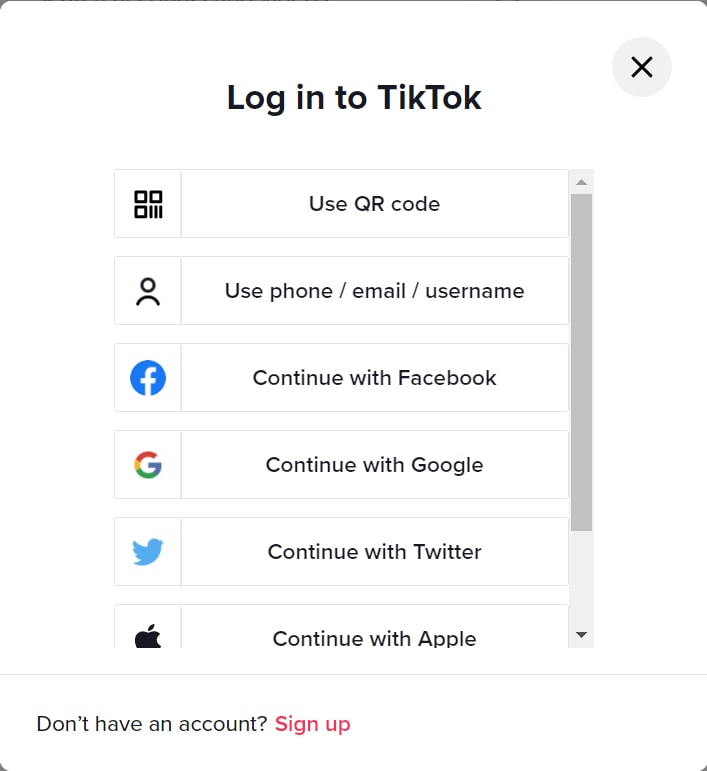
Go to the website version of Tiktok from Chrome, and click on “Log In” at the top-right corner of the page. You can also click on “Log In” under the “Following” option on the left.
Step 2
You will get a popup asking you to either sign up to Tiktok or log in using your email, Facebook, Twitter, Google, Apple, or Instagram. You can choose whichever option you find convenient.
Step 3
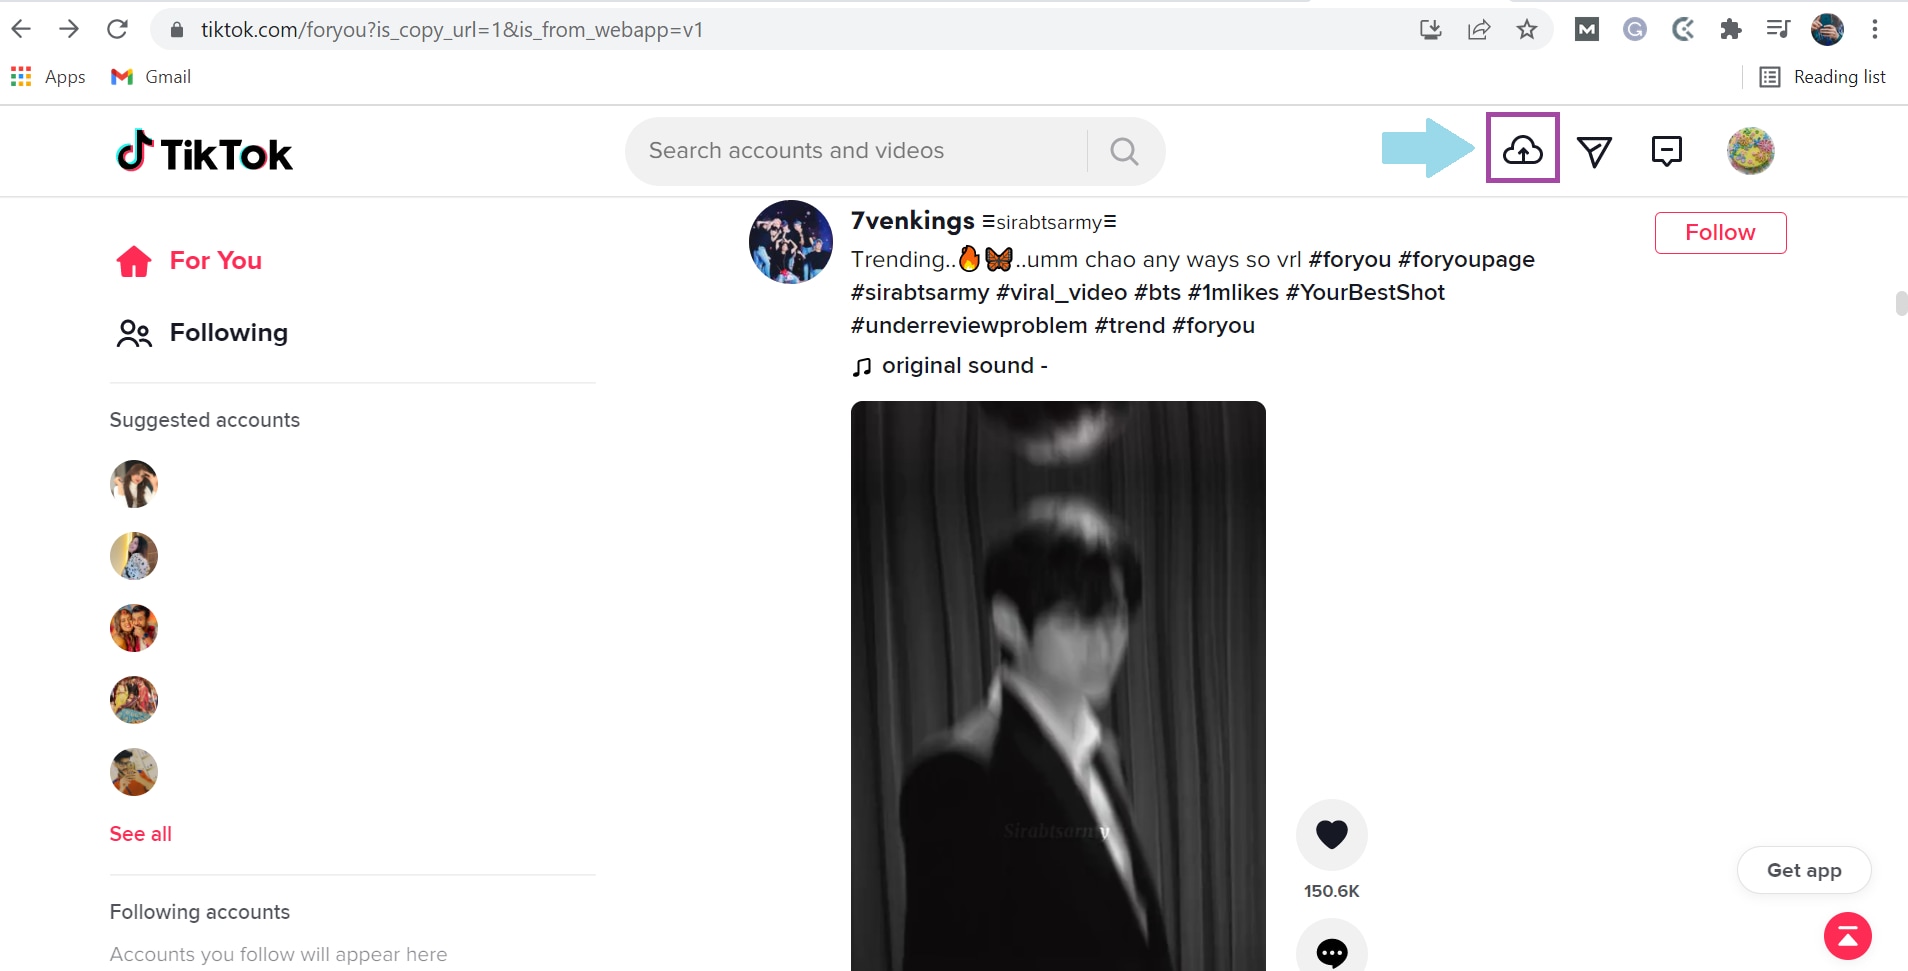
Click on the “Upload” option indicated by a cloud with an arrow.
Step 4
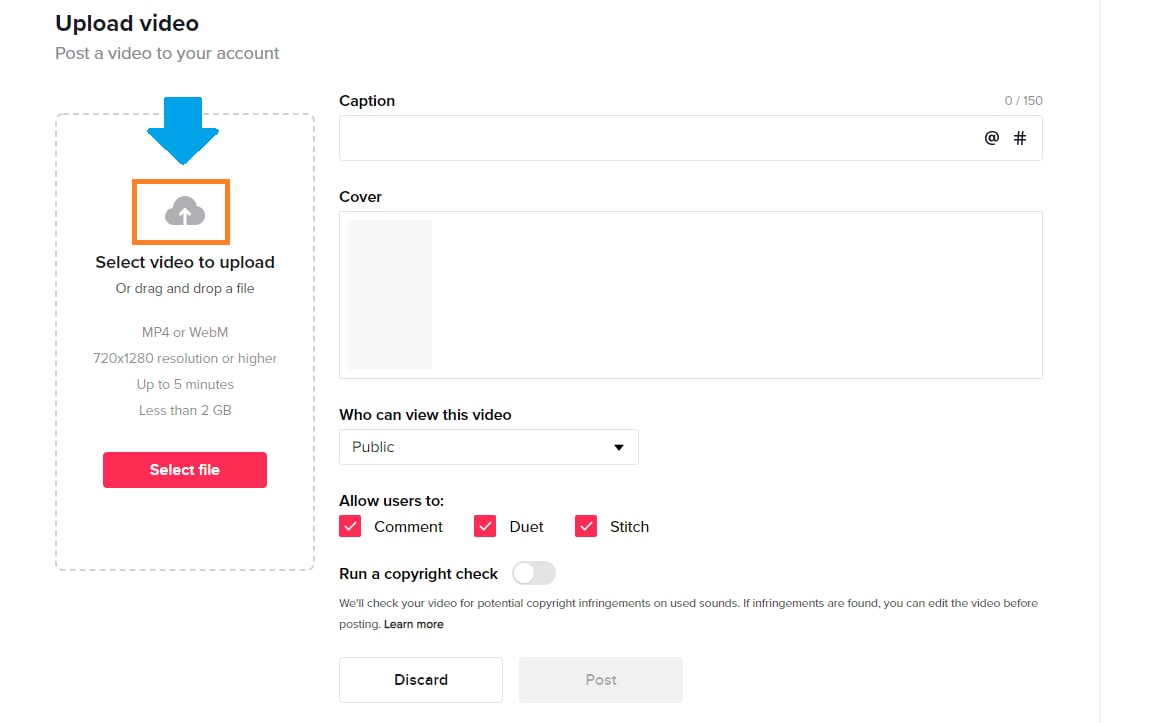
Click on “Select Video to Upload” and choose a video from your PC’s storage.

Step 5
Once the video is uploaded, add a caption with hashtags and select the cover for your video.
Step 6
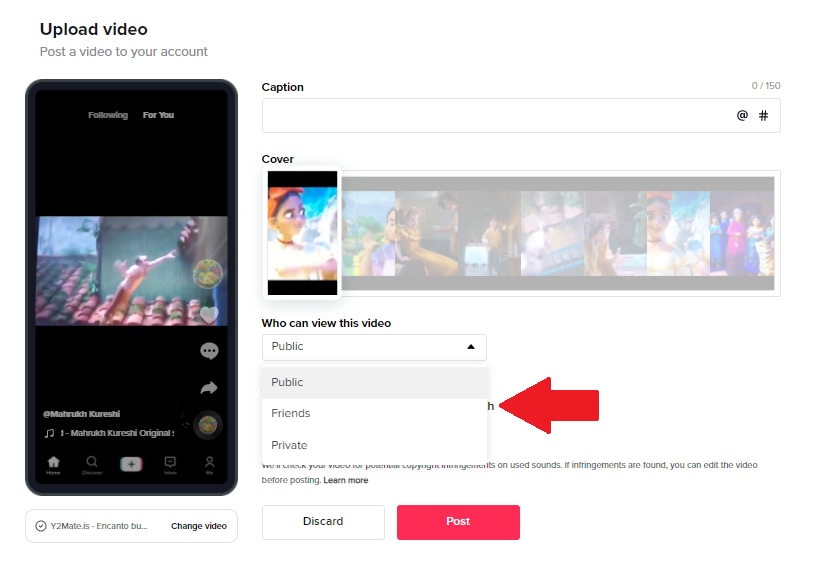
The next step is to choose whether your video can be viewed by the public or your friends or whether you want to keep it private from everyone.
Step 7
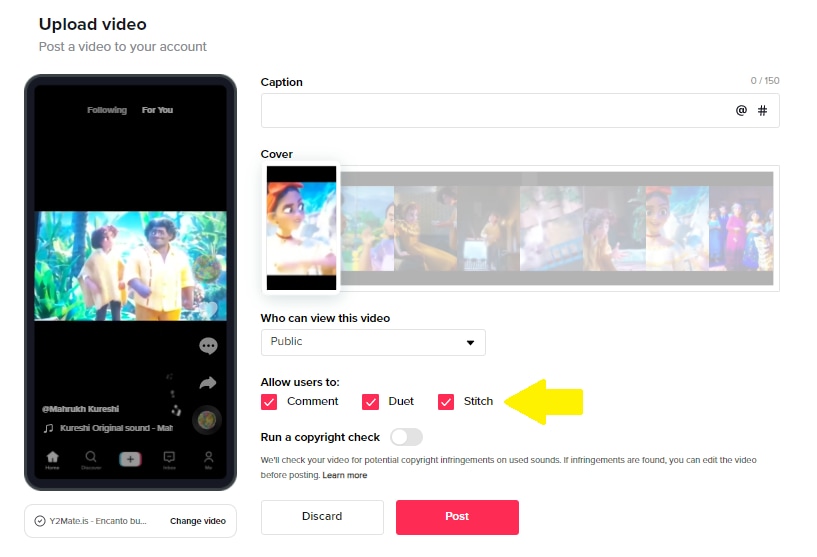
You can also allow or restrict users to comment on your video, make duets, or stitch your video.
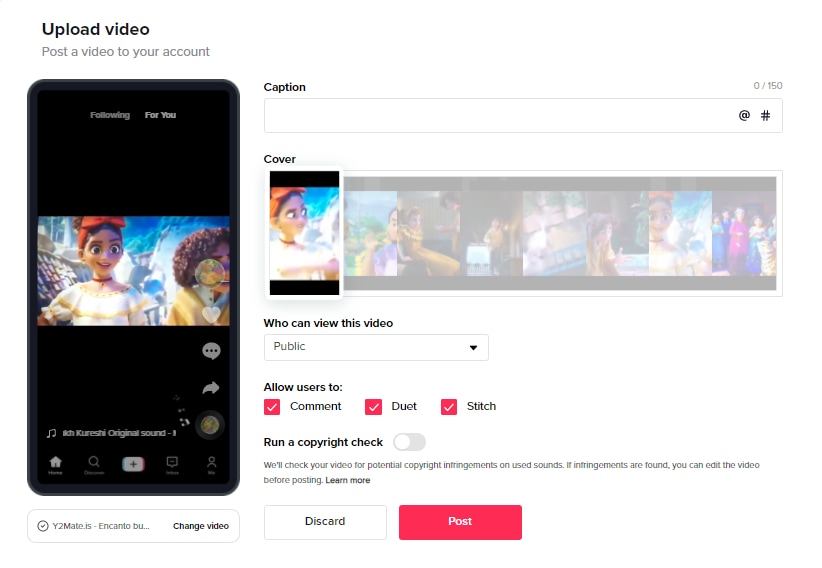
Step 8
Now comes the part where you run a copyright check on the video. Turn the toggle on for “Run a Copyright Check” and wait to see if any issues arise.
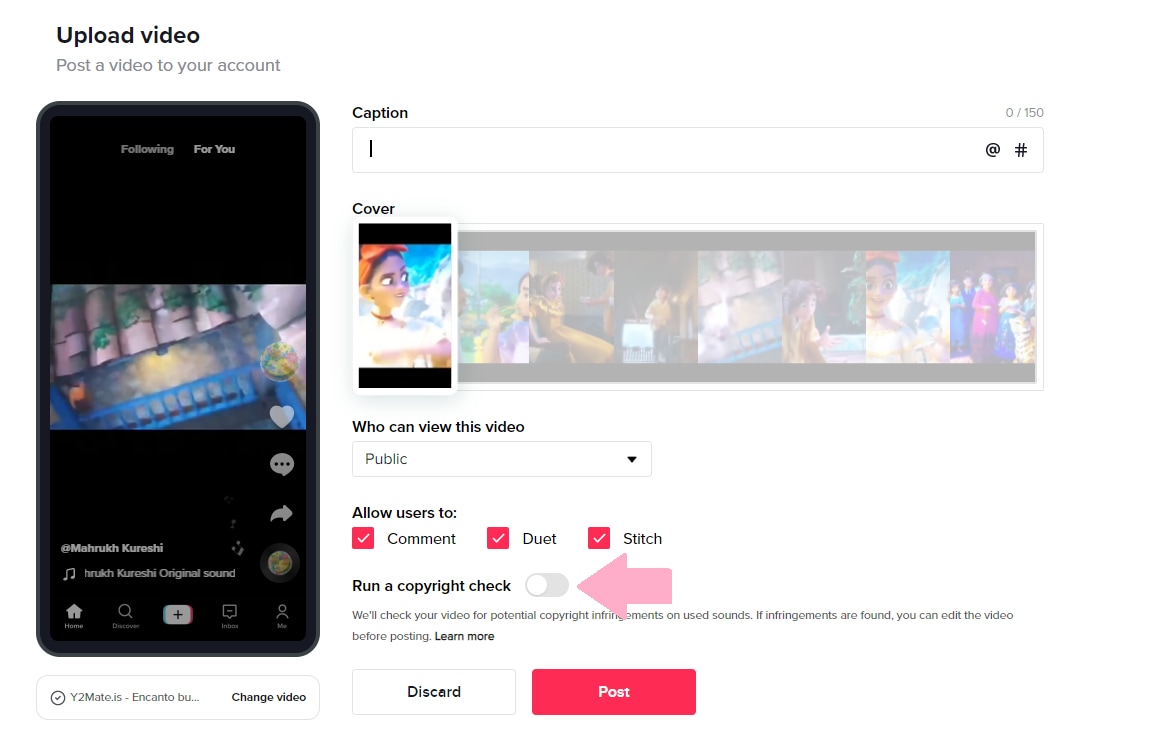
As you can see, this video does not have any copyright-related issues, so it is safe to post it.
However, if your video comes up with an issue, you can try using a sound from TikTok’s built-in library and proceed to post your video without any fear.
Conclusion
While making TikTok videos is quite a fun activity, we have to follow the rules, especially those revolving around using copyrighted material. According to TikTok’s policies, if a video has copyrighted sound, it will be muted, and if the video itself is copyrighted, like a clip from a movie or song, it will be taken down.
However, if you continue posting copyrighted content even after receiving copyright infringement notices from TikTok, it can result in your getting shut down for good!
Therefore, it’s good to know how to check TikTok video copyright before uploading through the steps explained in the article.
So, run a copyright check, and play it safe!
Check Tiktok Video Copyright Before Uploading
Whenever you’re posting a video to TikTok, you get the option of running a copyright check on it. But this option is only available on desktop browsers.
Therefore, if you’re posting a sound other than one from TikTok’s library, you can check if it’s copyrighted or not from your PC.
Here’s how:
Step 1
Go to the website version of Tiktok from Chrome, and click on “Log In” at the top-right corner of the page. You can also click on “Log In” under the “Following” option on the left.
Step 2
You will get a popup asking you to either sign up to Tiktok or log in using your email, Facebook, Twitter, Google, Apple, or Instagram. You can choose whichever option you find convenient.
Step 3
Click on the “Upload” option indicated by a cloud with an arrow.
Step 4
Click on “Select Video to Upload” and choose a video from your PC’s storage.
Step 5
Once the video is uploaded, add a caption with hashtags and select the cover for your video.
Step 6
The next step is to choose whether your video can be viewed by the public or your friends or whether you want to keep it private from everyone.
Step 7
You can also allow or restrict users to comment on your video, make duets, or stitch your video.
Step 8
Now comes the part where you run a copyright check on the video. Turn the toggle on for “Run a Copyright Check” and wait to see if any issues arise.
As you can see, this video does not have any copyright-related issues, so it is safe to post it.
However, if your video comes up with an issue, you can try using a sound from TikTok’s built-in library and proceed to post your video without any fear.
Conclusion
While making TikTok videos is quite a fun activity, we have to follow the rules, especially those revolving around using copyrighted material. According to TikTok’s policies, if a video has copyrighted sound, it will be muted, and if the video itself is copyrighted, like a clip from a movie or song, it will be taken down.
However, if you continue posting copyrighted content even after receiving copyright infringement notices from TikTok, it can result in your getting shut down for good!
Therefore, it’s good to know how to check TikTok video copyright before uploading through the steps explained in the article.
So, run a copyright check, and play it safe!
Elevating Self-Presence: Expert Guidance to Duplicating Oneself on TikTok
How to Clone Yourself on TikTok

Shanoon Cox
Mar 27, 2024• Proven solutions
Every rising pop star needs music videos, but using professional video editing software may be too time-consuming if you want to quickly create a clone video you can share with your fans on TikTok.
Multiplying yourself in a video is a cool way of making sure that your video is going to get the kind of attention it deserves. The process of cloning yourself in a video is a simple one, but there are certain rules you have to follow while recording the footage that will help you avoid overlapping the figures you’re cloning. Here’s how you can make your first clone yourself video on TikTok.

Selecting the Song for your Clone Video
Before you start shooting the video you first need to select the song on TikTok you’re going to use in the video. Once you’ve found the perfect track simply record it and save it as a video to your camera roll. You can then import the video clip that contains the song into the Video Star app.
Here are 10 Popular TikTok Songs for you.

Using the Video Star App to Clone Yourself
1. Download Video Star App
Choosing a location, mounting your iPhone on a tripod, or picking the positions for each of your clones are all important steps you’ll need to take before you actually start recording. There are several apps that enable you to create clone videos easily, but in this article, we are going to show you how you can clone yourself with Video Star. The app can be downloaded from the App Store for free, but additional in-app purchases are necessary if you want to have access to all the power packs Video Star offers. You don’t have to record the video clips with this app since the iPhone’s native camera app is powerful enough to enable you to record high-quality footage.
2. Edit Multiple Video Clips
After you record all the positions for your next clone video with the iPhone’s native camera app, you should cut the video clips and keep only the parts where you are perfectly positioned, so your position in one clip doesn’t overlap with other positions. During the video recording process try to create as much separation between two positions in order to avoid any chance of overlapping. One of the best ways to achieve this is to shoot at a location that is spacious enough so you can make enough separation between two positions. Keep in mind that the maximum number of clips you can combine in the Video Star app is limited to just three, so if you want to have more than three clones in the shot you first have to piece together three clips, save them as a single file and then add more clips to the cloned video you created.
3. Level up Your Videos with Video Star
Video Star also enables you to shoot your videos from the app, and you can adjust the Countdown before the app starts recording or the Recording Speed. Make sure to enter the lowest Recording Speed value possible, because that way you’ll be recording like TikTok does on fast.
Tap the Record button, then select the Multiple options, and play the video that contains the song you previously selected. Once you reach the spot in the song where you want to introduce the clone simply tap Set, so the recording will stop at the designated point and you can move to another position. If at any point during recording you realize that your movements extend to your clone’s location, you can simply tap on the hamburger icon and select the Delete Last option.
To preview the video, you just have to tap on the Scissors icon, and the recorded video will automatically start playing. The Record New Clip in the Scissors menu lets you start from the beginning in case you’re not happy with the results or you can use this option to start recording the video with the second position of your clone.
When done, head back to the Scissors menu, and tap on the Multi-Layer Clip. This feature doesn’t come with the free version of the app, and you must purchase it in order to create a clone video. This action will enable you to select the back and front clips. After selecting the clips, the Mask Front menu will appear on the screen, choose the Shape option and use the hamburger icon on the right side of the screen to change the video’s shape to Rectangle. Drag the rectangle in the preview window so you can crop the first clip to match the demands of your video and press the Next icon to continue the video editing process.
Alternatively, you can use the Erase option to remove the unwanted parts of each video. You can find this option in the Mask Front or Mask Back menu, so just select it and use your finger to remove sections of the shot you don’t want to use.
The Add Effect menu will pop up on the screen so you can add different effects to your first video clip, and then repeat the entire process for the back clip. Once you’ve edited the second clip tap on the Create button to complete the process of making a multilayer clip. Tap Done to save the clip to your camera roll, and upload it to TikTok.
Conclusion
Cloning yourself in a video using the Video Star app is a simple process that can be mastered in a short period of time. The Video Star app lets you create as many clones of yourself as you want, so you just have to make sure that your video clips can be easily combined to feature two or more of your clones and have fun exploring the effects that can make your videos look even cooler. If you want to be a success on the TikTok platform, learning how to make clone videos is one of the best ways to do it, so choose your favorite songs and start producing clone yourself videos.
You can also use Wondershare Filmora to make a split-screen with ease. Check the tutorial below to figure out how to make a split-screen video to clone.


Shanoon Cox
Shanoon Cox is a writer and a lover of all things video.
Follow @Shanoon Cox
Shanoon Cox
Mar 27, 2024• Proven solutions
Every rising pop star needs music videos, but using professional video editing software may be too time-consuming if you want to quickly create a clone video you can share with your fans on TikTok.
Multiplying yourself in a video is a cool way of making sure that your video is going to get the kind of attention it deserves. The process of cloning yourself in a video is a simple one, but there are certain rules you have to follow while recording the footage that will help you avoid overlapping the figures you’re cloning. Here’s how you can make your first clone yourself video on TikTok.
Selecting the Song for your Clone Video
Before you start shooting the video you first need to select the song on TikTok you’re going to use in the video. Once you’ve found the perfect track simply record it and save it as a video to your camera roll. You can then import the video clip that contains the song into the Video Star app.
Here are 10 Popular TikTok Songs for you.
Using the Video Star App to Clone Yourself
1. Download Video Star App
Choosing a location, mounting your iPhone on a tripod, or picking the positions for each of your clones are all important steps you’ll need to take before you actually start recording. There are several apps that enable you to create clone videos easily, but in this article, we are going to show you how you can clone yourself with Video Star. The app can be downloaded from the App Store for free, but additional in-app purchases are necessary if you want to have access to all the power packs Video Star offers. You don’t have to record the video clips with this app since the iPhone’s native camera app is powerful enough to enable you to record high-quality footage.
2. Edit Multiple Video Clips
After you record all the positions for your next clone video with the iPhone’s native camera app, you should cut the video clips and keep only the parts where you are perfectly positioned, so your position in one clip doesn’t overlap with other positions. During the video recording process try to create as much separation between two positions in order to avoid any chance of overlapping. One of the best ways to achieve this is to shoot at a location that is spacious enough so you can make enough separation between two positions. Keep in mind that the maximum number of clips you can combine in the Video Star app is limited to just three, so if you want to have more than three clones in the shot you first have to piece together three clips, save them as a single file and then add more clips to the cloned video you created.
3. Level up Your Videos with Video Star
Video Star also enables you to shoot your videos from the app, and you can adjust the Countdown before the app starts recording or the Recording Speed. Make sure to enter the lowest Recording Speed value possible, because that way you’ll be recording like TikTok does on fast.
Tap the Record button, then select the Multiple options, and play the video that contains the song you previously selected. Once you reach the spot in the song where you want to introduce the clone simply tap Set, so the recording will stop at the designated point and you can move to another position. If at any point during recording you realize that your movements extend to your clone’s location, you can simply tap on the hamburger icon and select the Delete Last option.
To preview the video, you just have to tap on the Scissors icon, and the recorded video will automatically start playing. The Record New Clip in the Scissors menu lets you start from the beginning in case you’re not happy with the results or you can use this option to start recording the video with the second position of your clone.
When done, head back to the Scissors menu, and tap on the Multi-Layer Clip. This feature doesn’t come with the free version of the app, and you must purchase it in order to create a clone video. This action will enable you to select the back and front clips. After selecting the clips, the Mask Front menu will appear on the screen, choose the Shape option and use the hamburger icon on the right side of the screen to change the video’s shape to Rectangle. Drag the rectangle in the preview window so you can crop the first clip to match the demands of your video and press the Next icon to continue the video editing process.
Alternatively, you can use the Erase option to remove the unwanted parts of each video. You can find this option in the Mask Front or Mask Back menu, so just select it and use your finger to remove sections of the shot you don’t want to use.
The Add Effect menu will pop up on the screen so you can add different effects to your first video clip, and then repeat the entire process for the back clip. Once you’ve edited the second clip tap on the Create button to complete the process of making a multilayer clip. Tap Done to save the clip to your camera roll, and upload it to TikTok.
Conclusion
Cloning yourself in a video using the Video Star app is a simple process that can be mastered in a short period of time. The Video Star app lets you create as many clones of yourself as you want, so you just have to make sure that your video clips can be easily combined to feature two or more of your clones and have fun exploring the effects that can make your videos look even cooler. If you want to be a success on the TikTok platform, learning how to make clone videos is one of the best ways to do it, so choose your favorite songs and start producing clone yourself videos.
You can also use Wondershare Filmora to make a split-screen with ease. Check the tutorial below to figure out how to make a split-screen video to clone.
Shanoon Cox
Shanoon Cox is a writer and a lover of all things video.
Follow @Shanoon Cox
Also read:
- [Updated] How To Start a Channel A Beginner's Guide to Reviewing Books & Ebooks for 2024
- [Updated] In 2024, The Ultimate TikTok Book List for Every Genre Lover
- [Updated] Pioneering Clear, High-Definition on Twitter Videos
- [Updated] Tactics for Trimming Outside FB Ads for 2024
- [Updated] The Complete Blueprint Integrating Real-Time Video on Sites for 2024
- Apply These Techniques to Improve How to Detect Fake GPS Location On Realme C33 2023 | Dr.fone
- Cutting-Edge TikTok Recording Capturing High-Quality Videos with Ease
- File Forwarding Made Easy Top 5 Methods to Upload Directly on PC for 2024
- Harnessing Microsoft Teams' Power with Simple Snap Camera Use
- How To Fake GPS On Infinix Hot 30 5G For Mobile Legends? | Dr.fone
- In 2024, How to Sign Out of Apple ID On Apple iPhone 13 without Password?
- In 2024, Navigating Through a TikTok Live Session A Comprehensive Overview
- Leveraging Camera Roll for Social Media - Step-by-Step Guide
- Tips and Tricks for iPhone Low Light Photography
- When Your TikTok Stalls How to Restore Functionality
- Title: [New] Legitimacy in the Limelight Copyright Verification Before Upload for 2024
- Author: Gary
- Created at : 2024-10-21 23:16:49
- Updated at : 2024-10-24 03:02:10
- Link: https://tiktok-clips.techidaily.com/new-legitimacy-in-the-limelight-copyright-verification-before-upload-for-2024/
- License: This work is licensed under CC BY-NC-SA 4.0.