
!["[New] In 2024, Tailoring Audio Quality Audacity's Path to Noiselessness"](https://www.lifewire.com/thmb/CfFxZCTA5C0bz9vqx_XZjrsIMRQ=/400x300/filters:no_upscale():max_bytes(150000):strip_icc()/get-apps-not-in-app-store-1999916-d340eee3c6c84bfcbcd89df995856bd4.png)
"[New] In 2024, Tailoring Audio Quality Audacity's Path to Noiselessness"
Tailoring Audio Quality: Audacity’s Path to Noiselessness
The most frequent request you’ll get from video makers is to eliminate irritating noises like rumbling or humming from an original clip. Almost all of the time, capturing high-quality audio during filming is challenging since the conversation is often hard to hear or is made unclear due to surrounding noises, such as the dreadful air conditioners or fans.
To get rid of all these awful noises, this Audacity Noise Reduction feature will serve you a significant purpose in removing unwanted background noise for your future videos. Without further ado, let’s get started!
In this article
01 Things You Need to Prepare for Background Noise Reduction
02 How to Remove Background Noise in Audacity?
03 Why is Audacity Noise Reduction Not Working?
04 How to Prevent Background Noise in Audio Recording?
05 How to Remove Background Noise in Filmora?
Part 1: Things You Need to Prepare for Background Noise Reduction
Here are few things that you need to consider before you apply the noise reduction to your clips:
1. Noise Sample
A decent sample of the noise you wish to eliminate is perhaps the most crucial aspect of the Audacity remove noise procedure.
This will be used by Audacity to understand the noise and build a noise profile. The noise recording should last for a fair amount of time and be devoid of any other noises.
2. Avoid Copy Pasting Tiny Noise Section in Your Spoken Phrases
When you have a tiny part of noise between your stated words on your audio, please don’t copy/paste it to make a more significant piece of sound for Audacity to examine.
You would not be supplying Audacity with any more information that will help it generate a decent noise profile. The noise profile is what enables Audacity to tell the difference between speech and noise.
3. Minimum 2048 Data Samples Required
To build a noise profile, the Noise Reduction function requires a minimum of 2048 sample data. An audio file with a sampling frequency of 44.1kHz is roughly five hundredths of a second.
Note that this is the minor sound level that Audacity needs to generate a noise profile; however, should you supply a larger sample of the noise, Audacity can typically perform a great job of producing a suitable noise profile. As a result, attempt to capture a few seconds of background noises wherever possible.
4. Establish Recording Level and Record “Silence”
Setting your audio volume and capturing some “quiet” prior to speaking is the best way to achieve this. Instead, when you’ve finished talking, keep your camera/recorder going for a few moments.
Don’t move or create any sounds while capturing the background noises, and keep an ear open for any other noises. You only need to capture the ambient noise for a few moments; two to five seconds will suffice.
Part 2: How to Remove Background Noise in Audacity on Windows and Mac?
Whether you are using Windows or macOS, we will show you a step-by-step process to achieve your results using both software in this part of Audacity remove background music guide.
Remove background noise in Audacity on Windows
Step 1: On your recording, select a few moments of sound. Any segment of noise that incorporates other noises should be avoided.

Step 2: From the Effect menu, select Noise Reduction.

Step 3: Select the Get Noise Profile option whenever the Noise Reduction effect screen appears.

Note: Choose whether to implement the noise removal to the entire waveforms or only a portion of it.
Step 4: To access the Noise Reduction effects window, go to Effects > Noise Reduction. Raise the level of noise reduction progressively while previewing the result.

Step 5: Head over to the File section to Export and Save the result. Audacity does not save sound clips when you select Save Project; instead, you must choose Export. Select the file type you want to store and the place wherever you can save it. Select Save after giving the File Name.

Remove background noise in Audacity on Mac
Step 1: Create a room tone-containing audio file. When you don’t have a separate track for room tone, use a recording with a few moments of quiet in it. Click-and-drag to select a segment with a few minutes of silence using the Selection Tool.

Step 2: Select Noise Reduction from the Effects tab. Select the Get Noise Profile tab in the new tab under Step 1. The screen will shut, and Audacity will take noise profile samples of the indicated area.

Step 3: Click-and-drag to select the whole file, which requires noise reduction with the Selection Tool. To re-open the function, go to the Effect tab and pick Noise Reduction. Make modifications to the following parameters under Step 2:
- Reduce and Residue
- Frequency Smoothing (bands)
- Sensitivity
- Noise Reduction

Step 4: To listen to how the chosen file will look with the selected parameters, select Preview. Re-adjust until you have a sound noise reduction with no interference. When you’re finished, select Reduce and click OK.
Part 3: Why is Audacity Noise Reduction Not Working?
It’s possible that the Noise Reduction function isn’t letting you mop up your recording since your audio isn’t appropriate for it. The disturbance must be continuous, not random or fluctuating, to work for Audacity’s Noise Reduction function.
For example, the Noise Reduction function will not assist if your audio was made in a busy environment with unique noises such as background chatter, random traffic noises, or in an exhibition space or museum. The Noise Reduction feature in Audacity isn’t meant to cope with that kind of distortion. You’ll need to alter your recording approach if you’re capturing voice in either of those situations.
Under the following situations, the Audacity Noise Reduction function might underperform.
- Particular noise in the background, including traffic or people.
- When the harmonics of the sound and voice are comparable.
- There is sound variance where there is fluctuation in the noise.
- The volume of the voice is comparable to or lower than that of the background noise.
- When the noise is irregular or changeable rather than continuous.
- The loudness is deafening.
- The sound is a single click or pop.
Part 4: How to Prevent Background Noise in Audio Recording?
Although Audacity allows eliminating noise very simply, it is still an additional level that takes time to refine your podcast production. These pointers can help you avoid the necessity for noise reduction and cut down on the amount of time you spend processing.
1. Reduce the Computer Fan Noise
Whenever computers become too heated, they can produce a lot of noise. You may limit the amount of software that runs and position your mic away from the keyboard to help lessen this impact and avoid the fan from coming on.
However, even if you observe all of these guidelines, undesired recording sounds may still appear in your program. Fortunately, contemporary software makes this problem quite simple to resolve.
2. Reduce the Gain and Get Close to the Mic
Reduce the gain (sensitivity of the microphone) and go nearer to it. Talking straight into the microphone won’t distort your audio if you reduce the gain, and that would assist your microphone in concentrating on scooping up your voice’s tone.
Bonus Tip: Set your recorder’s (or DAW’s) sensitivity such that your speech peaks between -12 and -10db.
3. Utilize a Versatile Microphone
Condenser and dynamic microphones are the two most common types of podcast microphones. Condenser microphones are significantly more sensitive instruments meant to take up average atmospheric noise, whereas dynamic microphones have a narrower frequency range, picking up fewer ambient noises.
4. Optimize Your Recording Environment
The most significant and most crucial aspect of your podcasts’ sound quality is where you capture it. To optimize your personal podcasting space, we recommend choosing a peaceful, compact area away from HVAC systems, vehicles, external hard drives, background sound, motors, and other distractions. You may also increase the tone of your room by using natural sound absorbents such as curtains, rugs, carpets, and sofas.
Part 5: How to Remove Background Noise in Filmora?
Although there is a lot of software available to eliminate ambient noise, we highly suggest Wondershare Filmora Video Editor to edit audio and video in one place.
In addition to the standard audio editing capabilities, the recently redesigned Filmora currently includes enhanced waveforms, volume Keyframing , peak metering, and audio transitions, giving you a better audio editing interface.
For Win 7 or later (64-bit)
For macOS 10.12 or later
Filmora Video Editor will quickly remove ambient sound from both sound/video. You may also remove the sound from the video with this simple video editor, use the Audio Equalizer or Audio Mixer functions to modify the audio further, and then Export and save the audio in an Mp3 file. Here are the detailed steps:
Step 1: In the Wondershare Filmora Timeline menu, Import your footage. Trim the footage after previewing it and deleting the sections you don’t want to retain.

Step 2: To eliminate the ambient noise immediately, double-click on the video file, and go to the Audio panel to select the Remove Background Noise option. You will find that the background noise is removed automatically.

Step 3: After checking the results, select Export to download the noise-reduced clip to your desktop or upload it immediately to YouTube or Vimeo.

Conclusion
Well, there you have it. In this Audacity Remove Background Noise guide, we have reviewed every possible method you can adopt to get rid of the unnecessary background noise in the Audacity. And if the desired results are still not achieved, we highly recommend using the Wondershare Filmora editing software. Not only will it help you remove the unwanted ambient noise, but it will also allow you to customize your audio or video file further.
02 How to Remove Background Noise in Audacity?
03 Why is Audacity Noise Reduction Not Working?
04 How to Prevent Background Noise in Audio Recording?
05 How to Remove Background Noise in Filmora?
Part 1: Things You Need to Prepare for Background Noise Reduction
Here are few things that you need to consider before you apply the noise reduction to your clips:
1. Noise Sample
A decent sample of the noise you wish to eliminate is perhaps the most crucial aspect of the Audacity remove noise procedure.
This will be used by Audacity to understand the noise and build a noise profile. The noise recording should last for a fair amount of time and be devoid of any other noises.
2. Avoid Copy Pasting Tiny Noise Section in Your Spoken Phrases
When you have a tiny part of noise between your stated words on your audio, please don’t copy/paste it to make a more significant piece of sound for Audacity to examine.
You would not be supplying Audacity with any more information that will help it generate a decent noise profile. The noise profile is what enables Audacity to tell the difference between speech and noise.
3. Minimum 2048 Data Samples Required
To build a noise profile, the Noise Reduction function requires a minimum of 2048 sample data. An audio file with a sampling frequency of 44.1kHz is roughly five hundredths of a second.
Note that this is the minor sound level that Audacity needs to generate a noise profile; however, should you supply a larger sample of the noise, Audacity can typically perform a great job of producing a suitable noise profile. As a result, attempt to capture a few seconds of background noises wherever possible.
4. Establish Recording Level and Record “Silence”
Setting your audio volume and capturing some “quiet” prior to speaking is the best way to achieve this. Instead, when you’ve finished talking, keep your camera/recorder going for a few moments.
Don’t move or create any sounds while capturing the background noises, and keep an ear open for any other noises. You only need to capture the ambient noise for a few moments; two to five seconds will suffice.
Part 2: How to Remove Background Noise in Audacity on Windows and Mac?
Whether you are using Windows or macOS, we will show you a step-by-step process to achieve your results using both software in this part of Audacity remove background music guide.
Remove background noise in Audacity on Windows
Step 1: On your recording, select a few moments of sound. Any segment of noise that incorporates other noises should be avoided.
Step 2: From the Effect menu, select Noise Reduction.
Step 3: Select the Get Noise Profile option whenever the Noise Reduction effect screen appears.
Note: Choose whether to implement the noise removal to the entire waveforms or only a portion of it.
Step 4: To access the Noise Reduction effects window, go to Effects > Noise Reduction. Raise the level of noise reduction progressively while previewing the result.
Step 5: Head over to the File section to Export and Save the result. Audacity does not save sound clips when you select Save Project; instead, you must choose Export. Select the file type you want to store and the place wherever you can save it. Select Save after giving the File Name.
Remove background noise in Audacity on Mac
Step 1: Create a room tone-containing audio file. When you don’t have a separate track for room tone, use a recording with a few moments of quiet in it. Click-and-drag to select a segment with a few minutes of silence using the Selection Tool.
Step 2: Select Noise Reduction from the Effects tab. Select the Get Noise Profile tab in the new tab under Step 1. The screen will shut, and Audacity will take noise profile samples of the indicated area.
Step 3: Click-and-drag to select the whole file, which requires noise reduction with the Selection Tool. To re-open the function, go to the Effect tab and pick Noise Reduction. Make modifications to the following parameters under Step 2:
- Reduce and Residue
- Frequency Smoothing (bands)
- Sensitivity
- Noise Reduction
Step 4: To listen to how the chosen file will look with the selected parameters, select Preview. Re-adjust until you have a sound noise reduction with no interference. When you’re finished, select Reduce and click OK.
Part 3: Why is Audacity Noise Reduction Not Working?
It’s possible that the Noise Reduction function isn’t letting you mop up your recording since your audio isn’t appropriate for it. The disturbance must be continuous, not random or fluctuating, to work for Audacity’s Noise Reduction function.
For example, the Noise Reduction function will not assist if your audio was made in a busy environment with unique noises such as background chatter, random traffic noises, or in an exhibition space or museum. The Noise Reduction feature in Audacity isn’t meant to cope with that kind of distortion. You’ll need to alter your recording approach if you’re capturing voice in either of those situations.
Under the following situations, the Audacity Noise Reduction function might underperform.
- Particular noise in the background, including traffic or people.
- When the harmonics of the sound and voice are comparable.
- There is sound variance where there is fluctuation in the noise.
- The volume of the voice is comparable to or lower than that of the background noise.
- When the noise is irregular or changeable rather than continuous.
- The loudness is deafening.
- The sound is a single click or pop.
Part 4: How to Prevent Background Noise in Audio Recording?
Although Audacity allows eliminating noise very simply, it is still an additional level that takes time to refine your podcast production. These pointers can help you avoid the necessity for noise reduction and cut down on the amount of time you spend processing.
1. Reduce the Computer Fan Noise
Whenever computers become too heated, they can produce a lot of noise. You may limit the amount of software that runs and position your mic away from the keyboard to help lessen this impact and avoid the fan from coming on.
However, even if you observe all of these guidelines, undesired recording sounds may still appear in your program. Fortunately, contemporary software makes this problem quite simple to resolve.
2. Reduce the Gain and Get Close to the Mic
Reduce the gain (sensitivity of the microphone) and go nearer to it. Talking straight into the microphone won’t distort your audio if you reduce the gain, and that would assist your microphone in concentrating on scooping up your voice’s tone.
Bonus Tip: Set your recorder’s (or DAW’s) sensitivity such that your speech peaks between -12 and -10db.
3. Utilize a Versatile Microphone
Condenser and dynamic microphones are the two most common types of podcast microphones. Condenser microphones are significantly more sensitive instruments meant to take up average atmospheric noise, whereas dynamic microphones have a narrower frequency range, picking up fewer ambient noises.
4. Optimize Your Recording Environment
The most significant and most crucial aspect of your podcasts’ sound quality is where you capture it. To optimize your personal podcasting space, we recommend choosing a peaceful, compact area away from HVAC systems, vehicles, external hard drives, background sound, motors, and other distractions. You may also increase the tone of your room by using natural sound absorbents such as curtains, rugs, carpets, and sofas.
Part 5: How to Remove Background Noise in Filmora?
Although there is a lot of software available to eliminate ambient noise, we highly suggest Wondershare Filmora Video Editor to edit audio and video in one place.
In addition to the standard audio editing capabilities, the recently redesigned Filmora currently includes enhanced waveforms, volume Keyframing , peak metering, and audio transitions, giving you a better audio editing interface.
For Win 7 or later (64-bit)
For macOS 10.12 or later
Filmora Video Editor will quickly remove ambient sound from both sound/video. You may also remove the sound from the video with this simple video editor, use the Audio Equalizer or Audio Mixer functions to modify the audio further, and then Export and save the audio in an Mp3 file. Here are the detailed steps:
Step 1: In the Wondershare Filmora Timeline menu, Import your footage. Trim the footage after previewing it and deleting the sections you don’t want to retain.
Step 2: To eliminate the ambient noise immediately, double-click on the video file, and go to the Audio panel to select the Remove Background Noise option. You will find that the background noise is removed automatically.
Step 3: After checking the results, select Export to download the noise-reduced clip to your desktop or upload it immediately to YouTube or Vimeo.
Conclusion
Well, there you have it. In this Audacity Remove Background Noise guide, we have reviewed every possible method you can adopt to get rid of the unnecessary background noise in the Audacity. And if the desired results are still not achieved, we highly recommend using the Wondershare Filmora editing software. Not only will it help you remove the unwanted ambient noise, but it will also allow you to customize your audio or video file further.
Mastering the Art of TikTok: Top 20 Engaging Caption Ideas
TikTok is one of the ideal social media handles that has gained a reputation over the years. It seems to favor teens because of the dynamic content of short videos. Most young people find them unique and opt to spend time entertaining themselves on Tiktok.
Whether you are new or a veteran on Tiktok, you need to grow your profile to get more subscribers. So, how do you do it? Have you heard of captions and bios? That’s all that you need. Well, you don’t need to concern about that because we have got you covered with some fabulous TikTok captions ideas that are easy to use.
In this article
01 What is a Caption on TikTok?
02 Best 20 TikTok Caption Ideas of 2022
03 How to Add Texts/Captions to TikTok Videos
04 How to Add Captions to TikTok Videos with Filmora?
Part 1: What is a Caption on TikTok?
A caption is what you will need to make your videos stand out just by using a few phrases. Of course, you will want your video to be captivating and get more subscribers. A good caption would be short and straightforward, but at the same time, exciting. All you need is to get an excellent caption to promote your entertaining video.
To make it even better, make sure that it is so good to the extent that viewers recommend their friends to watch it. And guess what? That’s how you grow your profile. You don’t need to invest so much time thinking about creating. That is the simplest way of getting your video viral. If that still sounds difficult, you can use one of these 20 TikTok captions ideas in one of your videos.
After posting the video, please take a minute and go back to confirm whether you have done it right without forgetting to include an excellent TikTok username. Also, don’t forget to go through some of your best videos, like dances or anything you like.
Part 2: Best 20 TikTok Caption Ideas of 2022
Coming up with a good Tiktok video may be challenging because it is not about getting into a lovely place and beginning to shoot some videos. Yes, you might have all the resources but lack a good caption. Make your video the best by being creative. Aesthetic usernames for TikTok, complemented with a caption, will boost your views. A caption will determine whether your video gets viewed by many people or a few people. Therefore, consider investing time in creating a nice one that will market your video out there. If you don’t have spare time for all that, here are some of the best captions you can use.
Funny Captions
1. “Getting the best house for your content.”
2. “Best dancing moves are never created unless they check out mine.”
3. “It’s the dancing captain on the move.”
4. “Here’s why Dunkin Donuts is going to give me his hand.”
5. “Already famous on TikTok? This is how I made it.”
Cute captions
1. “No one can challenge me unless I accept defeat.”
2. “Do this to find love on TikTok.”
3. “No dancing, no life.”
4. “I’m the one to receive the audio reward.”
5. “A true friend must include you on Tiktok.”
Quote Captions
1. “Dance is the hidden soul’s language” - Martha Graham
2. “The job of feet is walking, but their hobby is dancing.”- Amit Kalantri
3. “Dancing is a perpendicular horizontal desire.” - George Bernard Shaw
4. “Those who were observed dancing were said to be insane by those who could not feel the music” - Friedrich Nietzsche
5. “Every day offers an opportunity for you to draw in a breath. Kick-off your shoes. And dance.” - Oprah Winfrey.
Specifically, for slay queens (isn’t it ironic?)
1. A hardworking daddy who never ceases to provide for the family
2. I’m just kidding to see your response
3. I can’t stop enjoying life
4. Whoever knows the secret of money will stop looking for it.
5. I think I’m the best of the best.
Part 3: How to Add Texts/Captions to TikTok Videos
Adding text to your TikTok videos should be rosy. The presence of an inbuilt editor just made work more accessible. If you want to improve the views of the videos you post, you must include some text. This is not a made-up idea. A study done in the U.S. got fascinating results. 80% of TikTok users like watching videos with texts. In simple terms, you will get more customers.
Since you have some ideas on the importance of including captions in TikTok videos, let’s see exactly how you can do it! It is a simple procedure that you can follow and get things okay.
Step 1: Upload, Edit or Create Video
Check at the bottom of your stream and hit the “+” button. It will enable you to upload, create or edit a video. Choose from your library the device that you are using.
Step 2: Make Changes
Make any changes like cropping, then click “Next“ when done.
Step 3: Video Upload
Let the video upload to the editing menu, then click on the text icon represented by the symbol “Aa.”
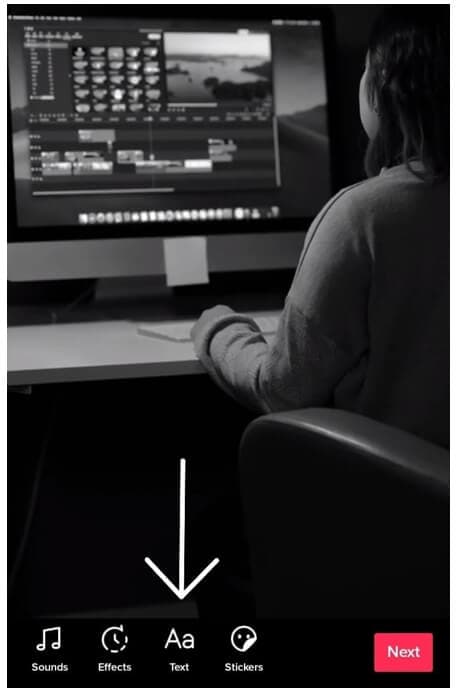
Step 4: Type your Text
Type whatever you want inside the textbox and change the font color when necessary.
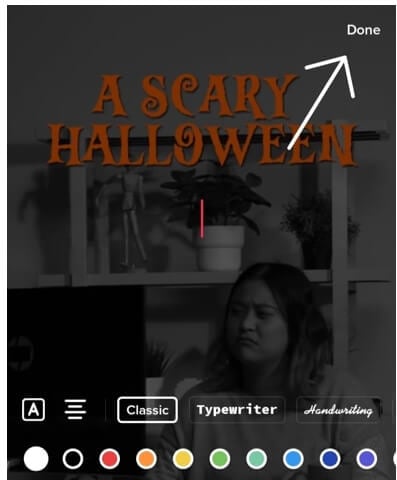
Finally, click “Next“ and add an interesting title. Next, clock on the post icon, and yay, it’s over.
Part 4: How to Add Captions to TikTok Videos with Filmora?
Usually, texts make sounds, videos, etc., appealing to the eye. Furthermore, the text will also enable your audience to see what you are talking about, especially where they need to mute the audio.
However, often you might not have access to video editing software and not know which software shall serve you the best in adding text to your videos. But you don’t have to overthink that matter as there’s one powerful tool that can help you add texts effortlessly. Yes, guys, I am talking about Filmora from Wondershare. Let’s get started using this incredible tool to add text to videos.
Wondershare Filmora
Get started easily with Filmora’s powerful performance, intuitive interface, and countless effects!
Try It Free Try It Free Try It Free Learn More >

Step 1: Start Project
Select a new project to get to Filmora’s main screen. Make some changes like the aspect ratio and adjust the frame gates of the video that you would like to edit.
Step 2: Video Upload
Upload the videos by dragging and dropping them into the Timeline panel.
Step 3: Reach Settings
Go to the titles tab and right-click on the title settings.
Now, select “ Text “ under the timeline section and move to the duration symbol.
Step 4: Make Changes
In the Timeline, double-click on the “Title,” A new window will pop up where you can edit by adding text and changing font size and color.
There you go! You added text to your video using Filmora successfully.
Conclusion
So, to sum up, you have learned the importance of adding text to your TikTok videos via the best inspirations of TikTok caption ideas. To skyrocket your views, ensure that you include a catchy title with some text conspicuous in the video. If you are not satisfied with TikTok, use any other option that will help you best express yourself!
02 Best 20 TikTok Caption Ideas of 2022
03 How to Add Texts/Captions to TikTok Videos
04 How to Add Captions to TikTok Videos with Filmora?
Part 1: What is a Caption on TikTok?
A caption is what you will need to make your videos stand out just by using a few phrases. Of course, you will want your video to be captivating and get more subscribers. A good caption would be short and straightforward, but at the same time, exciting. All you need is to get an excellent caption to promote your entertaining video.
To make it even better, make sure that it is so good to the extent that viewers recommend their friends to watch it. And guess what? That’s how you grow your profile. You don’t need to invest so much time thinking about creating. That is the simplest way of getting your video viral. If that still sounds difficult, you can use one of these 20 TikTok captions ideas in one of your videos.
After posting the video, please take a minute and go back to confirm whether you have done it right without forgetting to include an excellent TikTok username. Also, don’t forget to go through some of your best videos, like dances or anything you like.
Part 2: Best 20 TikTok Caption Ideas of 2022
Coming up with a good Tiktok video may be challenging because it is not about getting into a lovely place and beginning to shoot some videos. Yes, you might have all the resources but lack a good caption. Make your video the best by being creative. Aesthetic usernames for TikTok, complemented with a caption, will boost your views. A caption will determine whether your video gets viewed by many people or a few people. Therefore, consider investing time in creating a nice one that will market your video out there. If you don’t have spare time for all that, here are some of the best captions you can use.
Funny Captions
1. “Getting the best house for your content.”
2. “Best dancing moves are never created unless they check out mine.”
3. “It’s the dancing captain on the move.”
4. “Here’s why Dunkin Donuts is going to give me his hand.”
5. “Already famous on TikTok? This is how I made it.”
Cute captions
1. “No one can challenge me unless I accept defeat.”
2. “Do this to find love on TikTok.”
3. “No dancing, no life.”
4. “I’m the one to receive the audio reward.”
5. “A true friend must include you on Tiktok.”
Quote Captions
1. “Dance is the hidden soul’s language” - Martha Graham
2. “The job of feet is walking, but their hobby is dancing.”- Amit Kalantri
3. “Dancing is a perpendicular horizontal desire.” - George Bernard Shaw
4. “Those who were observed dancing were said to be insane by those who could not feel the music” - Friedrich Nietzsche
5. “Every day offers an opportunity for you to draw in a breath. Kick-off your shoes. And dance.” - Oprah Winfrey.
Specifically, for slay queens (isn’t it ironic?)
1. A hardworking daddy who never ceases to provide for the family
2. I’m just kidding to see your response
3. I can’t stop enjoying life
4. Whoever knows the secret of money will stop looking for it.
5. I think I’m the best of the best.
Part 3: How to Add Texts/Captions to TikTok Videos
Adding text to your TikTok videos should be rosy. The presence of an inbuilt editor just made work more accessible. If you want to improve the views of the videos you post, you must include some text. This is not a made-up idea. A study done in the U.S. got fascinating results. 80% of TikTok users like watching videos with texts. In simple terms, you will get more customers.
Since you have some ideas on the importance of including captions in TikTok videos, let’s see exactly how you can do it! It is a simple procedure that you can follow and get things okay.
Step 1: Upload, Edit or Create Video
Check at the bottom of your stream and hit the “+” button. It will enable you to upload, create or edit a video. Choose from your library the device that you are using.
Step 2: Make Changes
Make any changes like cropping, then click “Next“ when done.
Step 3: Video Upload
Let the video upload to the editing menu, then click on the text icon represented by the symbol “Aa.”
Step 4: Type your Text
Type whatever you want inside the textbox and change the font color when necessary.
Finally, click “Next“ and add an interesting title. Next, clock on the post icon, and yay, it’s over.
Part 4: How to Add Captions to TikTok Videos with Filmora?
Usually, texts make sounds, videos, etc., appealing to the eye. Furthermore, the text will also enable your audience to see what you are talking about, especially where they need to mute the audio.
However, often you might not have access to video editing software and not know which software shall serve you the best in adding text to your videos. But you don’t have to overthink that matter as there’s one powerful tool that can help you add texts effortlessly. Yes, guys, I am talking about Filmora from Wondershare. Let’s get started using this incredible tool to add text to videos.
Wondershare Filmora
Get started easily with Filmora’s powerful performance, intuitive interface, and countless effects!
Try It Free Try It Free Try It Free Learn More >
Step 1: Start Project
Select a new project to get to Filmora’s main screen. Make some changes like the aspect ratio and adjust the frame gates of the video that you would like to edit.
Step 2: Video Upload
Upload the videos by dragging and dropping them into the Timeline panel.
Step 3: Reach Settings
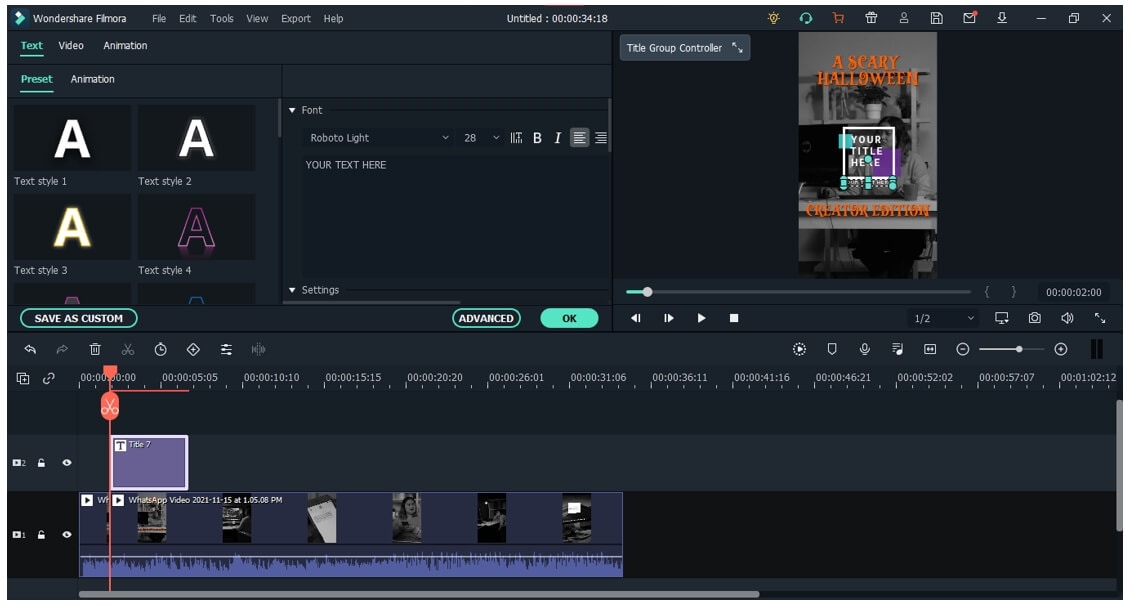
Go to the titles tab and right-click on the title settings.
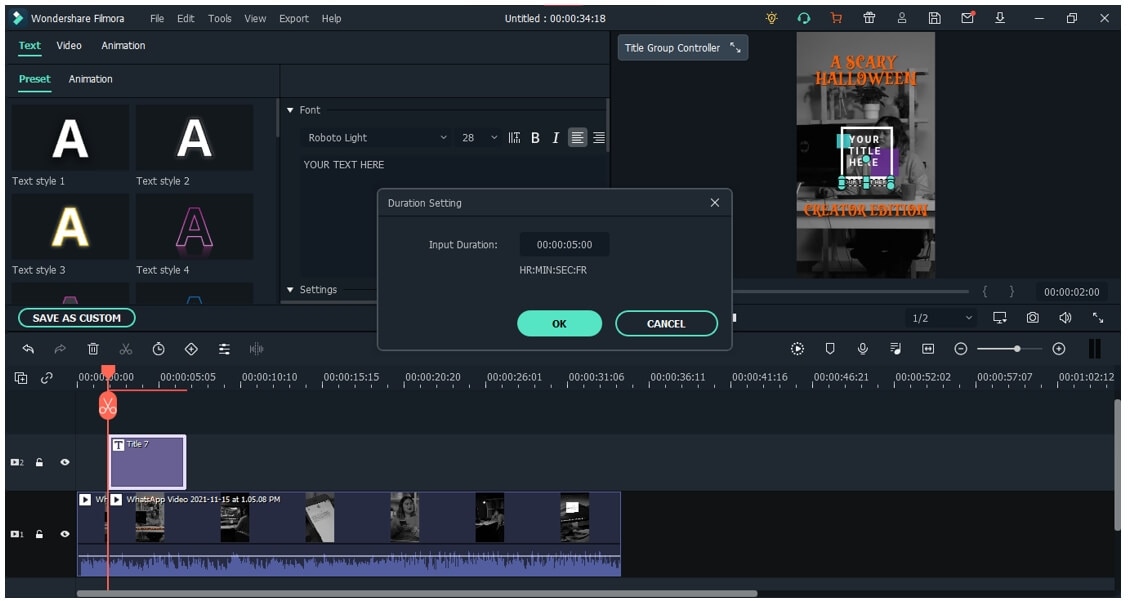
Now, select “ Text “ under the timeline section and move to the duration symbol.
Step 4: Make Changes
In the Timeline, double-click on the “Title,” A new window will pop up where you can edit by adding text and changing font size and color.
There you go! You added text to your video using Filmora successfully.
Conclusion
So, to sum up, you have learned the importance of adding text to your TikTok videos via the best inspirations of TikTok caption ideas. To skyrocket your views, ensure that you include a catchy title with some text conspicuous in the video. If you are not satisfied with TikTok, use any other option that will help you best express yourself!
Also read:
- Embrace Freedom with Easy, Watermark-Free TikTok Videos
- 2024 Approved The Essentials to Establish a Singular Hashtag on TikTok
- [New] Dominating Desktops Secrets to Viral TikTok Videos
- [New] 2024 Approved Snack Sensation TikTok's Viral Culinary Adventures
- In 2024, The Complete Guide to Implementing Siri Speech on TikTok Platforms
- [Updated] 2024 Approved Navigating TikTok Web Efficiently as a Mac User
- [Updated] Navigating TikTok Crashes Fix Guide for Android/iOS Users
- [Updated] Step Into Popularity with These 20 TikTok Moves
- In 2024, The Culinary Craze TikTok's Top 15 Viral Eats
- In 2024, Maximizing Your Social Reach Top 30 Out-of-the-Box TikTok Nicknames
- In 2024, Transforming Ordinary to Exceptional TikTok PFPs
- [Updated] Teaming Up for Duet Video on TikTok
- [New] 2024 Approved Master Noise Removal with Audacity for Flawless Recordings
- In 2024, Top 10 Trending TikTok Eats
- [New] The Most Influential Quotes List to Make Your TikTok Videos Shine
- [New] Effortless Enchantment Make Your Mark with Striking Templates for TikTok
- [Updated] From Basic to Bespoke Personalizing Your TikTok Profile for 2024
- [New] The Ultimate TikTok Toolkit Increase Views and Engagement
- [Updated] In 2024, Quick Access Installing and Using TikTok App on MacBook
- [Updated] In 2024, Avoid Infringement Checking Your TikTok Content for Rights
- [New] Exploring Leading TikTok GIF Conversion Apps Today
- [New] A User’s Ultimate Reference TikTok Element Guidebook
- [New] In 2024, Craft the Perfect Profile Narrative on TikTok
- [New] 2024 Approved Extraordinary Escapades The Ultimate List of Strange TikTok Titles
- [Updated] 2024 Approved Unveiling TikTok's Hidden Secrets Top 7 Emoji Exploration Guide
- In 2024, Prospects of the Future Top 10 TikTok Game Creators
- [Updated] 2024 Approved Needlework Nuggets Cultivating Craftsmanship in the Creative Sphere
- [Updated] In 2024, Creative Charisma Unprecedented Bio Concepts to Captivate Filmo-TikTok Audiences
- [New] Top 15 Emerging TikTok Patterns for 2024
- 2024 Approved Expanding Reach Crafting Winning TikTok Marketing Plans
- [Updated] 2024 Approved How to Film Top-Notch TikTok Videos Like a Pro
- Craft an Enigmatic Profile on TikTok with These Unique Ideas for 2024
- Expert Choices for TikTok Video to GIF Transformations
- [Updated] In 2024, The Cutting-Edge Trendsetters on TikTok
- [New] 2024 Approved Top 10 TikTok Ideas to Make Your Videos Go Viral
- 2024 Approved Culinary Vloggers Top 10 Foodie TikTok Creations
- [New] In 2024, Direct TikTok Download Remove Watermarks, Convert to MP4
- [New] 2024 Approved Top 6 TikTok Money Calculators
- [New] In 2024, 10 Best TikTok Filters to Make Your Videos Stand Out
- In 2024, Make an Impact on LinkedIn The Right Aspect Ratio for Your Videos
- In 2024, Audiovisual Archive System & Voice Recordings
- New Breaking Language Barriers Elevate Your Content with the Best Free Video Translator Apps for 2024
- [New] 2024 Approved Audiophile's Recorder Review
- Integrating Real-Time Collaboration Slack & Filmora's Meeting Guide for 2024
- Updated 2024 Approved The Ultimate List of No-Cost Audio-to-Text Transformation Tools for Multimedia Creators
- Can I use iTools gpx file to catch the rare Pokemon On Oppo A79 5G | Dr.fone
- [Updated] In 2024, Mastering FB Live 4 Key Recording Techniques
- [New] 2024 Approved Navigating the Boundaries of Video Posting on Facebook
- New The Top Free AVI Video Editors You Need to Try for 2024
- In 2024, How to Transfer Contacts from Vivo X100 Pro to iPhone XS/11 | Dr.fone
- Easily Unlock Your Itel A60s Device SIM
- New The Ultimate Guide to iMovie Alternatives on Windows 10 for 2024
- In 2024, Mastering Lock Screen Settings How to Enable and Disable on Realme C53
- Make Your Videos Pop Best Dimensions for Instagram for 2024
- [New] Expert Guide to Instagram Video Sizing for 2024
- VLLO for Mac A Comprehensive Guide to Downloads and Substitutes
- [Updated] Elevate Conference Calls A Guide to 10 Cost-Free Apps
- New 2024 Approved Filmora Watermark Removal Free and Paid Methods Explained
- [Updated] 2024 Approved From Picture-Perfect Videos to Melodious MP3 Files
- [New] In 2024, Unlock Your True Instagram Potential - Followers Guide
- In 2024, What Does Enter PUK Code Mean And Why Did The Sim Get PUK Blocked On Motorola Moto G34 5G Device
- Title: "[New] In 2024, Tailoring Audio Quality Audacity's Path to Noiselessness"
- Author: Gary
- Created at : 2024-05-23 07:58:31
- Updated at : 2024-05-24 07:58:31
- Link: https://tiktok-clips.techidaily.com/new-in-2024-tailoring-audio-quality-audacitys-path-to-noiselessness/
- License: This work is licensed under CC BY-NC-SA 4.0.
