
!["[New] 2024 Approved Vocalizing Video Content on TikTok"](https://www.lifewire.com/thmb/XFuiWPjHcnDr7xS6ElSbJzlvm9w=/400x300/filters:no_upscale():max_bytes(150000):strip_icc()/GettyImages-868647678-7738fe2c895c48ce9ea77b4853f927bb.jpg)
"[New] 2024 Approved Vocalizing Video Content on TikTok"
Vocalizing Video Content on TikTok
How to Use Text to Speech on TikTok - A Complete Guide

Shanoon Cox
Mar 27, 2024• Proven solutions
Ever since its arrival, TikTok has been a dominant force in the world of social media. A mix of lip sync videos, music, and micro-video content, TikTok is extremely popular with Gen Z. Over the years, TikTok has continued to enhance the user experience by adding new features, effects, and guidelines.
Text-to-speech is one of the newest features to be added to the popular platform and it provides an additional way to add something innovative to the video uploads. Announced in December 2020, text to speech on TikTok lets creators put their text over their videos and have a Siri-like voice read it out loud.
TikTok’s text-to-speech feature was added to make the platform accessible to more people by providing an easy way for text to be heard as well as read. Consequently, using this option in video creation is one way that content creators can ensure their videos appeal to a larger number of viewers, while also offering a more comprehensive experience in general.
Since its launch, the feature has been going viral. Many find the automated voice to be a selling point in itself and something that adds a different element to the content. Also, it is a great way to get a message across without actually speaking during the video. No matter the reason it is used, the fact that many are turning to text-to-speech makes it a great addition to TikTok.
Wondering how to get the text to speech on TikTok for your next video? Here’s a detailed insight into this new feature.
- Part 1: What is the Text-To-Speech Feature On TikTok?
- Part 2: What Happened to TikTok Text-To-Speech?
- Part 3: How to Use Text-To-Speech On TikTok?
- Part 4: How to Customize the Text-To-Speech Voice On TikTok?
Part 1: What is the Text-To-Speech Feature On TikTok?
In December 2020, TikTok began rolling out a new text-to-speech feature that automatically turns text into a voiceover as users watch videos that have the feature enabled. The popular social media platform included the new option as an accessibility feature for users with impaired vision, a growing trend for apps integrating voice technology.
Simply put, text to speech on TikTok allows video content creators to convert any piece of text they put on top of their video into a Siri-sounding voice. This means that whatever you type will be read out loud in a robotic tone, eliminating the need for you to narrate. It is a useful way to explain your videos to add context, describe what’s happening, or serve the purpose you see fit.
Source: dexerto.com
There are numerous reasons why you might decide to use this option. Firstly, it’s a great alternative for users who can’t or don’t want to use their own voice in videos. Perhaps you’re shy or just wish to keep an air of anonymity. Or, you might have a speech impediment, or communicate non-vocally or non-verbally. Either way, this feature offers a great alternative way to narrate to viewers.
Also, there are several benefits this feature provides to the audience. Some of your viewers may have poor eye-sight, might struggle to read, or are blind. Using text to speech on TikTok will help you make sure that they can still interact with your video.
Making your video more accessible means that you will get better engagement, which is a win-win situation for you. Lastly, many TikTokers use the text-to-speech option for comedic or dramatic effects.
Part 2: What Happened to TikTok Text-To-Speech?
Recently, TikTok changed the voice on its text-to-speech feature to a new, more energetic, and upbeat voice. This is because of a lawsuit filed by professional voice actor Beverley Standing against ByteDance – the parent company of TikTok. Standing had sued ByteDance in mid-May for using her voice in the text-to-speech setting without her permission.
The lawsuit of the voice actor states that she was hired to work in 2018 for the state-backed Chinese Institute Of Acoustics research body to use in translations and that TikTok has used them without paying her and it has caused damage. She said she hadn’t authorized the use of her voice beyond the use for translations.
The lawsuit concerns the English-language voice used in North America. TikTok videos made prior to the change still feature the old tone. Although TikTok is yet to comment on the new voice or Standing’s lawsuit, the timing of the changes is very suggestive.
Part 3: How to Use Text-To-Speech On TikTok?
Are you puzzled about how to get text to speech on TikTok? Check out the step-by-step guide below without any further ado!
Step 1: Update Your TikTok to The Latest Version
First things first, ensure your TikTok is updated to the latest version so that you have the TikTok text-to-speech function. Many people have the natural human tendency to push updates as far as technologically possible. But, if you are perplexed about how to do text to speech on TikTok, ensure you have the latest version of this social media app before anything else.

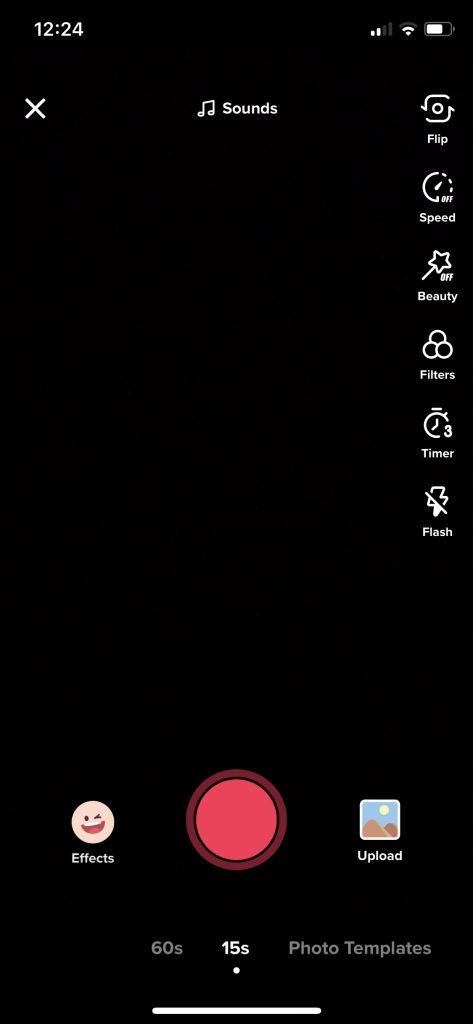
Step 2: Start Recording a Video
Take into account what you wish to say beforehand and have a rough idea of how quickly you want it to be read as the text to speech entry can be as long as your video. After you have the video recording you want to add the text over, press the checkmark on the lower right-hand corner of your app’s screen.
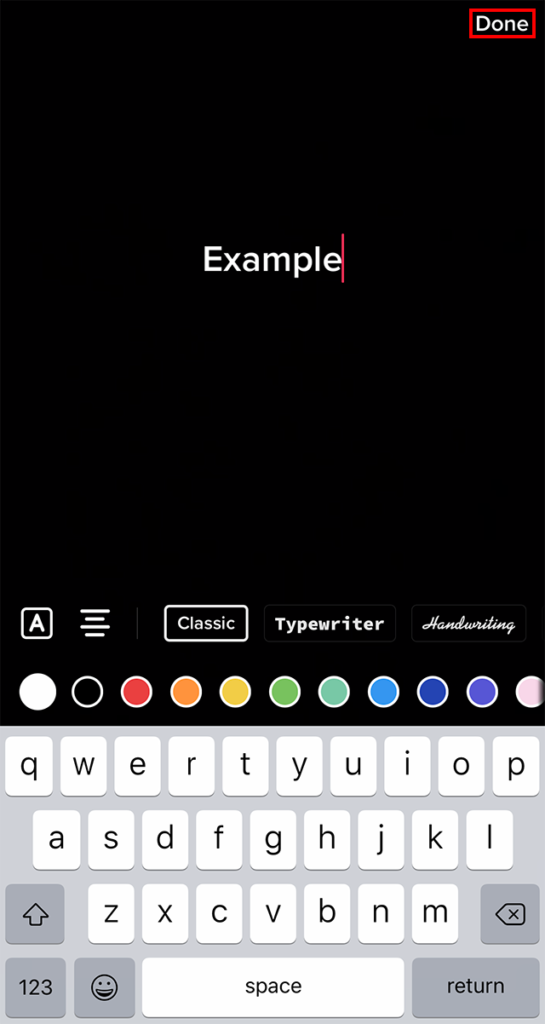
Step 3: Enter Your Text
Next, tap the text icon at the bottom of your screen and type the text you’d like to be read aloud. Ensure you keep in mind the length. Once you have entered the text, tap ‘Done’ in the upper right-hand corner of the screen. This will insert a customizable text box over your video.
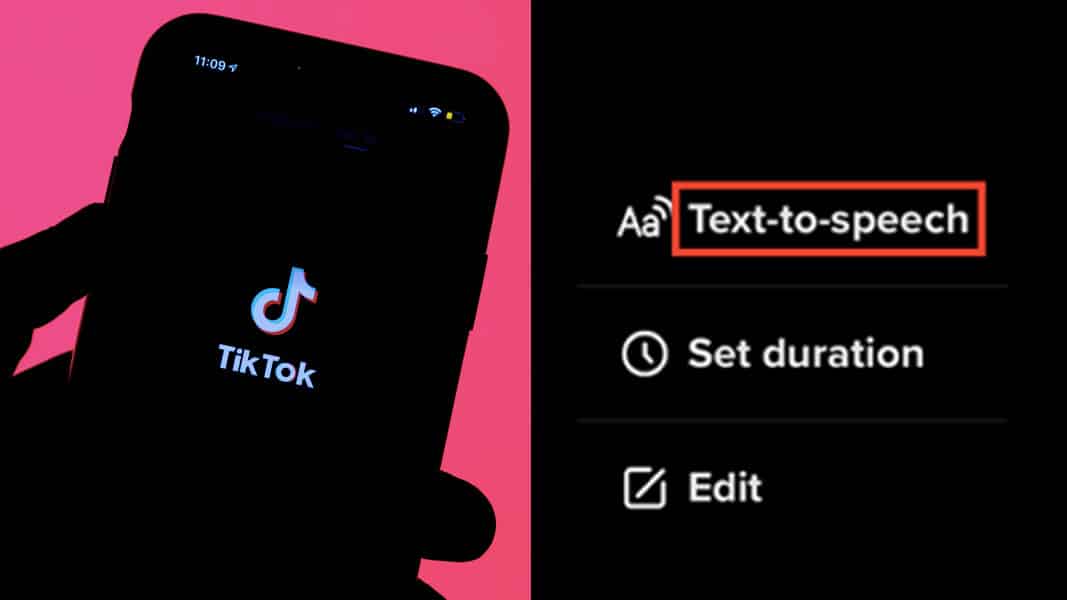
Step 4: Tap On the Text, Choose Text-To-Speech
When it comes to using text to speech on TikTok, this is another crucial step.Once you enter the text into the TikTok video, tap the Textbox and you will have three options: Text-to-Speech, Set Duration, and Edit. Select Text-to-Speech and the inbuilt text-to-speech AI of TikTok will read your text over the video.

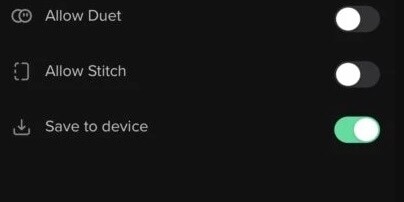
Step 5: Save the Video Locally
It is here that you will venture outside TikTok to change the text-to-speech voice. Once your video is ready in every other way, consider saving it locally on your device and not post it for everyone to see. Ensure the “Save to Device” option is active and you can post it privately.
Step 6: Download A Video Editor with Voice Modifiers
Next, you have to download a video editor – ideally for your smartphone – with voice modifiers. Adding ‘video’ into the search keywords alongside ‘Voice Modifier’ or ‘Voice Changer’ will bring up a list of options. Remember; many voice changers or free editors will either block the option to save edited videos onto the device behind a paywall or leave a watermark.
Step 7: Edit the Video and Resave
Once you have chosen your video editor, launch it and import your saved TikTok video. Here, you can edit the audio just like any other video, and voice modifiers can be applied if the video editing tool you choose has them. Apply different effects you’d like and resave your new and modified TikTok video to your device.
Step 8: Upload as A New Video to TikTok
Open the TikTok app and upload the new, edited TikTok as a singular video directly, without any further edits. You will get a TikTok video with a customized text-to-speech voice for all intents and purposes.
Part 4: How to Customize the Text-To-Speech Voice On TikTok?
Filmora is the powerful and easy-to-use video editing software that lets content creators empower the story and be amazed at results, no matter the skill level. It enables users to create stunning videos effortlessly using a range of editing tools. Filmora offers users a range of video effects like filters, animated elements, graphic overlays, etc.


Some of the key audio editing features of Wondershare Filmora are:
- Add background music
- Audio ducking
- Music beat detection
- Trim audio clips
- Adjust audio
- Split audio
- Fade audio in or out
- Adjust audio volume
- Adjust audio speed
Do you not like the in-built text-to-speech voice? Here’re a few useful tips on how to change the text to speech voice on TikTok:
- Head to the website Uberduck.ai
- Type your desired text into the “speech to synthesize” box
- Select a voice
- Download it as an MP3 file
- Upload the MP3 file to any video editing tool you have and let the video align
- Save and upload this video to TikTok.
Also, other text-to-speech websites like voicegenerator.io and tts.mp3.com are available too.
Conclusion
The text-to-speech on TikTok is one of the longest-running trends on this platform. The possibilities to get innovative with this effect are endless.
When it comes to using this feature on your content, the ultimate thing you will require is a video editor since the inbuilt text to speech isn’t adjustable as per your voice or text. And, if you are on the lookout for the best video editor, Filmora can be the best companion.
Shanoon Cox
Shanoon Cox is a writer and a lover of all things video.
Follow @Shanoon Cox
Shanoon Cox
Mar 27, 2024• Proven solutions
Ever since its arrival, TikTok has been a dominant force in the world of social media. A mix of lip sync videos, music, and micro-video content, TikTok is extremely popular with Gen Z. Over the years, TikTok has continued to enhance the user experience by adding new features, effects, and guidelines.
Text-to-speech is one of the newest features to be added to the popular platform and it provides an additional way to add something innovative to the video uploads. Announced in December 2020, text to speech on TikTok lets creators put their text over their videos and have a Siri-like voice read it out loud.
TikTok’s text-to-speech feature was added to make the platform accessible to more people by providing an easy way for text to be heard as well as read. Consequently, using this option in video creation is one way that content creators can ensure their videos appeal to a larger number of viewers, while also offering a more comprehensive experience in general.
Since its launch, the feature has been going viral. Many find the automated voice to be a selling point in itself and something that adds a different element to the content. Also, it is a great way to get a message across without actually speaking during the video. No matter the reason it is used, the fact that many are turning to text-to-speech makes it a great addition to TikTok.
Wondering how to get the text to speech on TikTok for your next video? Here’s a detailed insight into this new feature.
- Part 1: What is the Text-To-Speech Feature On TikTok?
- Part 2: What Happened to TikTok Text-To-Speech?
- Part 3: How to Use Text-To-Speech On TikTok?
- Part 4: How to Customize the Text-To-Speech Voice On TikTok?
Part 1: What is the Text-To-Speech Feature On TikTok?
In December 2020, TikTok began rolling out a new text-to-speech feature that automatically turns text into a voiceover as users watch videos that have the feature enabled. The popular social media platform included the new option as an accessibility feature for users with impaired vision, a growing trend for apps integrating voice technology.
Simply put, text to speech on TikTok allows video content creators to convert any piece of text they put on top of their video into a Siri-sounding voice. This means that whatever you type will be read out loud in a robotic tone, eliminating the need for you to narrate. It is a useful way to explain your videos to add context, describe what’s happening, or serve the purpose you see fit.
Source: dexerto.com
There are numerous reasons why you might decide to use this option. Firstly, it’s a great alternative for users who can’t or don’t want to use their own voice in videos. Perhaps you’re shy or just wish to keep an air of anonymity. Or, you might have a speech impediment, or communicate non-vocally or non-verbally. Either way, this feature offers a great alternative way to narrate to viewers.
Also, there are several benefits this feature provides to the audience. Some of your viewers may have poor eye-sight, might struggle to read, or are blind. Using text to speech on TikTok will help you make sure that they can still interact with your video.
Making your video more accessible means that you will get better engagement, which is a win-win situation for you. Lastly, many TikTokers use the text-to-speech option for comedic or dramatic effects.
Part 2: What Happened to TikTok Text-To-Speech?
Recently, TikTok changed the voice on its text-to-speech feature to a new, more energetic, and upbeat voice. This is because of a lawsuit filed by professional voice actor Beverley Standing against ByteDance – the parent company of TikTok. Standing had sued ByteDance in mid-May for using her voice in the text-to-speech setting without her permission.
The lawsuit of the voice actor states that she was hired to work in 2018 for the state-backed Chinese Institute Of Acoustics research body to use in translations and that TikTok has used them without paying her and it has caused damage. She said she hadn’t authorized the use of her voice beyond the use for translations.
The lawsuit concerns the English-language voice used in North America. TikTok videos made prior to the change still feature the old tone. Although TikTok is yet to comment on the new voice or Standing’s lawsuit, the timing of the changes is very suggestive.
Part 3: How to Use Text-To-Speech On TikTok?
Are you puzzled about how to get text to speech on TikTok? Check out the step-by-step guide below without any further ado!
Step 1: Update Your TikTok to The Latest Version
First things first, ensure your TikTok is updated to the latest version so that you have the TikTok text-to-speech function. Many people have the natural human tendency to push updates as far as technologically possible. But, if you are perplexed about how to do text to speech on TikTok, ensure you have the latest version of this social media app before anything else.
Step 2: Start Recording a Video
Take into account what you wish to say beforehand and have a rough idea of how quickly you want it to be read as the text to speech entry can be as long as your video. After you have the video recording you want to add the text over, press the checkmark on the lower right-hand corner of your app’s screen.
Step 3: Enter Your Text
Next, tap the text icon at the bottom of your screen and type the text you’d like to be read aloud. Ensure you keep in mind the length. Once you have entered the text, tap ‘Done’ in the upper right-hand corner of the screen. This will insert a customizable text box over your video.
Step 4: Tap On the Text, Choose Text-To-Speech
When it comes to using text to speech on TikTok, this is another crucial step.Once you enter the text into the TikTok video, tap the Textbox and you will have three options: Text-to-Speech, Set Duration, and Edit. Select Text-to-Speech and the inbuilt text-to-speech AI of TikTok will read your text over the video.
Step 5: Save the Video Locally
It is here that you will venture outside TikTok to change the text-to-speech voice. Once your video is ready in every other way, consider saving it locally on your device and not post it for everyone to see. Ensure the “Save to Device” option is active and you can post it privately.
Step 6: Download A Video Editor with Voice Modifiers
Next, you have to download a video editor – ideally for your smartphone – with voice modifiers. Adding ‘video’ into the search keywords alongside ‘Voice Modifier’ or ‘Voice Changer’ will bring up a list of options. Remember; many voice changers or free editors will either block the option to save edited videos onto the device behind a paywall or leave a watermark.
Step 7: Edit the Video and Resave
Once you have chosen your video editor, launch it and import your saved TikTok video. Here, you can edit the audio just like any other video, and voice modifiers can be applied if the video editing tool you choose has them. Apply different effects you’d like and resave your new and modified TikTok video to your device.
Step 8: Upload as A New Video to TikTok
Open the TikTok app and upload the new, edited TikTok as a singular video directly, without any further edits. You will get a TikTok video with a customized text-to-speech voice for all intents and purposes.
Part 4: How to Customize the Text-To-Speech Voice On TikTok?
Filmora is the powerful and easy-to-use video editing software that lets content creators empower the story and be amazed at results, no matter the skill level. It enables users to create stunning videos effortlessly using a range of editing tools. Filmora offers users a range of video effects like filters, animated elements, graphic overlays, etc.
Some of the key audio editing features of Wondershare Filmora are:
- Add background music
- Audio ducking
- Music beat detection
- Trim audio clips
- Adjust audio
- Split audio
- Fade audio in or out
- Adjust audio volume
- Adjust audio speed
Do you not like the in-built text-to-speech voice? Here’re a few useful tips on how to change the text to speech voice on TikTok:
- Head to the website Uberduck.ai
- Type your desired text into the “speech to synthesize” box
- Select a voice
- Download it as an MP3 file
- Upload the MP3 file to any video editing tool you have and let the video align
- Save and upload this video to TikTok.
Also, other text-to-speech websites like voicegenerator.io and tts.mp3.com are available too.
Conclusion
The text-to-speech on TikTok is one of the longest-running trends on this platform. The possibilities to get innovative with this effect are endless.
When it comes to using this feature on your content, the ultimate thing you will require is a video editor since the inbuilt text to speech isn’t adjustable as per your voice or text. And, if you are on the lookout for the best video editor, Filmora can be the best companion.
Shanoon Cox
Shanoon Cox is a writer and a lover of all things video.
Follow @Shanoon Cox
Pro Tips for Precise and Popular TikTok Reactions in Filmora
How to Make TikTok Reaction Videos Easily in 2 Ways
Shanoon Cox
Mar 27, 2024• Proven solutions
With all the videos of different moods and categories available on the platform, TikTok’s reaction is something that makes the footage more engaging. Available for both iOS and Android platforms, TikTok allows you to record, edit , and compile a video of up to 60 seconds, and apply a plethora of filters and animation effects to them along with adding relevant music to awe your audience.
Considering this, here you will learn how to make TikTok reaction videos with ease from within the app itself, and if that’s not enough, using one of the best and most efficient programs available in the market that can even allow you to add unique effects to the reactions you create.
- Part 1: How to Make React Videos on TikTok
- Part 2: How to Use Snap Filmora to Make TikTok Reaction Videos
Bonus: Create A More Attractive Video with Human Segmentation Effect
The human segmentation effect under AI Portrait allows you to isolate people from video background even without a green screen, and then you can composite it to make a reaction video easily. Watch the video tutorial below to find out more details.
Want to read the texts instead of watching videos? Check the complete guide to making a reaction video in 3 ways .
Part 1: How to React to a TikTok Video
After being equipped with all the worldly knowledge about TikTok reaction videos, you can follow the steps given below to learn how to react to the footage created by other people:
1. Tap Share and Record Your Reaction
Start TikTok, play the video you want to react on, tap the Share icon from the lower-right area, and tap the React option from the Share to menu. Tap Flip from the top-right corner of the Camera screen to switch between the front and rear camera as needed, optionally tap the Mic icon to disable or enable voice and system audio capture, drag and reposition React window according to the source footage, and tap the Record button from the bottom to start shooting your TikTok reaction. Wait while the source clip and your recording process are complete successfully before moving forward to the next step.

2. Apply Filters
Tap the Filters icon from the top-right corner, tap to pick a filter from those available at the bottom, and tap anywhere on the screen to accept the one you selected and to get back to the previous window.

3. Manage Audio
Tap the Mixer icon from the upper-right corner of the screen, drag the My Voice and Soundtrack Volume sliders to manage your voice recording and the internal audio respectively, and tap Done to save the changes once you’re through with the modifications. Back on the previous window, tap Next from the bottom-right corner.

4. Publish the Video
Tap the Who can view this video option to manage your reaction’s visibility settings (optional). Tap the Save to device toggle switch to prevent TikTok reaction from being stored on your mobile’s storage (optional). Next, tap the Post button from the bottom-right corner to publish the video to TikTok.

More creative tricks about TikTok video: Clone Yourself in TikTok
Part 2: How to Make Reaction Videos with Filmora
Even though you can make TikTok reaction videos using its own filters and audio mixing tools that work pretty well under ideal conditions, if you are a perfectionist and like precision in anything you do or create, you need a dedicated program that has been designed specifically for the purpose.
Although several such tools are available in the market and can be easily downloaded and used, the best among them is Filmora by Wondershare. Wondershare Filmora is an industry-standard production and post-production tool for both Mac and Windows PCs that the majority of users prefer over its competitors such as Adobe Premiere Pro, Final Cut Pro X, etc. This is because Filmora offers simple UI, is less resource-intensive, and is able to render the outputs significantly faster.
You can learn how to make TikTok reaction videos using Wondershare Filmora by following the steps given below:
Note: Before proceeding, make sure that you have already copied the source (and the reaction) video(s) from your smartphone to your computer.
1. Create New Project and Set Preferences
Start Wondershare Filmora on your Windows or Mac PC, go to File > New Project and click 9:16 (Portrait) from the submenu that appears.
Click Split Screen from the standard toolbar at the top, hover mouse to the screen type preset you want to use, click the + ( Add to Project ) icon that appears at the bottom-right corner of the thumbnail, and click OK from the bottom-right corner once the preset is added to the Timeline.

2. Import and Add Video(s) Preview/Timeline
Click the Media button from the standard toolbar, click anywhere inside the Media window at the upper-left corner, and when the Open box comes up, select and import the video file(s) you want to participate in the TikTok reaction. Alternatively, you can also click Record from below the standard toolbar, and choose any of the options to record your own video or voice right from within Wondershare Filmora itself.
Next, click and drag each of the imported videos to their corresponding screen sections in the Preview window in the upper-right area. Notice how the files are automatically added to the Timeline at the bottom.
3. Add Elements and Titles
Click Elements from the standard toolbar, hover mouse to the element you want to add to the reaction, click the + icon that appears at the center of the thumbnail, and reposition the element in the Timeline to match the duration with that of the reaction you are creating.

4. Export the Reaction

Click EXPORT from the top-middle section of the interface, go to the Local tab from the top of the Export box that appears next, select your preferred format from the left bar, optionally choose a destination folder from the right window, optionally click SETTINGS to fine-tune the output preferences as needed, and click EXPORT from the bottom-right corner to export the TikTok reaction. Or, you can save it in the settings perfect for iPhone or another device.
Below is a sample reaction video made with Filmora, you can do much better than that for your TikTok account:
Besides using Filmora to edit reaction videos with the split-screen presets, you can also use some other video editing software to create a reaction video . Filmora can empower your video creation with more creativity, watch the video below and download Filmora to try.
Conclusion
A TikTok reaction enables you to make the source videos more fun and entertaining. Luckily the app itself has a “React” button that helps you create TikTok reaction videos with merely a few simple taps. However, if you feel that the built-in options are not as robust as they should be, a third-party program like Wondershare Filmora is something you would definitely love to try your hands on as the software is not only easy to use, it is also lightweight, and doesn’t put any overhead on your computer hardware.
Shanoon Cox
Shanoon Cox is a writer and a lover of all things video.
Follow @Shanoon Cox
Shanoon Cox
Mar 27, 2024• Proven solutions
With all the videos of different moods and categories available on the platform, TikTok’s reaction is something that makes the footage more engaging. Available for both iOS and Android platforms, TikTok allows you to record, edit , and compile a video of up to 60 seconds, and apply a plethora of filters and animation effects to them along with adding relevant music to awe your audience.
Considering this, here you will learn how to make TikTok reaction videos with ease from within the app itself, and if that’s not enough, using one of the best and most efficient programs available in the market that can even allow you to add unique effects to the reactions you create.
- Part 1: How to Make React Videos on TikTok
- Part 2: How to Use Snap Filmora to Make TikTok Reaction Videos
Bonus: Create A More Attractive Video with Human Segmentation Effect
The human segmentation effect under AI Portrait allows you to isolate people from video background even without a green screen, and then you can composite it to make a reaction video easily. Watch the video tutorial below to find out more details.
Want to read the texts instead of watching videos? Check the complete guide to making a reaction video in 3 ways .
Part 1: How to React to a TikTok Video
After being equipped with all the worldly knowledge about TikTok reaction videos, you can follow the steps given below to learn how to react to the footage created by other people:
1. Tap Share and Record Your Reaction
Start TikTok, play the video you want to react on, tap the Share icon from the lower-right area, and tap the React option from the Share to menu. Tap Flip from the top-right corner of the Camera screen to switch between the front and rear camera as needed, optionally tap the Mic icon to disable or enable voice and system audio capture, drag and reposition React window according to the source footage, and tap the Record button from the bottom to start shooting your TikTok reaction. Wait while the source clip and your recording process are complete successfully before moving forward to the next step.
2. Apply Filters
Tap the Filters icon from the top-right corner, tap to pick a filter from those available at the bottom, and tap anywhere on the screen to accept the one you selected and to get back to the previous window.
3. Manage Audio
Tap the Mixer icon from the upper-right corner of the screen, drag the My Voice and Soundtrack Volume sliders to manage your voice recording and the internal audio respectively, and tap Done to save the changes once you’re through with the modifications. Back on the previous window, tap Next from the bottom-right corner.
4. Publish the Video
Tap the Who can view this video option to manage your reaction’s visibility settings (optional). Tap the Save to device toggle switch to prevent TikTok reaction from being stored on your mobile’s storage (optional). Next, tap the Post button from the bottom-right corner to publish the video to TikTok.
More creative tricks about TikTok video: Clone Yourself in TikTok
Part 2: How to Make Reaction Videos with Filmora
Even though you can make TikTok reaction videos using its own filters and audio mixing tools that work pretty well under ideal conditions, if you are a perfectionist and like precision in anything you do or create, you need a dedicated program that has been designed specifically for the purpose.
Although several such tools are available in the market and can be easily downloaded and used, the best among them is Filmora by Wondershare. Wondershare Filmora is an industry-standard production and post-production tool for both Mac and Windows PCs that the majority of users prefer over its competitors such as Adobe Premiere Pro, Final Cut Pro X, etc. This is because Filmora offers simple UI, is less resource-intensive, and is able to render the outputs significantly faster.
You can learn how to make TikTok reaction videos using Wondershare Filmora by following the steps given below:
Note: Before proceeding, make sure that you have already copied the source (and the reaction) video(s) from your smartphone to your computer.
1. Create New Project and Set Preferences
Start Wondershare Filmora on your Windows or Mac PC, go to File > New Project and click 9:16 (Portrait) from the submenu that appears.
Click Split Screen from the standard toolbar at the top, hover mouse to the screen type preset you want to use, click the + ( Add to Project ) icon that appears at the bottom-right corner of the thumbnail, and click OK from the bottom-right corner once the preset is added to the Timeline.
2. Import and Add Video(s) Preview/Timeline
Click the Media button from the standard toolbar, click anywhere inside the Media window at the upper-left corner, and when the Open box comes up, select and import the video file(s) you want to participate in the TikTok reaction. Alternatively, you can also click Record from below the standard toolbar, and choose any of the options to record your own video or voice right from within Wondershare Filmora itself.
Next, click and drag each of the imported videos to their corresponding screen sections in the Preview window in the upper-right area. Notice how the files are automatically added to the Timeline at the bottom.
3. Add Elements and Titles
Click Elements from the standard toolbar, hover mouse to the element you want to add to the reaction, click the + icon that appears at the center of the thumbnail, and reposition the element in the Timeline to match the duration with that of the reaction you are creating.
4. Export the Reaction
Click EXPORT from the top-middle section of the interface, go to the Local tab from the top of the Export box that appears next, select your preferred format from the left bar, optionally choose a destination folder from the right window, optionally click SETTINGS to fine-tune the output preferences as needed, and click EXPORT from the bottom-right corner to export the TikTok reaction. Or, you can save it in the settings perfect for iPhone or another device.
Below is a sample reaction video made with Filmora, you can do much better than that for your TikTok account:
Besides using Filmora to edit reaction videos with the split-screen presets, you can also use some other video editing software to create a reaction video . Filmora can empower your video creation with more creativity, watch the video below and download Filmora to try.
Conclusion
A TikTok reaction enables you to make the source videos more fun and entertaining. Luckily the app itself has a “React” button that helps you create TikTok reaction videos with merely a few simple taps. However, if you feel that the built-in options are not as robust as they should be, a third-party program like Wondershare Filmora is something you would definitely love to try your hands on as the software is not only easy to use, it is also lightweight, and doesn’t put any overhead on your computer hardware.
Shanoon Cox
Shanoon Cox is a writer and a lover of all things video.
Follow @Shanoon Cox
Also read:
- [Updated] In 2024, Pioneering TikTok Ads Trends & Proven Effective Examples
- In 2024, Elevating TikTok Visuals with Monumental Head Effects
- [New] Ultimate Guide The Top 6 No-Cost, Web Accessible MP3 From TikTok Apps (6)
- [Updated] 2024 Approved From Beginner to Expert The Complete Guide to Slow Mo in TikTok
- Stand-Out TikTok Profiles Innovative Frame Design Ideas
- [New] 2024 Approved Extraordinary Escapades The Ultimate List of Strange TikTok Titles
- 2024 Approved Worldwide Tastebuds Tasty Food Challenges
- [New] Elude the Invisible Threat Unshadowbanned on TikTok for 2024
- [New] Dance Away Worries with These 20 Soothing Country Hits (TikTok Edition)
- [New] 2024 Approved TikTok Transformation Hacks Best Filter Strategies Uncovered
- [Updated] Secrets of Creating a Bespoke TikTok Hashtag for 2024
- [Updated] Innovative Approaches to TikTok Lives From Desktop Devices
- [Updated] 2024 Approved From Novice to Pro Crafting Excellent Slow Mo Videos in TikTok
- [New] Tik-Hop Waves Unveiling Today's Viral Rap Sounds
- [Updated] In 2024, Refine Content Creation High-End Watermark Erasers
- [Updated] In 2024, Harnessing Your Creative Energy The Path to Wealth on TikTok
- [New] The Vibrant Sphere of TikTok Animation & Memes for 2024
- [Updated] Essential Guide to the Best TikTok-to-GIF Convertors Listed
- Instant Tune Livestreams on Douyin
- [Updated] In 2024, Zen-Zapped Grooves Top 20 Soothing Country Music for Easy Dancing (TikTok)
- [Updated] 2024 Approved Win Over the TikTok World Discovering Its Most Popular Tags
- In 2024, Foodie Fads The #Tiktok Treat that Took Over
- [Updated] 2024 Approved Secrets to Successful TikTok Creation Using Android, PC
- [Updated] Elevate Your Profile The Best 30 TikTok Handle Choices
- Fresh PFP Designs for Captivating TikTok Profiles for 2024
- [Updated] 2024 Approved How to Make TikTok Dance on Mac
- In 2024, Revamp Your TikTok Strategy with These 10 Analytic Aids
- [Updated] Revolutionize Your Reach on TikTok's Hot List
- [Updated] Enhancing Heads in TikTok Videos 3 Efficient Techniques
- Elite Peer-to-Peer Messaging Services
- [New] Flawless Download of TikTok Videos, iPhone Users Rejoice for 2024
- 2024 Approved Mastering Pre-Upload TikTok's Copyright Guidelines
- [New] Perfect Your Projects TopiMarker for iPhone & Android for 2024
- 2024 Approved Optimize TikTok Videos for Snappy Playback Times
- [Updated] 3 Innovative Methods for Large Head Effects in TikTok Videos for 2024
- Fashion Your Snaps Top Trendy Augmentations Revealed
- Discord's Broadcasting Features Unveiled A Step-by-Step Guide
- Stand-Out TikTok Profiles Innovative Frame Design Ideas for 2024
- 2024 Approved Leading Edits The 10 Best Video Apps
- [Updated] In 2024, Mastering Voice Modification on TikTok A Step-by-Step Guide
- In 2024, Humor Haven Identifying Rising Comedy Icons in TikTok
- Quick Guide to Adding Snapchat on Your MacBook
- [New] 2024 Approved Critical Considerations for Successful TikTok Use on macOS
- 2024 Approved Masterful Media Moments Innovative Bio Ideas for TikTok Audience Expansion via Filmora
- [New] In 2024, Anime Aesthetics Top 20 Visual Elements on TikTok
- [Updated] 2024 Approved Gastronomy Galore Cross-Country Foodie Favorites on TikTok
- [New] Capture the Moment Join the Top 10 Trending TikTok Creations
- 2024 Approved Capture Hearts on TikTok Designed Templates for Visual Impact
- [New] 2024 Approved Skip to the Good Part Tips for TikTok
- [New] 2024 Approved Achieving Video Greatness on TikTok with Smart Use of Pre-Made Templates
- 2024 Approved Streamlining Sound Sync How to Implement Audio Ducking for Dynamic Volume Control in PowerDirector
- New 2024 Approved Flip Videos Online for Free Best Tools and Websites
- [Updated] 2024 Approved Essential Leisure Ideal Screen-Time Solutions
- 2024 Approved Integrating APIs Expanding Functionality Beyond Basic HTML
- New 2024 Approved The Ultimate List 10 Timecode Calculators for Film and Video Pros
- In 2024, Expert Advice Capturing and Storing Twitter Vids on Phones
- Edit and Send Fake Location on Telegram For your Nubia Z50 Ultra in 3 Ways | Dr.fone
- In 2024, How to Unlock iPhone 7 Plus, Apples New iPhone | Dr.fone
- New 2024 Approved Top 10 Linux Alternatives to Adobe Premiere (Updated)
- Bypassing Google Account With vnROM Bypass For Xiaomi Mix Fold 3
- Maximize Zoom Audio Clarity Methods & Tips Shared
- [Updated] 2024 Approved Easy Steps to the Top Gaming Video Editing Programs
- [New] In 2024, The Insta-Ode Selecting Song Lyrics and Beats for Vids
- In 2024, Best Realme GT 5 Pro Pattern Lock Removal Tools Remove Android Pattern Lock Without Losing Data
- [New] In 2024, Master the Art of Meeting Management The Finest 10 Free Recorders for Slack
- In 2024, The Ultimate Guide to Unlocking Your Apple iPhone 14 on MetroPCS
- 3 Things You Must Know about Fake Snapchat Location On OnePlus 12 | Dr.fone
- [Updated] 2024 Approved Shine a Light The 12 Ultimate Fixes for Making Facebook Videos Visible Again
- New 5 Best Adobe Animate Courses & Classes | Beginners Complete Tutorial
- In 2024, Extract Focus From Logitech Cam Feed
- 4 Solutions to Fix Unfortunately Your App Has Stopped Error on Poco F5 5G | Dr.fone
- [Updated] Step-by-Step Tutorial for Efficient Video Capturing via ZD
- In 2024, 4 Feasible Ways to Fake Location on Facebook For your Vivo Y55s 5G (2023) | Dr.fone
- All You Need To Know About Mega Greninja For Oppo Find X6 Pro | Dr.fone
- [Updated] Superior Mac GIF Enhancer for 2024
- New Multiple Ways How To Remove iCloud Activation Lock From your iPhone 14 Pro
- 2024 Approved 10 Superior Tools for FBX File Recording
- iSpoofer is not working On Vivo V29 Pro? Fixed | Dr.fone
- How To Fix Part of the Touch Screen Not Working on ZTE Nubia Flip 5G | Dr.fone
- 3 Easy Solutions to Hard Reset Realme Narzo N55 | Dr.fone
- [Updated] In 2024, All About 2023'S Twitter Live Vids
- [New] 2024 Approved Elite Screen Recording Apps of 2023 - Expert Picks
- How to Unlock Apple iPhone 15?
- Updated 2024 Approved Free and Fabulous Video Editing Software for 32-Bit Windows
- New Vegas Pro Too Expensive? Check Out These 10 Affordable Mac Video Editing Software for 2024
- Updated 2024 Approved Unearthing the Echoes From Whistling Sounds
- Best Mobile Apps for Recording and Editing Reaction Videos
- Different Methods for Resetting Samsung Galaxy XCover 6 Pro Tactical Edition Phones with Screen Locked and Not | Dr.fone
- In 2024, How To Do Samsung Galaxy M34 5G Screen Sharing | Dr.fone
- Title: "[New] 2024 Approved Vocalizing Video Content on TikTok"
- Author: Gary
- Created at : 2024-05-23 08:17:48
- Updated at : 2024-05-24 08:17:48
- Link: https://tiktok-clips.techidaily.com/new-2024-approved-vocalizing-video-content-on-tiktok/
- License: This work is licensed under CC BY-NC-SA 4.0.
