
!["[New] 2024 Approved Techniques to Purify Your Recordings in Audacity"](https://www.lifewire.com/thmb/NJLgSOS-_Qq21qgfdWY713OPYzI=/400x300/filters:no_upscale():max_bytes(150000):strip_icc():format(webp)/GettyImages-527803604-ad6f389c89ff4be1b953a3c2cdc64c09.jpg)
"[New] 2024 Approved Techniques to Purify Your Recordings in Audacity"
Techniques to Purify Your Recordings in Audacity
The most frequent request you’ll get from video makers is to eliminate irritating noises like rumbling or humming from an original clip. Almost all of the time, capturing high-quality audio during filming is challenging since the conversation is often hard to hear or is made unclear due to surrounding noises, such as the dreadful air conditioners or fans.
To get rid of all these awful noises, this Audacity Noise Reduction feature will serve you a significant purpose in removing unwanted background noise for your future videos. Without further ado, let’s get started!
In this article
01 Things You Need to Prepare for Background Noise Reduction
02 How to Remove Background Noise in Audacity?
03 Why is Audacity Noise Reduction Not Working?
04 How to Prevent Background Noise in Audio Recording?
05 How to Remove Background Noise in Filmora?
Part 1: Things You Need to Prepare for Background Noise Reduction
Here are few things that you need to consider before you apply the noise reduction to your clips:
1. Noise Sample
A decent sample of the noise you wish to eliminate is perhaps the most crucial aspect of the Audacity remove noise procedure.
This will be used by Audacity to understand the noise and build a noise profile. The noise recording should last for a fair amount of time and be devoid of any other noises.
2. Avoid Copy Pasting Tiny Noise Section in Your Spoken Phrases
When you have a tiny part of noise between your stated words on your audio, please don’t copy/paste it to make a more significant piece of sound for Audacity to examine.
You would not be supplying Audacity with any more information that will help it generate a decent noise profile. The noise profile is what enables Audacity to tell the difference between speech and noise.
3. Minimum 2048 Data Samples Required
To build a noise profile, the Noise Reduction function requires a minimum of 2048 sample data. An audio file with a sampling frequency of 44.1kHz is roughly five hundredths of a second.
Note that this is the minor sound level that Audacity needs to generate a noise profile; however, should you supply a larger sample of the noise, Audacity can typically perform a great job of producing a suitable noise profile. As a result, attempt to capture a few seconds of background noises wherever possible.
4. Establish Recording Level and Record “Silence”
Setting your audio volume and capturing some “quiet” prior to speaking is the best way to achieve this. Instead, when you’ve finished talking, keep your camera/recorder going for a few moments.
Don’t move or create any sounds while capturing the background noises, and keep an ear open for any other noises. You only need to capture the ambient noise for a few moments; two to five seconds will suffice.
Part 2: How to Remove Background Noise in Audacity on Windows and Mac?
Whether you are using Windows or macOS, we will show you a step-by-step process to achieve your results using both software in this part of Audacity remove background music guide.
Remove background noise in Audacity on Windows
Step 1: On your recording, select a few moments of sound. Any segment of noise that incorporates other noises should be avoided.

Step 2: From the Effect menu, select Noise Reduction.

Step 3: Select the Get Noise Profile option whenever the Noise Reduction effect screen appears.

Note: Choose whether to implement the noise removal to the entire waveforms or only a portion of it.
Step 4: To access the Noise Reduction effects window, go to Effects > Noise Reduction. Raise the level of noise reduction progressively while previewing the result.

Step 5: Head over to the File section to Export and Save the result. Audacity does not save sound clips when you select Save Project; instead, you must choose Export. Select the file type you want to store and the place wherever you can save it. Select Save after giving the File Name.

Remove background noise in Audacity on Mac
Step 1: Create a room tone-containing audio file. When you don’t have a separate track for room tone, use a recording with a few moments of quiet in it. Click-and-drag to select a segment with a few minutes of silence using the Selection Tool.

Step 2: Select Noise Reduction from the Effects tab. Select the Get Noise Profile tab in the new tab under Step 1. The screen will shut, and Audacity will take noise profile samples of the indicated area.

Step 3: Click-and-drag to select the whole file, which requires noise reduction with the Selection Tool. To re-open the function, go to the Effect tab and pick Noise Reduction. Make modifications to the following parameters under Step 2:
- Reduce and Residue
- Frequency Smoothing (bands)
- Sensitivity
- Noise Reduction

Step 4: To listen to how the chosen file will look with the selected parameters, select Preview. Re-adjust until you have a sound noise reduction with no interference. When you’re finished, select Reduce and click OK.
Part 3: Why is Audacity Noise Reduction Not Working?
It’s possible that the Noise Reduction function isn’t letting you mop up your recording since your audio isn’t appropriate for it. The disturbance must be continuous, not random or fluctuating, to work for Audacity’s Noise Reduction function.
For example, the Noise Reduction function will not assist if your audio was made in a busy environment with unique noises such as background chatter, random traffic noises, or in an exhibition space or museum. The Noise Reduction feature in Audacity isn’t meant to cope with that kind of distortion. You’ll need to alter your recording approach if you’re capturing voice in either of those situations.
Under the following situations, the Audacity Noise Reduction function might underperform.
- Particular noise in the background, including traffic or people.
- When the harmonics of the sound and voice are comparable.
- There is sound variance where there is fluctuation in the noise.
- The volume of the voice is comparable to or lower than that of the background noise.
- When the noise is irregular or changeable rather than continuous.
- The loudness is deafening.
- The sound is a single click or pop.
Part 4: How to Prevent Background Noise in Audio Recording?
Although Audacity allows eliminating noise very simply, it is still an additional level that takes time to refine your podcast production. These pointers can help you avoid the necessity for noise reduction and cut down on the amount of time you spend processing.
1. Reduce the Computer Fan Noise
Whenever computers become too heated, they can produce a lot of noise. You may limit the amount of software that runs and position your mic away from the keyboard to help lessen this impact and avoid the fan from coming on.
However, even if you observe all of these guidelines, undesired recording sounds may still appear in your program. Fortunately, contemporary software makes this problem quite simple to resolve.
2. Reduce the Gain and Get Close to the Mic
Reduce the gain (sensitivity of the microphone) and go nearer to it. Talking straight into the microphone won’t distort your audio if you reduce the gain, and that would assist your microphone in concentrating on scooping up your voice’s tone.
Bonus Tip: Set your recorder’s (or DAW’s) sensitivity such that your speech peaks between -12 and -10db.
3. Utilize a Versatile Microphone
Condenser and dynamic microphones are the two most common types of podcast microphones. Condenser microphones are significantly more sensitive instruments meant to take up average atmospheric noise, whereas dynamic microphones have a narrower frequency range, picking up fewer ambient noises.
4. Optimize Your Recording Environment
The most significant and most crucial aspect of your podcasts’ sound quality is where you capture it. To optimize your personal podcasting space, we recommend choosing a peaceful, compact area away from HVAC systems, vehicles, external hard drives, background sound, motors, and other distractions. You may also increase the tone of your room by using natural sound absorbents such as curtains, rugs, carpets, and sofas.
Part 5: How to Remove Background Noise in Filmora?
Although there is a lot of software available to eliminate ambient noise, we highly suggest Wondershare Filmora Video Editor to edit audio and video in one place.
In addition to the standard audio editing capabilities, the recently redesigned Filmora currently includes enhanced waveforms, volume Keyframing , peak metering, and audio transitions, giving you a better audio editing interface.
For Win 7 or later (64-bit)
For macOS 10.12 or later
Filmora Video Editor will quickly remove ambient sound from both sound/video. You may also remove the sound from the video with this simple video editor, use the Audio Equalizer or Audio Mixer functions to modify the audio further, and then Export and save the audio in an Mp3 file. Here are the detailed steps:
Step 1: In the Wondershare Filmora Timeline menu, Import your footage. Trim the footage after previewing it and deleting the sections you don’t want to retain.

Step 2: To eliminate the ambient noise immediately, double-click on the video file, and go to the Audio panel to select the Remove Background Noise option. You will find that the background noise is removed automatically.

Step 3: After checking the results, select Export to download the noise-reduced clip to your desktop or upload it immediately to YouTube or Vimeo.

Conclusion
Well, there you have it. In this Audacity Remove Background Noise guide, we have reviewed every possible method you can adopt to get rid of the unnecessary background noise in the Audacity. And if the desired results are still not achieved, we highly recommend using the Wondershare Filmora editing software. Not only will it help you remove the unwanted ambient noise, but it will also allow you to customize your audio or video file further.
02 How to Remove Background Noise in Audacity?
03 Why is Audacity Noise Reduction Not Working?
04 How to Prevent Background Noise in Audio Recording?
05 How to Remove Background Noise in Filmora?
Part 1: Things You Need to Prepare for Background Noise Reduction
Here are few things that you need to consider before you apply the noise reduction to your clips:
1. Noise Sample
A decent sample of the noise you wish to eliminate is perhaps the most crucial aspect of the Audacity remove noise procedure.
This will be used by Audacity to understand the noise and build a noise profile. The noise recording should last for a fair amount of time and be devoid of any other noises.
2. Avoid Copy Pasting Tiny Noise Section in Your Spoken Phrases
When you have a tiny part of noise between your stated words on your audio, please don’t copy/paste it to make a more significant piece of sound for Audacity to examine.
You would not be supplying Audacity with any more information that will help it generate a decent noise profile. The noise profile is what enables Audacity to tell the difference between speech and noise.
3. Minimum 2048 Data Samples Required
To build a noise profile, the Noise Reduction function requires a minimum of 2048 sample data. An audio file with a sampling frequency of 44.1kHz is roughly five hundredths of a second.
Note that this is the minor sound level that Audacity needs to generate a noise profile; however, should you supply a larger sample of the noise, Audacity can typically perform a great job of producing a suitable noise profile. As a result, attempt to capture a few seconds of background noises wherever possible.
4. Establish Recording Level and Record “Silence”
Setting your audio volume and capturing some “quiet” prior to speaking is the best way to achieve this. Instead, when you’ve finished talking, keep your camera/recorder going for a few moments.
Don’t move or create any sounds while capturing the background noises, and keep an ear open for any other noises. You only need to capture the ambient noise for a few moments; two to five seconds will suffice.
Part 2: How to Remove Background Noise in Audacity on Windows and Mac?
Whether you are using Windows or macOS, we will show you a step-by-step process to achieve your results using both software in this part of Audacity remove background music guide.
Remove background noise in Audacity on Windows
Step 1: On your recording, select a few moments of sound. Any segment of noise that incorporates other noises should be avoided.
Step 2: From the Effect menu, select Noise Reduction.
Step 3: Select the Get Noise Profile option whenever the Noise Reduction effect screen appears.
Note: Choose whether to implement the noise removal to the entire waveforms or only a portion of it.
Step 4: To access the Noise Reduction effects window, go to Effects > Noise Reduction. Raise the level of noise reduction progressively while previewing the result.
Step 5: Head over to the File section to Export and Save the result. Audacity does not save sound clips when you select Save Project; instead, you must choose Export. Select the file type you want to store and the place wherever you can save it. Select Save after giving the File Name.
Remove background noise in Audacity on Mac
Step 1: Create a room tone-containing audio file. When you don’t have a separate track for room tone, use a recording with a few moments of quiet in it. Click-and-drag to select a segment with a few minutes of silence using the Selection Tool.
Step 2: Select Noise Reduction from the Effects tab. Select the Get Noise Profile tab in the new tab under Step 1. The screen will shut, and Audacity will take noise profile samples of the indicated area.
Step 3: Click-and-drag to select the whole file, which requires noise reduction with the Selection Tool. To re-open the function, go to the Effect tab and pick Noise Reduction. Make modifications to the following parameters under Step 2:
- Reduce and Residue
- Frequency Smoothing (bands)
- Sensitivity
- Noise Reduction
Step 4: To listen to how the chosen file will look with the selected parameters, select Preview. Re-adjust until you have a sound noise reduction with no interference. When you’re finished, select Reduce and click OK.
Part 3: Why is Audacity Noise Reduction Not Working?
It’s possible that the Noise Reduction function isn’t letting you mop up your recording since your audio isn’t appropriate for it. The disturbance must be continuous, not random or fluctuating, to work for Audacity’s Noise Reduction function.
For example, the Noise Reduction function will not assist if your audio was made in a busy environment with unique noises such as background chatter, random traffic noises, or in an exhibition space or museum. The Noise Reduction feature in Audacity isn’t meant to cope with that kind of distortion. You’ll need to alter your recording approach if you’re capturing voice in either of those situations.
Under the following situations, the Audacity Noise Reduction function might underperform.
- Particular noise in the background, including traffic or people.
- When the harmonics of the sound and voice are comparable.
- There is sound variance where there is fluctuation in the noise.
- The volume of the voice is comparable to or lower than that of the background noise.
- When the noise is irregular or changeable rather than continuous.
- The loudness is deafening.
- The sound is a single click or pop.
Part 4: How to Prevent Background Noise in Audio Recording?
Although Audacity allows eliminating noise very simply, it is still an additional level that takes time to refine your podcast production. These pointers can help you avoid the necessity for noise reduction and cut down on the amount of time you spend processing.
1. Reduce the Computer Fan Noise
Whenever computers become too heated, they can produce a lot of noise. You may limit the amount of software that runs and position your mic away from the keyboard to help lessen this impact and avoid the fan from coming on.
However, even if you observe all of these guidelines, undesired recording sounds may still appear in your program. Fortunately, contemporary software makes this problem quite simple to resolve.
2. Reduce the Gain and Get Close to the Mic
Reduce the gain (sensitivity of the microphone) and go nearer to it. Talking straight into the microphone won’t distort your audio if you reduce the gain, and that would assist your microphone in concentrating on scooping up your voice’s tone.
Bonus Tip: Set your recorder’s (or DAW’s) sensitivity such that your speech peaks between -12 and -10db.
3. Utilize a Versatile Microphone
Condenser and dynamic microphones are the two most common types of podcast microphones. Condenser microphones are significantly more sensitive instruments meant to take up average atmospheric noise, whereas dynamic microphones have a narrower frequency range, picking up fewer ambient noises.
4. Optimize Your Recording Environment
The most significant and most crucial aspect of your podcasts’ sound quality is where you capture it. To optimize your personal podcasting space, we recommend choosing a peaceful, compact area away from HVAC systems, vehicles, external hard drives, background sound, motors, and other distractions. You may also increase the tone of your room by using natural sound absorbents such as curtains, rugs, carpets, and sofas.
Part 5: How to Remove Background Noise in Filmora?
Although there is a lot of software available to eliminate ambient noise, we highly suggest Wondershare Filmora Video Editor to edit audio and video in one place.
In addition to the standard audio editing capabilities, the recently redesigned Filmora currently includes enhanced waveforms, volume Keyframing , peak metering, and audio transitions, giving you a better audio editing interface.
For Win 7 or later (64-bit)
For macOS 10.12 or later
Filmora Video Editor will quickly remove ambient sound from both sound/video. You may also remove the sound from the video with this simple video editor, use the Audio Equalizer or Audio Mixer functions to modify the audio further, and then Export and save the audio in an Mp3 file. Here are the detailed steps:
Step 1: In the Wondershare Filmora Timeline menu, Import your footage. Trim the footage after previewing it and deleting the sections you don’t want to retain.
Step 2: To eliminate the ambient noise immediately, double-click on the video file, and go to the Audio panel to select the Remove Background Noise option. You will find that the background noise is removed automatically.
Step 3: After checking the results, select Export to download the noise-reduced clip to your desktop or upload it immediately to YouTube or Vimeo.
Conclusion
Well, there you have it. In this Audacity Remove Background Noise guide, we have reviewed every possible method you can adopt to get rid of the unnecessary background noise in the Audacity. And if the desired results are still not achieved, we highly recommend using the Wondershare Filmora editing software. Not only will it help you remove the unwanted ambient noise, but it will also allow you to customize your audio or video file further.
Direct Conversion: From TikTok Videos to Professional MP4s
Hovering through your TikTok For You page brings up an array of content to dive in. With a few of your finger swipes, you could find yourself seeing a confidence-boosting pep talk, going behind the fashion show behind the scenes, or assisting how to grow herbs in your kitchen.
With so much information to consume nowadays, it’s only natural that you might like to save a couple of TikTok content to watch at a later date and time, without even opening the TikTok app. In this guide, we’ll show you how to convert TikTok to MP4 via the best TikTok converters MP4 available.
In this article
01 Top 3 TikTok MP4 Converters in 2021
02 How to Convert TikTok Video to MP4 without Watermark?
03 How to Save TikTok without Watermark for Free?
Part 1: Top 3 TikTok MP4 Converters in 2021
1. ttdown.org

TTDown provides a colorful website to scroll through and learn about TikTok and a step-by-step tutorial on downloading TikTok MP4. In addition, TTDown brings you the most straightforward way to download TikTok MP4 videos by copy-pasting the video’s link on their website.
However, its Bookmarklet feature saves the users’ time from copy-pasting. They have provided their website link that you can drag into your browser’s bookmarks. Just hit the bookmark when you scroll through TikTok and wish to save a video.
Price: Free
2. Experts PHP
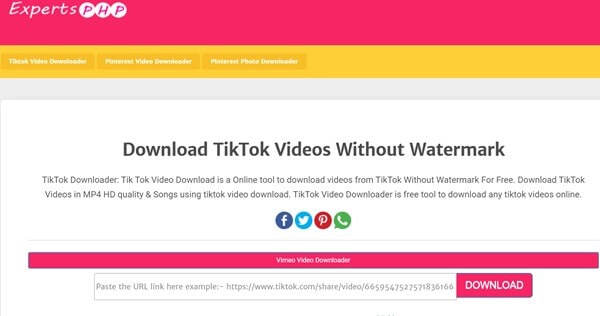
ExpertPHP TikTok converter MP4 lets you download TikTok files by pasting the file’s copied link to be downloaded into the text bar offered on the ExpertsPHP’s web page. It further enables us to download videos and images from platforms like Pinterest, TikTok, etc. Here, you can download videos freely without watermarks.
One downside of ExpertsPHP is that it does not provide other features, like converting videos into GIFs, as offered by its alternatives.
Price: Free
3. Qoob Clips
Qoob Clips lets us view and download unlimited TikTok and Instagram media files. You can even get access to the private accounts’ content through Qoob.
To proceed with the process, you are only required to install Qoob on your computer, enter your username, and begin viewing content downloaded automatically into your PC. Just by entering the username, you can even search for a private account’s content.
This MP4 TikTok downloader also lets you download unlimited highlights and stories. It further supports unlimited private accounts without displaying any ads.
Part 2: How to Convert TikTok Video to MP4 without Watermark?
Before proceeding further, it’s essential to consider whether any copyright infringement issues could arise from downloading a TikTok video. According to the Community Guidelines of TikTok, users cannot post, send, or share any content that violates someone else’s trademarks, copyrights, or intellectual property rights.
To prevent this, TikTok applies a watermark featuring both its account’s username and the logo that originally posted the content if someone downloads a TikTok video.
In other words, you have to ensure the watermark’s visibility or give full credit to the user in another way while reposting the user’s video on social media. And, this is where the job of the best TikTok converter MP4 comes in.
Cropping watermarks from your videos with Wondershare Filmora video editing software is a pretty straightforward process. You don’t need be a professional to finish these simple editing actions.
All you must do is choose a method that best suits your preferences and performs an easy action, though.
So, without any delay, let’s have a look at some editing techniques you can use to blur or crop watermarks from the downloaded videos of TikTok with Filmora.
Wondershare Filmora
Get started easily with Filmora’s powerful performance, intuitive interface, and countless effects!
Try It Free Try It Free Try It Free Learn More >

Note: the methods listed below won’t work perfectly if the watermark is in the middle of the screen. And you may need to subscribe to remove the watermark via Wondershare Filmora. In addition, you can fetch a special discount at Filmora Education Plan if you’re a student.
Method 1: Blurring the Watermark
The Filmora’s Mosaic feature will allow you to blur logos and all other on-screen graphics with just a few taps.
Hit the Effects tab at the top, select the Utility tab at left, and then hit the Mosaic option to preview the effect.
Click plus icon on the thumbnail on Mosaic or drag-and-drop it into the track above the video.
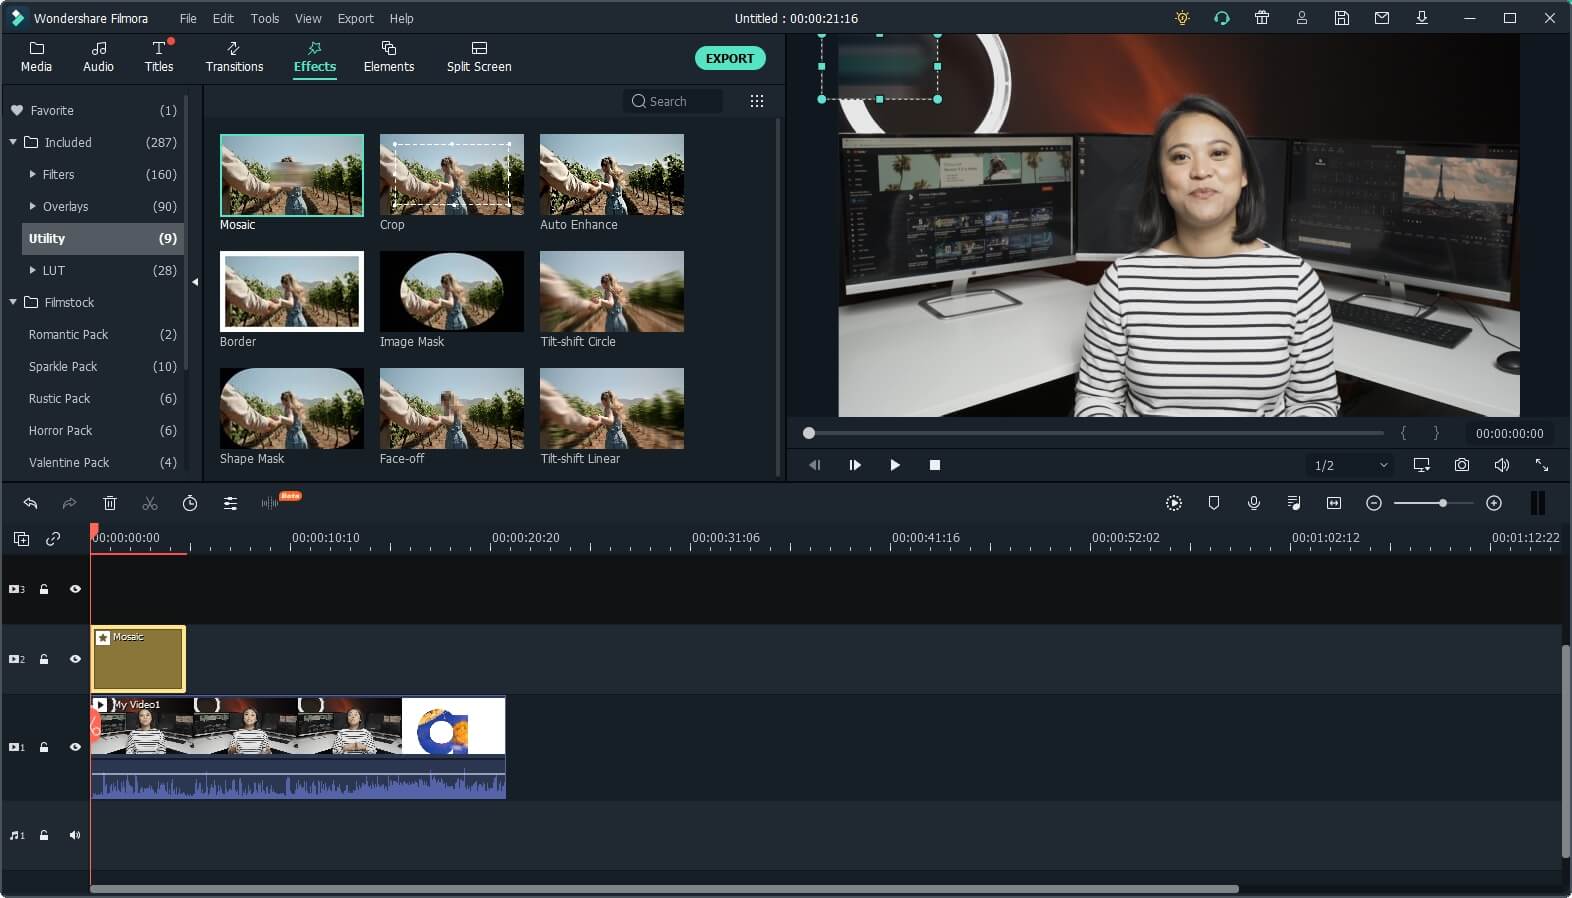
A mosaic square will appear after you apply it in the preview window by relocating it by simply dragging it to the preview window area or adjusting its size at the watermarked position.
If the downloaded video has more than one logo to hide, tapping the plus icon will introduce you to another mosaic square within the video
project.
In the timeline, double click those Mosaic effects; you can select Blur Amount and Type to adjust the shape and size of the mosaic. Hit the OK tab to apply the adjustment.

You can also consider using this Mosaic effect to blur other objects or even the face.
Method 2: Remove watermark by Cropping the video
This method will allow you to remove the watermark from your video entirely. Cropping the area where the watermark isn’t possible in any video editor, so if you select to crop the video, be prepared to lose a particular section of the picture.
Right-click the video and choose the Crop and Zoom option once the footage you wish to crop is on the video track in Filmora’s timeline.
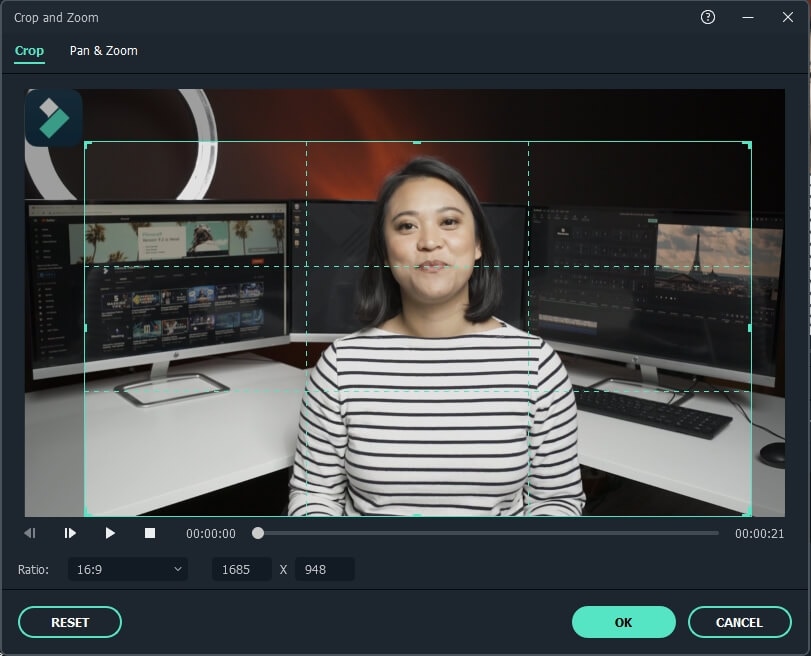
The crop window that enables you to use automatic aspect ratios or manually will appear on the screen. You can reposition the videos’ corners of the cropping rectangle from here by dragging it as much as essential to remove TikTok’s username watermark.
You can change the aspect ratios or keep them originally based on your needs. Hit the OK tab to apply the cropping effect, and you have successfully removed a watermark from your video.
So, it’s a worthy, reliable, and feature-rich TikTok watermark remover that you can easily use as the best TikTok MP4 converter.
Part 3: How to Save TikTok without Watermark for Free?
How to Save TikTok Without Watermark Online
When there is a need for the best TikTok video downloaders, you might get offers with various options. But the quantity of TikTok downloaders without watermarked videos is counted on the fingers of one hand.
We’ve founded SSSTikTok, an ideal online tool fit for the same.
We conducted the tutorial below on Windows 10’s Chrome browser, but it is almost the same on iOS, Android, and Mac.
Step 1. Copy the TikTok video’s URL on the Pc or TikTok mobile app.
Step 2. Open the web browser, and visit the SSSTikTok official website. Paste the video link to the blank tab and select the download tab. And it will take only a few secs to analyze the URL.
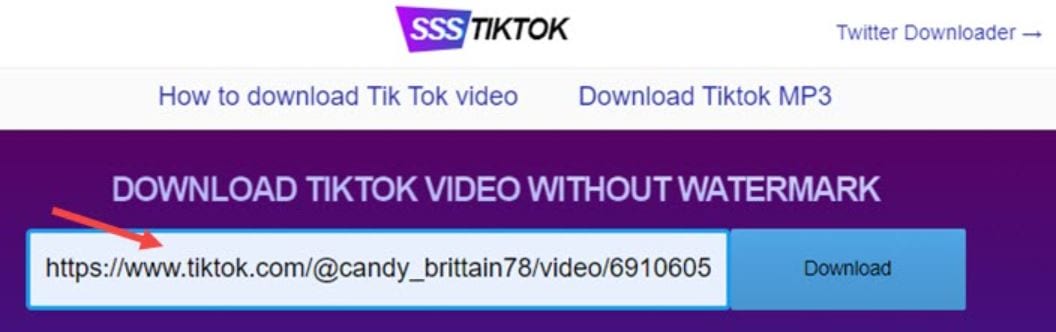
Step 3. Select the “Without Watermark“ option, and the video will be immediately get saved to the browser downloads folder.
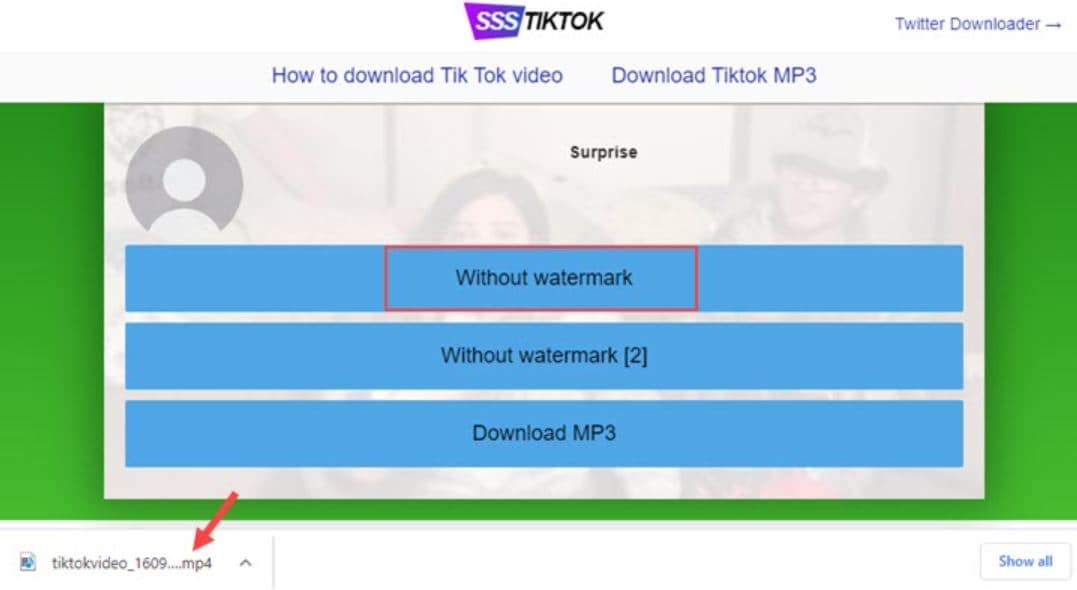
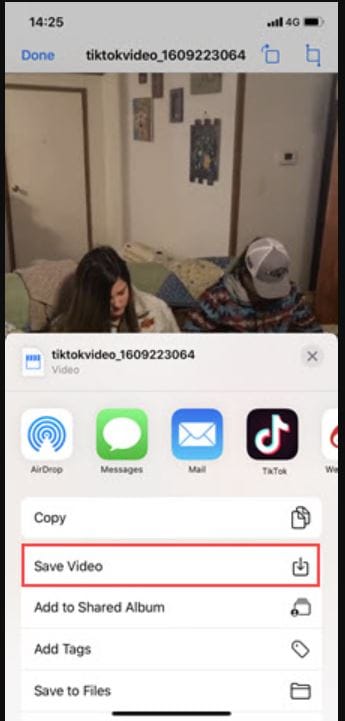
Tips for iPhone users: There’s one more step you should be aware of if you’re using this TikTok downloader. After downloading the video on iOS Safari, you can preview the video, hit the share icon, and select the “Save video “option.
Conclusion
Finally, we hope it won’t be that difficult to convert TikTok to MP4 via the best TikTok converters MP4 with the solution mentioned above. Ensure that you didn’t break the law whether you want to remove it with an online watermark remover or with a program for PC and Mac, or on iPhone or Android phones.
If you want to go for the straightforward and hassle-free option, check our video editing program Filmora and use it to blur or crop the watermarks of TikTok’s downloaded videos.
02 How to Convert TikTok Video to MP4 without Watermark?
03 How to Save TikTok without Watermark for Free?
Part 1: Top 3 TikTok MP4 Converters in 2021
1. ttdown.org
TTDown provides a colorful website to scroll through and learn about TikTok and a step-by-step tutorial on downloading TikTok MP4. In addition, TTDown brings you the most straightforward way to download TikTok MP4 videos by copy-pasting the video’s link on their website.
However, its Bookmarklet feature saves the users’ time from copy-pasting. They have provided their website link that you can drag into your browser’s bookmarks. Just hit the bookmark when you scroll through TikTok and wish to save a video.
Price: Free
2. Experts PHP
ExpertPHP TikTok converter MP4 lets you download TikTok files by pasting the file’s copied link to be downloaded into the text bar offered on the ExpertsPHP’s web page. It further enables us to download videos and images from platforms like Pinterest, TikTok, etc. Here, you can download videos freely without watermarks.
One downside of ExpertsPHP is that it does not provide other features, like converting videos into GIFs, as offered by its alternatives.
Price: Free
3. Qoob Clips
Qoob Clips lets us view and download unlimited TikTok and Instagram media files. You can even get access to the private accounts’ content through Qoob.
To proceed with the process, you are only required to install Qoob on your computer, enter your username, and begin viewing content downloaded automatically into your PC. Just by entering the username, you can even search for a private account’s content.
This MP4 TikTok downloader also lets you download unlimited highlights and stories. It further supports unlimited private accounts without displaying any ads.
Part 2: How to Convert TikTok Video to MP4 without Watermark?
Before proceeding further, it’s essential to consider whether any copyright infringement issues could arise from downloading a TikTok video. According to the Community Guidelines of TikTok, users cannot post, send, or share any content that violates someone else’s trademarks, copyrights, or intellectual property rights.
To prevent this, TikTok applies a watermark featuring both its account’s username and the logo that originally posted the content if someone downloads a TikTok video.
In other words, you have to ensure the watermark’s visibility or give full credit to the user in another way while reposting the user’s video on social media. And, this is where the job of the best TikTok converter MP4 comes in.
Cropping watermarks from your videos with Wondershare Filmora video editing software is a pretty straightforward process. You don’t need be a professional to finish these simple editing actions.
All you must do is choose a method that best suits your preferences and performs an easy action, though.
So, without any delay, let’s have a look at some editing techniques you can use to blur or crop watermarks from the downloaded videos of TikTok with Filmora.
Wondershare Filmora
Get started easily with Filmora’s powerful performance, intuitive interface, and countless effects!
Try It Free Try It Free Try It Free Learn More >
Note: the methods listed below won’t work perfectly if the watermark is in the middle of the screen. And you may need to subscribe to remove the watermark via Wondershare Filmora. In addition, you can fetch a special discount at Filmora Education Plan if you’re a student.
Method 1: Blurring the Watermark
The Filmora’s Mosaic feature will allow you to blur logos and all other on-screen graphics with just a few taps.
Hit the Effects tab at the top, select the Utility tab at left, and then hit the Mosaic option to preview the effect.
Click plus icon on the thumbnail on Mosaic or drag-and-drop it into the track above the video.
A mosaic square will appear after you apply it in the preview window by relocating it by simply dragging it to the preview window area or adjusting its size at the watermarked position.
If the downloaded video has more than one logo to hide, tapping the plus icon will introduce you to another mosaic square within the video
project.
In the timeline, double click those Mosaic effects; you can select Blur Amount and Type to adjust the shape and size of the mosaic. Hit the OK tab to apply the adjustment.
You can also consider using this Mosaic effect to blur other objects or even the face.
Method 2: Remove watermark by Cropping the video
This method will allow you to remove the watermark from your video entirely. Cropping the area where the watermark isn’t possible in any video editor, so if you select to crop the video, be prepared to lose a particular section of the picture.
Right-click the video and choose the Crop and Zoom option once the footage you wish to crop is on the video track in Filmora’s timeline.
The crop window that enables you to use automatic aspect ratios or manually will appear on the screen. You can reposition the videos’ corners of the cropping rectangle from here by dragging it as much as essential to remove TikTok’s username watermark.
You can change the aspect ratios or keep them originally based on your needs. Hit the OK tab to apply the cropping effect, and you have successfully removed a watermark from your video.
So, it’s a worthy, reliable, and feature-rich TikTok watermark remover that you can easily use as the best TikTok MP4 converter.
Part 3: How to Save TikTok without Watermark for Free?
How to Save TikTok Without Watermark Online
When there is a need for the best TikTok video downloaders, you might get offers with various options. But the quantity of TikTok downloaders without watermarked videos is counted on the fingers of one hand.
We’ve founded SSSTikTok, an ideal online tool fit for the same.
We conducted the tutorial below on Windows 10’s Chrome browser, but it is almost the same on iOS, Android, and Mac.
Step 1. Copy the TikTok video’s URL on the Pc or TikTok mobile app.
Step 2. Open the web browser, and visit the SSSTikTok official website. Paste the video link to the blank tab and select the download tab. And it will take only a few secs to analyze the URL.
Step 3. Select the “Without Watermark“ option, and the video will be immediately get saved to the browser downloads folder.
Tips for iPhone users: There’s one more step you should be aware of if you’re using this TikTok downloader. After downloading the video on iOS Safari, you can preview the video, hit the share icon, and select the “Save video “option.
Conclusion
Finally, we hope it won’t be that difficult to convert TikTok to MP4 via the best TikTok converters MP4 with the solution mentioned above. Ensure that you didn’t break the law whether you want to remove it with an online watermark remover or with a program for PC and Mac, or on iPhone or Android phones.
If you want to go for the straightforward and hassle-free option, check our video editing program Filmora and use it to blur or crop the watermarks of TikTok’s downloaded videos.
Also read:
- [New] Premier 10 Editors to Enhance W-Based TikTok Videos for 2024
- [Updated] Advanced TikTok Analytics The Best Instrument Guide
- [New] Step up Your Game Top 20 Favorite TikTok Dances to Learn for 2024
- [Updated] In 2024, Essential Tips for Mac-Based TikTok Video Edits
- 9 Must-Know Techniques for Enhancing Your TikTok Following for 2024
- The Dual Identity Approach for Influential TikTok Presence for 2024
- [Updated] Rhyme Capsules Shortcuts to Today's Viral Rapping Beats
- [New] Audience Focus The Ultimate Guide to Creating Powerful TikTok Captions
- [Updated] In 2024, Breaking Free From the Old A Complete, Step-By-Step Guide to Updating Your TikTok Avatar
- [New] Easy Steps to Audit Your Favorite TikTok Sessions for 2024
- [New] Ignite Your Videos with These Top 50+ Inspirational Quotes for 2024
- In 2024, Enlarging Your Footage Techniques for Massive Headscapes on TikTok
- Top Tools to Decode TikTok Engagement and Growth Patterns
- [New] 2024 Approved Cutting-Edge TikTok Live Broadcast Techniques on Computer
- Master the Art of Visuals on TikTok with Smart Background Choices
- Speedy TikTok Video Acquisition Guide for 2024
- In 2024, Foodie Hits Top TikTok Chefs & Cooks
- Top PFP Concepts to Boost Your TikTok Profile's Attractiveness
- [Updated] Unlock the Secrets of High-Quality TikTok Filming for 2024
- 2024 Approved Viral Videos Vaulted Into Visuals Optimal TikTok-to-GIF Tools
- Eternal Anthems A Curated List of 2024’S Stubbornly Sticking Tik Tok Melodies
- [Updated] Critical Considerations for Successful TikTok Use on macOS for 2024
- In 2024, Combatting Common Complications in TikTok Usage
- [Updated] In 2024, The Comprehensible Handbook for TikTok Emoji Usage
- In 2024, Mastering TikTok Top Video Editing Tools Released
- [New] 2024 Approved Essential Guide to the Best TikTok-to-GIF Convertors Listed
- [Updated] Binge on the Best TikTok's Viral Video Collection
- Urban Beats on TikTok The Best Rap Collabs
- Stirring Emotions and Interest with the Best TikTok Caption Ideas for 2024
- [Updated] In 2024, A New Era for TikTok Profiles Top 30 Innovative PFP Concepts
- [New] Unraveling the Favorites 15 Top-Rated Books in BookTok’s Limelight for 2024
- [Updated] Elevate Your Content Game Top 20 Best Practices for Captivating TikTok Captions
- 2024 Approved The Social Media Face-Off Is the Future of Sharing with Likes, Not TikTok?
- [Updated] 2024 Approved TikTok Content Preservation Gallery Access on Smartphones
- [New] Ensuring Authenticity & Compliance in Your TikToks
- [Updated] In 2024, Essential Fixes for Disruptive TikTok Activity
- [New] Scaling Up Integrating TikTok Into Your Brand's Strategy
- [New] 2024 Approved Humor Haven Identifying Rising Comedy Icons in TikTok
- [Updated] Enhance Creativity Top 50+ Inspirational TikTok Quotes
- [New] Unlock the Full Power of Apple's Siri with Integrated Voice Control on TikTok for 2024
- [Updated] 2024 Approved Strategic Steps to Determine a Unique TikTok Hashtag
- [Updated] In 2024, Navigating Through TikTok’s Rich Content Ecosystem (Dances, Songs & Memes)
- [Updated] Sail Through the Sea of TikTok Video Downloads
- [New] Transform Your Facebook Presence with Dynamic Slideshows
- How to Factory Reset Infinix Note 30 VIP Racing Edition without Losing Data | Dr.fone
- In 2024, Is GSM Flasher ADB Legit? Full Review To Bypass Your Xiaomi Redmi K70 Pro Phone FRP Lock
- [Updated] The Complete Instagram Reversal Methodology
- New 2024 Approved Exploring the Premier 8 Voice-Activated Applications for PCs & MACs
- [New] Streamline Your Footage Insta-Length Management on macOS for 2024
- In 2024, Expert Strategies for High-Quality MacBook Webcam Recordings
- CatchEmAll Celebrate National Pokémon Day with Virtual Location On Tecno Spark 20 | Dr.fone
- Updated Master Amazon Live Features, Pro Tips and Future Trends for 2024
- [New] Becoming a Reaction Guru A Complete Guidebook for 2024
- New Troubleshoot Avidemux Audio Problems Step-by-Step Guide 2023
- What Pokémon Evolve with A Dawn Stone For Samsung Galaxy S24+? | Dr.fone
- New Free Video Assets Galore Top Public Domain Download Sites for 2024
- Updated Meme Mastery The Top 10 Apps for Android and iOS Users for 2024
- In 2024, Ultimate List Best Mac Videos Grabber Software
- [Updated] Twitter Video Requirements | How to Upload a Video on Twitter, In 2024
- How to Fix Apple iPhone 13 Passcode not Working? | Dr.fone
- 2024 Approved Best 15 Female Anime Characters-Who Is Your Favorite?
- In 2024, Unleash Your Potential on Facebook Keyword Strategies Reviewed
- In 2024, How Can We Unlock Our Vivo S17 Pro Phone Screen?
- Explore Fauna Fun Top 12 Android Simulation Games for 2024
- How To Repair iOS System of iPhone 12 Pro Max? | Dr.fone
- New Video Editing Hack How to Reverse Clips in Final Cut Pro
- Top Auditory Supplements for Tranquil Soundscapes
- [Updated] Dissecting Video Self-Presentation Uncovering Truthfulness Needs
- In 2024, Silence Meets You An Easy, Step-by-Step Approach to Disabling Zoom Microphones
- How to Quickly Fix Bluetooth Not Working on Xiaomi Redmi Note 12 Pro 4G | Dr.fone
- Step-by-Step Sharing Twitch on Your FB Page
- [Updated] 2024 Approved Becoming an Expert at Scheduling Virtual Team Sessions (Google)
- Guide on How To Change Your Apple ID Email Address On Apple iPhone XS Max | Dr.fone
- 2024 Approved Perfect Your Audio Quality Leveraging State-of-the-Art Noise Cancellation Technologies
- Updated Best Facebook to MP3 Conversion Tools Online for 2024
- 3 Solutions to Find Your Honor Play 8T Current Location of a Mobile Number | Dr.fone
- Solutions to restore deleted files from Google Pixel 7a
- 2024 Approved Cutting Edge Strategies for Efficient Speech Translation with Google
- Updated In 2024, If You Are Wondering How to Play a Slideshow in PowerPoint Automatically, This Article Is for You. Here We Will Be Looking at How to Add a Slideshow in PowerPoint and Other Relevant Headings that Would Help You Quickly Work on a PowerPoint
- Top 10 Fingerprint Lock Apps to Lock Your Vivo Y100i Phone
- Updated Echoing Quietness A Guide to Purifying Your Podcasts From High-Frequency Humming for 2024
- 2024 Approved The Complete Users Manual to Extract Sound From Videos on Various Operating Systems (Win/Mac/iOS/Android - 2023 Edition)
- 2024 Approved Instant Live From OBS to Instagram App
- In 2024, How to Track Vivo V27 Location without Installing Software? | Dr.fone
- 2024 Approved Leading Water & Liquid Game Simulations Unveiled
- [Updated] 2024 Approved Apowersoft Picks The Ultimate PC Screen Capture Solution
- Title: "[New] 2024 Approved Techniques to Purify Your Recordings in Audacity"
- Author: Gary
- Created at : 2024-05-23 07:58:56
- Updated at : 2024-05-24 07:58:56
- Link: https://tiktok-clips.techidaily.com/new-2024-approved-techniques-to-purify-your-recordings-in-audacity/
- License: This work is licensed under CC BY-NC-SA 4.0.
