
:max_bytes(150000):strip_icc()/FamilyTech_GettyImages-528922090_mactrunk_CROPPEDv1745-2100f4a2c6e54112b4aaefa7d73ad75e.jpg)
From Disjointed Elements to a Cohesive TikTok Narrative for 2024
From Disjointed Elements to a Cohesive TikTok Narrative
Best Video Editor for Beginners on Windows and Mac
Wondershare Filmora is one of the most popular video editing software among TikTokers , download and have a try.
TikTok’s collaborative nature is one of its most appealing features. Your video is not finished the moment you publish it. They can be responded to, remixed, and re-shared by anybody. TikTok is meant to allow users to construct on other’s films shared on the network, whether you’re utilizing audio from some other video or making a duet.
Thanks to the stitch tool, creators may remix, remake, and reply to videos with a couple of taps. This article will tell you what you need to know about stitching videos on TikTok. Continue reading to learn more about Stitching and how to stitch on TikTok. Let’s get started!
In this article
02 How to Turn Stitch On or Off?
04 How to Stitch Any TikTok Video withFilmora Video Editor ?
05 FAQs About TikTok Video Stitch
Part 1: What is Stitch on TikTok?
TikTok’s latest video editing tool ‘Stitch,’ lets people incorporate video snippets from other people into their own. Creators may use Stitch to provide a five-second snippet from a TikTok video out of their own. Unlike duets that play videos together, stitched videos play in the sequence they were stitched. Videos containing open-ended questions have gained in popularity with the advent of the stitch.
Whenever you Stitch a clip-on TikTok, you are essentially inserting your video after yet another video that has already been submitted. People frequently utilize this to remark on or reply to other videos. And, when done well, it can add a lot more context to your movies.
The one limitation of the Stitch tool is that you may only publish up to five seconds from some other video. So, if you’re focusing on a Stitch, you must select the five seconds which are most critical to highlight your message.
Part 2: How to Turn Stitch On or Off?
By enabling the Stitch feature, you make your material available to millions of prospective collaborators. Consider the possibilities – it might be a fantastic approach to enhance reach and virility.
If you aren’t comfortable exposing your films to the whole TikTok community, users can opt out of allowing others to Stitch their work. You may modify them under the Privacy Controls. Here’s how to do a Stitch on TikTok:
Step 1: Launch the TikTok app and then head to your profile by clicking on the Profile option at the bottom right. After that, select the three dots to open the settings.
Step 2: After entering the settings, select Privacy to proceed, and then tap on the Stitch option to open the Stitch settings.
Step 3: Now, you will see three options that are No-one, Everyone, and Friends. If you want to allow the Stitching, select either Everyone or Friends. However, to restrict the people from stitching your videos, choose No-one. After you are done selecting, click on the back arrow to save the applied changes.
Part 3: How to Stitch on TikTok?
TikTok keeps giving creators more reasons to continue producing, and fans like us are more committed to continuing to open it. Stitch, a new app functionality from the famous social networking platform, makes things more straightforward than ever for artists to interact with each other.
But, you might be wondering, how to do a stitch on TikTok? Don’t worry; you’ve come to the right place. Here’s how:
Step 1: Launch TikTok and then go to the video that you want to stitch. Select the Share icon, which resembles an arrow. Select the Stitch symbol from the menu that displays, and then wait a few seconds for the video to complete. The lengthier the video is, the more the loading time.

Step 2: When it’s finished, you’ll be sent to a screen where you may take five seconds of the film and use it on your own. To navigate through the movie, use the sliders and the red bars to choose the portion you want. When you’re finished, tap Next.

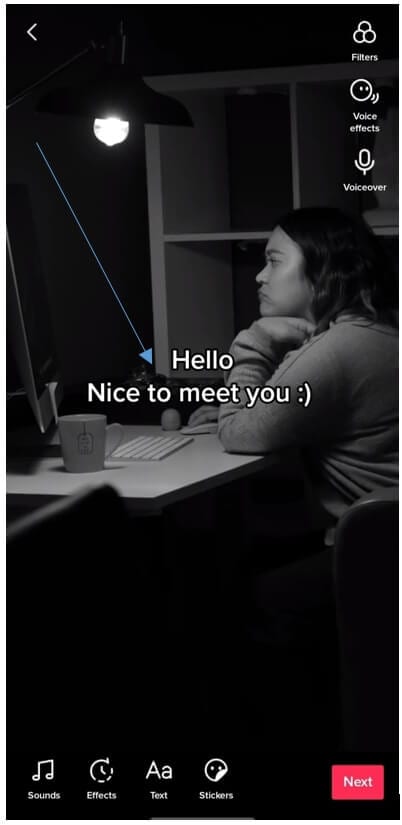
Step 3: You’ll be sent to TikTok’s normal recording screen. Record the remainder of your TikTok video with all of the features you’re accustomed to utilizing. You may use whatever effects, stickers, texts, voiceovers, or captions you desire. After that, press the Next button.

Step 4: Make a title and hashtags for your TikTok video. You could also choose whether or not these users may Stitch your movie here – hit the toggle switch beside Allow Stitch to turn it off. Following that, hit the Post option, and your stitched video will be uploaded.

Part 4: How to Stitch Any TikTok Video with Filmora Video Editor ?
Before getting started, understand why people opt for Filmora video editor for stitching videos on TikTok when this can be done through the official TikTok application. TikTok app only allows you to stitch a video for up to five seconds which is quite frustrating if you wish to stitch an entire video.
One more reason is that, with TikTok, you cannot stitch the already existing video from the camera roll, which restricts creators from adding the already edited content to the existing video. So, to avoid the above problems, Filmora is used for stitching TikTok videos.
For Win 7 or later (64-bit)
For macOS 10.12 or later
To begin, download the video that you wish to stitch with from TikTok. After, follow the below stepwise guide:
Step 1: Launch the Filmora software on your PC and import the video files by clicking on the File and then Import/Export Media. You can simply drag and drop the videos as well.
Step 2: Drag the clips from the media library to the Timeline’s video track. All video files will be stitched into a single video with no transitions.

Note: To add a transition to the video , go to the Transition tab and drop the desired transition to the junction of two clips.

Step 3: Now, preview the stitched video and, when finished, click the Export option to save numerous video segments to a single file. Choose any format from the Format tab’s list.
Part 5: FAQs About TikTok Video Stitch
1. Can you do a Stitch on TikTok with a video from your Camera Roll?
Unfortunately, you cannot utilize a video from your Camera Roll in a Stitch at the time of this writing. So, whatever your reaction to a Stitch is, you must record 100% unique footage shot with the TikTok camera. However, you may download the video first and then stitch it with some third-party software such as Filmora.
2. Can you stitch longer than 5 seconds?
No, it is not possible to stitch a video for longer than five seconds using the built-in Stitching feature of the TikTok app. But this can be done by stitching the videos using third-party applications and software.
3. How do I see TikTok stitches?
Users who want to view as many stitches as possible can do it by browsing for them on the app. You must first browse to Discover, and from there to the search box. Then type #Stitch @username, where the username is the name of the account from which you wish to view stitches.
4. TikTok Stitch option not showing. How to fix it?
Users may choose whether or not someone else can Stitch their work in their settings. The option may be found under the Settings and Privacy tab, where users can activate or uncheck Stitch for all videos. So, if the Stitch option is not showing, the user may have disabled the Stitch option.
Conclusion
The Stitch feature is an excellent way to continue the discussion with your videos. You may leave comments on popular content on the site. Most importantly, it may be a fun method to generate material different from what you usually publish. And since you know How to Stitch on TikTok after reading this article, stitch the videos today and create unique content!
TikTok’s collaborative nature is one of its most appealing features. Your video is not finished the moment you publish it. They can be responded to, remixed, and re-shared by anybody. TikTok is meant to allow users to construct on other’s films shared on the network, whether you’re utilizing audio from some other video or making a duet.
Thanks to the stitch tool, creators may remix, remake, and reply to videos with a couple of taps. This article will tell you what you need to know about stitching videos on TikTok. Continue reading to learn more about Stitching and how to stitch on TikTok. Let’s get started!
In this article
02 How to Turn Stitch On or Off?
04 How to Stitch Any TikTok Video withFilmora Video Editor ?
05 FAQs About TikTok Video Stitch
Part 1: What is Stitch on TikTok?
TikTok’s latest video editing tool ‘Stitch,’ lets people incorporate video snippets from other people into their own. Creators may use Stitch to provide a five-second snippet from a TikTok video out of their own. Unlike duets that play videos together, stitched videos play in the sequence they were stitched. Videos containing open-ended questions have gained in popularity with the advent of the stitch.
Whenever you Stitch a clip-on TikTok, you are essentially inserting your video after yet another video that has already been submitted. People frequently utilize this to remark on or reply to other videos. And, when done well, it can add a lot more context to your movies.
The one limitation of the Stitch tool is that you may only publish up to five seconds from some other video. So, if you’re focusing on a Stitch, you must select the five seconds which are most critical to highlight your message.
Part 2: How to Turn Stitch On or Off?
By enabling the Stitch feature, you make your material available to millions of prospective collaborators. Consider the possibilities – it might be a fantastic approach to enhance reach and virility.
If you aren’t comfortable exposing your films to the whole TikTok community, users can opt out of allowing others to Stitch their work. You may modify them under the Privacy Controls. Here’s how to do a Stitch on TikTok:
Step 1: Launch the TikTok app and then head to your profile by clicking on the Profile option at the bottom right. After that, select the three dots to open the settings.
Step 2: After entering the settings, select Privacy to proceed, and then tap on the Stitch option to open the Stitch settings.
Step 3: Now, you will see three options that are No-one, Everyone, and Friends. If you want to allow the Stitching, select either Everyone or Friends. However, to restrict the people from stitching your videos, choose No-one. After you are done selecting, click on the back arrow to save the applied changes.
Part 3: How to Stitch on TikTok?
TikTok keeps giving creators more reasons to continue producing, and fans like us are more committed to continuing to open it. Stitch, a new app functionality from the famous social networking platform, makes things more straightforward than ever for artists to interact with each other.
But, you might be wondering, how to do a stitch on TikTok? Don’t worry; you’ve come to the right place. Here’s how:
Step 1: Launch TikTok and then go to the video that you want to stitch. Select the Share icon, which resembles an arrow. Select the Stitch symbol from the menu that displays, and then wait a few seconds for the video to complete. The lengthier the video is, the more the loading time.
Step 2: When it’s finished, you’ll be sent to a screen where you may take five seconds of the film and use it on your own. To navigate through the movie, use the sliders and the red bars to choose the portion you want. When you’re finished, tap Next.
Step 3: You’ll be sent to TikTok’s normal recording screen. Record the remainder of your TikTok video with all of the features you’re accustomed to utilizing. You may use whatever effects, stickers, texts, voiceovers, or captions you desire. After that, press the Next button.
Step 4: Make a title and hashtags for your TikTok video. You could also choose whether or not these users may Stitch your movie here – hit the toggle switch beside Allow Stitch to turn it off. Following that, hit the Post option, and your stitched video will be uploaded.
Part 4: How to Stitch Any TikTok Video with Filmora Video Editor ?
Before getting started, understand why people opt for Filmora video editor for stitching videos on TikTok when this can be done through the official TikTok application. TikTok app only allows you to stitch a video for up to five seconds which is quite frustrating if you wish to stitch an entire video.
One more reason is that, with TikTok, you cannot stitch the already existing video from the camera roll, which restricts creators from adding the already edited content to the existing video. So, to avoid the above problems, Filmora is used for stitching TikTok videos.
For Win 7 or later (64-bit)
For macOS 10.12 or later
To begin, download the video that you wish to stitch with from TikTok. After, follow the below stepwise guide:
Step 1: Launch the Filmora software on your PC and import the video files by clicking on the File and then Import/Export Media. You can simply drag and drop the videos as well.
Step 2: Drag the clips from the media library to the Timeline’s video track. All video files will be stitched into a single video with no transitions.
Note: To add a transition to the video , go to the Transition tab and drop the desired transition to the junction of two clips.
Step 3: Now, preview the stitched video and, when finished, click the Export option to save numerous video segments to a single file. Choose any format from the Format tab’s list.
Part 5: FAQs About TikTok Video Stitch
1. Can you do a Stitch on TikTok with a video from your Camera Roll?
Unfortunately, you cannot utilize a video from your Camera Roll in a Stitch at the time of this writing. So, whatever your reaction to a Stitch is, you must record 100% unique footage shot with the TikTok camera. However, you may download the video first and then stitch it with some third-party software such as Filmora.
2. Can you stitch longer than 5 seconds?
No, it is not possible to stitch a video for longer than five seconds using the built-in Stitching feature of the TikTok app. But this can be done by stitching the videos using third-party applications and software.
3. How do I see TikTok stitches?
Users who want to view as many stitches as possible can do it by browsing for them on the app. You must first browse to Discover, and from there to the search box. Then type #Stitch @username, where the username is the name of the account from which you wish to view stitches.
4. TikTok Stitch option not showing. How to fix it?
Users may choose whether or not someone else can Stitch their work in their settings. The option may be found under the Settings and Privacy tab, where users can activate or uncheck Stitch for all videos. So, if the Stitch option is not showing, the user may have disabled the Stitch option.
Conclusion
The Stitch feature is an excellent way to continue the discussion with your videos. You may leave comments on popular content on the site. Most importantly, it may be a fun method to generate material different from what you usually publish. And since you know How to Stitch on TikTok after reading this article, stitch the videos today and create unique content!
Stepwise Introduction to Adding Texts on TikTok
The TikTok app is a fantastic tool for creating and editing videos. Whenever it comes to applying final touches to videos (and many would say: rightly so!), without depending on any other third-party editing program, you may add many sorts of animations, appealing sounds, voiceover, slow-mo motion effects, fast motion effects, and a variety of other effects.
Even if you’ve just joined TikTok, you’d be well familiar with the fact that you can now add text to your TikTok videos any way that you want. You don’t need to have special skills or superhuman abilities to get it done. All you need is a “know-how” on how toadd text to TikTok videos in a matter of moments. Continue reading to learn more about this!
In this article
01 How to Add Text to a TikTok in the TikTok Editor?
02 How to Edit and Customize Text on TikTok?
03 How to Add Background Color to Text on TikTok?
04 How to Add Text to Video in Filmora?
Part 1: How to Add Text to a TikTok in the TikTok Editor?
The TikTok text editor is straightforward to use. Your participation and overall account reach will skyrocket when you start adding text to your TikTok videos. And this is not just a “made-up” fact from us or from someone we know. According to an estimate, 80% of US consumers love watching videos containing textual captions. What it does is that it increases the customer engagement, viewership, and comprehending of the video much more accessible.
Now that you know a little background information on why adding to your TikTok videos is essential in the modern age, it’s finally time to start mastering the art. Don’t worry, though. It’s no rocket science. All you need is to follow this step-by-step procedure down below on how to add captions on TikTok to your videos. Starting with:
Step 1: Make a new TikTok by pressing the “+” box at the bottom of your stream to begin adding text. Create a new video, edit an existing one, or upload a video from your photo library.
Step 2: Collectively, Edit and Cut your clip. Click Next after you’re satisfied.
Step 3: Tap the Text icon (Aa) at the bottom of the display when TikTok has taken you to the video editing menu.
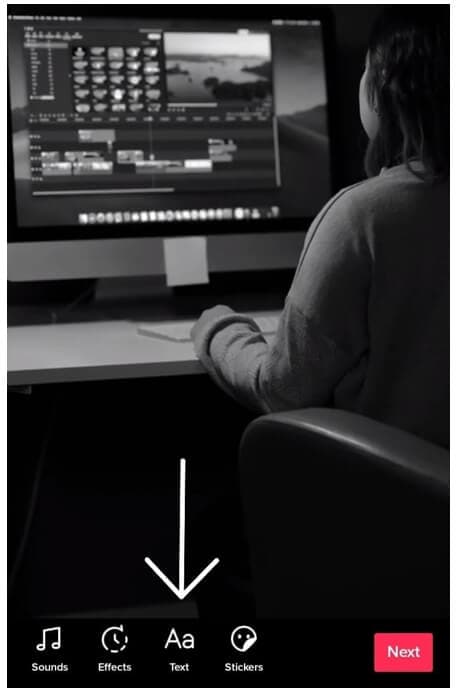
Step 4: Type your text in the box, and then use the options available to modify the text. Select your preferred Font and Color that you would like to use. Tap Done in the top-right corner of the display, taking into account that you can only adjust the text location and time after this stage.
Step 5: Then, choose Next, write a title and any other required information, and afterward tap on Post to finish the TikTok video production.
Part 2: How to Edit and Customize Text on TikTok?
While you can add text to your TikTok videos, that’s not the only thing you can do with adding text. TikTok offers you the chance to further customize the video by making modifications to the added text. Here are three ways in which you can further customize your TikTok video:
1. How to Put Text on TikTok and Make It Disappear?
TikTok allows you to control when your text that appears onscreen. The single condition is that it must be visible for at least one full second. All you have to do now is follow these steps to determine the length of your content.
Step 1: Tap on the Text you want to edit.
Step 2: You’ll need to pick Set duration to change the time of the text on your video. This will take you to a panel where you can control when the text displays and, if necessary, when it fades away. Drag the timing bar so that it fits perfectly to choose a start and finish time.

Step 3: Drag the red box around the bottom of the timeline to choose when the text should appear.
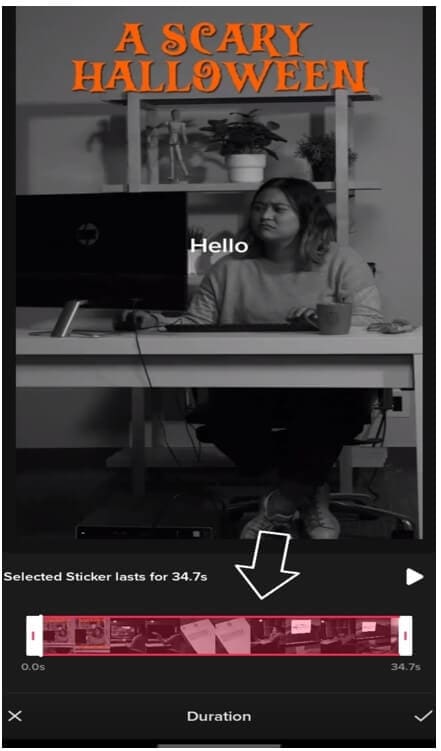
Step 4: Tap the Checkmark in the bottom right-hand corner once you’re done.
2. How to Change TikTok Text, Font, and Size?
Customization of your textual videos on TikTok isn’t restricted to adding and disappearing the text or adding multiple lines of text. You also change the text font and size of your captions by using these steps:
Step 1: By tapping the A on the left side of the display, you can Highlight the text.
Step 2: You can alter the Fonts by picking an alternative from the multi-colored circles at the bottom of the display.
Step 3: TikTok further allows you to alter the color by choosing an alternative from the Color options provided on the top-left side of the text menu.
3. How to Add Multiple Lines of Text to Your TikTok?
One line of text isn’t always sufficient. You can add your first in-video caption by completing the procedures outlined above. Then follow these steps to learn how to use the TikTok editor to add various texts to your clips.
Step 1: Tap the Text button once again once you’ve added your first line of text to your video.
Step 2: Type the new caption line.
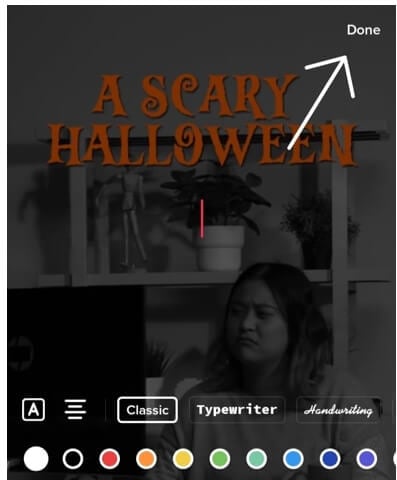
Step 3: Choose a Font and a Color. Don’t forget to tap Done.
Part 3: How to Add Background Color to Text on TikTok?
Right when you thought the video editing with textual effects was limited to this point, TikTok decided to surprise you further. You might have seen your Instagram fellow members use a dark background behind their text in several stories, videos, posts, haven’t you? We assumed so.
But did you know you can use a similar effect to post or share videos on TikTok too? Even if you didn’t, it’s not a problem. Because in this part, we will tell you how you can use the help of Instagram and add background color to text on TikTok.
Step 1: You access the Story recording view by clicking the + icon on the interface. Then you either record live video or use video from the gallery collection.
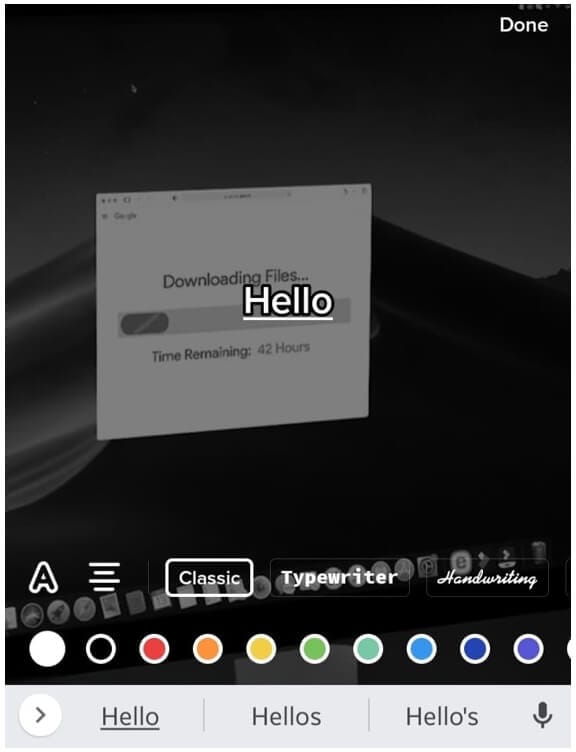
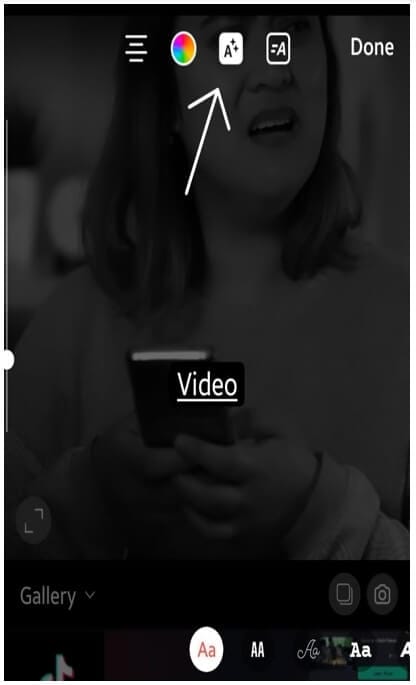
Step 2: Select the letter Aa in the video interface to enter the text you wish to appear in the video. You may change the font and size of the text displayed below.
Step 3: Choose a black backdrop for the text by clicking on the letter A with two asterisks above. Then press the Next button. There are two tiles for applying text effects to the letter A symbol.
Step 4: As a result, we produced a text effect vide a dark backdrop. To save videos to your device’s album, click the Download symbol.
Step 5: To capture video, Launch the TikTok application and tap the + icon. To access the gallery on the smartphone and pick the video to download from Instagram, click Upload squares in the touch interface.
Step 6: Lastly, you can add extra elements to the video, such as filters and stickers, before uploading it to your TikTok account.
Part 4: How to Add Text to Video in Filmora?
One of the finest methods to tidy up your videos is to add text. Applying text to video allows viewers to see the film in a loud setting while still getting the information they need, which would be ideal for individuals watching the muted Autoplay videos on Facebook’s News Feed.
For Win 7 or later (64-bit)
For macOS 10.12 or later
Although adding text to video would need video editing software, you can use a powerful yet easy to use editor such as Filmora. With this video editor’s various cutting-edge editing tools, adding and customizing texts in TikTok videos becomes a breeze. In this tutorial, we’ll walk you through how to use Filmora to add text overlay to video.
Step 1: To go to the main screen of Filmora, select New Project. When entering the Project Settings box, we recommend modifying options such as aspect ratio and frame rates.
Step 2: To modify your video clips, drag & drop them from the Media Library to the Timeline panel.
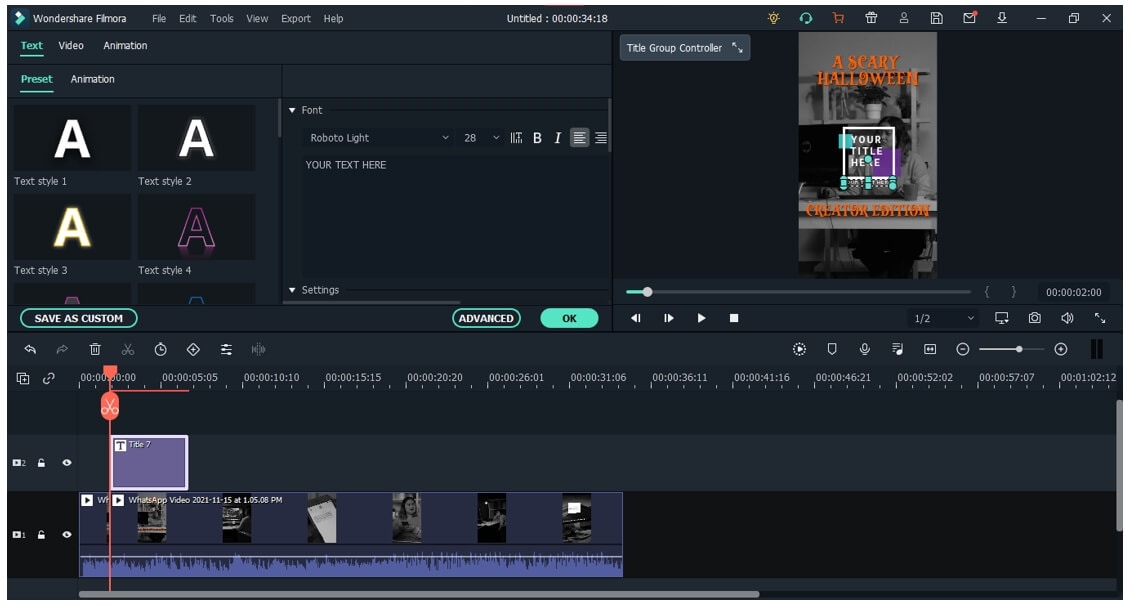
Step 3: To access the Text & Title settings, go to the Titles tab. Filmora includes over 200 text effects that span various genres, including lifestyle, media, seasonal, opener, bottom third, and end credits. In the Preview window, double-click the Titles setting to see the outcome.
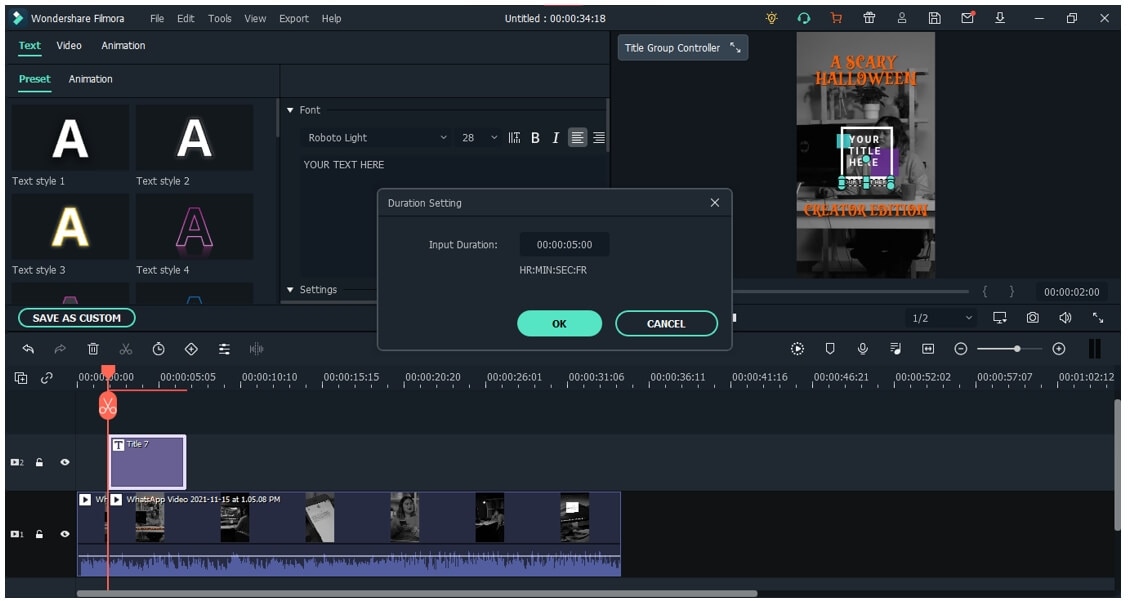
Step 4: To alter the length of the text effect, first pick Text in the Timeline and then select the Duration symbol.
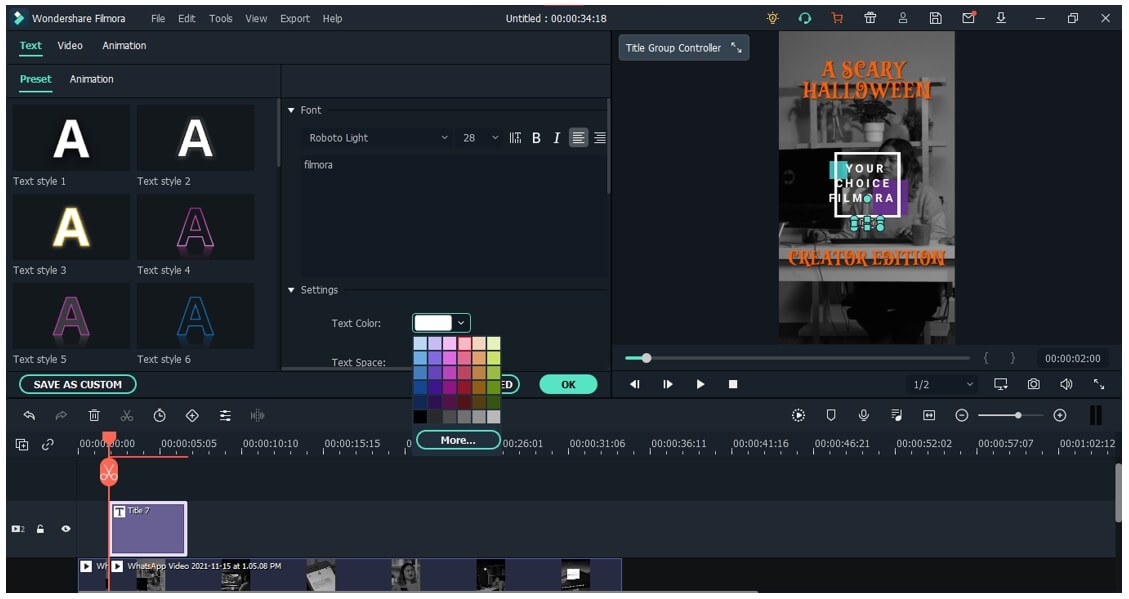
Step 5: Double-click the Title frame in the Timeline to bring up a window where you may conduct some simple title editing. You may type the text for your text overlay here and alter the text’s font, color, and size.
Conclusion
We are hopeful that you now know precisely How to Add Text to TikTok video. TikTok videos that are short and energetic might capture a wider audience. Additionally, adding adaptive text to your videos is another option for adding some diversity to your material.
Nevertheless, based on why you’re using TikTok, there are various methods to express yourself. And if TikTok isn’t cutting it for you, there are plenty of other options to consider.
02 How to Edit and Customize Text on TikTok?
03 How to Add Background Color to Text on TikTok?
04 How to Add Text to Video in Filmora?
Part 1: How to Add Text to a TikTok in the TikTok Editor?
The TikTok text editor is straightforward to use. Your participation and overall account reach will skyrocket when you start adding text to your TikTok videos. And this is not just a “made-up” fact from us or from someone we know. According to an estimate, 80% of US consumers love watching videos containing textual captions. What it does is that it increases the customer engagement, viewership, and comprehending of the video much more accessible.
Now that you know a little background information on why adding to your TikTok videos is essential in the modern age, it’s finally time to start mastering the art. Don’t worry, though. It’s no rocket science. All you need is to follow this step-by-step procedure down below on how to add captions on TikTok to your videos. Starting with:
Step 1: Make a new TikTok by pressing the “+” box at the bottom of your stream to begin adding text. Create a new video, edit an existing one, or upload a video from your photo library.
Step 2: Collectively, Edit and Cut your clip. Click Next after you’re satisfied.
Step 3: Tap the Text icon (Aa) at the bottom of the display when TikTok has taken you to the video editing menu.
Step 4: Type your text in the box, and then use the options available to modify the text. Select your preferred Font and Color that you would like to use. Tap Done in the top-right corner of the display, taking into account that you can only adjust the text location and time after this stage.
Step 5: Then, choose Next, write a title and any other required information, and afterward tap on Post to finish the TikTok video production.
Part 2: How to Edit and Customize Text on TikTok?
While you can add text to your TikTok videos, that’s not the only thing you can do with adding text. TikTok offers you the chance to further customize the video by making modifications to the added text. Here are three ways in which you can further customize your TikTok video:
1. How to Put Text on TikTok and Make It Disappear?
TikTok allows you to control when your text that appears onscreen. The single condition is that it must be visible for at least one full second. All you have to do now is follow these steps to determine the length of your content.
Step 1: Tap on the Text you want to edit.
Step 2: You’ll need to pick Set duration to change the time of the text on your video. This will take you to a panel where you can control when the text displays and, if necessary, when it fades away. Drag the timing bar so that it fits perfectly to choose a start and finish time.
Step 3: Drag the red box around the bottom of the timeline to choose when the text should appear.
Step 4: Tap the Checkmark in the bottom right-hand corner once you’re done.
2. How to Change TikTok Text, Font, and Size?
Customization of your textual videos on TikTok isn’t restricted to adding and disappearing the text or adding multiple lines of text. You also change the text font and size of your captions by using these steps:
Step 1: By tapping the A on the left side of the display, you can Highlight the text.
Step 2: You can alter the Fonts by picking an alternative from the multi-colored circles at the bottom of the display.
Step 3: TikTok further allows you to alter the color by choosing an alternative from the Color options provided on the top-left side of the text menu.
3. How to Add Multiple Lines of Text to Your TikTok?
One line of text isn’t always sufficient. You can add your first in-video caption by completing the procedures outlined above. Then follow these steps to learn how to use the TikTok editor to add various texts to your clips.
Step 1: Tap the Text button once again once you’ve added your first line of text to your video.
Step 2: Type the new caption line.
Step 3: Choose a Font and a Color. Don’t forget to tap Done.
Part 3: How to Add Background Color to Text on TikTok?
Right when you thought the video editing with textual effects was limited to this point, TikTok decided to surprise you further. You might have seen your Instagram fellow members use a dark background behind their text in several stories, videos, posts, haven’t you? We assumed so.
But did you know you can use a similar effect to post or share videos on TikTok too? Even if you didn’t, it’s not a problem. Because in this part, we will tell you how you can use the help of Instagram and add background color to text on TikTok.
Step 1: You access the Story recording view by clicking the + icon on the interface. Then you either record live video or use video from the gallery collection.
Step 2: Select the letter Aa in the video interface to enter the text you wish to appear in the video. You may change the font and size of the text displayed below.
Step 3: Choose a black backdrop for the text by clicking on the letter A with two asterisks above. Then press the Next button. There are two tiles for applying text effects to the letter A symbol.
Step 4: As a result, we produced a text effect vide a dark backdrop. To save videos to your device’s album, click the Download symbol.
Step 5: To capture video, Launch the TikTok application and tap the + icon. To access the gallery on the smartphone and pick the video to download from Instagram, click Upload squares in the touch interface.
Step 6: Lastly, you can add extra elements to the video, such as filters and stickers, before uploading it to your TikTok account.
Part 4: How to Add Text to Video in Filmora?
One of the finest methods to tidy up your videos is to add text. Applying text to video allows viewers to see the film in a loud setting while still getting the information they need, which would be ideal for individuals watching the muted Autoplay videos on Facebook’s News Feed.
For Win 7 or later (64-bit)
For macOS 10.12 or later
Although adding text to video would need video editing software, you can use a powerful yet easy to use editor such as Filmora. With this video editor’s various cutting-edge editing tools, adding and customizing texts in TikTok videos becomes a breeze. In this tutorial, we’ll walk you through how to use Filmora to add text overlay to video.
Step 1: To go to the main screen of Filmora, select New Project. When entering the Project Settings box, we recommend modifying options such as aspect ratio and frame rates.
Step 2: To modify your video clips, drag & drop them from the Media Library to the Timeline panel.
Step 3: To access the Text & Title settings, go to the Titles tab. Filmora includes over 200 text effects that span various genres, including lifestyle, media, seasonal, opener, bottom third, and end credits. In the Preview window, double-click the Titles setting to see the outcome.
Step 4: To alter the length of the text effect, first pick Text in the Timeline and then select the Duration symbol.
Step 5: Double-click the Title frame in the Timeline to bring up a window where you may conduct some simple title editing. You may type the text for your text overlay here and alter the text’s font, color, and size.
Conclusion
We are hopeful that you now know precisely How to Add Text to TikTok video. TikTok videos that are short and energetic might capture a wider audience. Additionally, adding adaptive text to your videos is another option for adding some diversity to your material.
Nevertheless, based on why you’re using TikTok, there are various methods to express yourself. And if TikTok isn’t cutting it for you, there are plenty of other options to consider.
Also read:
- [Updated] 2024 Approved Break Into the Heart of a TikTok Live Session
- [New] Making Memorable TikTok Reactions for Viewers for 2024
- [Updated] Mastering the Art of Voiceovers on the Popular Video Platform, TikTok for 2024
- In 2024, Blueprint for Stellar TikTok Campaigns and Social Media Conquests
- The Ultimate Guide to Revamping Your TikTok Profile
- [Updated] 2024 Approved Breaking Down Why Your TikTok Freezes
- [New] In 2024, Journey of Rhythms Choreographing TikTok on MacOS
- How to Download TikTok on Macbook for 2024
- [New] From Novice to Entrepreneur TikTok Creator Fund Success Story
- [New] 2024 Approved Unraveling the Mystery of Individual TikTok Tags
- [Updated] Legitimacy in the Limelight Copyright Verification Before Upload for 2024
- The Ultimate MacOS Manual for OOTD Videographers
- In 2024, How to Edit Video for TikTok on Mac
- [Updated] Leaders in Conversion - 6 Best No-Cost TikTok to MP3 Online Tools
- Unveil 10 Filter Gems to Elevate Your TikTok Posts for 2024
- 2024 Approved Eliminate Visual Annoyances Best Mobile Apps
- [New] TikTok Livestream Immersion Your Playbook
- [Updated] Best-Kept Secrets Top 5 Social Platforms Beyond TikTok
- In 2024, Mastering Profile Transformation on TikTok - A Guide
- [New] Step-by-Step Implementing Siri Speech on TikTok for 2024
- [Updated] How to Craft a Unique Identifier for Your TikTok Stream for 2024
- [Updated] 2024 Approved TikTok's Treat Trove The Best Viral Baking Creations
- [Updated] In 2024, Collect Life's Moments - TikTok Files, FREE & Pure
- [Updated] Echo Elimination Refining Recordings with Audacity for 2024
- Top Strategies for Dominating the TikTok Marketing Arena for 2024
- 2024 Approved Dynamic Diversity 30+ Fresh Biographical Strategies to Triple Your Views, Following on TikTok-Filmora Platform
- [New] 2024 Approved Top 7 Cost-Free TikTok Edits for Mac Users
- [Updated] In 2024, Unearth TikTok's Best & Hidden Emoji Treasures
- Become a Voice Customization Guru on TikTok
- [New] The Newest TikTok Sensations for Your Ears/Eyes
- [New] In 2024, How to Upload Tiktok Videos on Chrome/Android/iPhone?
- [Updated] 2024 Approved Unlocking Viral Success A Guide to TikTok Editing Mastery
- [New] In 2024, Boosting TikTok Traffic The Ultimate List of Engaging Usernames
- [New] 2024 Approved Copyright Quest for Content Creators (TikTok Edition)
- [New] 2024 Approved Text Integration in TikTok Creations, Step by Step
- In 2024, How to Fast Forward on TikTok?
- [Updated] Tasty Treats Who's Cooking Up Trends for 2024
- Direct TikTok to MP4 Format Downloader for 2024
- [New] The MacOS Blueprint to Stellar OOTD Videos for 2024
- [Updated] Elevate TikTok Visuals Switch Backgrounds with Confidence and Precision for 2024
- [Updated] Cutting-Edge Techniques for Outstanding TikTok Video Production Using Templates for 2024
- [New] 2024 Approved Bold Profile Features for Captivating Your TikTok Audience
- [Updated] Crafting Prime TikTok Openings Using MacOS for 2024
- [Updated] In 2024, Join the Favorite Fun Top 10 TikTok Trials
- [Updated] Simplified Method for Inserting Text on Your TikTok Videos for 2024
- [Updated] Unlock Endless Entertainment with TikTok on Your MacBook for 2024
- In 2024, Full Guide to Fix iToolab AnyGO Not Working On Motorola Moto G23 | Dr.fone
- 4 Easy Ways for Your Vivo V30 Hard Reset | Dr.fone
- Your Complete Guide To Reset Realme Narzo 60 Pro 5G | Dr.fone
- How to Remove Apple iPhone 15 Pro Device from iCloud
- [New] 2024 Approved OBS Utilization Comprehensive Gameplay Recording
- 7 Solutions to Fix Error Code 963 on Google Play Of Sony Xperia 10 V | Dr.fone
- Updated In 2024, 33 Best Video Splitter Recommended
- Updated In 2024, Video Aspect Ratio A Step-by-Step Guide to Resizing
- Recover your pictures after Pixel Fold has been deleted.
- A Quick Guide to Realme GT Neo 5 FRP Bypass Instantly
- 2024 Approved Revolutionary Tactics for Enhanced ROI in Animated Facebook Advertising
- Hassle-Free Ways to Remove FRP Lock from Honor Phones with/without a PC
- In 2024, Adding Allure Selecting the Best Borders & Frames for IG Shots
- The Ultimate List Top 10 Free Video Editing Software for Linux Ubuntu for 2024
- How To Unbrick a Dead Vivo Y55s 5G (2023) | Dr.fone
- [New] 2024 Approved Techniques to Seamlessly Save Web-Based Television Shows
- New Looking Into The Top Free Slow Motion Apps (Android & iOS) for 2024
- How to restore wiped call history on Honor Magic V2?
- How To Fix Unresponsive Touch Screen on Tecno Spark 10C | Dr.fone
- How To Pause Life360 Location Sharing For Lava Yuva 2 Pro | Dr.fone
- In 2024, A Complete Guide To OEM Unlocking on Nokia C32
- Ways to stop parent tracking your Oppo K11 5G | Dr.fone
- How to Use Life360 on Windows PC For Gionee F3 Pro? | Dr.fone
- [Updated] 2024 Approved Six Secrets to Masterful .MOV Saving in Windows 11
- In 2024, Innovating Your Teaching with Interactive Screencasts
- Premier Video Communication Tools The Top 10 for iOS & Android
- No.1 Quick Capture Time-Lapsing System for 2024
- Musical Spectacles The Best Top 10 Videos on Facebook for 2024
- Updated What Is an XML File and How to Export XML in Final Cut Pro X?
- Fix App Not Available in Your Country Play Store Problem on Realme Narzo 60x 5G | Dr.fone
- [New] In 2024, Venmo Photo Frame Guidelines
- Top 10 Oppo F23 5G Android SIM Unlock APK
- 2024 Approved Mastering Audio Amplitude Control in Audacity
- Google Play Services Wont Update? 12 Fixes are Here on Asus ROG Phone 8 Pro | Dr.fone
- New Top-Rated MP3 Converters for Mac Reviews and Comparisons
- 2024 Approved Top 8 Stop Motion Animation Software for Mac and PC
- [New] Sustainable Cinematic Solutions Catalog for 2024
- iPogo will be the new iSpoofer On Vivo Y100? | Dr.fone
- Complete Guide to Hard Reset Your Samsung Galaxy S24 Ultra | Dr.fone
- [New] In 2024, The ABC's of Amassing Affection on FB Squaring Up Your Video Strategy
- In 2024, Beginners Luck 15 Free Video Editing Programs to Get You Started
- New In 2024, Make an Impact Add Slow Motion to Your Videos without Spending a Dime - Filmora
- [New] Guide to Delivering Engaging PPT in Google Meet (Mobile/Desktop) for 2024
- This is how you can recover deleted pictures from Vivo Y100 5G.
- In-Depth Look at Fraps Screen Capture
- [Updated] Conveniently Capture Top Chrome Utilities for FB Video Downloads for 2024
- Title: From Disjointed Elements to a Cohesive TikTok Narrative for 2024
- Author: Gary
- Created at : 2024-05-23 06:26:15
- Updated at : 2024-05-24 06:26:15
- Link: https://tiktok-clips.techidaily.com/from-disjointed-elements-to-a-cohesive-tiktok-narrative-for-2024/
- License: This work is licensed under CC BY-NC-SA 4.0.
