
"Eliminate Your Discord Servers Desktop & Android Tips"
Eliminate Your Discord Servers: Desktop & Android Tips
How to Delete Discord Server?

Richard Bennett
Mar 27, 2024• Proven solutions
Discord servers are made and designed to help gamers – and now work colleagues – communicate and coordinate via private rooms.
As a communication app, it offers permanent servers for people who are working on the same project, playing the same game, or even if they’re part of the same family!
However, you may have to someday delete a server you own.
Today we will discuss how to delete Discord server or deleting the Discord server of someone who has passed away:
Part 1: How to Delete Discord Server Permanently on A Desktop?
If you’re familiar with Discord, you will know that there will come a time that you no longer need a server: it may be because you’ve resigned from your workplace or stopped playing a game.
If you are looking into how to delete your Discord server, you came to the right place. Even though Discord makes communication easier, you may need a break from around-the-clock connectivity for various reasons.
Discord works on desktop platforms and smartphones, with a blend of a VoIP chat system, a chat lobby, and a message board in a single app. Therefore, you can attempt to delete a server off on any device that you may have Discord downloaded and active on.
Most server owners choose to delete their Discord server when too many extra, strange, or ill-meaning visitors are visiting.
Servers are more like chat rooms inside the application. Deleting them is a relatively simple process – as you will learn from our how to delete server on Discord tips – however, their retrieval is impossible.
Once the server has been removed, you can not “undo the process” or recreate it. Therefore, be absolutely sure and proceed with caution.
It is also advised to skim through any essential files that you might have on the server. Back them up before letting it go forever.
And lastly, ensure that this is what you intend on doing because deleting a Discord server is permanent. Here are the simple steps to follow on how to delete a server on Discord:
- Open the Discord desktop app and click on the server you want to delete
- Once you select the server, there will be an options list under the server’s name
- Click the “server setting” button from the menu (This will be the second option on the list)

- At the end of the sidebar, you will find the option “delete the server on the left side.” Click it

Image: The image shows the screen that pops up after clicking “Server settings,” here, the delete button can be seen in red.
- After clicking, a pop-up window will appear, asking for confirmation
- Confirm by entering the server’s name and authentication code; this is only required when two-factor authentication is enabled
- Click on “delete server” to confirm
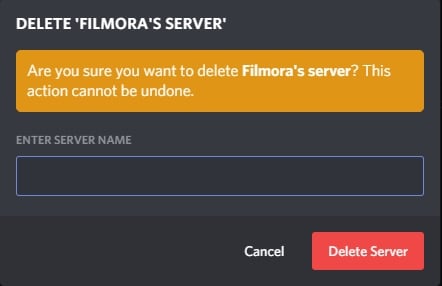
Image: As mentioned, you must be sure you want to permanently lose a server and all of its content before deleting it; this prompt serves the same purpose
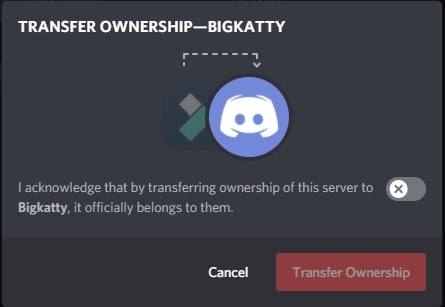
You can also transfer your server’s ownership to another individual if you do not want to delete it. To do this:
- Open server settings and then select “Members” in the left sidebar
- A list of every server member will open, hover over the person’s name that you want to transfer ownership to, and then click the three dots appearing on the right
transfer-ownership-on-discord-server.jpg
- Select “Transfer Ownership” and then confirm the transfer.
How to Delete A Server On Discord Via The Mobile App?
Suppose you do not want to go through the hassle of logging on to the desktop app. In that case, you have the option of deleting your Discord server via the mobile app quickly.
Here are some easy to follow steps on how to delete Discord server using the mobile app:
- Open the Discord app on your Android device or iPhone and then tap the hamburger settings icon on the top-left
- Search for the server you wish to delete, and then long-press the icon of the server you chose
- A mini option bar will pop up; here, you must click on “More Options” and then the server options will slide up on your screen; click on “Settings” to continue.
- This will take you to the control panel; here, click on the three-dotted settings on the top right
- Now you will be provided only one option: “Delete (server name).” Click on it
At this point, in the how to delete server on Discord process, Discord will ask you why you chose to delete the server as part of their customer experience surveys.
It is nothing but a formality; choosing to ignore it or answer it will not affect the process’s outcome.
You can choose from pre-decided answers as well, and to give you an example, one of the options is: “I couldn’t get people to join.”
How Do I Delete A Discord Server Without Ownership?
Previously you could delete your Discord server using a BOT. Anyone who had permission to use the command/action within BOT could also delete the server. However, now only the server owner and the Discord trust and safety team can delete a server.
Richard Bennett
Richard Bennett is a writer and a lover of all things video.
Follow @Richard Bennett
Richard Bennett
Mar 27, 2024• Proven solutions
Discord servers are made and designed to help gamers – and now work colleagues – communicate and coordinate via private rooms.
As a communication app, it offers permanent servers for people who are working on the same project, playing the same game, or even if they’re part of the same family!
However, you may have to someday delete a server you own.
Today we will discuss how to delete Discord server or deleting the Discord server of someone who has passed away:
Part 1: How to Delete Discord Server Permanently on A Desktop?
If you’re familiar with Discord, you will know that there will come a time that you no longer need a server: it may be because you’ve resigned from your workplace or stopped playing a game.
If you are looking into how to delete your Discord server, you came to the right place. Even though Discord makes communication easier, you may need a break from around-the-clock connectivity for various reasons.
Discord works on desktop platforms and smartphones, with a blend of a VoIP chat system, a chat lobby, and a message board in a single app. Therefore, you can attempt to delete a server off on any device that you may have Discord downloaded and active on.
Most server owners choose to delete their Discord server when too many extra, strange, or ill-meaning visitors are visiting.
Servers are more like chat rooms inside the application. Deleting them is a relatively simple process – as you will learn from our how to delete server on Discord tips – however, their retrieval is impossible.
Once the server has been removed, you can not “undo the process” or recreate it. Therefore, be absolutely sure and proceed with caution.
It is also advised to skim through any essential files that you might have on the server. Back them up before letting it go forever.
And lastly, ensure that this is what you intend on doing because deleting a Discord server is permanent. Here are the simple steps to follow on how to delete a server on Discord:
- Open the Discord desktop app and click on the server you want to delete
- Once you select the server, there will be an options list under the server’s name
- Click the “server setting” button from the menu (This will be the second option on the list)
- At the end of the sidebar, you will find the option “delete the server on the left side.” Click it
Image: The image shows the screen that pops up after clicking “Server settings,” here, the delete button can be seen in red.
- After clicking, a pop-up window will appear, asking for confirmation
- Confirm by entering the server’s name and authentication code; this is only required when two-factor authentication is enabled
- Click on “delete server” to confirm
Image: As mentioned, you must be sure you want to permanently lose a server and all of its content before deleting it; this prompt serves the same purpose
You can also transfer your server’s ownership to another individual if you do not want to delete it. To do this:
- Open server settings and then select “Members” in the left sidebar
- A list of every server member will open, hover over the person’s name that you want to transfer ownership to, and then click the three dots appearing on the right
transfer-ownership-on-discord-server.jpg
- Select “Transfer Ownership” and then confirm the transfer.
How to Delete A Server On Discord Via The Mobile App?
Suppose you do not want to go through the hassle of logging on to the desktop app. In that case, you have the option of deleting your Discord server via the mobile app quickly.
Here are some easy to follow steps on how to delete Discord server using the mobile app:
- Open the Discord app on your Android device or iPhone and then tap the hamburger settings icon on the top-left
- Search for the server you wish to delete, and then long-press the icon of the server you chose
- A mini option bar will pop up; here, you must click on “More Options” and then the server options will slide up on your screen; click on “Settings” to continue.
- This will take you to the control panel; here, click on the three-dotted settings on the top right
- Now you will be provided only one option: “Delete (server name).” Click on it
At this point, in the how to delete server on Discord process, Discord will ask you why you chose to delete the server as part of their customer experience surveys.
It is nothing but a formality; choosing to ignore it or answer it will not affect the process’s outcome.
You can choose from pre-decided answers as well, and to give you an example, one of the options is: “I couldn’t get people to join.”
How Do I Delete A Discord Server Without Ownership?
Previously you could delete your Discord server using a BOT. Anyone who had permission to use the command/action within BOT could also delete the server. However, now only the server owner and the Discord trust and safety team can delete a server.
Richard Bennett
Richard Bennett is a writer and a lover of all things video.
Follow @Richard Bennett
Streamlining Content Sharing on Discord with Ease and Finesse
How to Send Videos on Discord
Richard Bennett
Mar 27, 2024• Proven solutions
The whole point of Discord is to bring together communities of like-minded people to talk, share ideas and have fun together. And this isn’t just limited to chatting but sometimes you’re going to want to share content, including videos.
So, whether it’s a compilation of your best gaming moments that you’ve carefully edited together, a home movie that you want to share with friends, or just a funny clip that someone’s sent you that you want to pass on, here we’ll take you through how to send videos on Discord both on PC and mobile, and the likely issues you might face.
- Part 1: How to Send Videos on Discord PC
- Part 2: How to Send Videos on Discord Mobile
- Part 3: How to Send Long Videos on Discord That Are More Than 8MB
- Part 4: FAQs About Uploading Videos to Discord
Part 1: How to Send Videos on Discord PC
It’s actually pretty simple to send videos on Discord when using a PC, providing they aren’t too large a file size.
Firstly, you just need to navigate to the channel or private message where you want to send the video. Just find the right option on the list of servers you’re a member of, or head to your message inbox to find the user you want to send it to privately.
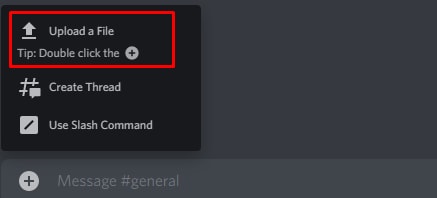
Once you’re in the right place, click on the plus (+) icon that you’ll find to the left of the chatbox at the bottom of the screen where you’d normally type your message.
You’ll then just need to find the file on your computer, and double click on it. It’ll then bring up a pop-up for the video where you can add a comment, which will sit above the video (ideal if you need to give context on why you’re sharing it). You can also mark it as a spoiler – useful if you’re sharing a gaming tip but you don’t want to spoil the story for anyone who’s not reached that point yet.
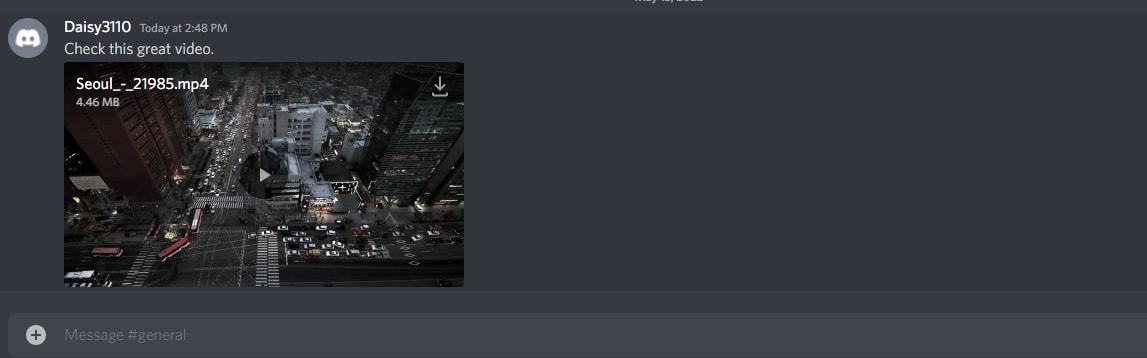
From there, it’s as simple as clicking the upload button. Once it’s ready, the video will be in the chat window for anyone in the server to watch, or for your friend if you’ve sent it privately. And if they want to download it, they’ll just need to click the download button (a downward-facing arrow) at the top right of the video.
It’s worth noting that, while Discord will play most video formats, it can’t manage everything. If you upload a format that Discord isn’t compatible with, then it won’t show a video player – instead, the file will just be uploaded. Other people can still download it to watch on their own devices.
Also, there’s a strict file limit of 8MB. This isn’t huge at all – while there’s no definitive file size for video (as it depends on file type, resolution, compression, etc) it’s unlikely to be more than 60 seconds of footage, and could just be a few seconds. If the video you want to upload is more than 8MB, carry on reading below to find out how.
Part 2: How to Send Videos on Discord Mobile
The process to send video on Discord Mobile is pretty similar both with iOS and Android, but with just a few minor tweaks.
Firstly, you still need to navigate to either the server or inbox where you want to share the video. You can then click the ‘Photo Selector’ button directly to the left of the chatbox.
This will open your phone’s gallery, but it’ll only be searching for photos. You instead want the File Selector, which will be the third icon along – it looks like a text document with a folded-over corner.
Click this and it’ll give you the option to directly upload a video from your phone’s Downloads folder. To send a video that’s stored elsewhere, click on the Expand arrow at the top left of the menu. This will send you to your phone’s file navigation system where you can find the video you want.
Once you’ve selected the video, just hit the blue Send icon to send your video to the chat. Again you can add a message as a caption, but this time it’ll just be in the normal message box rather than a dedicated comment box before you hit upload.
Part 3: How to Send Long Videos on Discord That Are More Than 8MB
So as we’ve said above, there is a file size limit when you’re using a free Discord account of just 8MB, which isn’t much at all. There are a few ways around this, so take your pick from the one that sounds best for you.
1. Update to Discord Nitro to Upload 100MB
The first option is possibly the simplest but it’s definitely not the cheapest, and that’s to pay for an upgrade to Discord Nitro. The paid version of Discord has a number of benefits, one of which is the increased file upload size of 100MB. It costs $4.99 per month or $49.99 per year, so if you’re likely to be regularly uploading videos that are lower than this limit, it might make sense.
2. Cut Unwanted Clips/Compress Video with Filmora Video Editor
The second choice would be to take your video and cut it into pieces, sending them one at a time. This might sound time-consuming but with Filmora’s Instant Cutter Tool, it’s really simple.
All you need to do is open a video in Filmora by clicking the arrow next to Import and then choosing ‘Import with Instant Cutter Tool’.
This will open the Instant Cutter window where you can click Open File to add your video. From here you can trim your files and export them in multiple sections. There are different ways that you can do this, and while each is a simple process, there are still a few steps to follow.


For more detail, check out this post for a step-by-step guide on the different ways you can trim a video in Filmora.
You can also try to compress your video size, which may let you keep the whole video at the expense of some of the quality. Again, using Filmora, this is easy. But also again, there are different ways to go about it.
You could literally crop the video in order to trim some of the data, as the reduced viewing screen won’t be as big a file. You can also reduce the resolution, or convert your video to a format that uses fewer data. You’ll need to test it though, as converting to some video formats might result in blurry footage.
There are advanced settings you can tinker with too, such as lowering the frame rate or the bit rate. Again, rather than go through all of those options in an epic article here, it’s easier to head to a post dedicated to these steps about compress videos with Filmora .
3. Upload to YouTube/Vimeo/Google Drive/Dropbox
The final option is to upload your video to an online player or storage site, and link to it, rather than having Discord host the file. YouTube and Vimeo are the obvious options, but Streamable is another popular choice too with a free membership. YouTube’s maximum video uploads are 128GB, which is huge, while other sites like Streamable cap free accounts to 500MB per video.
So, if you want to upload massive files, you’ll need to decide whether to choose YouTube or pay for an upgraded membership elsewhere. Wherever you host your video, once it’s online just grab the link and paste it into Discord to share your content.
The only drawback to this option is that it stops other users from being able to download the video directly, and you may need to look at a file sharing alternative such as Dropbox if you want to send the actual file.
FAQs About Uploading Videos to Discord
Which Kind of Video Formats Can I Upload to Discord?
You can send any filetype to another user on Discord, so that they can download it and watch it on their own device. But if you want to upload a video so that Discord embeds it, and makes it playable within the chat, you’re limited to only mp4 and WebM filetypes.
You can also use MOV files, but not everyone will be able to play them, and FLAC files are supported on desktop only but not on mobile.
How Can I Upload Saved Videos to Discord?
If you find a video on Discord that you want to share on a different server or in a private DM, you can use the download icon to save it locally. Then, follow the steps above to upload the video to the server or DM chat window where you want to share it.
Richard Bennett
Richard Bennett is a writer and a lover of all things video.
Follow @Richard Bennett
Richard Bennett
Mar 27, 2024• Proven solutions
The whole point of Discord is to bring together communities of like-minded people to talk, share ideas and have fun together. And this isn’t just limited to chatting but sometimes you’re going to want to share content, including videos.
So, whether it’s a compilation of your best gaming moments that you’ve carefully edited together, a home movie that you want to share with friends, or just a funny clip that someone’s sent you that you want to pass on, here we’ll take you through how to send videos on Discord both on PC and mobile, and the likely issues you might face.
- Part 1: How to Send Videos on Discord PC
- Part 2: How to Send Videos on Discord Mobile
- Part 3: How to Send Long Videos on Discord That Are More Than 8MB
- Part 4: FAQs About Uploading Videos to Discord
Part 1: How to Send Videos on Discord PC
It’s actually pretty simple to send videos on Discord when using a PC, providing they aren’t too large a file size.
Firstly, you just need to navigate to the channel or private message where you want to send the video. Just find the right option on the list of servers you’re a member of, or head to your message inbox to find the user you want to send it to privately.
Once you’re in the right place, click on the plus (+) icon that you’ll find to the left of the chatbox at the bottom of the screen where you’d normally type your message.
You’ll then just need to find the file on your computer, and double click on it. It’ll then bring up a pop-up for the video where you can add a comment, which will sit above the video (ideal if you need to give context on why you’re sharing it). You can also mark it as a spoiler – useful if you’re sharing a gaming tip but you don’t want to spoil the story for anyone who’s not reached that point yet.
From there, it’s as simple as clicking the upload button. Once it’s ready, the video will be in the chat window for anyone in the server to watch, or for your friend if you’ve sent it privately. And if they want to download it, they’ll just need to click the download button (a downward-facing arrow) at the top right of the video.
It’s worth noting that, while Discord will play most video formats, it can’t manage everything. If you upload a format that Discord isn’t compatible with, then it won’t show a video player – instead, the file will just be uploaded. Other people can still download it to watch on their own devices.
Also, there’s a strict file limit of 8MB. This isn’t huge at all – while there’s no definitive file size for video (as it depends on file type, resolution, compression, etc) it’s unlikely to be more than 60 seconds of footage, and could just be a few seconds. If the video you want to upload is more than 8MB, carry on reading below to find out how.
Part 2: How to Send Videos on Discord Mobile
The process to send video on Discord Mobile is pretty similar both with iOS and Android, but with just a few minor tweaks.
Firstly, you still need to navigate to either the server or inbox where you want to share the video. You can then click the ‘Photo Selector’ button directly to the left of the chatbox.
This will open your phone’s gallery, but it’ll only be searching for photos. You instead want the File Selector, which will be the third icon along – it looks like a text document with a folded-over corner.
Click this and it’ll give you the option to directly upload a video from your phone’s Downloads folder. To send a video that’s stored elsewhere, click on the Expand arrow at the top left of the menu. This will send you to your phone’s file navigation system where you can find the video you want.
Once you’ve selected the video, just hit the blue Send icon to send your video to the chat. Again you can add a message as a caption, but this time it’ll just be in the normal message box rather than a dedicated comment box before you hit upload.
Part 3: How to Send Long Videos on Discord That Are More Than 8MB
So as we’ve said above, there is a file size limit when you’re using a free Discord account of just 8MB, which isn’t much at all. There are a few ways around this, so take your pick from the one that sounds best for you.
1. Update to Discord Nitro to Upload 100MB
The first option is possibly the simplest but it’s definitely not the cheapest, and that’s to pay for an upgrade to Discord Nitro. The paid version of Discord has a number of benefits, one of which is the increased file upload size of 100MB. It costs $4.99 per month or $49.99 per year, so if you’re likely to be regularly uploading videos that are lower than this limit, it might make sense.
2. Cut Unwanted Clips/Compress Video with Filmora Video Editor
The second choice would be to take your video and cut it into pieces, sending them one at a time. This might sound time-consuming but with Filmora’s Instant Cutter Tool, it’s really simple.
All you need to do is open a video in Filmora by clicking the arrow next to Import and then choosing ‘Import with Instant Cutter Tool’.
This will open the Instant Cutter window where you can click Open File to add your video. From here you can trim your files and export them in multiple sections. There are different ways that you can do this, and while each is a simple process, there are still a few steps to follow.
For more detail, check out this post for a step-by-step guide on the different ways you can trim a video in Filmora.
You can also try to compress your video size, which may let you keep the whole video at the expense of some of the quality. Again, using Filmora, this is easy. But also again, there are different ways to go about it.
You could literally crop the video in order to trim some of the data, as the reduced viewing screen won’t be as big a file. You can also reduce the resolution, or convert your video to a format that uses fewer data. You’ll need to test it though, as converting to some video formats might result in blurry footage.
There are advanced settings you can tinker with too, such as lowering the frame rate or the bit rate. Again, rather than go through all of those options in an epic article here, it’s easier to head to a post dedicated to these steps about compress videos with Filmora .
3. Upload to YouTube/Vimeo/Google Drive/Dropbox
The final option is to upload your video to an online player or storage site, and link to it, rather than having Discord host the file. YouTube and Vimeo are the obvious options, but Streamable is another popular choice too with a free membership. YouTube’s maximum video uploads are 128GB, which is huge, while other sites like Streamable cap free accounts to 500MB per video.
So, if you want to upload massive files, you’ll need to decide whether to choose YouTube or pay for an upgraded membership elsewhere. Wherever you host your video, once it’s online just grab the link and paste it into Discord to share your content.
The only drawback to this option is that it stops other users from being able to download the video directly, and you may need to look at a file sharing alternative such as Dropbox if you want to send the actual file.
FAQs About Uploading Videos to Discord
Which Kind of Video Formats Can I Upload to Discord?
You can send any filetype to another user on Discord, so that they can download it and watch it on their own device. But if you want to upload a video so that Discord embeds it, and makes it playable within the chat, you’re limited to only mp4 and WebM filetypes.
You can also use MOV files, but not everyone will be able to play them, and FLAC files are supported on desktop only but not on mobile.
How Can I Upload Saved Videos to Discord?
If you find a video on Discord that you want to share on a different server or in a private DM, you can use the download icon to save it locally. Then, follow the steps above to upload the video to the server or DM chat window where you want to share it.
Richard Bennett
Richard Bennett is a writer and a lover of all things video.
Follow @Richard Bennett
Also read:
- [New] 2024 Approved From Script to Splendor Animating Effects Unbound
- [New] 2024 Approved The Art of Engagement Mastering TikTok's Language Through 5 Essential Caption Techniques
- [New] Become a TikTok Fanatic Setup Guide for MacBook
- [New] Captivating Content Through Words Top 5 Innovative TikTok Caption Ideas
- [New] Eco-Stage Designs Mastering Cinematographic Skills with Free Downloads
- [Updated] 2024 Approved Ignite Your Marketing Flame Sparkling Strategies for SMM Success
- [Updated] Captivating Viewers with TikTok's Best Captioning Practices (Top 5) for 2024
- [Updated] Pure Greenprints Accessible Templates to Amplify Your Filmmaking Expertise for 2024
- Crafting Memorable Content on Snapchat (Top Tips)
- Fixing a Non-Functional Mic Issue in Windows 11
- How to Successfully Refresh Your Samsung Mobile Device's USB Drivers for Optimal Performance
- In 2024, Extreme Escape Top 10 Unpredictable TikTok Challenges
- In 2024, How does the stardust trade cost In pokemon go On Apple iPhone 15? | Dr.fone
- Top 5 Ways Copernic Enhances Your Work-From-Home Experience
- Who Are TikTok’s Most Influential Gaming Bloggers, In 2024
- YL Computing's Elegant Sayori Themes: Premium Backdrop Graphics & Walls
- Title: Eliminate Your Discord Servers Desktop & Android Tips
- Author: Gary
- Created at : 2024-12-22 09:05:58
- Updated at : 2024-12-25 00:02:35
- Link: https://tiktok-clips.techidaily.com/eliminate-your-discord-servers-desktop-and-android-tips/
- License: This work is licensed under CC BY-NC-SA 4.0.