
"Conquer Snapchat Lens Design Two Easy Approaches"
Conquer Snapchat Lens Design: Two Easy Approaches
How to Create Snapchat Lenses Easily: 2 Methods

Ollie Mattison
Mar 27, 2024• Proven solutions
Are you feeling like creating your own Snapchat lens, so you can have an even better experience with the app? The good news is that two new Snapchat tools have been released – the Lens Studio and Create Your Own Lens applications.
If you are a regular Snapchat user, you may want to learn about the Snapchat lens and how it can help you. We will help you get started. Here is our step by step guide on how to make Snapchat lenses.
- Part1: Comparing Lens Studio and Creating Your Own Lens
- Part2: How to Use Lens Studio
- Part3: How to Create Snapchat Lenses Using Create Your Own Lens
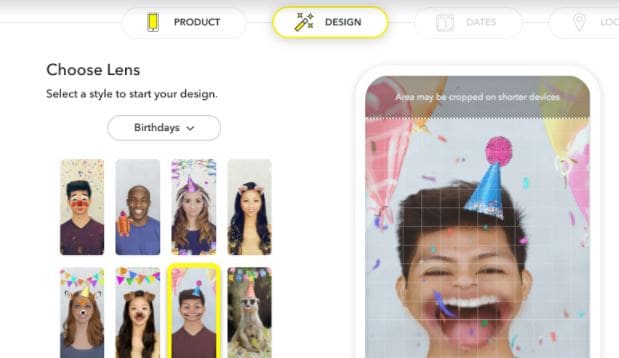
Part 1: Comparing Lens Studio and Creating Your Own Lens
The two programs that we are highlighting today are Lens Studio and Create Your Own Lens. These are both fantastic programs for creating your own Snapchat lens, but they do have slightly different uses. If you are the type of person who wants to design a professional Snapchat lens, you are going to prefer Lens Studio.
But if you are hoping to come up with something creative that you can share with your friends and family, then you may love Create Your Own Lens. It is a very easy program to use, and it offers a ton of features that you may be surprised to see.
Snapchat lenses is for fun
The beauty of Snapchat lenses is that you can now create your own environment, which you can use each time you are taking photos or videos. Sure, you can always use the filters that are already available in the application, but not everyone would find those enough.
If you want some customization, or you just want to mess around until you get the filter that makes sense for you, Snapchat lenses are the way to go.

Lens Studio is for business
Lens Studio is perfect for businesses that may want to create unique environments for their clients, or the times when they are releasing company Snapchat posts. Say the company is hosting an event. They may want a custom graphic for that event, which is used for all the pictures and videos posted to Snapchat about the event. Using Lens Studio lets them do that with ease.
Create Your Own Lens is great when you are going to a special event, birthday party or graduating, and you want a special graphic that comes up in all your snaps. It is very intuitive to use, and is available through the App Store as a download.
Part 2: How to Use Lens Studio
1. Download Lens Studio
The first step involves downloading Lens Studio, which you can do from your computer. It is compatible with both Windows and Mac computers, and will run on any semi-modern system. According to the Snapchat team, Lens Studio is similar to the program used by their AR teams to create lenses. That means you are getting similar functionality, but with an easier to manage interface.
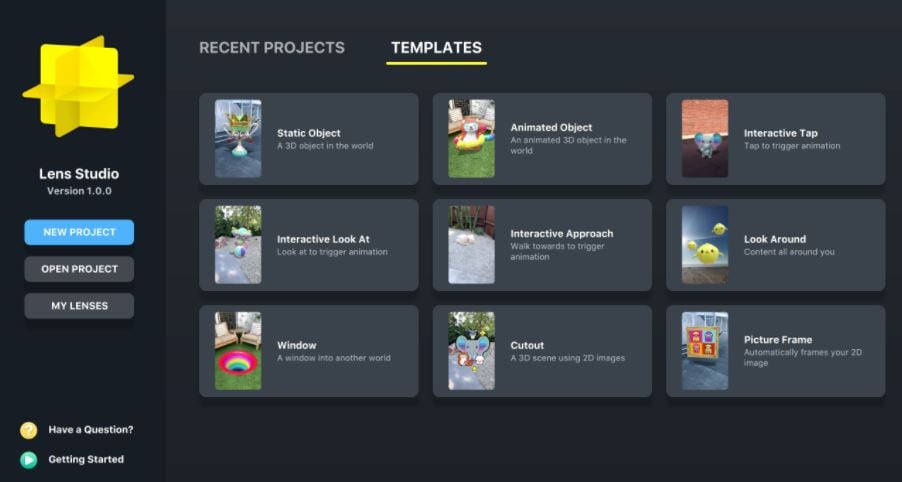
2. Choose Templates Page
It is normal to feel a little overwhelmed the first time you try and use this program. But that is why the templates page is so great. You can select from templates depending on the type of lens that you are hoping to create. You can just use a template, or you can incorporate your own ideas to customize the template.
There is also a Lens Studio Overview guide that you can access online, which will help you get acquainted with the program’s various features and quirks.
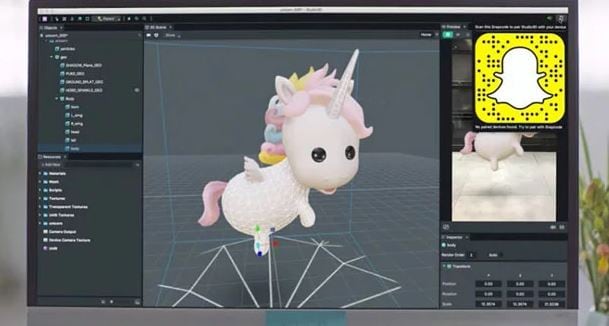
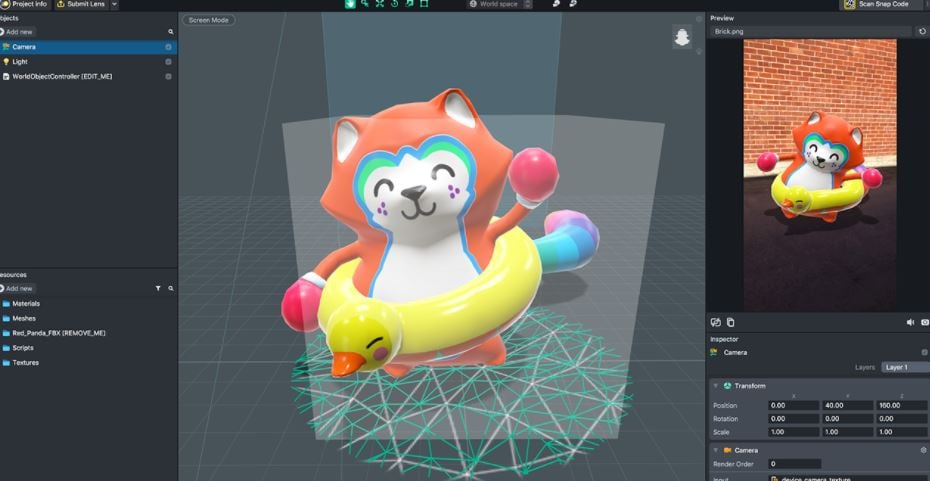
3. Use Studio Panels
Are you ready to create your own custom Snapchat lens? It is time to head over to Studio Panels on the application. This is the area where you can add your own 2D or 3D objects, and you can visualize how they would look as a Snapchat filter. You can add, remove, resize and drag objects to specific areas of the screen.
There are other tools accessible from the Resources panel. You can use these tools to ensure that your Snapchat lens is exactly as you want.
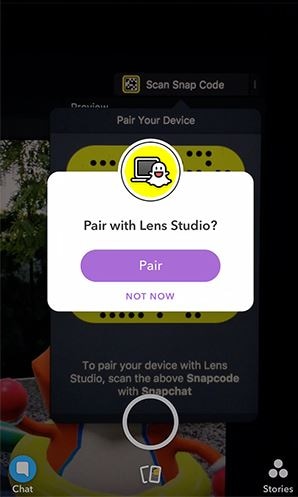
4. Preview the Snapchat Lens You Create
The great thing about this application is that you can preview the lens before you send it out to your phone. When you are satisfied with the image on the preview, you can pair your phone with the application, and you will be able to send that Snapchat lens onto your phone through your Snapcode. It is that simple!
Part 3: How to Create Snapchat Lenses Using Create Your Own Lens
- There are two ways that you can access the tool for creating fun Snapchat lenses. You can either visit the website snapchat.com/create, or you can go on the “filters and lenses” section on your iOS device. If you are using Snapchat on an Android device, you will only have the option for the website. But the feature is coming to the Android version of Snapchat very soon.
- When you are in the application or on the website, you may start to look at the different templates for Snapchat lenses. Now you can add other items into the templates, such as photographs, text or graphics.
It is all up to your imagination. You can create the perfect Snapchat lens, which you can then send into your Snapchat account through your Snapcode. Of course, if you are using your iOS device to create the lens, it is already linked to your account.
Another cool feature is how you can set the location for where the Snapchat lens is available. Say you are hosting a party. You can have the Snapchat lens available to everyone who uses Snapchat within a set square footage of your home. That is an amazing way to let everyone share social media pictures and photos of your party, through the lens you created.
Conclusion
Creating Snapchat lenses has never been easier. Whether you are a business looking to add a custom lens, or you just want to create a fun lens for a graduation or party, there are tools that make the job very easy. Using these tools will allow you to create the perfect Snapchat lens for any occasion.
Ollie Mattison
Ollie Mattison is a writer and a lover of all things video.
Follow @Ollie Mattison
Ollie Mattison
Mar 27, 2024• Proven solutions
Are you feeling like creating your own Snapchat lens, so you can have an even better experience with the app? The good news is that two new Snapchat tools have been released – the Lens Studio and Create Your Own Lens applications.
If you are a regular Snapchat user, you may want to learn about the Snapchat lens and how it can help you. We will help you get started. Here is our step by step guide on how to make Snapchat lenses.
- Part1: Comparing Lens Studio and Creating Your Own Lens
- Part2: How to Use Lens Studio
- Part3: How to Create Snapchat Lenses Using Create Your Own Lens
Part 1: Comparing Lens Studio and Creating Your Own Lens
The two programs that we are highlighting today are Lens Studio and Create Your Own Lens. These are both fantastic programs for creating your own Snapchat lens, but they do have slightly different uses. If you are the type of person who wants to design a professional Snapchat lens, you are going to prefer Lens Studio.
But if you are hoping to come up with something creative that you can share with your friends and family, then you may love Create Your Own Lens. It is a very easy program to use, and it offers a ton of features that you may be surprised to see.
Snapchat lenses is for fun
The beauty of Snapchat lenses is that you can now create your own environment, which you can use each time you are taking photos or videos. Sure, you can always use the filters that are already available in the application, but not everyone would find those enough.
If you want some customization, or you just want to mess around until you get the filter that makes sense for you, Snapchat lenses are the way to go.
Lens Studio is for business
Lens Studio is perfect for businesses that may want to create unique environments for their clients, or the times when they are releasing company Snapchat posts. Say the company is hosting an event. They may want a custom graphic for that event, which is used for all the pictures and videos posted to Snapchat about the event. Using Lens Studio lets them do that with ease.
Create Your Own Lens is great when you are going to a special event, birthday party or graduating, and you want a special graphic that comes up in all your snaps. It is very intuitive to use, and is available through the App Store as a download.
Part 2: How to Use Lens Studio
1. Download Lens Studio
The first step involves downloading Lens Studio, which you can do from your computer. It is compatible with both Windows and Mac computers, and will run on any semi-modern system. According to the Snapchat team, Lens Studio is similar to the program used by their AR teams to create lenses. That means you are getting similar functionality, but with an easier to manage interface.
2. Choose Templates Page
It is normal to feel a little overwhelmed the first time you try and use this program. But that is why the templates page is so great. You can select from templates depending on the type of lens that you are hoping to create. You can just use a template, or you can incorporate your own ideas to customize the template.
There is also a Lens Studio Overview guide that you can access online, which will help you get acquainted with the program’s various features and quirks.
3. Use Studio Panels
Are you ready to create your own custom Snapchat lens? It is time to head over to Studio Panels on the application. This is the area where you can add your own 2D or 3D objects, and you can visualize how they would look as a Snapchat filter. You can add, remove, resize and drag objects to specific areas of the screen.
There are other tools accessible from the Resources panel. You can use these tools to ensure that your Snapchat lens is exactly as you want.
4. Preview the Snapchat Lens You Create
The great thing about this application is that you can preview the lens before you send it out to your phone. When you are satisfied with the image on the preview, you can pair your phone with the application, and you will be able to send that Snapchat lens onto your phone through your Snapcode. It is that simple!
Part 3: How to Create Snapchat Lenses Using Create Your Own Lens
- There are two ways that you can access the tool for creating fun Snapchat lenses. You can either visit the website snapchat.com/create, or you can go on the “filters and lenses” section on your iOS device. If you are using Snapchat on an Android device, you will only have the option for the website. But the feature is coming to the Android version of Snapchat very soon.
- When you are in the application or on the website, you may start to look at the different templates for Snapchat lenses. Now you can add other items into the templates, such as photographs, text or graphics.
It is all up to your imagination. You can create the perfect Snapchat lens, which you can then send into your Snapchat account through your Snapcode. Of course, if you are using your iOS device to create the lens, it is already linked to your account.
Another cool feature is how you can set the location for where the Snapchat lens is available. Say you are hosting a party. You can have the Snapchat lens available to everyone who uses Snapchat within a set square footage of your home. That is an amazing way to let everyone share social media pictures and photos of your party, through the lens you created.
Conclusion
Creating Snapchat lenses has never been easier. Whether you are a business looking to add a custom lens, or you just want to create a fun lens for a graduation or party, there are tools that make the job very easy. Using these tools will allow you to create the perfect Snapchat lens for any occasion.
Ollie Mattison
Ollie Mattison is a writer and a lover of all things video.
Follow @Ollie Mattison
Innovative Approaches to Keeping Your Snaps Connected
With over 347million daily users, Snapchat is one of the most popular social media platforms out there, especially among millennials, and one of the things that makes it unique is its Streaks.
For those who don’t have any idea about Snapchat streaks, they are essentially a measure of how often you and your friends send Snaps to each other within a 24-hour period. The longer the streak, the more points you earn.
In this article, we’ll give you some Snapchat streak ideas to help you keep them alive and show your dedication to your friends.
The Things You Should Know About Snapchat Streaks
Snapchat streaks are a popular way to stay connected with friends on the app. But what are Snapstreaks, and how do they work?
Below, we’ll give you a quick rundown of everything you need to know about Snapchat streaks.
(1) What Will Not Be Counted Towards Snapchat Streaks
We all know how important it is to keep up our Snapchat streaks - after all, it’s a way to show how close we are to someone! But there are a few things that won’t count towards your Snapstreak, even if you’re still talking to your friends every day.
- Chatting: If you’re just chatting with someone without exchanging any snaps, that won’t count towards your streaks.
- Story: Views of your Story don’t count, but if you reply to someone’s story with a snap, that will keep your streaks going.
- Memories: Any picture from your Memories vault will not be considered a Snapstreak.
- Group Chat: Group chats, whether text-based or Snaps, do not contribute to a Streak.
- Snapchat Spectacle: Any snap sent through Snapchat spectacle won’t be considered a Snapstreak interaction.
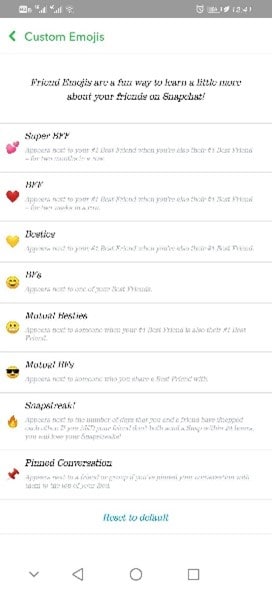
(2) The Emojis Relevant To Snapchat Streak
There are many new emojis on Snapchat that you can use in your snaps to communicate with your friends or family in a whole new way. However, only a handful of them is related to Snapstreaks.
Here’s a list of the emojis relevant to Snapchat Streak and what they mean:
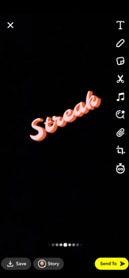
- Fire: When you send Snaps to a contract for three consecutive days, a fire emoji will appear next to the person’s name, indicating a streak has started.
- 100: This emoji appears if you send one snap every day for 100 days.
- Hourglass: When you don’t send a snap within 24 hours to someone that you have started the streak with, an hourglass emoji will appear next to the person’s name, indicating that the Snapstreak is about to end.
- Face with Sunglasses: This emoji reflects that you and your friends are mutual besties.
- Hearts: There are three kinds of heart emojis: Double Pink Hearts, Red, and Yellow. The former indicates Super BFF, while the second shows that you and your friend are BFFs. The third one is for Besties.
- Mountain: Many claims that a unicorn-type emoji will appear when you have a very long steak but details of this emoji are not available in Snapchat documentation.
- Smiling Face: This emoji appears when you and your friends are best friends.
How To Keep Your Snapchat Streak Alive
Have you seen the dreaded “hourglass” emoji and your streak with your best friend or family member is about to expire, but you have no idea how to keep it alive?
Don’t worry; below, we’ve provided some creative Snapstreak ideas to help you never let your streak expire again!
Tip 1. Ideas To Create And Send Snaps Quickly
Below are some tips/ideas to help you quickly create and send Snaps to keep your Snapchat streak alive:
Idea 1. Edit Blank Snap And Send As New Snap
If you have run out of snap ideas, don’t worry about sending a high-quality one. No one is judging you, so send a blank snap to keep the streak alive; however, edit it a little so it looks like you have put in some effort.
Idea 2. Send Black Screen
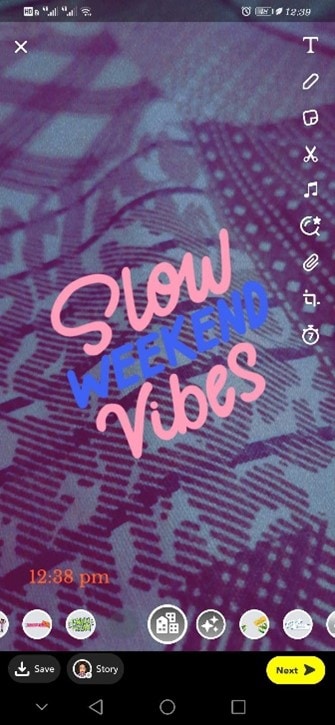
Your Snapstreaks are about to expire, and you’re freaking out? Here’s a little hack that will keep them alive: send a black screen snap. That’s right! You can also add some doodles or stickers to the picture to make things look more interesting.
Idea 3. Use Emojis And Bitmojis
You can also add emojis or Bitmojis to your photos to make them look more interesting and fun. Simply open up the Snapchat app, click a picture, and tap on the emoji icon to select the emoji or Bitmoji that you want to add to your Snap. You can even resize and move them around to get it just right.
Idea 4. Snap With Your Pets
We all love our pets - and we also like staying connected with our friends on Snapchat. So why not combine the two? Occasionally take a picture of your pet using the app and send it to your besties to make their day and keep the streak alive!

Idea 5. Streak With Daily Food
Food is always a good topic and can be one of the best ways to keep your Snapchat streak alive. Simply send a snap to your friend every day before you start munching.

Tip 2. Seize Occasions And Keep Your Snapchat Sneak Alive
To keep your Snapchat streak alive, try to seize any opportunity you can to take pictures and send them to friends. Below are some ideas to do this:
Idea 1. The First Day Matters
Many people choose to start their streaks on special days because it helps them remember to keep them alive. For example, if you start your streak on your birthday, you’ll always remember to keep the streak going on, and it will also help you to grab the attention of people.
Idea 2. Memorable Day
We all have memorable days in our lives, like a milestone, graduation, or special event that we want to remember forever. What is a better way to commemorate them than with a Snap? Your friends and family will appreciate it, and you will be able to keep your streak alive for days to come.
Idea 3. Streak While Traveling
Whenever you are on a trip, travel to your office/college, or head out to run some errands, remember to take a picture of the surroundings that look interesting and send it to whom you are establishing the streak.

Tip 3. Organize Your Snapchat And Your Time
Are you trying to get the most out of Snapchat without letting it take over your life? Below we’ve provided some ideas to help you organize your time and your snaps.
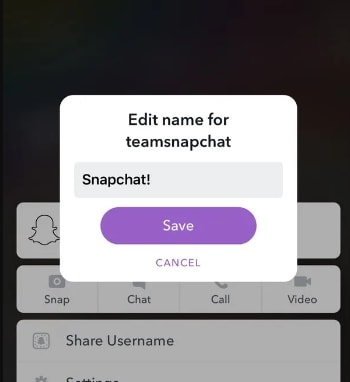
Idea 1. Edit the Name of your Snapchat Friends
To avoid losing your Snapchat streaks with any of your contacts, you should start editing their names. Snapchat lists your most contacted friends at the top, so you might not see the others who are lower on your list. Editing their names to include something that will help you search for them will make it easier to avoid forgetting to send them a snap regularly.
Idea 2. Pin Your Conversations
If you want to keep someone at the top of your chat list, consider pinning their chat. This will also ultimately help you send snaps to them without breaking the streak.

Idea 3. Stick to a Particular Time of the Day
You will gain more by starting your Snapstreaks later on in the day, especially if you are only sending one snap per day. This way, the hourglass emoji will be visible for a considerable amount of time before it expires.
Idea 4. Check Your Filters
If you’re trying to keep up with multiple Snapstreaks at once, it’s easy to forget who you’re on a streak with. But there’s a way to see them without going to your list of friends.
Whenever you’re about to send a new snap, swipe through the filters. Here, you’ll see a special Snapchat streak filter, which will show how many consecutive days of successful streak you have in big white numbers next to the fire emoji.
Conclusion
In this article, we’ve compiled a list of fun and creative Snapchat streak ideas to help you stay connected with your friends.
Hopefully, by following these tips, you can now keep your Snapchat streak alive and stay connected with your contacts in a better and more engaging way!
Free Download For Win 7 or later(64-bit)
Free Download For macOS 10.14 or later
Free Download For macOS 10.14 or later
Also read:
- [New] 2024 Approved Unleash Creativity Video Art & Live Streaming with VLC Webcam Capabilities
- [New] Complete Guide to Recording Live TV on Your Windows PC for 2024
- [New] Enjoy TikTok at Your Fingertips Download & Setup on MacBook for 2024
- [New] In 2024, Mastering TikTok Brand Extraction Android/iOS Solutions
- [New] The Secrets to Stellar TikTok Creation with Ingenious Templates
- [New] Unleashing Your Creative Potential with Siri on TikTok Apps for 2024
- [Updated] In 2024, How to Make Duet On TikToK?
- [Updated] In 2024, Ultimate Series Top-Tier Webcam Grips
- 2024 Approved Pioneering Top VR Movies for Enjoyment
- 2024 Approved Step-by-Step TikTok Usage for Mac and PC Users
- How to Enable Control for Voice-Only Windows Bluetooth
- How to Get and Use Pokemon Go Promo Codes On Google Pixel Fold | Dr.fone
- In 2024, How To Enable USB Debugging on a Locked Poco X6 Pro Phone
- In 2024, Top 30 Anime-Inspired Videos Reshaping Online Culture
- Rising Stars Will Likes Surpass TikTok's Mass Appeal for 2024
- Spotify Keeps Crashing A Complete List of Fixes You Can Use on Realme 11 5G | Dr.fone
- Unlock Slides' Potential Embedding Video From YouTube for 2024
- Title: Conquer Snapchat Lens Design Two Easy Approaches
- Author: Gary
- Created at : 2025-01-01 16:30:38
- Updated at : 2025-01-03 16:40:47
- Link: https://tiktok-clips.techidaily.com/conquer-snapchat-lens-design-two-easy-approaches/
- License: This work is licensed under CC BY-NC-SA 4.0.