
:max_bytes(150000):strip_icc()/how-to-reset-network-settings-on-mac-67f9ced141324211893514022b0229fb.jpg)
"Beyond Playfulness Unveiling the Subtext in Snapchat Symbols"
Beyond Playfulness: Unveiling the Subtext in Snapchat Symbols
Snapchat Emojis: the Real Meaning You May not Know

Ollie Mattison
Mar 27, 2024• Proven solutions
If you’re a Snapchat user, you will have spotted the emojis that appear in your friends list next to the names of your friends. These Snapchat emojis don’t simply remain the same forever, but instead change over the course of time, and the changes themselves are based on the way that you interact with your friend. Only you are able to see the emojis. The Snapchat emojis themselves include stars, hearts, faces and more.
- Part1: What do exactly the Snapchat emojis mean?
- Part2: How to change the streak emojis on Snapchat
- Part3: How to get a Bitmoji on Snapchat
- Part4: Why to use Snapchat emojis
Part 1: What do exactly the Snapchat emojis mean?
In this section, we will tell you all about the different emojis on Snapchat. If you’ve been wondering what the Snap emoji meanings actually are, read on. A Gold Star next to someone’s name means they have replaced your snaps during the past 24 hours. A Yellow Star means you are #1 best friends with one another. You will send your largest amount of snaps to them and vice versa.
A Red Heart snap emoji is used to say that you have been #1 Bfs for a fortnight without interruption, whilst a Pink Heart Snapchat best friend emoji tells that that this has been the case for two months. If you see a baby emoji, this means you have only recently become friends with the person.
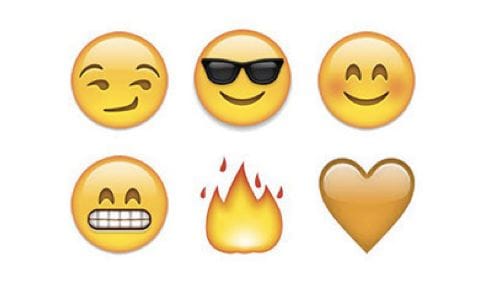
Have you seen a Face with Sunglasses? This means the person is B.Fs with one of your best friends and you send plenty of snaps to someone that they send many snaps to. A Grimacing Face tells you that your #1 is also their #1 friend and that the person you send the most snaps to is the same person they send the vast majority of their snaps to.
The Smirking Face shows that you are one of their B.Fs without this being reciprocated. In other words, they send you many snaps but you don’t return the favor. A Smiling Face means that you are good friends with someone but they aren’t quite your #1 B.F.
Part 2: How to change the streak emojis on Snapchat
If you’re not happy with the emojis that you are seeing or you feel that they are not accurate for the person in question, don’t worry – these can easily be changed. You can switch the emojis by taking the following steps.
- Open Snapchat and swipe down
- Tap Settings
- Tap Manage Preferences
- Tap Friend Emojis
- Tap the icon that you want to change
- Tap the emoji that you wish to use
Part 3: How to get a Bitmoji on Snapchat
Snapchat purchased Bitmoji creator Bitstrips in 2016 in an attempt to capitalise on the popularity of emojis. It is now possible to link your Bitmoji account to your Snapchat one, and it only takes a few moments to connect the two. By doing so, you can enjoy greater customisation options and enhance the experience of using Snapchat.
Take these steps if you wish to get a personal Bitmoji on Snapchat.
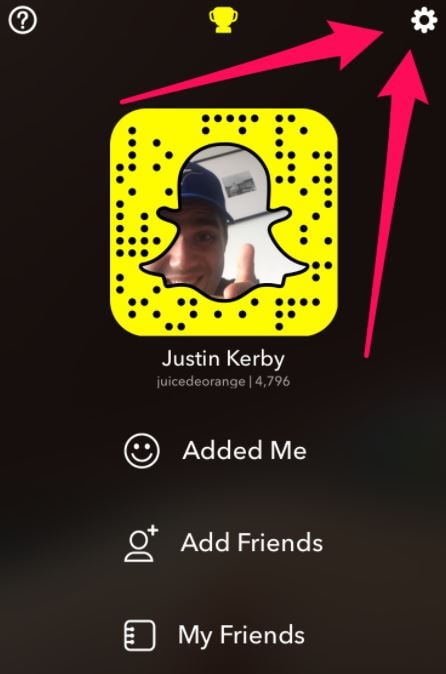
1. Open your Snapchat settings
Swipe down on your home screen, tapping the gear icon located in the top right-hand corner of your screen.
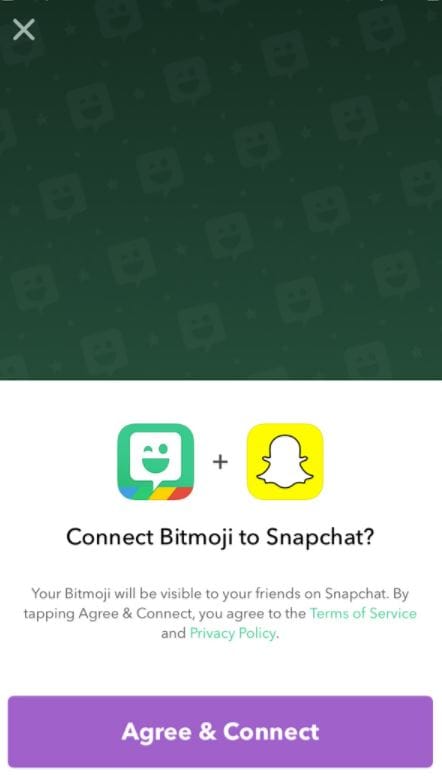
You can find this in the ‘My Account’ section. Those that have already registered with Bitmoji will be able to link their account in the next step, but if you haven’t, you will need to set up a new Bitmoji account.
2. Agree and connect
You will now be able to link your Bitmoji account up to your Snapchat account. This means you can easily share your very own Bitmoji character with your followers on Snapchat and make the experience of using the service even more fun and personal to you.
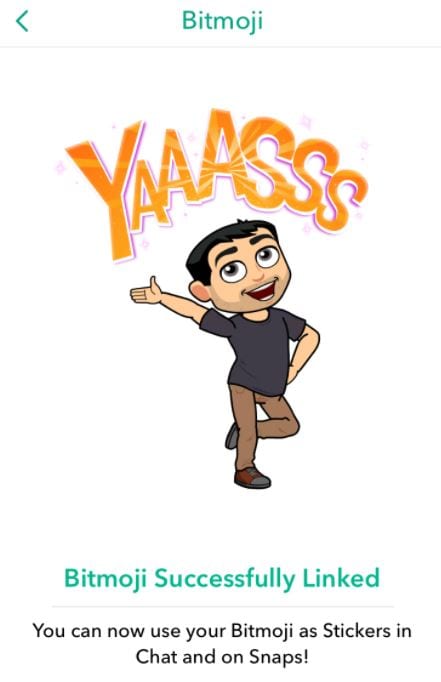
3. Send Snaps using your new Bitmoji character
Everything is set up for you to make the most of linking Bitmoji to Snapchat. Your Bitmoji is now stored in your regular emoji tab and can be seen under the icon which resembles a face.
Part 4: Why to use Snapchat emojis
There are many great reasons for using Snapchat. The platform first appeared way back in September and has attracted millions upon millions of users since then. Snapchat may be strongly associated with teenagers, but it is used by adults of all ages. When you use Snapchat, the content you share is more direct and personal and is only seen by the people you want to see it, for ten seconds only. Snapchat is great for privacy, and if anyone attempts to take a screenshot of your content you will be notified.
Another reason so many people use Snapchat is that there are no complex settings to leave you confused. It also simplifies the video calling process and makes it much less complicated than other video communication platforms. Snapchat has also become a major marketing tool for businesses around the world, allowing them to connect with and promote their services to a wider range of tech-loving users.
You may also like: Add Emojis to Videos on YouTube/Facebook/Snapchat [Step by Step Guide] >>
Conclusion
More and more people are using Bitmoji to change the emojis on Snapchat. When you use Bitmoji to change your Snap emojis, you can make an excellent statement about yourself. Snapchat brings friends closer together, and it’s said that the platform had more daily users than Twitter in 2016. The creators of Snapchat actually failed 34 projects before their innovation became a success, which shows that perseverance can pay off. Why not change your Snapchat emojis today?
Ollie Mattison
Ollie Mattison is a writer and a lover of all things video.
Follow @Ollie Mattison
Ollie Mattison
Mar 27, 2024• Proven solutions
If you’re a Snapchat user, you will have spotted the emojis that appear in your friends list next to the names of your friends. These Snapchat emojis don’t simply remain the same forever, but instead change over the course of time, and the changes themselves are based on the way that you interact with your friend. Only you are able to see the emojis. The Snapchat emojis themselves include stars, hearts, faces and more.
- Part1: What do exactly the Snapchat emojis mean?
- Part2: How to change the streak emojis on Snapchat
- Part3: How to get a Bitmoji on Snapchat
- Part4: Why to use Snapchat emojis
Part 1: What do exactly the Snapchat emojis mean?
In this section, we will tell you all about the different emojis on Snapchat. If you’ve been wondering what the Snap emoji meanings actually are, read on. A Gold Star next to someone’s name means they have replaced your snaps during the past 24 hours. A Yellow Star means you are #1 best friends with one another. You will send your largest amount of snaps to them and vice versa.
A Red Heart snap emoji is used to say that you have been #1 Bfs for a fortnight without interruption, whilst a Pink Heart Snapchat best friend emoji tells that that this has been the case for two months. If you see a baby emoji, this means you have only recently become friends with the person.
Have you seen a Face with Sunglasses? This means the person is B.Fs with one of your best friends and you send plenty of snaps to someone that they send many snaps to. A Grimacing Face tells you that your #1 is also their #1 friend and that the person you send the most snaps to is the same person they send the vast majority of their snaps to.
The Smirking Face shows that you are one of their B.Fs without this being reciprocated. In other words, they send you many snaps but you don’t return the favor. A Smiling Face means that you are good friends with someone but they aren’t quite your #1 B.F.
Part 2: How to change the streak emojis on Snapchat
If you’re not happy with the emojis that you are seeing or you feel that they are not accurate for the person in question, don’t worry – these can easily be changed. You can switch the emojis by taking the following steps.
- Open Snapchat and swipe down
- Tap Settings
- Tap Manage Preferences
- Tap Friend Emojis
- Tap the icon that you want to change
- Tap the emoji that you wish to use
Part 3: How to get a Bitmoji on Snapchat
Snapchat purchased Bitmoji creator Bitstrips in 2016 in an attempt to capitalise on the popularity of emojis. It is now possible to link your Bitmoji account to your Snapchat one, and it only takes a few moments to connect the two. By doing so, you can enjoy greater customisation options and enhance the experience of using Snapchat.
Take these steps if you wish to get a personal Bitmoji on Snapchat.
1. Open your Snapchat settings
Swipe down on your home screen, tapping the gear icon located in the top right-hand corner of your screen.
You can find this in the ‘My Account’ section. Those that have already registered with Bitmoji will be able to link their account in the next step, but if you haven’t, you will need to set up a new Bitmoji account.
2. Agree and connect
You will now be able to link your Bitmoji account up to your Snapchat account. This means you can easily share your very own Bitmoji character with your followers on Snapchat and make the experience of using the service even more fun and personal to you.
3. Send Snaps using your new Bitmoji character
Everything is set up for you to make the most of linking Bitmoji to Snapchat. Your Bitmoji is now stored in your regular emoji tab and can be seen under the icon which resembles a face.
Part 4: Why to use Snapchat emojis
There are many great reasons for using Snapchat. The platform first appeared way back in September and has attracted millions upon millions of users since then. Snapchat may be strongly associated with teenagers, but it is used by adults of all ages. When you use Snapchat, the content you share is more direct and personal and is only seen by the people you want to see it, for ten seconds only. Snapchat is great for privacy, and if anyone attempts to take a screenshot of your content you will be notified.
Another reason so many people use Snapchat is that there are no complex settings to leave you confused. It also simplifies the video calling process and makes it much less complicated than other video communication platforms. Snapchat has also become a major marketing tool for businesses around the world, allowing them to connect with and promote their services to a wider range of tech-loving users.
You may also like: Add Emojis to Videos on YouTube/Facebook/Snapchat [Step by Step Guide] >>
Conclusion
More and more people are using Bitmoji to change the emojis on Snapchat. When you use Bitmoji to change your Snap emojis, you can make an excellent statement about yourself. Snapchat brings friends closer together, and it’s said that the platform had more daily users than Twitter in 2016. The creators of Snapchat actually failed 34 projects before their innovation became a success, which shows that perseverance can pay off. Why not change your Snapchat emojis today?
Ollie Mattison
Ollie Mattison is a writer and a lover of all things video.
Follow @Ollie Mattison
Step-by-Step Guide to Pause & Extend Videos on Snapchat
Snapchat is an instant messaging app that allows you to share your pictures and videos with your family members, friends, and colleagues. In addition, you can even create your stories in the form of movie clips and share them on the app. These stories remain available for the next 24 hours, after which they are automatically removed from the platform.
While sharing the videos, you can apply several filters that are already present in the app, and Slow Motion is one of them. You may want to learn how to slow down a video on Snapchat when you want to emphasize and draw viewers’ attention toward the scene, or wish to make the audience see your actions closely and in detail.
That said, in the following sections, you will see how to slow down videos on Snapchat, and what other methods you can use to reduce the playback speed more professionally.
In this article
01 How to Add Slow Motion Effects to Video Using the Snapchat App
02 How to Record a Slo-Mo Video and Upload to Snapchat
03 How to Make Flash and Smooth Slo Mo Video for Snapchat
04 FAQs about Slowing Down Snapchat Video
Part 1: How to Add Slow Motion Effects to Video Using the Snapchat App
Snapchat has a built-in Slow Motion filter that reduces the playback speed of a video when applied. You can learn how to slow down on Snapchat by following the instructions that are given below:
Step 1: Record a Video
Launch Snapchat on your smartphone (iPhone 13 Pro Max is used here for illustrations), make sure that the Camera section is selected from the bottom, tap and hold down the Capture button that is present at the lower part of the interface, and let go of it when you are done recording.

Step 2: Apply the Slow Motion Filter
Once the video is recorded, swipe the screen from left to right. Repeat this process until you see the Snail (Slow Motion) icon on the screen. This will reduce the playback speed of the clip.

Step 3: Decorate the Video (Optional)
Use the options present on the upper-right area of the screen to further decorate the video and/or add annotations to it.

Step 4: Share or Publish the Video
Once everything is done, tap Send To from the bottom-right corner to share the video with your family, friends, and colleagues, or publish it as a story that remains available for the next 24 hours.
Related: How to Record Slo-Mo videos on iPhone .
Part 2: How to Record a Slo-Mo Video and Upload to Snapchat
With Snapchat, even though you don’t require any third-party tool to reduce the playback speed of a video, the app has certain limitations. For example, it doesn’t allow you to set a zoom level, you are stuck with the framerate that the app has to offer, etc.
Because of this, many people prefer to use different methods to record a video in slow motion with their preferences, and then upload it to Snapchat. This approach also eliminates the need to swipe the screen several times merely to use a single slow-motion filter.
Fortunately, iPhone has a built-in SLO-MO mode in its Camera app that allows you to capture the videos in slow motion. To learn how to do slow mo on Snapchat with the iPhone’s Camera app, you can follow the instructions that are given below:
Step 1: Get to the iPhone’s SLO-MO Mode
Launch the Camera app on your iPhone (iPhone 13 Pro Max is used here for illustrations), and swipe the screen from left to right until you get to the SLO-MO mode.

Step 2: Set Recording Preferences
Tap the number that is present at the top-right corner (240 here) to toggle between different framerates, tap 1x from the lower-center area, swipe slightly up, and then use the wheel that appears next to define your preferred zoom level.

Step 3: Start and Stop the Recording
Tap the Record button to start the recording, and tap Stop when you’re done.
Note: Make sure that the duration of the recorded video doesn’t exceed 60 seconds.
Step 4: Upload the Slow-Motion Video to Snapchat
After the video is recorded in slow motion, close the Camera app, launch Snapchat, and tap the Gallery icon from the left side of the Capture button on the Camera section. From the Memories screen, go to the Camera Roll tab, and tap to select the video that you recorded in the previous step.
Next, optionally, tap the Edit icon from the bottom-left corner to decorate the video and/or add annotations to it, and follow the process as explained in the previous section to share the clip with your family, friends, or colleagues, or publish it as your story.

Part 3: How to Make Flash and Smooth Slo Mo Video for Snapchat
Although iPhone has the built-in SLO-MO mode that even enables you to set your preferred framerate and zoom level before recording, it still doesn’t allow you to slow down different parts of a video in different speed at your convenience. You can either record the entire video in slow motion or at a normal speed.
This is where a third-party app comes into play. While there are several video editing programs available online, the one of the best slow motion apps that helps you slow down the portions of a video with precision is CapCut.
Downloading and installing CapCut on your iPhone or Android phone is simple, and once it is done, you can follow the process given below to learn how to slow things down on Snapchat:
With CapCut, you can either slow down the whole clip or manage the speed for different segments. This section explains both methods.
Method 1: Slow Down the Whole Clip with CapCut
Step 1: Get to the Speed Panel
Launch CapCut, import the video that you want to slow down, and tap the imported media in the Timeline. Next, tap Speed from the bottom of the interface to get to the next window.

Step 2: Reduce the Speed of the Video
Tap Normal from the bottom of the screen that appears next, and drag the Speed slider to the left to reduce the playback speed. Tap OK from the bottom-right corner to save the changes.

Step 3: Upload the Video to Snapchat
Back on the previous interface, optionally tap Volume from the bottom and reduce the slider to 0 to mute the audio of the footage as it may get distorted due to the reduction in the speed.
Next, tap Share from the top-right corner to save the video on your iPhone, and then use the method explained in the previous section to access the clip from the Gallery within Snapchat for uploading.
Method 2: Reduce the Playback Speed of Different Parts of a Video
Step 1: Get to the Speed Panel
Use the process described in the previous method to get to the Speed panel.
Step 2: Reduce the Speed of Different Parts of the Video
Tap Curve from the bottom of the interface. On the next screen, tap Custom from the lower area, and then tap Edit. From the next panel, drag the beat points down to reduce the speed (or drag them above the line to increase).

Notice that each beat point represents a particular section of the video, and dragging it down reduces the playback speed of that segment. You can even tap anywhere on the line to add a new beat point and drag it down as needed for more precise speed management. Once done, tap OK from the bottom-right corner to save the modifications.

Optionally, you can also tap any of the available presets on the Curve screen to reduce the playback speed of the video accordingly.
Step 3: Upload the Video to Snapchat
Use the method explained in the previous method to export the video, upload it to Snapchat, and share the clip with your family, friends, and colleagues, or publish it as your story.
Part 4: FAQs about Slowing Down Snapchat Video
1. Can I record a slow mo video in Snapchat?
Technically speaking, no, you cannot. However, once you have recorded a video at a normal speed in Snapchat, you can apply the built-in Slow Motion filter to it by swiping the screen from left to right until you see the Snail icon at the center. The Snail icon represents the Slow Motion filter that reduces the playback speed when applied.
2. Besides slow-motion, which speed filters does Snapchat have?
In addition to slow motion Snapchat also has Forward and Fast Forward filters that increase the playback speed. While the Forward filter increases the speed slightly, the Fast Forward one enhances it drastically.
Conclusion
When using an iPhone, even though the SLO-MO mode enables you to record footage in slow motion, you don’t get many options. Therefore, it would be safe to say that it is easy to slow down the speed of a video if you have a dedicated third-party post-production app. However, if you want to go for a convenient method, learning how to slow down a video on Snapchat is an extremely simple and straightforward process.
02 How to Record a Slo-Mo Video and Upload to Snapchat
03 How to Make Flash and Smooth Slo Mo Video for Snapchat
04 FAQs about Slowing Down Snapchat Video
Part 1: How to Add Slow Motion Effects to Video Using the Snapchat App
Snapchat has a built-in Slow Motion filter that reduces the playback speed of a video when applied. You can learn how to slow down on Snapchat by following the instructions that are given below:
Step 1: Record a Video
Launch Snapchat on your smartphone (iPhone 13 Pro Max is used here for illustrations), make sure that the Camera section is selected from the bottom, tap and hold down the Capture button that is present at the lower part of the interface, and let go of it when you are done recording.
Step 2: Apply the Slow Motion Filter
Once the video is recorded, swipe the screen from left to right. Repeat this process until you see the Snail (Slow Motion) icon on the screen. This will reduce the playback speed of the clip.
Step 3: Decorate the Video (Optional)
Use the options present on the upper-right area of the screen to further decorate the video and/or add annotations to it.
Step 4: Share or Publish the Video
Once everything is done, tap Send To from the bottom-right corner to share the video with your family, friends, and colleagues, or publish it as a story that remains available for the next 24 hours.
Related: How to Record Slo-Mo videos on iPhone .
Part 2: How to Record a Slo-Mo Video and Upload to Snapchat
With Snapchat, even though you don’t require any third-party tool to reduce the playback speed of a video, the app has certain limitations. For example, it doesn’t allow you to set a zoom level, you are stuck with the framerate that the app has to offer, etc.
Because of this, many people prefer to use different methods to record a video in slow motion with their preferences, and then upload it to Snapchat. This approach also eliminates the need to swipe the screen several times merely to use a single slow-motion filter.
Fortunately, iPhone has a built-in SLO-MO mode in its Camera app that allows you to capture the videos in slow motion. To learn how to do slow mo on Snapchat with the iPhone’s Camera app, you can follow the instructions that are given below:
Step 1: Get to the iPhone’s SLO-MO Mode
Launch the Camera app on your iPhone (iPhone 13 Pro Max is used here for illustrations), and swipe the screen from left to right until you get to the SLO-MO mode.
Step 2: Set Recording Preferences
Tap the number that is present at the top-right corner (240 here) to toggle between different framerates, tap 1x from the lower-center area, swipe slightly up, and then use the wheel that appears next to define your preferred zoom level.
Step 3: Start and Stop the Recording
Tap the Record button to start the recording, and tap Stop when you’re done.
Note: Make sure that the duration of the recorded video doesn’t exceed 60 seconds.
Step 4: Upload the Slow-Motion Video to Snapchat
After the video is recorded in slow motion, close the Camera app, launch Snapchat, and tap the Gallery icon from the left side of the Capture button on the Camera section. From the Memories screen, go to the Camera Roll tab, and tap to select the video that you recorded in the previous step.
Next, optionally, tap the Edit icon from the bottom-left corner to decorate the video and/or add annotations to it, and follow the process as explained in the previous section to share the clip with your family, friends, or colleagues, or publish it as your story.
Part 3: How to Make Flash and Smooth Slo Mo Video for Snapchat
Although iPhone has the built-in SLO-MO mode that even enables you to set your preferred framerate and zoom level before recording, it still doesn’t allow you to slow down different parts of a video in different speed at your convenience. You can either record the entire video in slow motion or at a normal speed.
This is where a third-party app comes into play. While there are several video editing programs available online, the one of the best slow motion apps that helps you slow down the portions of a video with precision is CapCut.
Downloading and installing CapCut on your iPhone or Android phone is simple, and once it is done, you can follow the process given below to learn how to slow things down on Snapchat:
With CapCut, you can either slow down the whole clip or manage the speed for different segments. This section explains both methods.
Method 1: Slow Down the Whole Clip with CapCut
Step 1: Get to the Speed Panel
Launch CapCut, import the video that you want to slow down, and tap the imported media in the Timeline. Next, tap Speed from the bottom of the interface to get to the next window.
Step 2: Reduce the Speed of the Video
Tap Normal from the bottom of the screen that appears next, and drag the Speed slider to the left to reduce the playback speed. Tap OK from the bottom-right corner to save the changes.
Step 3: Upload the Video to Snapchat
Back on the previous interface, optionally tap Volume from the bottom and reduce the slider to 0 to mute the audio of the footage as it may get distorted due to the reduction in the speed.
Next, tap Share from the top-right corner to save the video on your iPhone, and then use the method explained in the previous section to access the clip from the Gallery within Snapchat for uploading.
Method 2: Reduce the Playback Speed of Different Parts of a Video
Step 1: Get to the Speed Panel
Use the process described in the previous method to get to the Speed panel.
Step 2: Reduce the Speed of Different Parts of the Video
Tap Curve from the bottom of the interface. On the next screen, tap Custom from the lower area, and then tap Edit. From the next panel, drag the beat points down to reduce the speed (or drag them above the line to increase).
Notice that each beat point represents a particular section of the video, and dragging it down reduces the playback speed of that segment. You can even tap anywhere on the line to add a new beat point and drag it down as needed for more precise speed management. Once done, tap OK from the bottom-right corner to save the modifications.
Optionally, you can also tap any of the available presets on the Curve screen to reduce the playback speed of the video accordingly.
Step 3: Upload the Video to Snapchat
Use the method explained in the previous method to export the video, upload it to Snapchat, and share the clip with your family, friends, and colleagues, or publish it as your story.
Part 4: FAQs about Slowing Down Snapchat Video
1. Can I record a slow mo video in Snapchat?
Technically speaking, no, you cannot. However, once you have recorded a video at a normal speed in Snapchat, you can apply the built-in Slow Motion filter to it by swiping the screen from left to right until you see the Snail icon at the center. The Snail icon represents the Slow Motion filter that reduces the playback speed when applied.
2. Besides slow-motion, which speed filters does Snapchat have?
In addition to slow motion Snapchat also has Forward and Fast Forward filters that increase the playback speed. While the Forward filter increases the speed slightly, the Fast Forward one enhances it drastically.
Conclusion
When using an iPhone, even though the SLO-MO mode enables you to record footage in slow motion, you don’t get many options. Therefore, it would be safe to say that it is easy to slow down the speed of a video if you have a dedicated third-party post-production app. However, if you want to go for a convenient method, learning how to slow down a video on Snapchat is an extremely simple and straightforward process.
Also read:
- 2024 Approved Pro-Free Tools Best 10 TikTok Editors Compatible with MacOS
- [Updated] 50+ Effective Social Media Tags for Viral Content on TikTok for 2024
- In 2024, Mastering the Art of TikTok Downloads Quickly
- [Updated] 2024 Approved Top PFP Concepts to Boost Your TikTok Profile's Attractiveness
- [New] TikTok Livestream Immersion Your Playbook for 2024
- [New] In 2024, Step-by-Step Strategies for Sizzling TikTok Videos via Mac Editing
- [New] In 2024, 20 Best TikTok Caption Ideas to Engage Your Next Audience
- [New] In 2024, Trendy Tastes From Viral TikTok Chefs
- [Updated] Discovering the Most Influential TikTok Trends
- [Updated] Breakthrough Personalities on TikTok A Guide for Motivation
- [New] A Beginner's Guide to Adding Text in TikTok Media for 2024
- [Updated] In 2024, Sizzling Snaps From TikTok’s Culinary Kings & Queens
- [Updated] Unveiling the Hottest Books on Social Media's Reading Stage
- Unlock the Secrets How to Increase Your Content's Discoverability on TikTok
- [New] Top 6 Online-Free TikTop To MP3 Converter Tools for 2024
- [Updated] In 2024, Mastering PC TikTok Live Streams A Step-by-Step Guide
- [Updated] Unleash Fun Top 10 Binge-Worthy TikTok Challenges
- [Updated] High-Quality TikTok Editors Ranked #1-10 on Windows
- [Updated] Master the Art of Storytelling in TikTok with These Quotes for 2024
- 2024 Approved Culinary Choreography Top 10 Viral Kitchen Moves
- [Updated] In 2024, Unmarked Path Your Guide to TikTok Video Download
- [Updated] Enhancing TikToks with Customizable Video Subtitles for 2024
- [Updated] Unlocking the Full Power of TikTok with Apple's Voice Commands Integration for 2024
- [New] In 2024, Harness Filmora Transforming Your TikTok React Videos Instantly
- [Updated] In 2024, Pioneering the Path to Financial Independence on Social Media Platforms
- [New] Mealtime Magic The Most Entertaining Food Moments
- The Ultimate Guide to Incorporating Siri Commands in TikTok Videos
- [Updated] 2024 Approved The Ultimate List of Popular TikTok Reactions
- [Updated] Mastering Top 10 Crafting Winning TikTok Marketing Campaigns
- Innovative Ways to Earn on Snapchat
- Beyond Imagination The Real-World Significance of Snapchat Emojis
- Securing Your Snapchat Memories Mobile Recorders' Guide
- [New] 2024 Approved The Viral Feast Top 15 Easy, Innovative TikTok Dishes
- [New] 2024 Approved Top 20 TikTok Anime Ideas
- [Updated] In 2024, Pioneering TikTok Ads Trends & Proven Effective Examples
- In 2024, How to Cast Infinix Note 30 VIP to Computer for iPhone and Android? | Dr.fone
- In 2024, Detailed Guide on Removing Apple iPhone XS Max Activation Lock without Previous Owner?
- Methods to Change GPS Location On Tecno Camon 20 Premier 5G | Dr.fone
- 2024 Approved Reviving Memories with Instagram Reposts
- In 2024, Recommended Best Applications for Mirroring Your Xiaomi 13T Pro Screen | Dr.fone
- Best Online MPEG to GIF Converters
- Updated In 2024, Top 5 Udemy Subtitle Translation Tools for Seamless Auto Translations
- [Updated] Gamers' Choice Top Software for Live Scenes
- [Updated] 2024 Approved Screen Snag Reviewed In-Depth Analysis
- [Updated] In 2024, VideoCapture Clash Royale
- New Cutting-Edge Audio Mastery Expert Tips for Implementing Gradual Sound Diminishment & Augmentation in Adobe After Effects for 2024
- In 2024, Best Live Streaming Platforms To Engage Audiences and Increase Viewership
- Edit and Send Fake Location on Telegram For your Sony Xperia 5 V in 3 Ways | Dr.fone
- How to Transfer Data from Apple iPhone XS Max to ZTE Phones | Dr.fone
- [Updated] Premium Solutions for Remote Team Interaction for 2024
- [Updated] In 2024, Unlocking the Secrets of Zoom Communication Practical Advice for Successful Meetings
- Getting the Pokemon Go GPS Signal Not Found 11 Error in Lava Blaze Curve 5G | Dr.fone
- In 2024, Instagram Edge Video Cutting Techniques to Boost Engagement
- [New] Props to the Best Android Tools for PlayStation 2 Experience for 2024
- New An Ultimate Guide of Best Narrator Voice Generators for 2024
- [Updated] In 2024, Windows Screencast Champions Revealed
- 6 Ways to Change Spotify Location On Your Realme 12 Pro 5G | Dr.fone
- 2024 Approved Reimagining Team Call Backdrops Before/After Chats
- New How to Make an Instant Slideshow on Mac for 2024
- Title: "Beyond Playfulness Unveiling the Subtext in Snapchat Symbols"
- Author: Gary
- Created at : 2024-05-23 05:47:00
- Updated at : 2024-05-24 05:47:00
- Link: https://tiktok-clips.techidaily.com/beyond-playfulness-unveiling-the-subtext-in-snapchat-symbols/
- License: This work is licensed under CC BY-NC-SA 4.0.
