
:max_bytes(150000):strip_icc()/GettyImages-140173628BetsieVanDerMeer-5927117e5f9b5859509a476c.jpg)
Acclaimed Discord Screen Capture Apps Reviewed
Acclaimed Discord Screen Capture Apps Reviewed
Best Discord Screen Recorders [Online/Windows/Mac/Phone]

Liza Brown
Mar 27, 2024• Proven solutions
Discord is packed with great features, but one thing it’s missing is a screen recorder. You can chat, enjoy video calls and share your screen with friends or colleagues, but you can’t record these conversations or videos without using a third-party app.
Thankfully, there are plenty of choices for finding the best screen recorder for Discord. So here we’ll take you through the best options for Discord on the browser, on Windows and Mac, and on mobile so that no matter how you use Discord, you can record those epic gaming sessions or study groups for you to revisit later.
One thing to note before we begin – make sure everyone in your chat or server knows they’re being recorded. In some countries, it’s illegal to record someone without their permission, but even where legalities don’t matter, you don’t want to upset people by recording them without them being aware.
In this article
- Part 1: Best Screen Recorder Software for Discord Desktop App
- Part 2: Best Online Screen Recorder for Discord
- Part 3: Best Screen Recorder Apps for Discord on iPhone and Android
- Part 4: How to Record Discord Video Screen with Filmora?
Part 1: Best Windows/Mac Screen Recorder Software for Discord
If you prefer to use the Discord app on Windows or Mac, you’ll want a more robust screen recording tool . Here are four of the best screen recorders for Discord app users.
1. OBS
OBS (Open Broadcaster Software) is a free, open-source tool that many people use to stream live and record their screens. It works on Windows, Mac, and Linux and offers customization tools.
There are no pricing plans, everything is completely free, and it lets you add a range of sources so that you can record your webcam, Discord audio, and everything on the screen, including any overlays. The two main drawbacks to OBS are its complexity – it can be demanding on your computer, and it’s not the easiest to use. So expect to take some time getting a handle on how to set it up first.
2. Bandicam
Bandicam is another option that manages to be more intuitive. It’s easy to use, although it has many options to help you get the perfect recording. But if you’re not interested in spending ages tinkering, Bandicam is more likely to give you a higher quality recording using default settings, and it’s less demanding.
Bandicam isn’t free, but it doesn’t involve a monthly subscription, unlike many suggested tools. A one-off license for Bandicam for one PC is $39.95, or you can get a two-PC license for $59.95. If you want the editing software, Bandicut included, then that’s $60.95 with a single license. It’s also worth noting that Bandicam only works on Windows.
3. Wondershare Filmora
Though Filmora is a specialized video editing software, it also features screen recording , webcam recording, and audio recording tools. One of the biggest advantages of using Filmora to record Discord videos is that it features lots of elements and game video special effects, which will make your video cool. You can head to Part 4 of this article for detailed information about recording Discord video.


4. DemoCreator
If you plan to edit your screen recordings before uploading them, consider Wondershare DemoCreator . Working with both Windows and Mac, it’s a powerful screen recorder with some basic editing features, making it easy to turn your screen records into epic videos.
You can record in up to 120fps using two devices, such as your screen and webcam, and as well as the editing suite, there are effects tools you can utilize as well. Choose an annual subscription for $23.99 or buy a perpetual license for one PC for $47.99.
5. Camtasia
If you’re specifically looking to record your Discord screen to record tutorials, then Camtasia is a specialist tool with various templates that you can use to record professional-quality videos using your Discord app.
However, while Camtasia is fantastic for these videos, it lacks some of the effects options you might want if you’re recording game streams. And the cost is a huge factor, too – it’s around $300 for a one-off license, with an annual fee of $60 if you need ongoing support and an extra $25 for some of the additional capture tools required.
Part 2: Best Online Screen Recorder for Discord
If you’re using the online version of Discord in your web browser, you’ll be best suited to a screen recorded that specialist recorder.
2. Screen Capture
One such option is Screen Capture , which is extremely easy to use. As well as recording what’s happening on the screen, you have the option to record your microphone, audio, and webcam. As soon as your head to the Screen Capture website, you can start recording in one click, although the free version does have a watermark. It’s £4.95 per month to remove this.
There’s no software to download, and your videos will be saved in HD quality. You’ll need to click Start Recording and then, in the pop-up, permit it to record your screen. It works with all the major browsers – Chrome, Firefox, Edge, and Opera.
3. Clipchamp
If you need some more tools at your disposal, you might prefer Clipchamp . Unlike Screen Capture, you’ll need to create an account, and the free version only lets you output in standard definition. However, Clipchamp includes editing tools to record and tweak your footage before exporting it easily.
It works fully with Chrome and Edge and other Chromium-based browsers, with partial support for other browsers. If you want to output at 720p or higher, you’ll need to upgrade to a Creator account at $9 per month, while Full HD is available with a Business account for $19 per month.
3. Screencast-o-matic
The third option we would recommend as one of the best screen recorders for online Discord is Screencast-o-matic . This will record whatever is on the screen in any browser, working on all Windows, Mac, Chrome OS, Android, and iOS systems.
The free option lets you record up to 15 minutes of footage, while the Deluxe removes that limit and includes basic editing for $1.65 per month. However, the difference here is that you’ll need to download an application to record your browser – it’s not just an online tool. Once it’s downloaded, just run the software, and you can record Discord in your browser with a few clicks.
Part 3: Best Screen Recorder Apps for Discord on iPhone and Android
If you prefer to use the Discord mobile app, you’ll need a dedicated smartphone tool to record your screen. It’s important to do your research, as mobile apps are often full of ads or issues that can cause your device to slow down to a crawl. It’s not helped because review scores are so easily manipulated. You should use one of these recommendations for what we feel are the best screen recorders for Discord mobile.
1. AZ Screen Recorder
AZ Screen Recorder is a free tool you can download from the Google Play Store on an Android device. It lets you record in Full HD quality at 60fps, ideal for recording your Discord video calls to share or review later.
It also includes some editing tools, so you can trim your video, add text or music, and compress it to reduce the file size. However, a major drawback is that it cannot record audio from the source – instead, it’ll record through your phone’s microphone. This is great if you want to add commentary, but not so much if you’re dealing with background noise.
2. Screen Recorder for Game, Video Call, Screenshots
Another option for Android is ‘Screen Recorder for Game, Video Call, Screenshots’ . Despite the mouthful of a name, it’s a pretty simple app to use, and again it’s free. It has an advantage over AZ Screen Recorder in that it can record up to 1440p, perfect for then sharing over Discord with users on a gaming monitor.
The main issue with Screen Recorder is that it’s a little unreliable at times, with many people struggling to access the extra video editing tools. But if you were to combine Screen Recorder with editing software like Filmora, you could get a comprehensive solution for Discord mobile recording.
3. Record It
If you’re an iOS user, you’ll want to look at ‘Record It! ’. It’s another free option that works well on both iPhone and iPad, letting you record your apps, including Discord. You can record the entire screen in high quality and add your Face Cam as an overlay.
The included editor doesn’t have amazingly comprehensive tools, but you can trim your video, add a filter or adjust the playback speed. But, again, if you want to do more intensive editing, you’ll need to pair it with dedicated software such as Filmora.
Part 4: How to Record Discord Video Screen with Filmora?
If you want to record your screen with Filmora, create a video tutorial, or show off your gaming skills.
Start by heading to File and then Record Media, and choose the option to Record from PC.
You’ll then get a pop-up that lets you choose how much of your screen you want to capture. Enter a custom resolution, or drag the box that’s appeared on your screen to the size and location you want to record. You can also use this screen to configure whether your microphone and system audio is recorded.
If you click on the Settings cog, you’ll get a dropdown with more options – change the resolution, frame rate, and the location where you’re saving the file. You can also change the settings for showing mouse clicks, which you’ll want to do if you’re making a tutorial.
Once you hit the red record button, the screen will start recording after a countdown of five seconds – ample time to switch browser window to Discord. Then, when you’re done, head back to Filmora and click the Stop button at the top-right of the screen.
The video will save automatically to your chosen file path. You can then drag it into Filmora to trim off the start and end, if necessary, and use all of Filmora’s editing tools to enhance your video.
Liza Brown
Liza Brown is a writer and a lover of all things video.
Follow @Liza Brown
Liza Brown
Mar 27, 2024• Proven solutions
Discord is packed with great features, but one thing it’s missing is a screen recorder. You can chat, enjoy video calls and share your screen with friends or colleagues, but you can’t record these conversations or videos without using a third-party app.
Thankfully, there are plenty of choices for finding the best screen recorder for Discord. So here we’ll take you through the best options for Discord on the browser, on Windows and Mac, and on mobile so that no matter how you use Discord, you can record those epic gaming sessions or study groups for you to revisit later.
One thing to note before we begin – make sure everyone in your chat or server knows they’re being recorded. In some countries, it’s illegal to record someone without their permission, but even where legalities don’t matter, you don’t want to upset people by recording them without them being aware.
In this article
- Part 1: Best Screen Recorder Software for Discord Desktop App
- Part 2: Best Online Screen Recorder for Discord
- Part 3: Best Screen Recorder Apps for Discord on iPhone and Android
- Part 4: How to Record Discord Video Screen with Filmora?
Part 1: Best Windows/Mac Screen Recorder Software for Discord
If you prefer to use the Discord app on Windows or Mac, you’ll want a more robust screen recording tool . Here are four of the best screen recorders for Discord app users.
1. OBS
OBS (Open Broadcaster Software) is a free, open-source tool that many people use to stream live and record their screens. It works on Windows, Mac, and Linux and offers customization tools.
There are no pricing plans, everything is completely free, and it lets you add a range of sources so that you can record your webcam, Discord audio, and everything on the screen, including any overlays. The two main drawbacks to OBS are its complexity – it can be demanding on your computer, and it’s not the easiest to use. So expect to take some time getting a handle on how to set it up first.
2. Bandicam
Bandicam is another option that manages to be more intuitive. It’s easy to use, although it has many options to help you get the perfect recording. But if you’re not interested in spending ages tinkering, Bandicam is more likely to give you a higher quality recording using default settings, and it’s less demanding.
Bandicam isn’t free, but it doesn’t involve a monthly subscription, unlike many suggested tools. A one-off license for Bandicam for one PC is $39.95, or you can get a two-PC license for $59.95. If you want the editing software, Bandicut included, then that’s $60.95 with a single license. It’s also worth noting that Bandicam only works on Windows.
3. Wondershare Filmora
Though Filmora is a specialized video editing software, it also features screen recording , webcam recording, and audio recording tools. One of the biggest advantages of using Filmora to record Discord videos is that it features lots of elements and game video special effects, which will make your video cool. You can head to Part 4 of this article for detailed information about recording Discord video.
4. DemoCreator
If you plan to edit your screen recordings before uploading them, consider Wondershare DemoCreator . Working with both Windows and Mac, it’s a powerful screen recorder with some basic editing features, making it easy to turn your screen records into epic videos.
You can record in up to 120fps using two devices, such as your screen and webcam, and as well as the editing suite, there are effects tools you can utilize as well. Choose an annual subscription for $23.99 or buy a perpetual license for one PC for $47.99.
5. Camtasia
If you’re specifically looking to record your Discord screen to record tutorials, then Camtasia is a specialist tool with various templates that you can use to record professional-quality videos using your Discord app.
However, while Camtasia is fantastic for these videos, it lacks some of the effects options you might want if you’re recording game streams. And the cost is a huge factor, too – it’s around $300 for a one-off license, with an annual fee of $60 if you need ongoing support and an extra $25 for some of the additional capture tools required.
Part 2: Best Online Screen Recorder for Discord
If you’re using the online version of Discord in your web browser, you’ll be best suited to a screen recorded that specialist recorder.
2. Screen Capture
One such option is Screen Capture , which is extremely easy to use. As well as recording what’s happening on the screen, you have the option to record your microphone, audio, and webcam. As soon as your head to the Screen Capture website, you can start recording in one click, although the free version does have a watermark. It’s £4.95 per month to remove this.
There’s no software to download, and your videos will be saved in HD quality. You’ll need to click Start Recording and then, in the pop-up, permit it to record your screen. It works with all the major browsers – Chrome, Firefox, Edge, and Opera.
3. Clipchamp
If you need some more tools at your disposal, you might prefer Clipchamp . Unlike Screen Capture, you’ll need to create an account, and the free version only lets you output in standard definition. However, Clipchamp includes editing tools to record and tweak your footage before exporting it easily.
It works fully with Chrome and Edge and other Chromium-based browsers, with partial support for other browsers. If you want to output at 720p or higher, you’ll need to upgrade to a Creator account at $9 per month, while Full HD is available with a Business account for $19 per month.
3. Screencast-o-matic
The third option we would recommend as one of the best screen recorders for online Discord is Screencast-o-matic . This will record whatever is on the screen in any browser, working on all Windows, Mac, Chrome OS, Android, and iOS systems.
The free option lets you record up to 15 minutes of footage, while the Deluxe removes that limit and includes basic editing for $1.65 per month. However, the difference here is that you’ll need to download an application to record your browser – it’s not just an online tool. Once it’s downloaded, just run the software, and you can record Discord in your browser with a few clicks.
Part 3: Best Screen Recorder Apps for Discord on iPhone and Android
If you prefer to use the Discord mobile app, you’ll need a dedicated smartphone tool to record your screen. It’s important to do your research, as mobile apps are often full of ads or issues that can cause your device to slow down to a crawl. It’s not helped because review scores are so easily manipulated. You should use one of these recommendations for what we feel are the best screen recorders for Discord mobile.
1. AZ Screen Recorder
AZ Screen Recorder is a free tool you can download from the Google Play Store on an Android device. It lets you record in Full HD quality at 60fps, ideal for recording your Discord video calls to share or review later.
It also includes some editing tools, so you can trim your video, add text or music, and compress it to reduce the file size. However, a major drawback is that it cannot record audio from the source – instead, it’ll record through your phone’s microphone. This is great if you want to add commentary, but not so much if you’re dealing with background noise.
2. Screen Recorder for Game, Video Call, Screenshots
Another option for Android is ‘Screen Recorder for Game, Video Call, Screenshots’ . Despite the mouthful of a name, it’s a pretty simple app to use, and again it’s free. It has an advantage over AZ Screen Recorder in that it can record up to 1440p, perfect for then sharing over Discord with users on a gaming monitor.
The main issue with Screen Recorder is that it’s a little unreliable at times, with many people struggling to access the extra video editing tools. But if you were to combine Screen Recorder with editing software like Filmora, you could get a comprehensive solution for Discord mobile recording.
3. Record It
If you’re an iOS user, you’ll want to look at ‘Record It! ’. It’s another free option that works well on both iPhone and iPad, letting you record your apps, including Discord. You can record the entire screen in high quality and add your Face Cam as an overlay.
The included editor doesn’t have amazingly comprehensive tools, but you can trim your video, add a filter or adjust the playback speed. But, again, if you want to do more intensive editing, you’ll need to pair it with dedicated software such as Filmora.
Part 4: How to Record Discord Video Screen with Filmora?
If you want to record your screen with Filmora, create a video tutorial, or show off your gaming skills.
Start by heading to File and then Record Media, and choose the option to Record from PC.
You’ll then get a pop-up that lets you choose how much of your screen you want to capture. Enter a custom resolution, or drag the box that’s appeared on your screen to the size and location you want to record. You can also use this screen to configure whether your microphone and system audio is recorded.
If you click on the Settings cog, you’ll get a dropdown with more options – change the resolution, frame rate, and the location where you’re saving the file. You can also change the settings for showing mouse clicks, which you’ll want to do if you’re making a tutorial.
Once you hit the red record button, the screen will start recording after a countdown of five seconds – ample time to switch browser window to Discord. Then, when you’re done, head back to Filmora and click the Stop button at the top-right of the screen.
The video will save automatically to your chosen file path. You can then drag it into Filmora to trim off the start and end, if necessary, and use all of Filmora’s editing tools to enhance your video.
Liza Brown
Liza Brown is a writer and a lover of all things video.
Follow @Liza Brown
Mastering Discord’s Video Communication for PC/iOS Users
How to Make a Discord Video Call | Desktop & Mobile

Richard Bennett
Mar 27, 2024• Proven solutions
Discord is a great place to hang out with like-minded people and just relax. But sometimes you want to do more than just chat using text messaging, which is where video calling comes in handy.
Discord has video call options built into the desktop app, the web browser and the mobile app, so you don’t need to switch between different software when you want to chat on video with your friends or colleagues. Read on to find out how to make a video call on Discord.
- Part 1: Best Settings for Discord Video Call
- Part 2: How to Make a Private Video Call on Discord?
- Part 3: How to Make a Server Video Call on Discord?
- Part 4: FAQs about Discord Video Call
Part 1: Best Settings for Discord Video Call
Before you start calling everyone, you’ll want to check your settings to make sure you have the best experience. It’s important to make sure you’ve got your best equipment setup to work for the highest quality audio and video possible.

So, start by heading to the User Settings page. You’ll find this at the bottom left of the screen – look for the cog icon next to your name. You won’t see this on mobile, this is only on the desktop app and the web browser version of Discord.
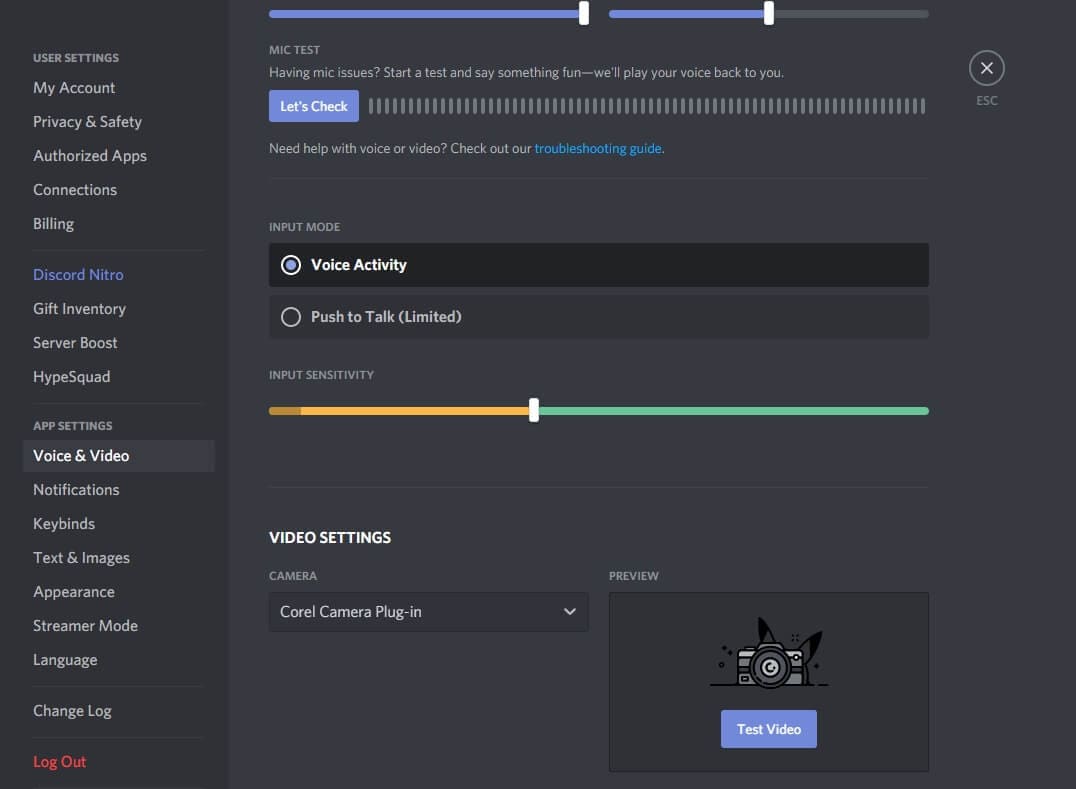
Once you’ve opened settings, you’ll want to click on the Voice & Video tab. Here you can check your microphone settings and adjust the volume, and choose your camera. If you’re using an external camera instead of the built-in option, check that the right one is selected in the dropdown.
You can also use this opportunity to run a test video – so that you know you’re well-lit, properly framed and otherwise good to go. You can adjust the lighting in your room or move the camera if you don’t feel it’s quite right.
One quick note for the web browser version of Discord – you’ll be asked to grant permission to your microphone and camera. Make sure you allow the site to use your equipment otherwise it won’t work on the video call.
Once you are happy, just click the close button at the top right of the settings options.
Part 2: How to Make a Private Video Call on Discord?
Once you’ve got your settings ready, you’re set to make your private Discord video call. If you’re doing it on the web browser or desktop app, you’ll need to first navigate to the inbox you share with the person you want to call. Do this by clicking on the Home button at the top left – you’ll then get a list of all your contacts.
If you’re only calling one person then it’s easy – just click on their name.

If you want to call a private group, you need to click the + button and then create a group DM. Add the names of the users you want to call.
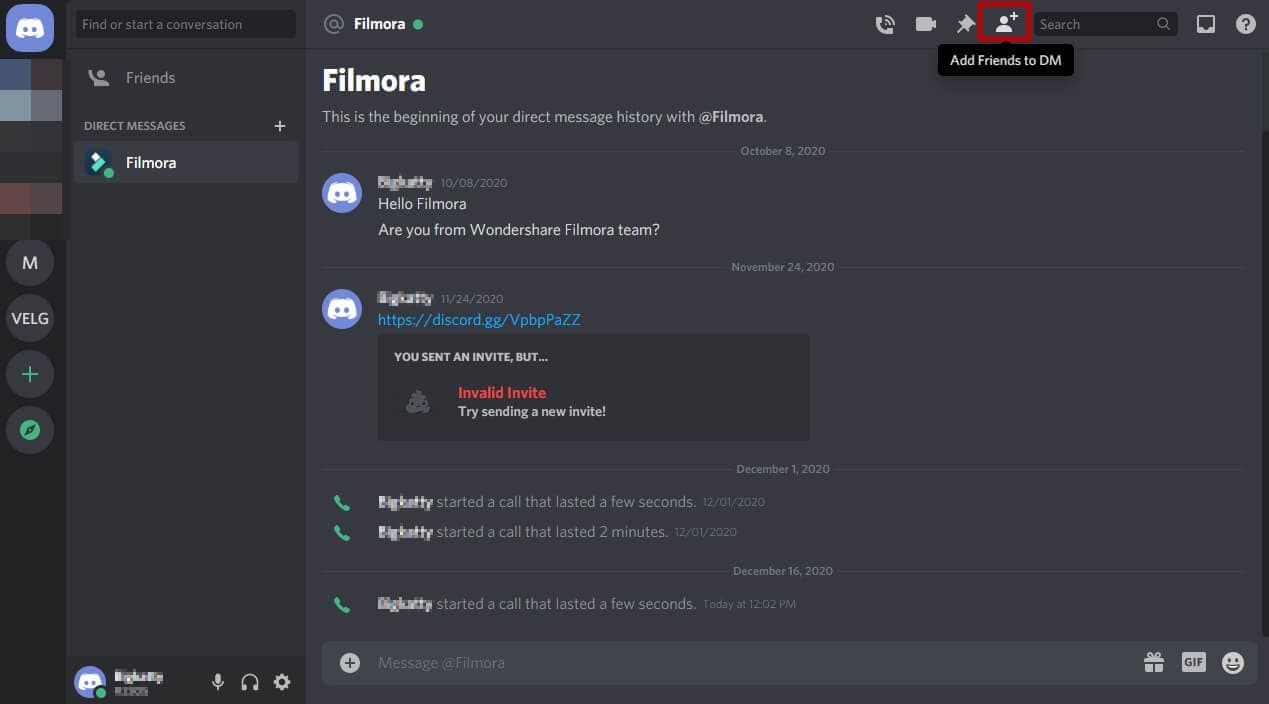
Once you’re in the direct message window of the person or group you want to call, you need to look at the buttons at the top right of the screen. The second icon that looks like a video camera is the one you’re looking for. Click that and you’ll start a video call.
You’ll see yourself on screen at this point, but you’ll need to wait until the other person or group members have joined the call for the chat to properly begin.
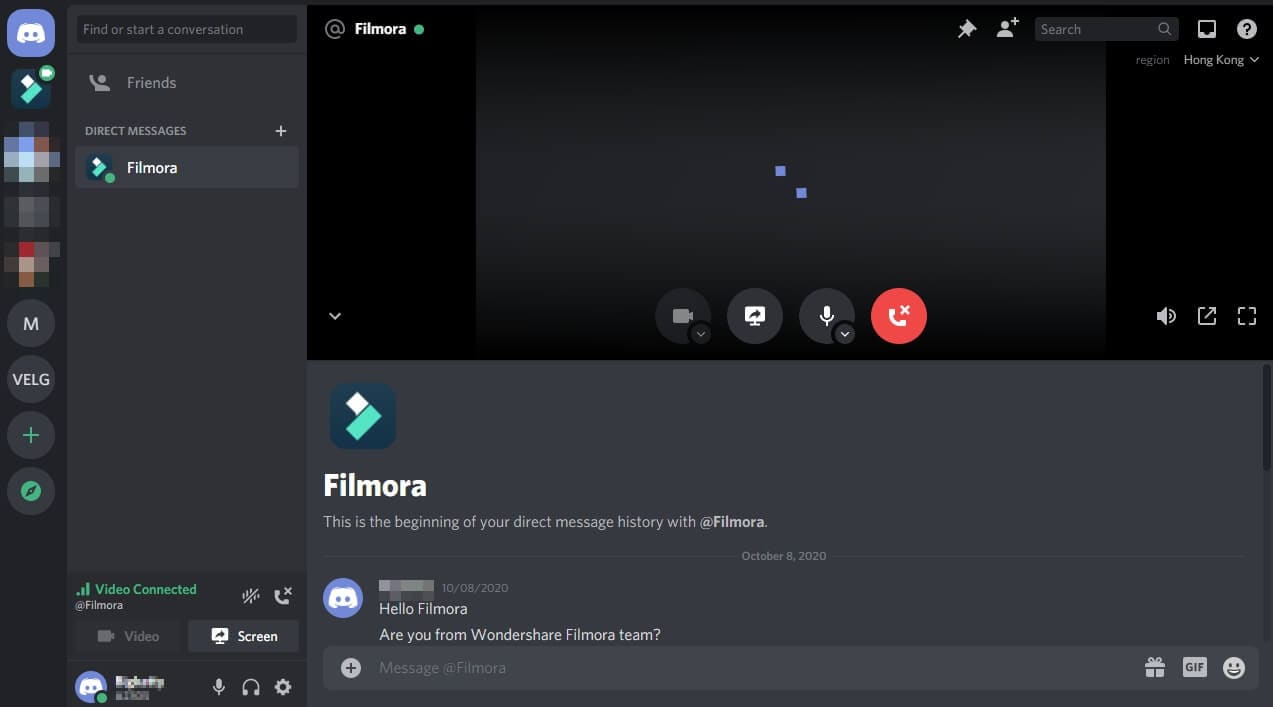
The process of making video call on Discord mobile is essentially identical. You just need to open the direct message group and click on the video call icon, which is still at the top right of your screen.
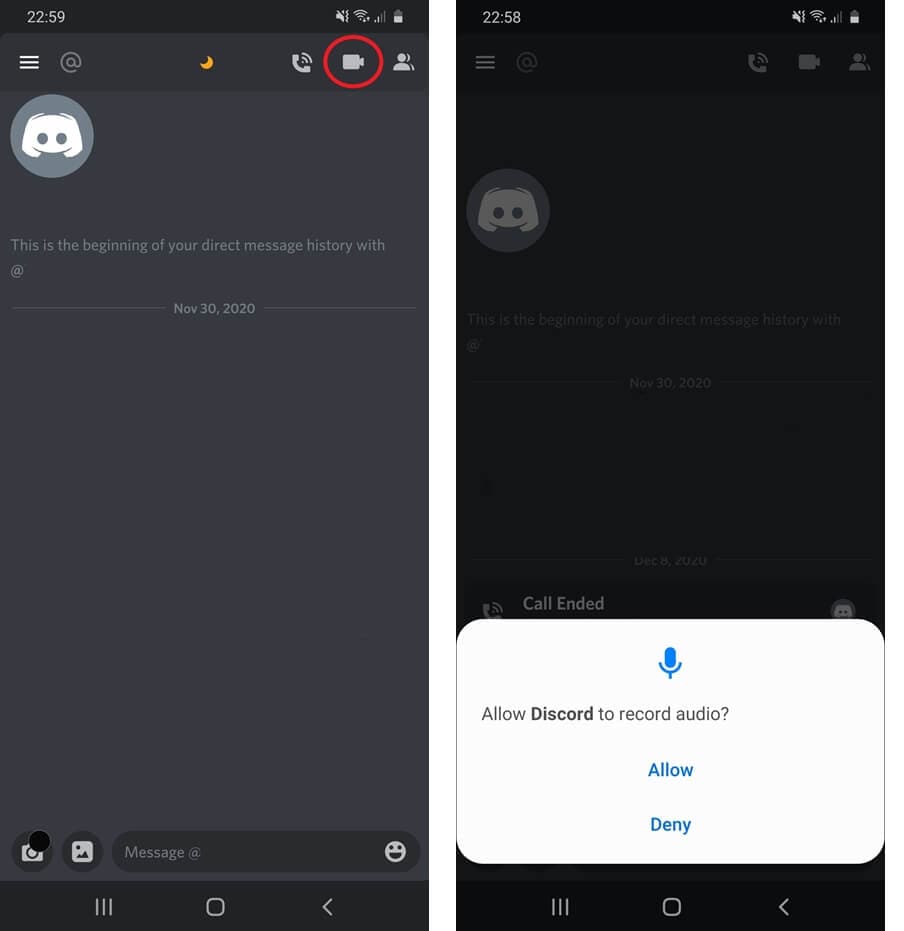
You’ll need to give permissions for the Discord mobile app to use your microphone and camera if you haven’t already.
Once you’ve finished your video call on either desktop or mobile, just hit the red button to end it and switch your camera off again.
Part 3: How to Make a Server Video Call on Discord?
If you want to make a group video call on a public server, you again need to first navigate to the server. Once you’re there, you’ll need to join the voice channel that you should see on the left side of the screen.
Once you’re in the voice channel, click Lounge, Community Hangout or Stream Room, and then switch on your camera by clicking the ‘Video’ button. You’ll find this at the bottom-left of the screen. Again, if you’re on the web browser, you’ll be asked by your browser for permission to use your camera at this stage.
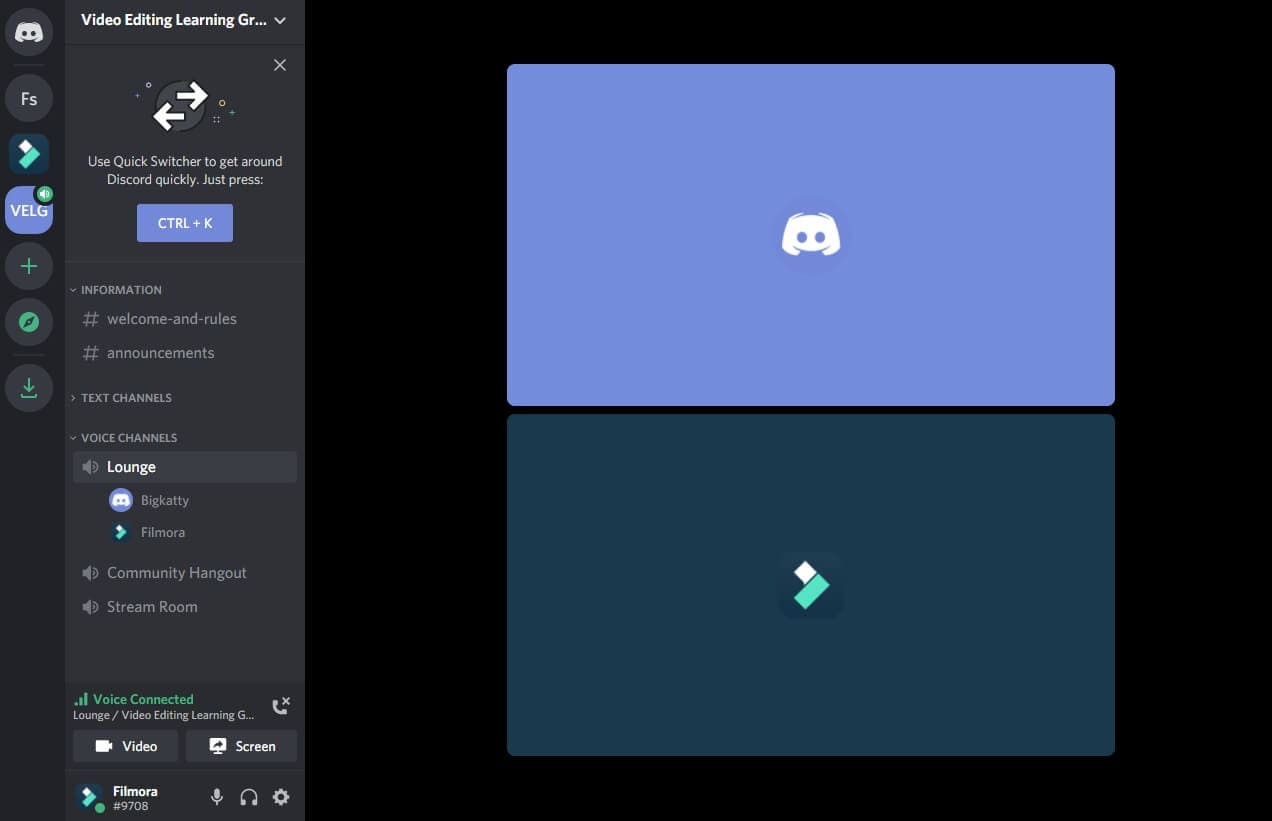
And that’s it – the video call is now live and anyone who joins the voice channel will be able to see you, chat to you and switch on their camera to join the video conference as well.
On mobile, it’s slightly different. You’ll still want to head to the server you want to join and then click on the voice channel to join it. But as soon as you click on the voice channel, you’ll get a pop-up with an icon at the bottom right where you can instantly switch on your camera.
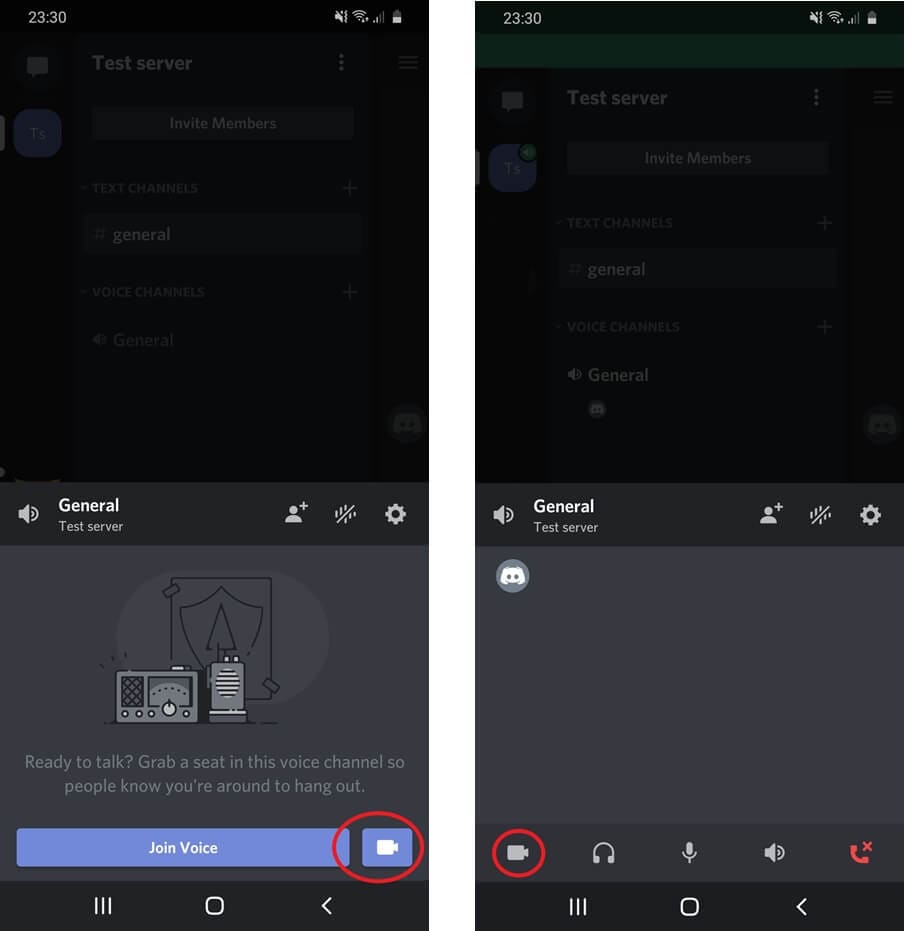
If you prefer, you can still just join as voice, and then at any stage click on your name where you’ll be able to then switch on your camera to turn a voice chat into a video call.
Whenever you want to end the video call, just click on your name again to switch off your camera, or disconnect completely from the voice channel.
FAQs About Discord Video Chat Call
1. How Many People Can Join in the Discord Group Video Call?
Normally, the limit for the number of users on a group video call in Discord is 10. However, during the Coronavirus pandemic, the team behind Discord know that it’s a valuable tool to help people stay connected. So the limit has been increased to 25 users. This may be reduced in the future once the world returns to some sense of normality.
2. How to Join a Video Call on Discord?
Joining an existing video call on Discord is a really easy process.
If it’s a private video call, you’ll get a pop-up in the chat window letting you know that a video call has been started. You have the option of declining the video call, joining it with video, or just joining with voice without your camera switched on.
If instead, it’s a public server where a video call is happening, you just need to join the voice channel by clicking on it on the left side of the screen, and then clicking on the video button next to your name, just as if you were starting the call in the first place.
Richard Bennett
Richard Bennett is a writer and a lover of all things video.
Follow @Richard Bennett
Richard Bennett
Mar 27, 2024• Proven solutions
Discord is a great place to hang out with like-minded people and just relax. But sometimes you want to do more than just chat using text messaging, which is where video calling comes in handy.
Discord has video call options built into the desktop app, the web browser and the mobile app, so you don’t need to switch between different software when you want to chat on video with your friends or colleagues. Read on to find out how to make a video call on Discord.
- Part 1: Best Settings for Discord Video Call
- Part 2: How to Make a Private Video Call on Discord?
- Part 3: How to Make a Server Video Call on Discord?
- Part 4: FAQs about Discord Video Call
Part 1: Best Settings for Discord Video Call
Before you start calling everyone, you’ll want to check your settings to make sure you have the best experience. It’s important to make sure you’ve got your best equipment setup to work for the highest quality audio and video possible.
So, start by heading to the User Settings page. You’ll find this at the bottom left of the screen – look for the cog icon next to your name. You won’t see this on mobile, this is only on the desktop app and the web browser version of Discord.
Once you’ve opened settings, you’ll want to click on the Voice & Video tab. Here you can check your microphone settings and adjust the volume, and choose your camera. If you’re using an external camera instead of the built-in option, check that the right one is selected in the dropdown.
You can also use this opportunity to run a test video – so that you know you’re well-lit, properly framed and otherwise good to go. You can adjust the lighting in your room or move the camera if you don’t feel it’s quite right.
One quick note for the web browser version of Discord – you’ll be asked to grant permission to your microphone and camera. Make sure you allow the site to use your equipment otherwise it won’t work on the video call.
Once you are happy, just click the close button at the top right of the settings options.
Part 2: How to Make a Private Video Call on Discord?
Once you’ve got your settings ready, you’re set to make your private Discord video call. If you’re doing it on the web browser or desktop app, you’ll need to first navigate to the inbox you share with the person you want to call. Do this by clicking on the Home button at the top left – you’ll then get a list of all your contacts.
If you’re only calling one person then it’s easy – just click on their name.
If you want to call a private group, you need to click the + button and then create a group DM. Add the names of the users you want to call.
Once you’re in the direct message window of the person or group you want to call, you need to look at the buttons at the top right of the screen. The second icon that looks like a video camera is the one you’re looking for. Click that and you’ll start a video call.
You’ll see yourself on screen at this point, but you’ll need to wait until the other person or group members have joined the call for the chat to properly begin.
The process of making video call on Discord mobile is essentially identical. You just need to open the direct message group and click on the video call icon, which is still at the top right of your screen.
You’ll need to give permissions for the Discord mobile app to use your microphone and camera if you haven’t already.
Once you’ve finished your video call on either desktop or mobile, just hit the red button to end it and switch your camera off again.
Part 3: How to Make a Server Video Call on Discord?
If you want to make a group video call on a public server, you again need to first navigate to the server. Once you’re there, you’ll need to join the voice channel that you should see on the left side of the screen.
Once you’re in the voice channel, click Lounge, Community Hangout or Stream Room, and then switch on your camera by clicking the ‘Video’ button. You’ll find this at the bottom-left of the screen. Again, if you’re on the web browser, you’ll be asked by your browser for permission to use your camera at this stage.
And that’s it – the video call is now live and anyone who joins the voice channel will be able to see you, chat to you and switch on their camera to join the video conference as well.
On mobile, it’s slightly different. You’ll still want to head to the server you want to join and then click on the voice channel to join it. But as soon as you click on the voice channel, you’ll get a pop-up with an icon at the bottom right where you can instantly switch on your camera.
If you prefer, you can still just join as voice, and then at any stage click on your name where you’ll be able to then switch on your camera to turn a voice chat into a video call.
Whenever you want to end the video call, just click on your name again to switch off your camera, or disconnect completely from the voice channel.
FAQs About Discord Video Chat Call
1. How Many People Can Join in the Discord Group Video Call?
Normally, the limit for the number of users on a group video call in Discord is 10. However, during the Coronavirus pandemic, the team behind Discord know that it’s a valuable tool to help people stay connected. So the limit has been increased to 25 users. This may be reduced in the future once the world returns to some sense of normality.
2. How to Join a Video Call on Discord?
Joining an existing video call on Discord is a really easy process.
If it’s a private video call, you’ll get a pop-up in the chat window letting you know that a video call has been started. You have the option of declining the video call, joining it with video, or just joining with voice without your camera switched on.
If instead, it’s a public server where a video call is happening, you just need to join the voice channel by clicking on it on the left side of the screen, and then clicking on the video button next to your name, just as if you were starting the call in the first place.
Richard Bennett
Richard Bennett is a writer and a lover of all things video.
Follow @Richard Bennett
Also read:
- [New] Bypass the Hidden Shadowban on TikTok
- 2024 Approved 15 Powerful Voices in the TikTok World
- [Updated] Elevate Your Profile The Best 30 TikTok Handle Choices for 2024
- [Updated] Hip-Hop Frenzy Top TikTok Rap Videos of Today
- [Updated] The Clear-Sky Route to Free, Unmarked TikTok Videos
- In 2024, Engage and Grow A Curated List of Popular TikTok Hashes
- Top PFP Concepts to Boost Your TikTok Profile's Attractiveness
- [Updated] 2024 Approved Downloading the Latest TikTok Features on Your MacBook
- 2024 Approved Enhance VFX Quality Best TikTok Watermark Removers
- In 2024, Dare to Be Different Elevating Your Profile Above TikTok's Elite
- 20 Popular TikTok Rap Songs You Probably Have Listened To for 2024
- Integrating Siri Voice Techniques Into TikTok Sharing
- [Updated] The Art of Divergence From Popular TikTok Personalities for 2024
- [New] Dodging the Invisible Block Unshade Your TikTok Presence
- [New] 2024 Approved The Ultimate Guide to Earning More Followers and Likes on TikTok
- [Updated] 2024 Approved Freely Collect TikTok Masterpieces - No Marks Included
- [Updated] In 2024, Maximizing Your Impact 4 Methods for Streaming on Computer
- [Updated] Tickle-Me Trendsetters Top 20 Hilarious TikTok Jokes & Riddles
- [New] Amplify Your Message with TikTok Voiceovers for 2024
- TikTok PFP Innovation Standout Techniques to Notice for 2024
- [New] 2024 Approved 10 Viral Culinary Phenomena on TikTok
- Download-Your-Wish Unwatermarked TikTok Files for 2024
- [New] 2024 Approved Effortlessly Acquire TikTok Videos for iPhone without Any Watermarks
- Hit the Rhythm Easy-to-Learn Top TikTok Dance Routines
- [New] In 2024, Caught the Viral Vibe? Here Are Amazon’s 30 Hot TikTok Deals
- In 2024, Meme Mayhem The Ultimate List of Crazy TikTok Challenges
- [Updated] In 2024, The Comprehensible Handbook for TikTok Emoji Usage
- [New] In 2024, The Ultimate Tutorial for TikTok Voice Customization
- [Updated] In 2024, From Basic to Breathtaking Crafting Top-Tier TikTok Videos Using Templates
- In 2024, How to Drive Engagement and Reach on TikTok Through Innovative Advertising
- In 2024, 10 Sizzling TikTok Strategies for Fame
- 2024 Approved Avoid Legal Pitfalls Pre-Upload Video Copyright on TikTok
- [New] In 2024, A Peek at TikTok's Hot Viral Reactions
- Effortlessly Pinning Friends on Snapchat with Confidence
- [New] 2024 Approved Mastering Vocal Customization Techniques in TikTok Videos
- [Updated] Understanding and Uphold Points in TikTok Copyright Law
- 2024 Approved Master the Charts Your Guide to Hot TikTok Dances
- In 2024, Best TikTok Earning Tools Top Earnings Predictors
- [New] The Essence of Personal Branding Top PFPs for TikTok Success
- [New] In 2024, Hitching a Ride in High-Flying TikTok Live Shows
- [Updated] Unlock Creative Potential Crafting TikTok Videos Using Templates
- 2024 Approved Giggle-O-Meter Rising Top TikTok Joke Threads for Laughter
- 2024 Approved Navigating Through TikTok’s Rich Content Ecosystem (Dances, Songs & Memes)
- [Updated] 2024 Approved Avoid Losing TikTok Videos Prevent Accidental Renewals
- [Updated] Exploring the Dynamic World of TikTok Creativity for 2024
- [New] In 2024, Iconic PFP Ideas Make a Mark in the World of TikTok
- Updated In 2024, The Digital Sound Tuner Scaling Volume, Speed & Tonality Remotely
- How to Hard Reset Infinix Note 30 Without Password | Dr.fone
- In 2024, Top Apps and Online Tools To Track Nubia Phone With/Without IMEI Number
- In 2024, How To Unlock SIM Cards Of Vivo S17e Without PUK Codes
- 2024 Approved Premier Mac Tools Beyond Bandicam
- In 2024, The Ultimate Guide to Get the Rare Candy on Pokemon Go Fire Red On Honor X50i | Dr.fone
- Unlock android phone if you don't have Spark 10 Pro fingerprint
- [New] 10 Best Webcam Recorders Windows 10 for 2024
- Updated What Is AI Background Generator?
- Updated In 2024, Revolutionizing Communication Real-Time AI Voice Changer
- Ultimate 6 Film Repository on Fb
- [New] Perfecting Slow Motion Cinematography for Social Media Engagement on Instagram
- 2024 Approved Tricks to Upgrade Streaming Quality on Mobile Apps Like Facebook
- Updated 2024 Approved Perfecting the Playback Speed and Pitch Control for Enhanced Soundscapes in Adobe Rush
- [New] 2024 Approved Facing Instagram Video Issues? You May Find the Answers Here
- In 2024, Cutting Edge Techniques Recording in Adobe Presenter
- How to Erase an Apple iPhone 15 Pro Max without Apple ID?
- In 2024, Top 9 Indoor Game Apps - Perfect For Android Without Connectivity
- In 2024, Sim Unlock OnePlus Phones without Code 2 Ways to Remove Android Sim Lock
- [New] 2024 Approved Dive Into Instagram Live Without Hesitation
- Evaluating Professional Filmmaking Tools Filmora & Democreator for 2024
- Updated Top15 Apps & Websites to Use to Add Music to a Video for 2024
- Ways to trade pokemon go from far away On Nokia C110? | Dr.fone
- [New] A Step-by-Step Guide to Creating Compelling Instagram Puzzles
- How to Mirror PC Screen to Realme GT 5 Pro Phones? | Dr.fone
- [Updated] Evaluating VLC for Screen Recordings for 2024
- How to Reset Oppo Reno 11 Pro 5G Without the Home Button | Dr.fone
- Possible solutions to restore deleted videos from C51
- [Updated] Easy Steps to Blend IGTV Into Your Stories
- [New] In 2024, Online Alter-Ego Artistry Drawing a Fancy Profile
- New Tasteful Harmonies for Streaming Media Artistry for 2024
- In 2024, How To Remove Phone Number From Your Apple ID from Your Apple iPhone 15 Plus?
- [Updated] Tapestry Transitions Loom Recording Steps for 2024
- In 2024, Best Screen Recorders for Google Meet You Should Try [Free and Paid]
- In 2024, Full Guide on Mirroring Your Itel P40 to Your PC/Mac | Dr.fone
- [New] Stop Video Capture A QuickTime Guide
- Undelete lost music from Honor Magic 6 Pro
- In 2024, How to Transfer Contacts from Oppo K11 5G To Phone | Dr.fone
- [Updated] 2024 Approved Deciphering the Code to Your Liked Videos on Facebook
- How to Fix the Soft Bricked Xiaomi Redmi Note 12 5G? | Dr.fone
- [Updated] Expert Video Capture Maximizing Performance with Logitech Webcam Tech for 2024
- How To Deal With the Motorola G54 5G Screen Black But Still Works? | Dr.fone
- [New] Capturing Skype Audio/Video Windows & Mac Tips for 2024
- [Updated] Premium Mac Image Transformer for 2024
- 3 Ways for Android Pokemon Go Spoofing On Infinix Zero 30 5G | Dr.fone
- Mastering Webcam & Screen Capture Unison Techniques for 2024
- Title: Acclaimed Discord Screen Capture Apps Reviewed
- Author: Gary
- Created at : 2024-05-23 05:50:00
- Updated at : 2024-05-24 05:50:00
- Link: https://tiktok-clips.techidaily.com/acclaimed-discord-screen-capture-apps-reviewed/
- License: This work is licensed under CC BY-NC-SA 4.0.
